This is a fantastic article by Kim Frehe. Kim wrote this article
because she came across “a minor issue with being able to update an
item that requires check in and check out via workflow and being
able to apply that to “any” list, content type, page or document” in SharePoint Designer 2010.
Check out her article below –
I love that SharePoint Designer gives you the ability to create
reusable workflows. It’s even better that you can select “All” as
the content type. However, I have come across a minor issue with
being able to update an item that requires check in and check out
via workflow and being able to apply that to “any” list, content
type, page or document. You can’t start a workflow on an item
that’s checked out, but you can’t update an item that’s checked in.
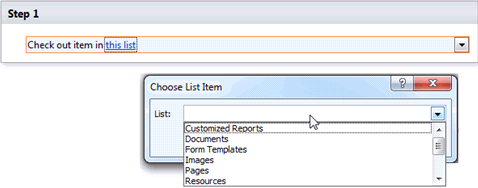
When you try to use the “Check out” action, you are expected to
select a list to check out an item from.
The Requirement:
Create a workflow that will make field updates to a document or
page that requires check-in / check-out. This workflow must be able
to work on any page or document library in the site
collection.
The Problem:
1.I can’t update any old field on a checked-in item housed in a
library where check-out is required.
2.SharePoint Designer workflow action “Check out item” wants me to
choose a List Item to check out, but I need to be able to use this
on any list or content type
The Solution:
A modification to the .xoml file that tells the workflow
to use “this item” regardless of the list.
Disclaimer: If you want to model an out of the box workflow,
always copy and modify…it is never a good idea to
modify the out of the box global workflows directly.
Steps:
1.Set up your workflow with placeholders for your
check-in and check-out actions.
2.Add “Check out item in this list” and “Check in item in this
list with Comment” actions to the appropriate steps on your
workflow.
•Do not select a List. Leave the “this list” as is.
3.Save your workflow.
4.Go “All Files”, “Workflows”, click on the workflow name in the
window below “All files” so that your workflow displays it’s files
in the window on the right side of the screen.
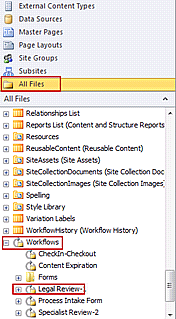
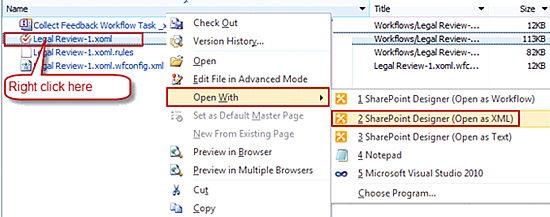
5.Right click on the .xoml file and
click “Open With”, “SharePoint Designer (open as XML)”
6.Click Ctrl+F to find “CheckOutItemActivity”
7.In that row you will see: ListItem={x:Null}”
ListID=”{x:Null}”
8.Replace “x:Null” in “ListItem=” with “ActivityBind ROOT,
Path=__item”

Path=__list”
10.Click “Ctrl+F” to find “CheckInItemActivity”
11.Repeat steps 8 and 9 for this line item
Stay tuned for more information on the next European
SharePoint Conference event and keep a look out for more
content by joining our
community or by following us on twitter or facebook.