Series Contents
- Introduction
- History & Background
- Part 1: Application Authentication — Azure AD Application Registrations
- Part 2: Request Storage — SharePoint
- Part 3: Request Process Automation — Microsoft Power Automate (you are here)
- Part 4: Enhanced User Interface — Power Apps
- Part 5: Next Steps — Security
And here we are, the pièce de résistance, the automated process to both provision the requested Microsoft Team as well as configure it with Guest Access on or off.
Big Picture View
Located here we have the image of the full flow. Rather than go through a step-by-step walk through and construction of the entire flow (cause it’s crazy long) I’m going to call out specific areas of importance that folks should be mindful of in the construction of it. These steps, combined with the overall picture (and previous steps) will result in a baseline process to create a Team automatically.
Get Requestor’s Manager — Try/Catch

When we want to determine the requestor’s manager, we want to be able to account for those instances where that individual doesn’t have a manager. To accomplish this we use of a Scope.
I’ve constructed our two scopes in the form of a try/catch scenario. The first “tries” to the operations happening inside of it. The second “catches” any exceptions from the prior. If the second scope fires, then we execute the process accordingly. In this case we’re saying “if I can’t find that person’s manager, make them the approver”. While this shouldn’t be a real-world scenario, it exemplifies additional logical controls that we can configure to move the process forward. Also note that we’ve configured the “run after” settings to provide a proper logic flow.
AAD App Registration — Client & Secret
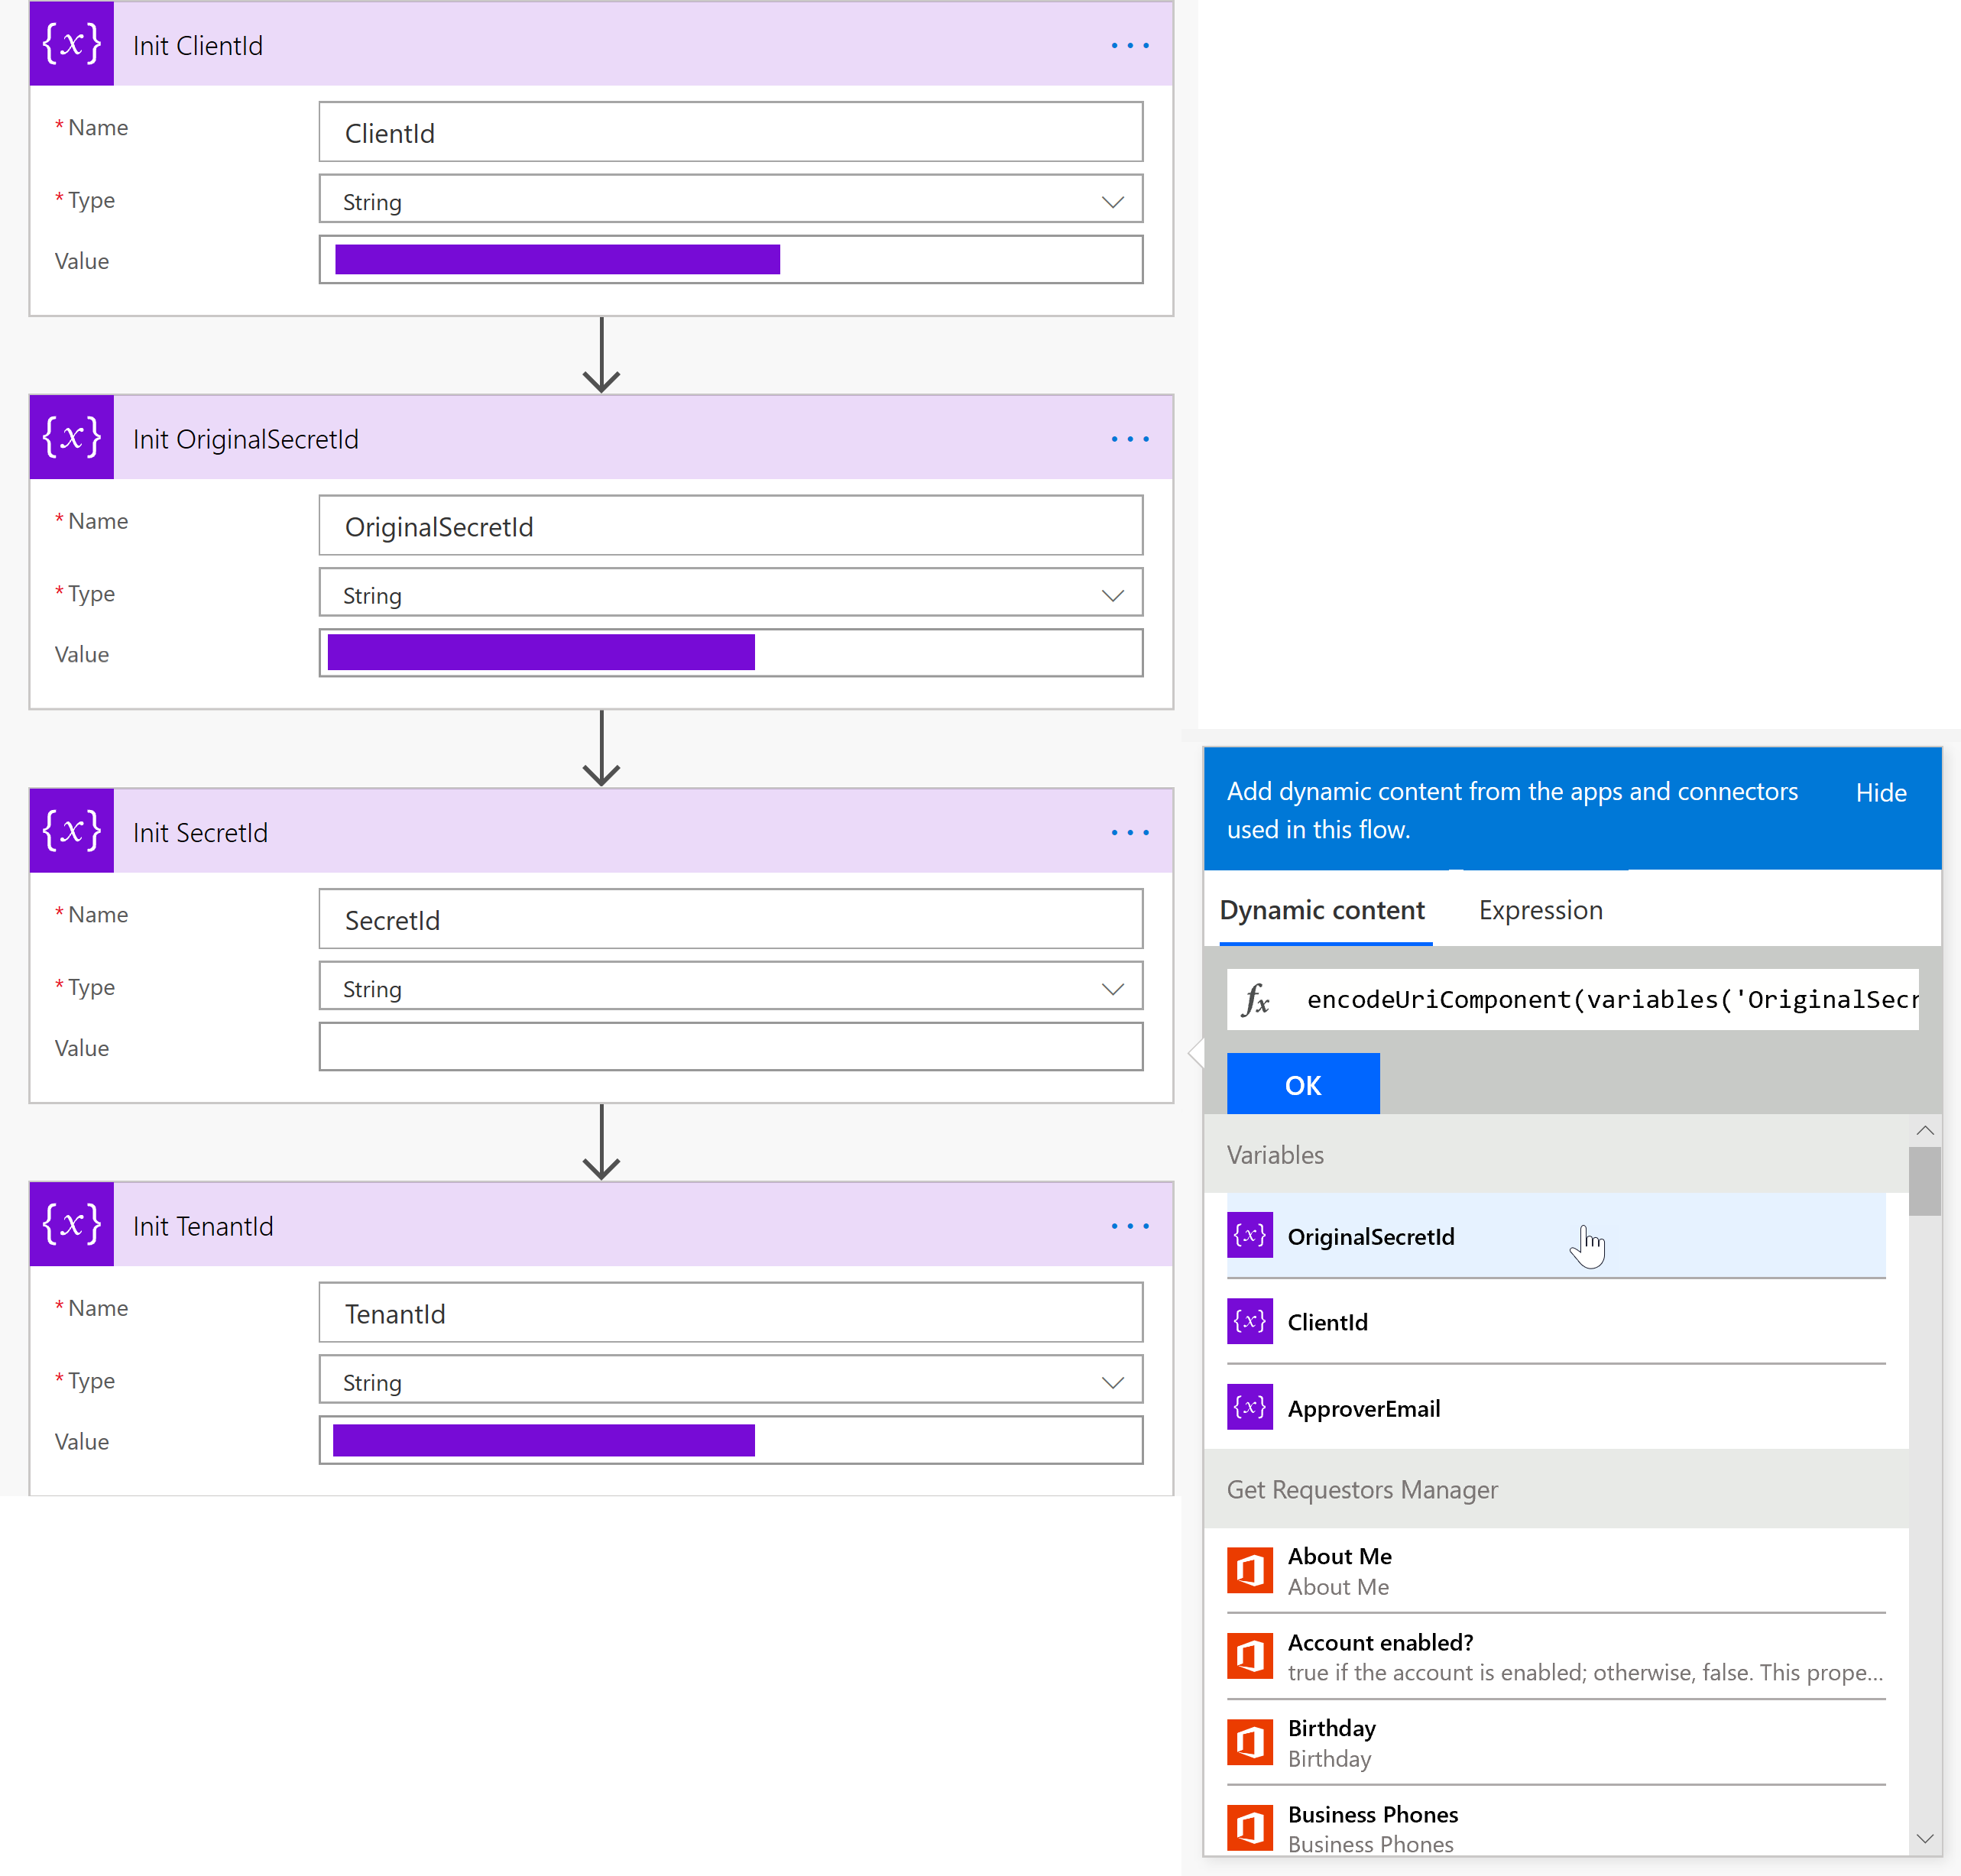
Our flow will need to use the keys from our AAD App Registration that we created earlier. We retain this information through the use of variables within the flow. On occasion tho, when you create a Secret, it could contain URL-unsafe characters. We get around this by using the encodeUriComponent() function. This results in a string with escaped characters. This resultant string is what is used inside the SecretId variable.
Team Owner Assignment

Part of the request to create a team requires a single owner to be assigned during creation. When we created our SharePoint list to hold our requests we allow for multiple owners to be assigned. We do this because the call out actually expects an array of owner IDs to be provided. This is why we created a variable (SOIDArray) of type Array. We loop through all of the provided owners, and for each owner query its properties, and appending its ID to a string in the following format: concat(‘https://graph.microsoft.com/v1.0/users/’,body(‘Get_Owner_Profile’)?[‘id’]). This value is then appended to our SOIDArray variable.
Create Team JSON Request Payload

When we make a REST call to the Microsoft Graph to create a team, we need to provide the properly constructed JSON payload with the relevant information. To handle the construction of this easily we put it in its own variable. The example on the left shows a sample payload using the beta endpoint. The beta endpoint in this instance allows us to use the Teams Templates, but you could use the v1.0 endpoints if desired, just to create a simple team. Specific things to note are the attributes used in the payload and where they’re placed. In addition to the template (in this case) we use the team’s name here, its description, as well as the array of owner IDs. Note: While we can provide multiple owners through the currently designed request mechanism, the call to create the team expects only 1 (and will error if there are more than 1). An enhancement to this flow would be the ability to take the first owner and use them in this payload, and then add the rest of the desired owners after-the-fact.
Approval Terms & Conditions

We use a simple condition to determine what value Guest Access has, and tailor the notification text. We use this text in our approval so that individuals have an additional visual notification related to the Guest Access process. We use a simple line of text here but you could get as fancy as you’d like, for example, place a URL to an existing policy on Guests and their terms of use.
Obtain the Access Token

Remember when we first spoke of the necessity for our Azure AD App Registration? Well, the combination of your Tenant ID, Client ID and Secret ID will result in an Access Token. This token will then be used as the key for all of the further REST calls made.
We use the Tenant ID in the actual URI of the REST call, and the Client and Secret IDs are added to the body of the call. This results in a response which contains the Access Token.
We parse the Access Token out, following the relevant schema, so that we can refer to the token for all REST calls made from this point on.
Make the Call! Create a Team!

Now that you have your token, you can call the relevant REST endpoints to create your team. And remember, we scoped the permissions to only allow for creating a team and updating its settings, so you wouldn’t be able to do anything else. A couple things to point out…
There is a single {space} between the text Bearer and your token. Make sure you have one-and-only-one space.
When a response is received the body doesn’t contain the ID of the created team, but the header of it does. We do some string manipulation against the header to pull out the actual ID.
- Set Location Value: @{outputs(‘Create_Team_API’)[‘headers’]?[‘location’]}
- Get Index of First Quote Input: add(int(indexOf(variables(‘Location’), ‘’’’)), 1)
- Get Team Id: substring(variables(‘Location’), outputs(‘Get_Index_of_First_Quote’),36)
Add Some Members


We loop through the provided members and add accordingly.
Set Up Guest Access for The Group

The piece that makes this whole thing work is the REST call to update the settings of the newly created Office 365 Group behind the team. Because this specific setting doesn’t exist on the group yet we wind up creating it. Remember, from a guest access perspective, the setting is tracked at the tenant-level. In order to apply a setting to one team, and a different setting to another, we need to create it on the group. We call this with a true or false value, depending on where we are in our logic path. All of the available group settings can be found here.
But Let’s Not Forget SharePoint

And, just because SharePoint is SharePoint, we have to make sure that we lock down the ability to share information in another area as well. At the time of this writing, the only way (that I’ve found) to modify the sharing settings is via a Site Design. Luckily, SharePoint exposes the ability to apply a design via REST. So we make the call that you see here with the relevant information.
The Site Design ID you see was generated when you created the design to begin with, so keep track of that. The PowerShell scripts to create this design is found in the GitHub repo here. Note that you’ll need to configure it for your environment.
Recap and Enhancements
So, the above flow is the important part of the overall provisioning process. We learned how to utilize the information from our previous posts and create a flow that will take that information and create a team. An export of the actual flow can be found here, but note that you’ll have to add all of your configuration information (client, secret ,valid URLs, etc.) for it to work properly.
And while this current process works, again it’s more of a concept, and as such there are enhancements that you do take on as extra credit. The below are just some examples of enhancements you can provide:
- A more robust manager approval process (or even a process specific to your organization)
- Update the Terms and Conditions area to incorporate your own policies
- Add logic to have more than one owner applied to the created team
- Create an Access Review policy when a team has guest access = true (I think I’m going to do this one myself as it’s a great thing to do upon initial creation)
Next Steps
Keep a look out for the next in the series, where we pretty up the UI for this. In actuality, we’ll use a Power App that’s a part of Teams, so you don’t need to go to a SharePoint site to request one. Stay tuned!
About the Author:
Michael Mukalian is the Modern Workplace Technical Architect at the Microsoft Technology Center in Philadelphia (Malvern), PA. covering Office 365. He is co-owner of the Tri-State Office 365 User Group (https://www.meetup.com/TSSPUG/), was a contributing author on the SharePoint 2010 Administrator’s Pocket Consultant, speaks at a number of SharePoint Saturdays and Code Camps around the country and was awarded Microsoft’s MVP award in CY2010 for SharePoint Services. With over 25 years of IT experience and certifications in SharePoint and Office 365, Michael has architected and developed solutions for enterprises of all sizes.
Reference:
Mukalian, M. (2019). Automating the Provisioning of Selective Teams with Guest Access: Part 3 — Microsoft Power Automate. Available at: https://medium.com/@michael.mukalian/automating-the-provisioning-of-selective-teams-with-guest-access-part-3-microsoft-power-automate-bae61f7a759a [Accessed: 18th February 2020].
Check out more great Microsoft Teams content here or join our mailing list to stay up to date.