After my talk at the Virtual Azure Community Day, I promised I’d deliver a series of articles about my adventures with Gatekeeper on Azure Kubernetes Service (AKS).
In Part 1, I told you all about Rego, the domain-specific language (DSL) that is used by Open Policy Agent (OPA). In Part 2, I explained how to set up and use Gatekeeper to enforce policies in a cluster.
Now, in Part 3, I’ll talk about how easily you can enable Azure Policy for Kubernetes and get the Gatekeeper set up for free by Microsoft. I will touch on the difference between Gatekeeper and Azure Policy for Kubernetes. Finally, I’ll explain how to build a Proof of Concept cluster and set up an Azure Container Registry (ACR) to test the policies I’m going to use.
Comparing Gatekeeper to Azure Policy
Azure Policy for Kubernetes is based on the Open Policy Agent Gatekeeper implementation. Let’s look at the difference between native Gatekeeper and Azure Policy for Kubernetes.
Part 2 of this series offers an in-depth overview of Gatekeeper, and I’ll review that information briefly here. When you set up Gatekeeper, you will have two pods (gatekeeper-audit and gatekeeper-controller-manager) and a validating webhook configuration. The gatekeeper-controller-manager validates all incoming requests with the defined constraints. Failed requests will be blocked, and you will receive an error message describing the issue.
The gatekeeper-audit pod scans your cluster for any violations against your defined constraints. It does not matter which enforcement action (deny, the default one, or dry-run) is defined as the constraint. The gatekeeper-audit pod always checks for violations.
Azure Policy for Kubernetes has nearly identical architecture as it uses Gatekeeper v3 under the hood. You still get the gatekeeper-controller-manager, validating admission controller, and gatekeeper-audit pod.
There are also two azure-policy pods in the kube-system namespace. These pods have several responsibilities, including the automatic deployment of the constraints and constraint templates into the cluster. These pods also report detected violations to the Azure Policy system so you can check the compliance state of the AKS cluster in the Azure portal.
At the moment, a big downside of Azure Policy for Kubernetes is the limitation on built-in policies. You cannot use custom policies with custom constraints and constraint templates, as the native Gatekeeper implementation allows. You get a set of basic pre-defined policies, but for now, those are just for proof of concept.
The following table presents a good overview of the differences.
| Gatekeeper | Azure Policy |
|---|---|
| + Flexible | + Managed |
| – Not-managed | + Reporting via Azure Policy |
| + Constraint templates and constraints via Azure Policy | |
| – Only built-in policies |
Enabling Azure Policy for Kubernetes
Please note that everything I’ll show you here is in Preview at the time of writing. For now, Azure Policy supports only Linux node pools and built-in policy definitions, but the implementation might change before going general available (GA), and support is limited. I strongly advise you to use a greenfield Azure Subscription to try this out. You can create a subscription if you need it.
For the examples, I’ll use the Azure CLI commandline tools. Install them if you haven’t done that yet, or use the Cloud Shell on the Azure Portal.
Prerequisites
Before we can interact with our Azure subscription, we first need to authenticate (if you are not using Cloud Shell).
az login
Select the right subscription for this demo. I recommend not using any subscriptions that hold production workloads.
az account set --subscription < Subscription name >
Now run the following commands to enable the feature providers:
# Provider register: Register the Azure Kubernetes Service provider
az provider register --namespace Microsoft.ContainerService

# Provider register: Register the Azure Policy provider
az provider register --namespace Microsoft.PolicyInsights

# Feature register: enables installing the add-on
az feature register --namespace Microsoft.ContainerService --name AKS-AzurePolicyAutoApprove
We can check if everything is ready with the following command:
az feature list -o table --query "[?contains(name, 'Microsoft.ContainerService/AKS-AzurePolicyAutoApprove')]. {Name:name,State:properties.state}"
When the above command returns “Registered,” we can propagate the change by running:
az provider register -n Microsoft.ContainerService
Now we need to install Azure CLI preview extension for AKS, aks-preview:
az extension add --name aks-preview
Let’s check if the install was successful:
az extension show --name aks-preview
Creating a test cluster
As mentioned before, the Azure Policy for Kubernetes is still in preview. As such, I recommend creating a new cluster for this demo.
I will put all the resources in a custom resource group, policy-demo.
az group create --name policy-demo --location westeurope
For this demo, I will create a very simple cluster with only a single node. You can change the parameters of the az aks create command as you see fit for your proof of concept.
az aks create -n policy-demo --node-count 1 --node-vm-size Standard_B2s --load-balancer-sku basic --node-osdisk-size 32 --resource-group policy-demo
If you don’t have kubectl installed yet, you can run the following command to do so:
az aks install-cli
Let’s connect with the newly generated cluster:
az aks get-credentials --resource-group policy-demo --name policy-demo
Your kubectl context will now automatically switch over to the new cluster. Let’s check if everything is ready:
❯ kubectl get nodes
NAME                                STATUS   ROLES   AGE   VERSION
aks-nodepool1-21764572-vmss000000   Ready    agent   6m    v1.17.9
Let’s deploy an NGINX into the front-end namespace on the cluster. This container will not follow any Policies and will be the example container for the continuous audit functionality of this demo.
kubectl create ns frond-end
kubectl create deployment nginx --namespace=frond-end  --image=nginx
Now check if the container is running:
❯ kubectl get pods -n frond-end
NAME                     READY   STATUS    RESTARTS   AGE
nginx-86c57db685-frxvr   1/1     Running   0          24s
Installing the Azure Policy add-on
Now that we have a cluster with all feature providers enabled, let’s install the Azure Policy add-on in the AKS cluster:
az aks enable-addons --addons azure-policy --name policy-demo --resource-group policy-demo
This command returns a bunch of JSON. Let’s check if the add-on to the cluster was successfully installed.
 ❯ kubectl get pods -n kube-system
NAME                                         READY   STATUS    RESTARTS   AGE
azure-policy-58bdb9d86f-kv5r4                1/1     Running   0          4m11s
azure-policy-webhook-59db96c58b-clpbz        1/1     Running   0          4m11s
In the kube-system namespace, you should find an Azure Policy pod and a Azure Policy webhook. These are for the Azure Policy internals and the connection between Azure and the cluster.
 ❯ kubectl get pods -n gatekeeper-system
NAME                                     READY   STATUS    RESTARTS   AGE
gatekeeper-audit-6dcbf5f997-rs2ph        1/1     Running   0          5m26s
gatekeeper-controller-7d464cb5b7-9v4r2   1/1     Running   0          5m26s
gatekeeper-controller-7d464cb5b7-vlkhd   1/1     Running   0          5m26s
We find the actual Gatekeeper pods in the gatekeeper-system. These pods are the same as in Part 2 of this series and function in the same way. Notice that you haven’t manually deployed the Gatekeeper system—it was all installed for you by the Azure Policy system.
Assigning a built-in policy
Let’s enable some policies. From the Azure Portal, go to Policy and then to Definitions.
All the Kubernetes policies are under the category “Kubernetes.” In the following image, you can see the overview page on which I selected the Kubernetes category.
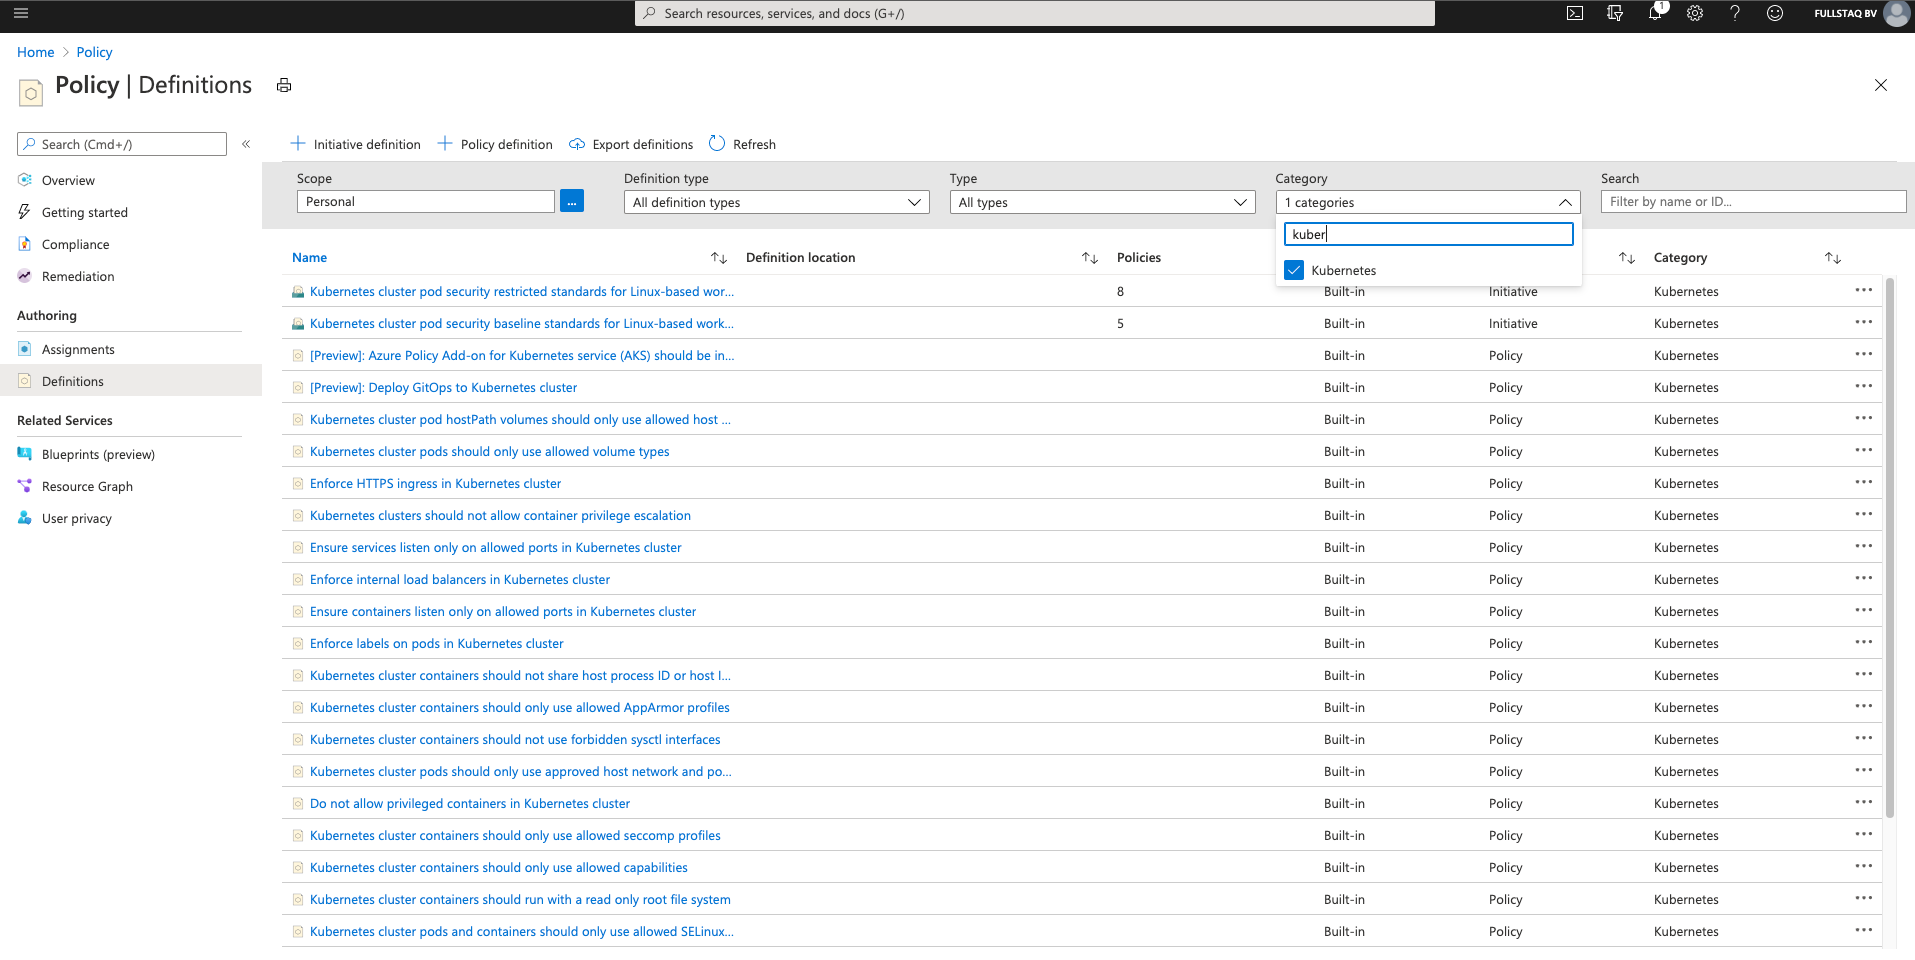
As you can see, you can choose from a wide range of built-in policies. At the time of writing, you are limited to the options you see in the image.
For this demo, I will enable two policies. The first will validate the presence of a specific label, and the second will check if we are pulling the image from a trusted repository.
Requiring specific labels
Labels are important if you work with Kubernetes. They not only are used for selecting workloads but also can provide you with additional information about the workloads. As such, it is best to validate whether certain labels are present. For example, at my current assignment, we use the owner label to supply the platform team with information about the contact person when the workload fails.
I will set up a Definition to validate the existence of the owner label:
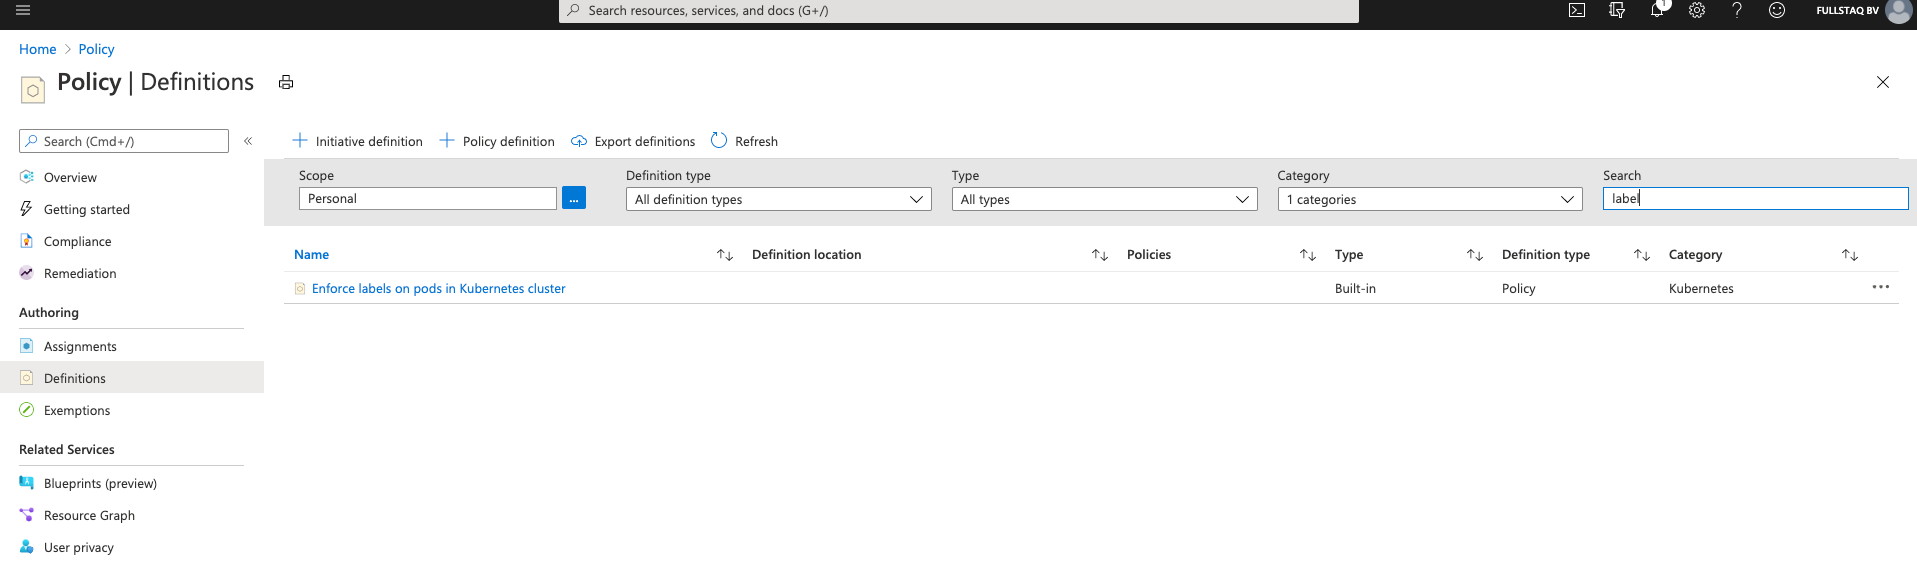
As you can see in the picture, I’m using the search filter to narrow down the list to show only the Definitions that contain “label.”
If you click the three dots to the right, you can select Assign.
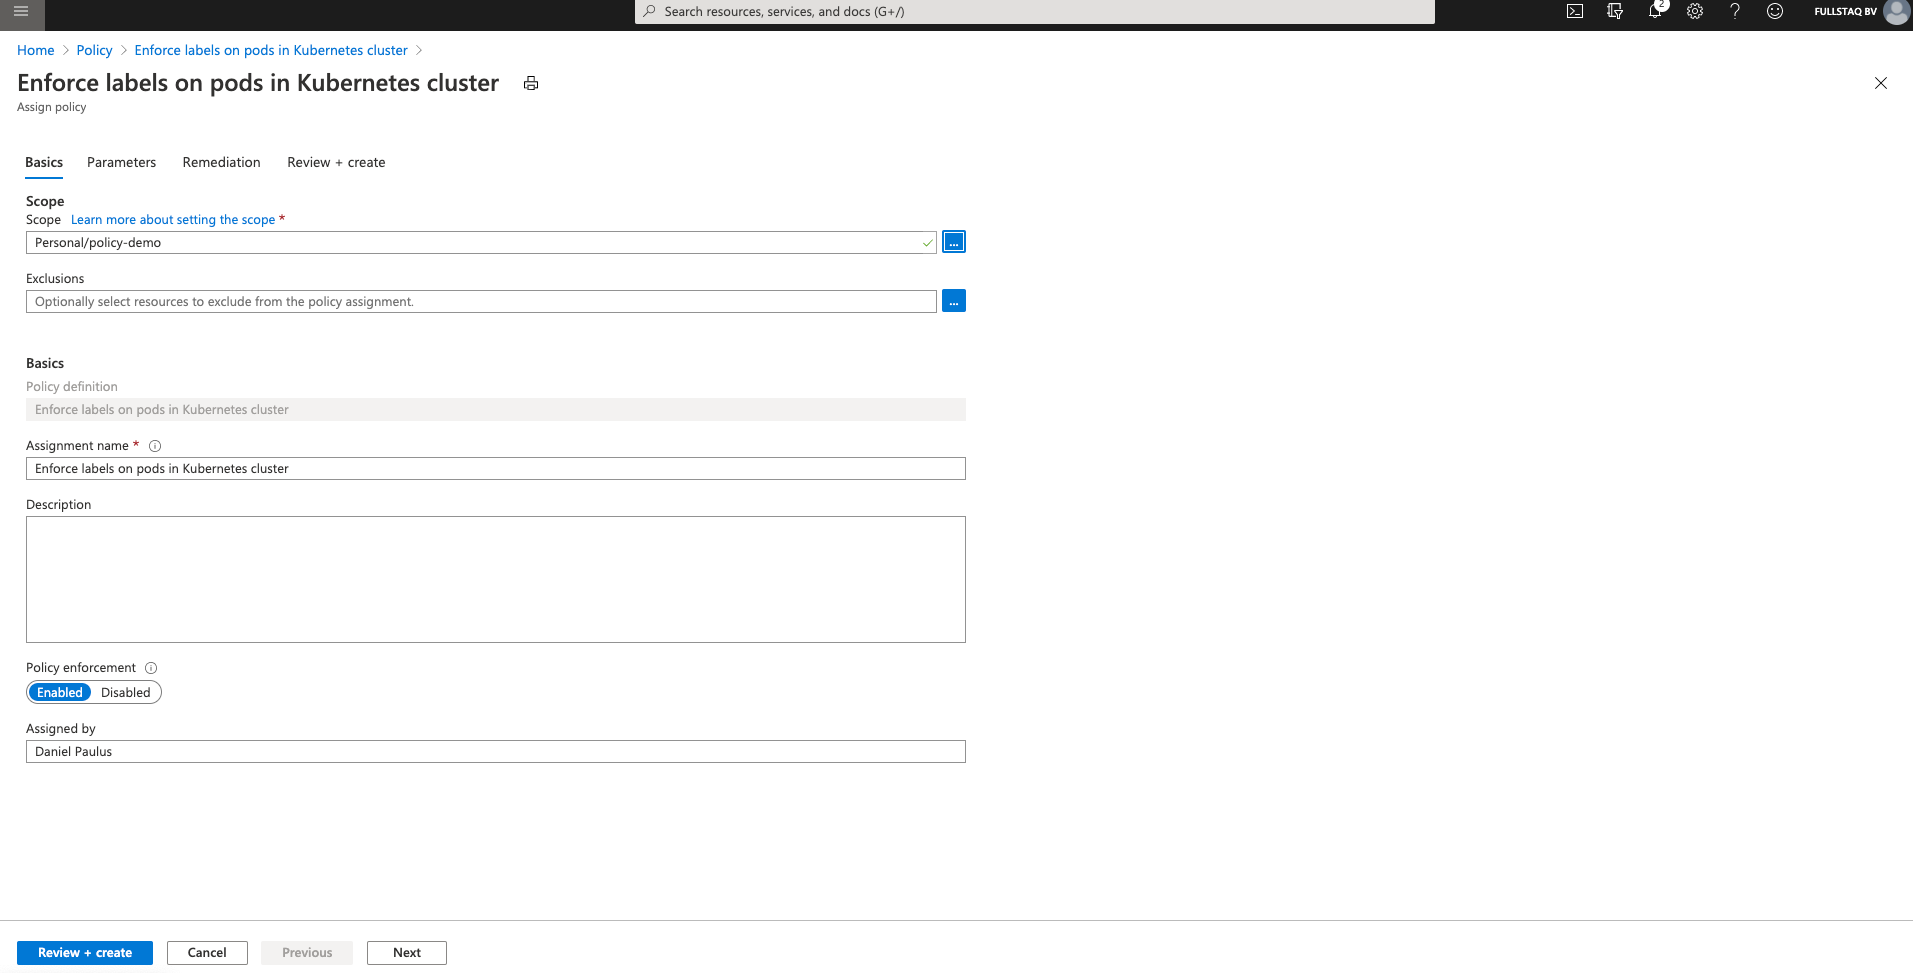
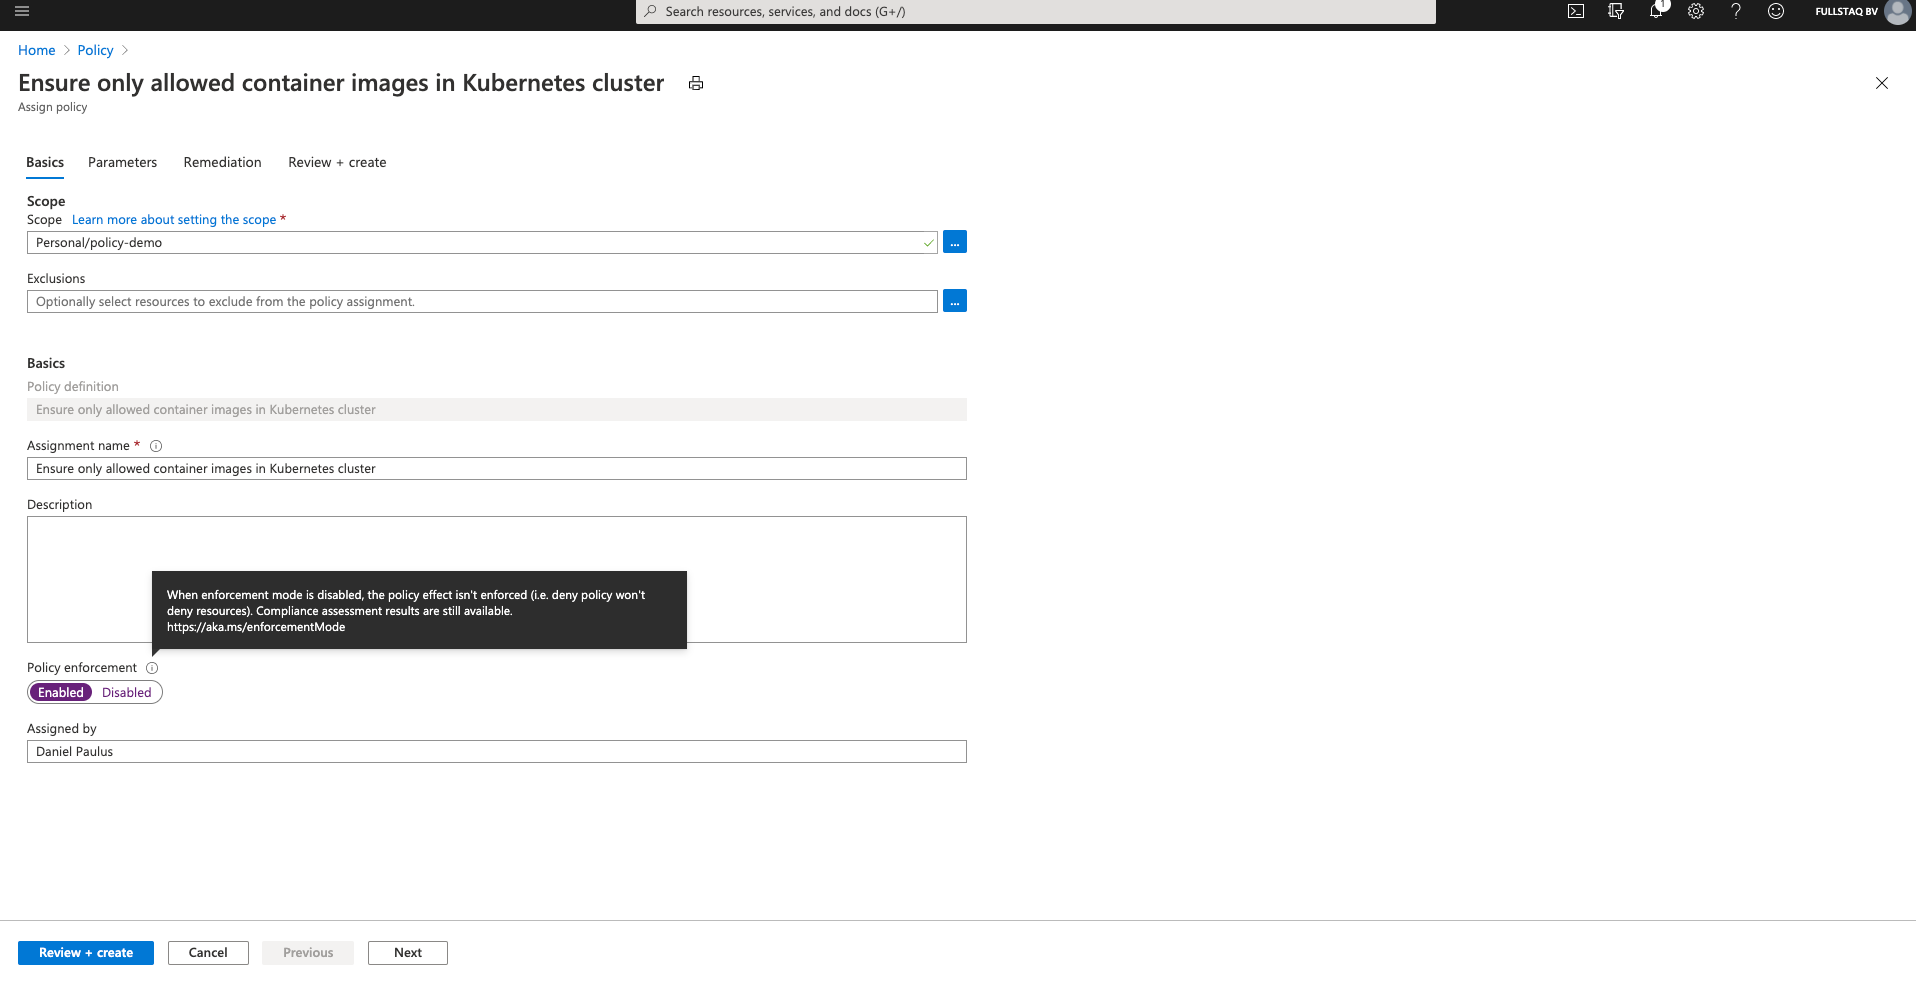
Now we have to fill in some information so the Definition knows what to do and where to look for validations. Make sure to select your cluster in the scope field.
Pay attention to the Policy enforcement field here. This is an Azure Policy setting and has nothing to do with the underlying Gatekeeper config. If you select Disabled, the policy effect will not be enforced during resource creation or updates. You will still get Compliance assessments.
After we finish filling out all the information, we need to supply the parameters the Definition will use.
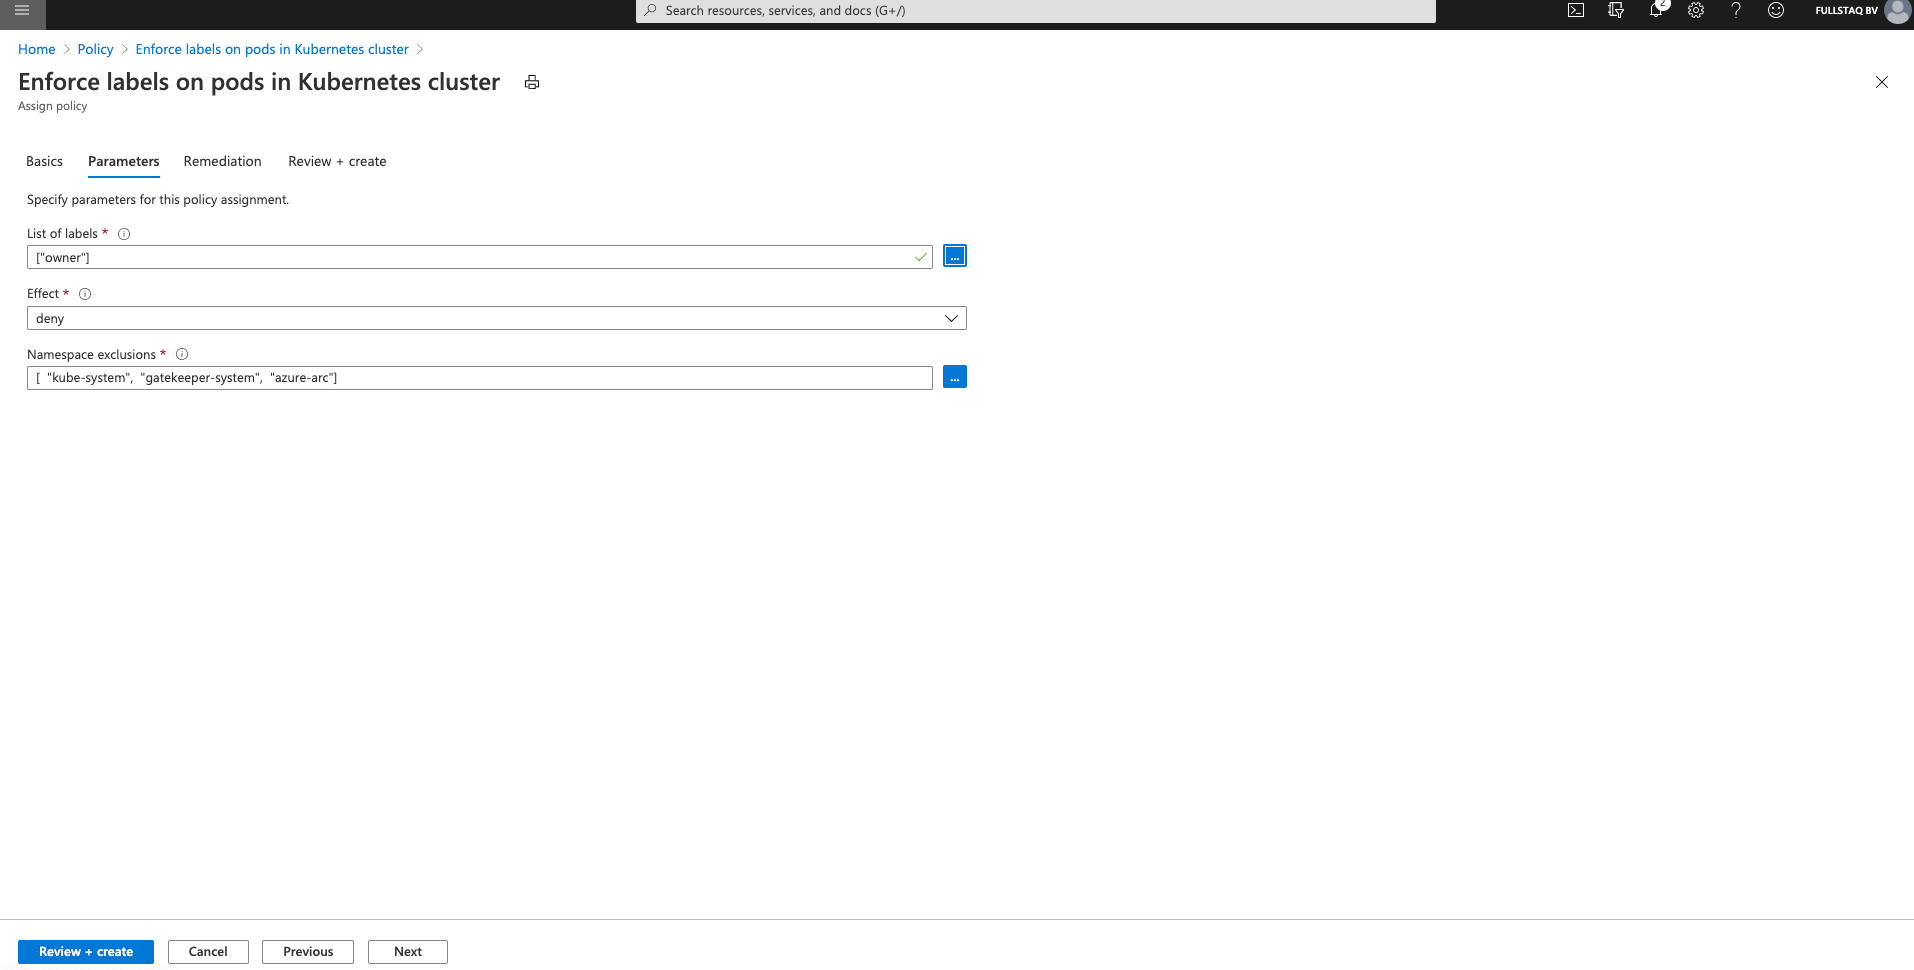
The Parameters are an important part of the Definition because they define how we’d like the Definition to behave.

The Effect field also is important. If you use “Audit,” non-compliant resources still can be created, but they will be flagged as non-compliant. “Deny” blocks resource creation and will return an error message if you try to create it. “Disable” turns off the policy completely.
When you are done, press Review + Create to create the Definition.
Pulling images from a trusted repository
It’s best to always pull your images from a trusted repository. As we use all Azure services, I will create a Definition that allows the use of only ACR images.
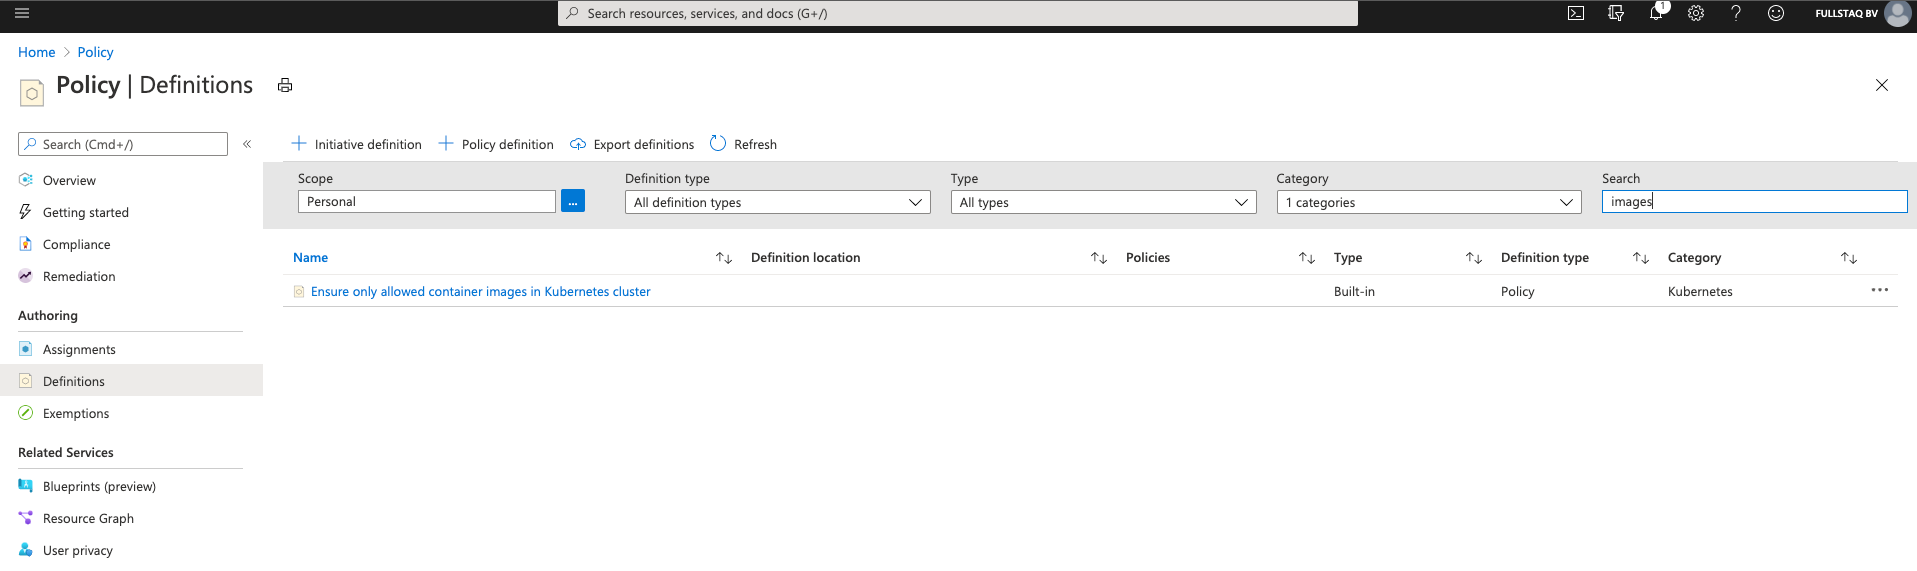
On the Definitions overview page, I again select the Kubernetes category, search for images, click on the three dots to the right, and select Assign.
As before, I select the right cluster in the Scope field, use the prefilled settings for the rest, and select Parameters.
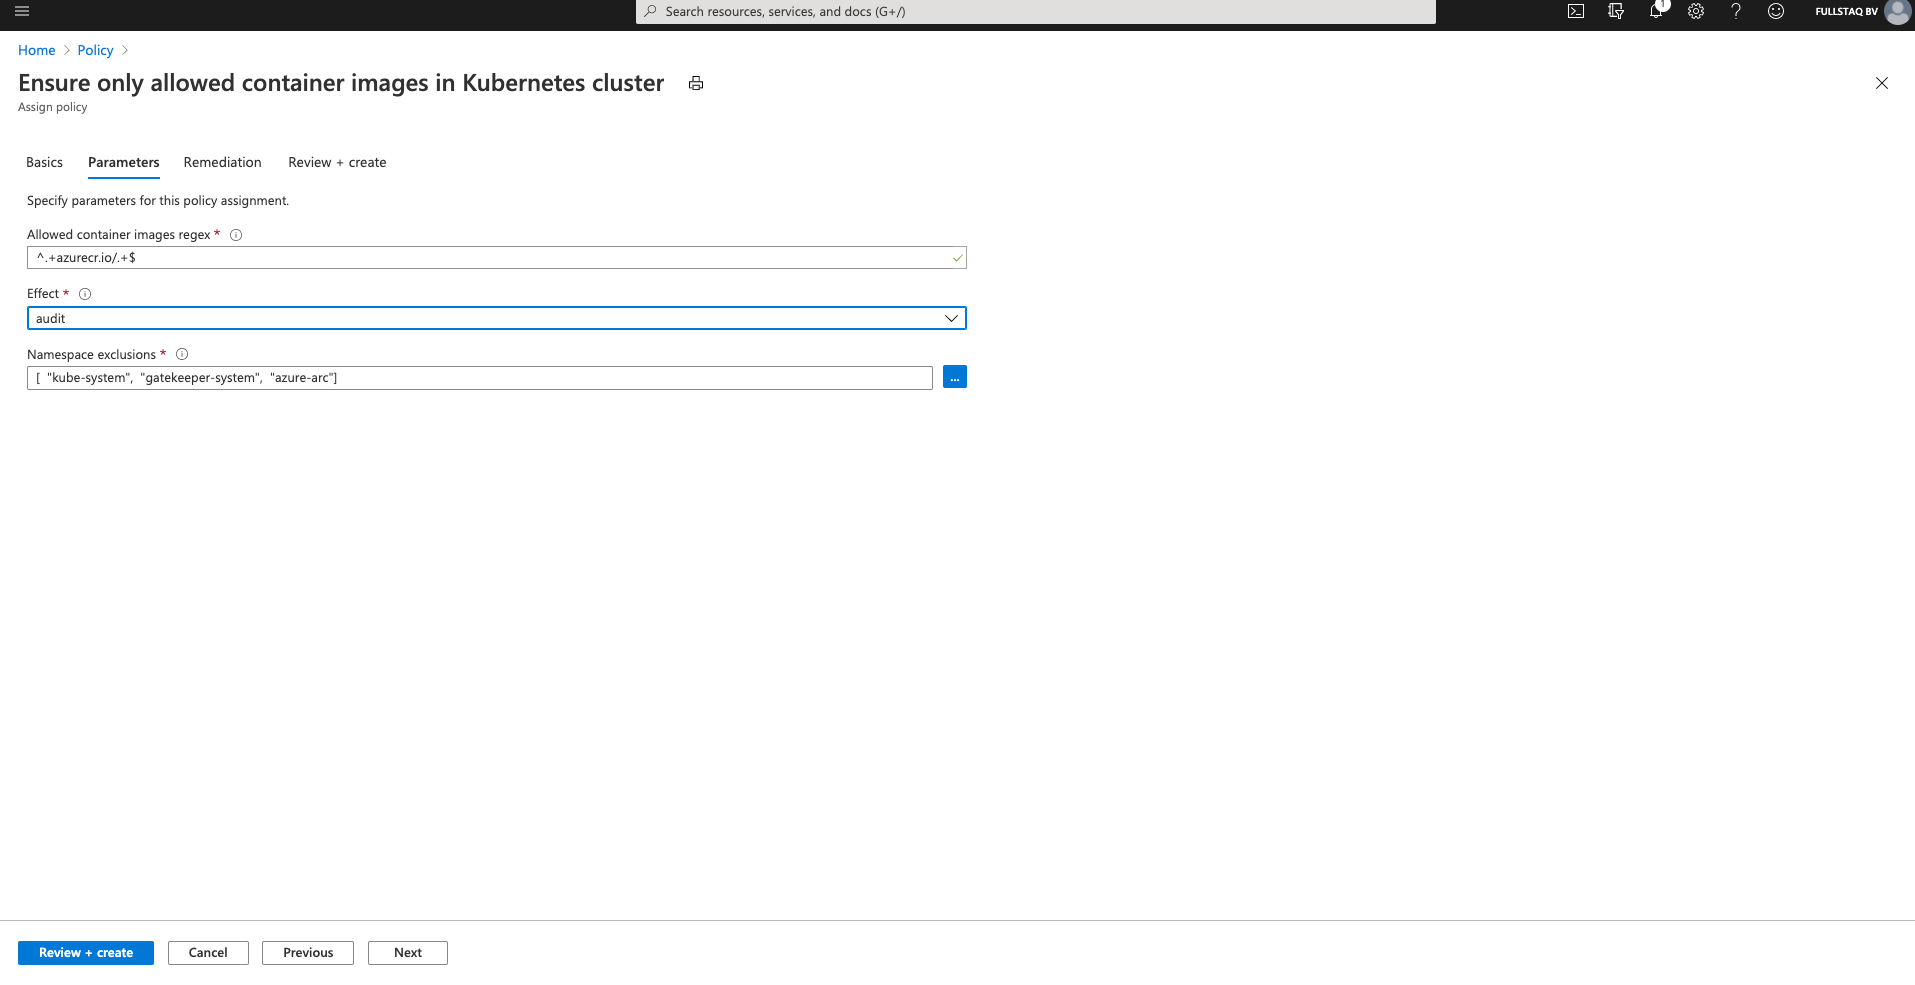
The smart people at Microsoft expect you to use the Azure Container Registry, so you can use the prefilled value for the “Allowed container images regex” field.
I changed the Effect here for demo purposes. By setting this to Audit, I can deploy workloads that are non-compliant and show that it will still register as a violation.
You can exclude namespaces you don’t want to monitor. Here, I also use the defaults.
When you are done, press Review + Create to create the Definition.
Let’s check the cluster to see if Gatekeeper now uses constrainttemplates.
 ❯ kubectl get constrainttemplates
NAME                             AGE
k8sazurecontainerallowedimages   10m
k8sazurepodenforcelabels         10m
Monitoring the Policies
Remember how we created a NGINX container in the frond-end namespace when we created the demo cluster? This container uses an image pulled from Docker hub and has no labels set.
We should be able to see this in the Policy Compliance overview page.
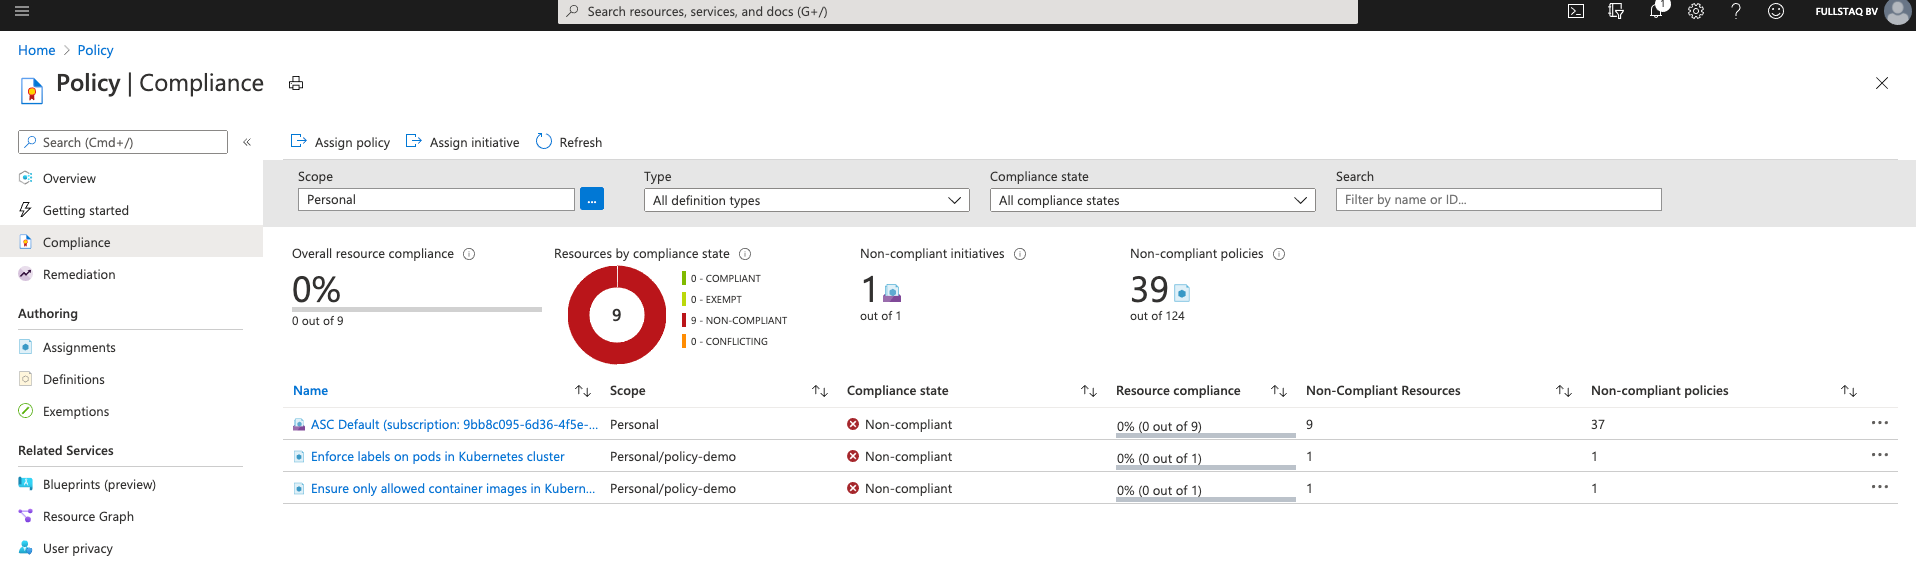
As you can see, we have three violations: two are known, but one pod has no label and comes from an untrusted repository. We do, however, get an extra Policy. This comes from Azure Security Center (ASC) and checks some of the basic cluster settings.
Azure Security Center
Let’s look at some of the Definitions we get from the Security Center.
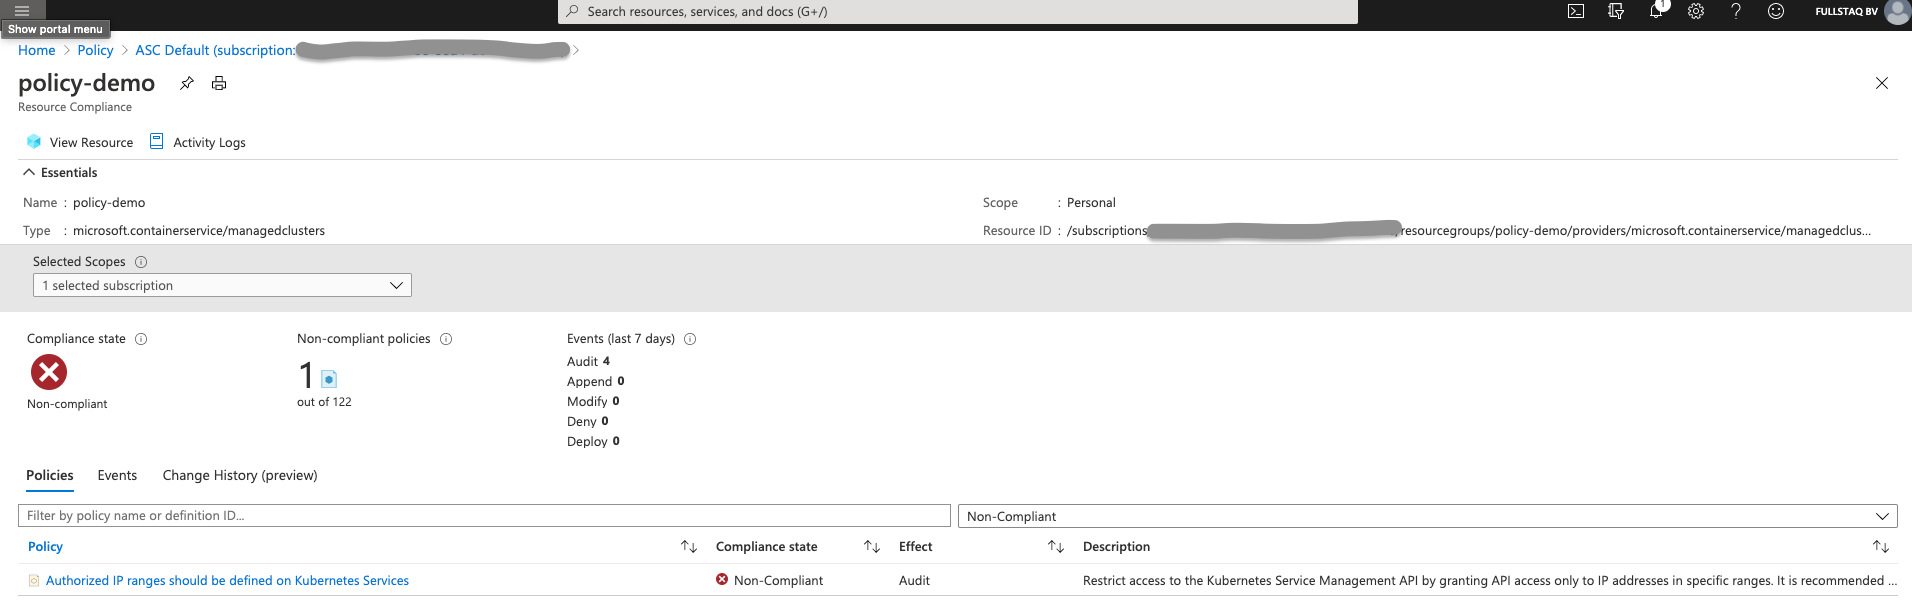
As it stands, we have only one violation. We should restrict access to the Kubernetes Service Management API by granting API access only to IP addresses in specific ranges.
Let’s update the configuration and fix this violation
❯ az aks update -n policy-demo -g policy-demo --api-server-authorized-ip-ranges < my_ip >/32

Operation failed with status: 'Bad Request'. Details: Setting apiServerAuthorizedIPRanges [< my_ip >/32] is not allowed with basic load balancer. Please recreate cluster with standard load balancer. Refer to https://aka.ms/aks/auth-ip-ranges for more details
Oh no, I can’t. I have to redeploy the cluster with a Standard loadbalancer before I can secure the API server. For this demo, I’m going to skip this step.
When you click the three dots to the right, you can click Delete Assignment to remove the Definition from this resource.
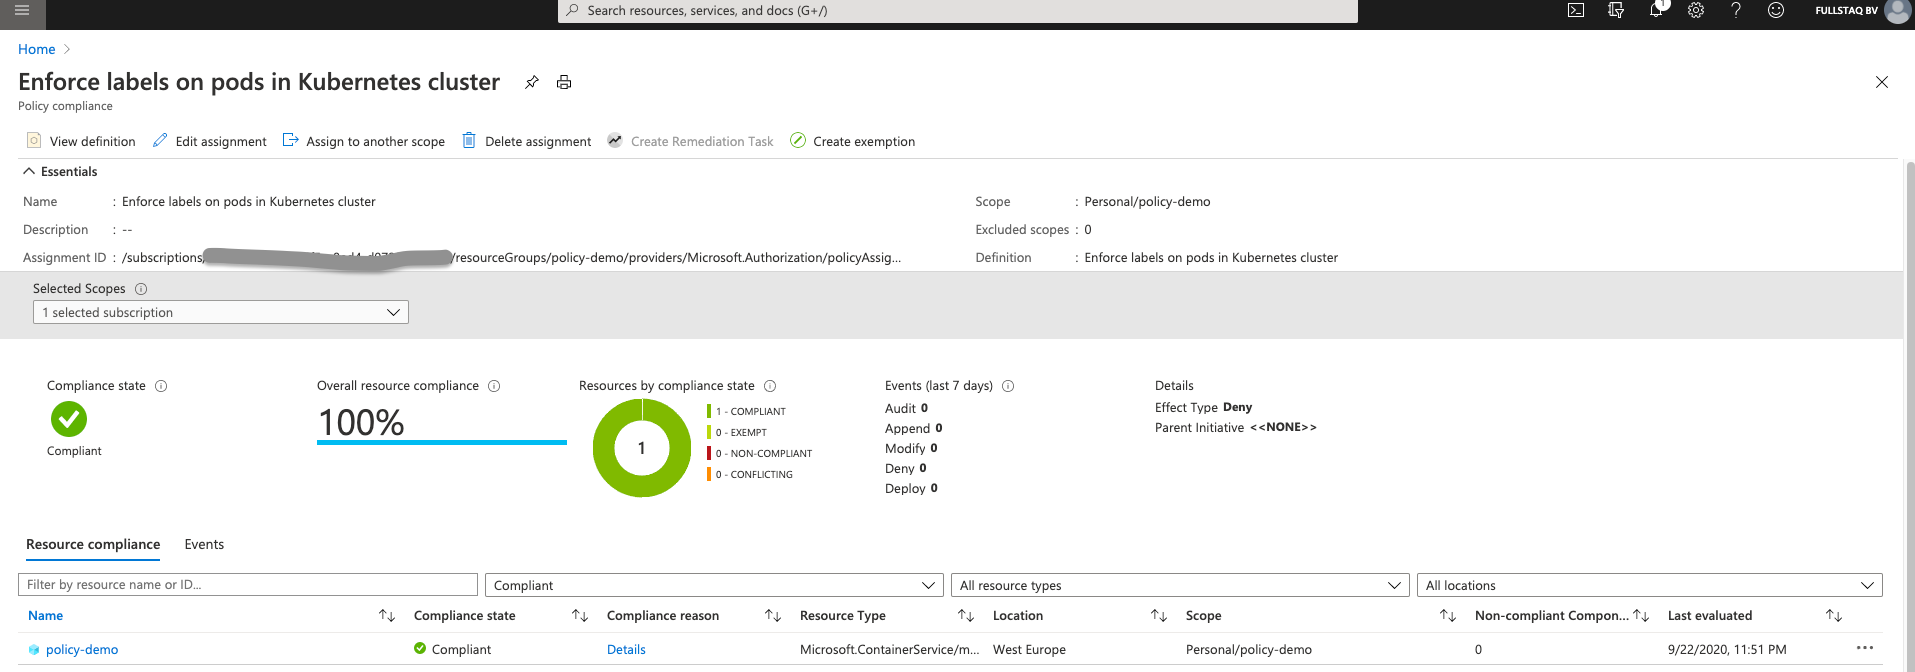
Fixing the labels
Let’s look at the next violation: the owner label should be present.
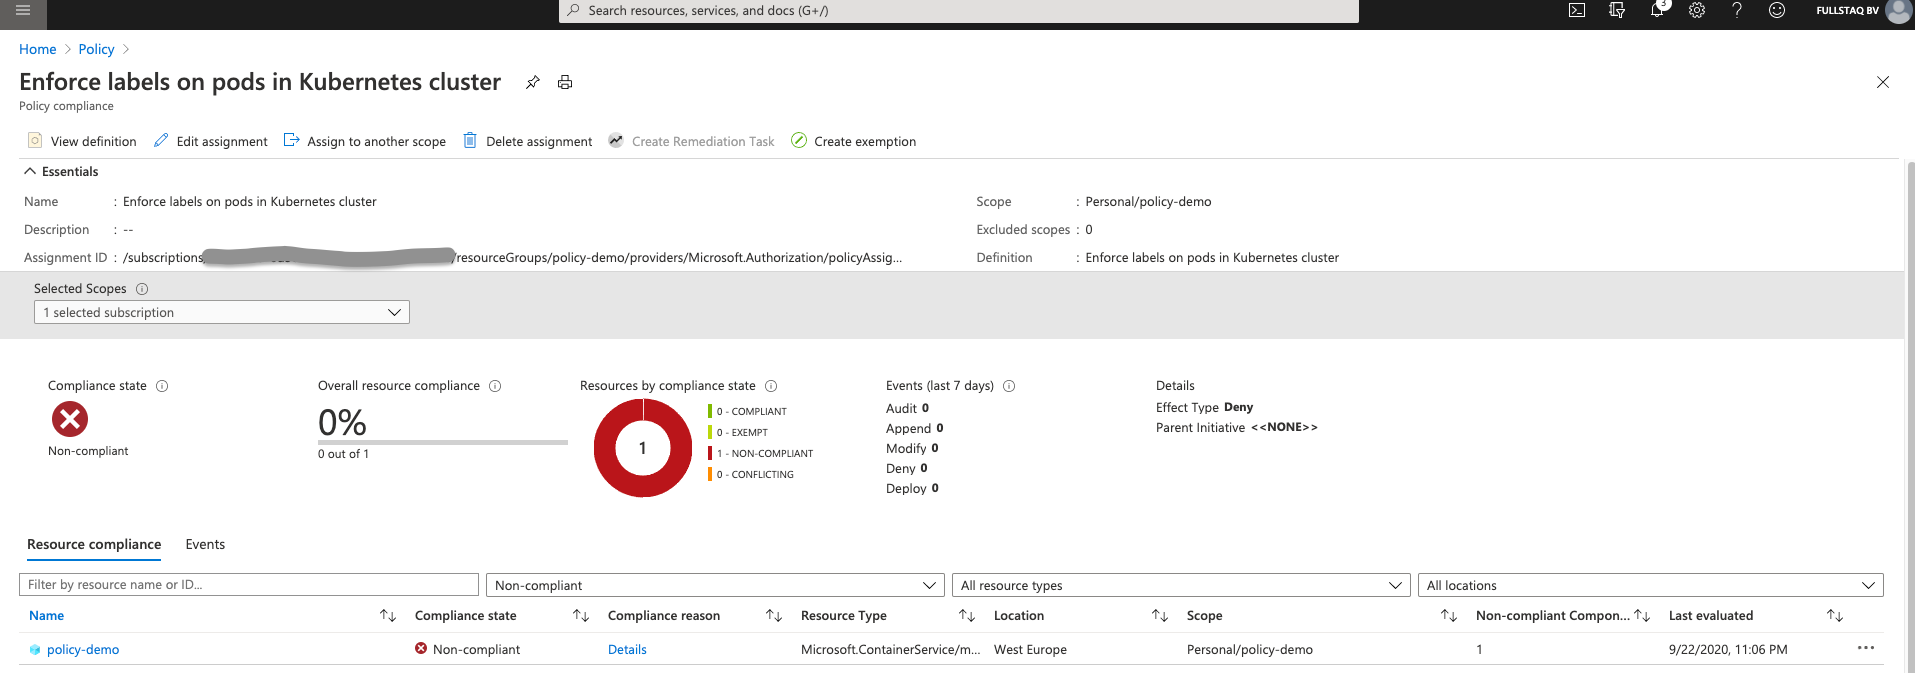
On this overview page, you see details about the cluster, including where the Definition is looking and where the violation is happening.
Click on the cluster name to view a detail page.
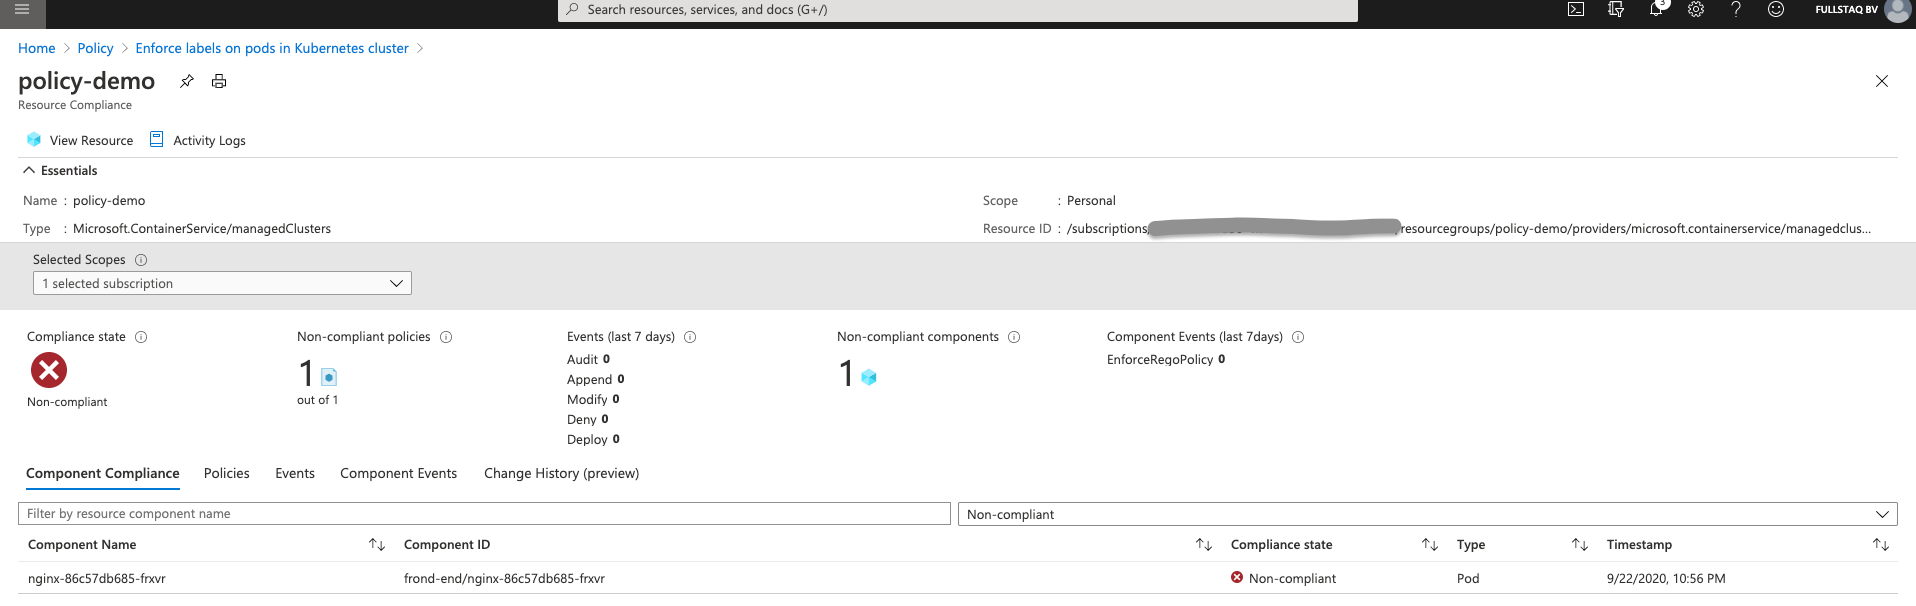
On this detail page, you see which object in the AKS cluster caused the violation. We can fix this by running the following command:
kubectl label pod -n frond-end nginx-86c57db685-frxvr owner=dpaulus
After a time, we see that the resource’s status has been updated to Compliant.
If we now create a new resource to test the constraint, it looks like we can deploy non-compliant workloads.
❯ kubectl create deployment label-test --namespace=frond-end  --image=nginx
deployment.apps/label-test created
If you inspect the logs, however, you’ll notice an error that prevents the pod from starting: Error creating: admission webhook "validation.gatekeeper.sh" denied the request: [denied by azurepolicy-pod-enforce-labels-47a9bbb9809d07b278bb] you must provide labels: {"owner"}
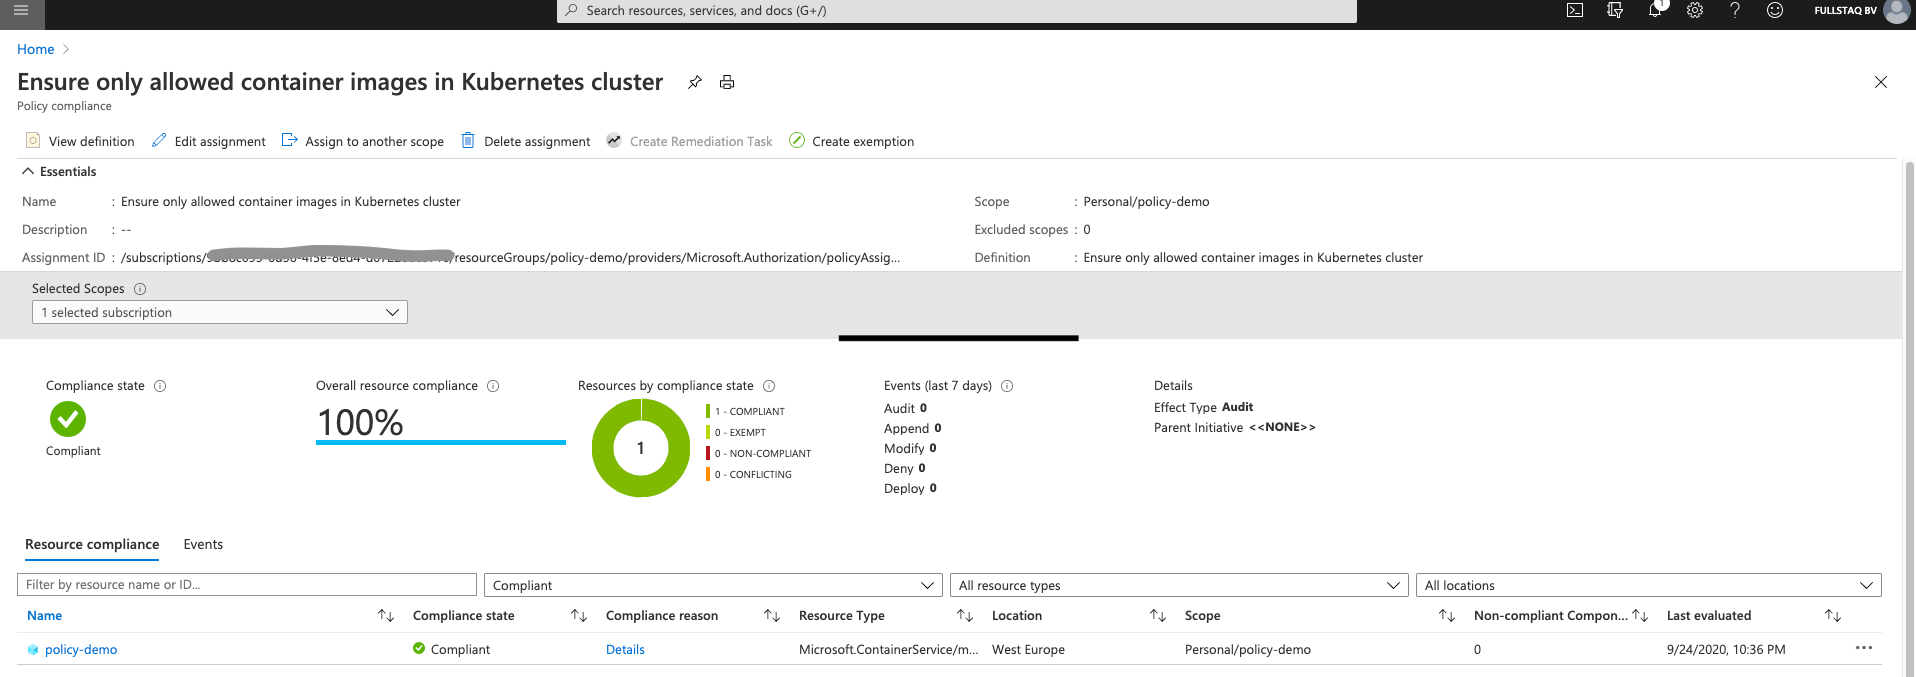
What about the container registry
As I said before, it is best to use a private repository. You can store all your images there and ensure their availability for deployment in your cluster.
We created a Definition that allows the use of images from the ACR, so let’s set an ACR up and use it with our NGINX image.
az acr create -g policy-demo -n acrpolicydemo --sku Standard
az aks update -n policy-demo -g policy-demo --attach-acr acrpolicydemo
az acr login --name acrpolicydemo
We can now pull NGINX from upstream, push it to ACR, and store it there. Note that this is not really secure as I did not do any additional scanning or tests.
docker pull nginx
docker tag nginx acrpolicydemo.azurecr.io/nginx
docker push acrpolicydemo.azurecr.io/nginx

We now have the image ready to go in our Container Registry and can continue to update the deployment in our cluster to use this image.
❯ kubectl set image -n frond-end deployments/nginx  nginx=acrpolicydemo.azurecr.io/nginx
deployment.apps/nginx image updated
After a time, the violation will disappear and the overview screen will turn green.
Wrap up
Hopefully, this post has helped you get started with Azure Policy for Kubernetes and provided you with enough insight to decide whether it will work for you.
Here are the key takeaways:
- Azure Policy for Kubernetes uses Gatekeeper v3 as the underlying technology.
- It is a completely managed solution.
- Currently, it is still in preview.
- Currently, it is not possible to bring your own policies.
Given its current lack of flexibility, I would not recommend using Azure Policy for Kubernetes on production clusters. Instead, I would use the native Gatekeeper and set it up with policies that meet your needs. Hopefully, in the future, it will be possible to use your own Definitions with Azure Policy.
If your company is already using Azure Policy for other Azure resources, I recommend that you enable some of the basic Definitions to give your security team insights into your cluster from their own dashboards. For some clients, I noticed that this facilitated the adoption of the new container platform.
You can find the documentation on the Azure docs website. On GitHub you can find a overview of the built-in policies.
In sum, in Part 3 of this series, you learned to use Microsoft’s automatic Gatekeeper installation and integration with the Azure Kubernetes Service. If you would like to learn more about the native implementation of Gatekeeper, check out Part 2.
Spoiler alert: in Part 4, we will look at Conftest and a shifting-left policy control.
This blog is part of Azure Week. Check it out for more great content!
About the Author:
Devops with @bluebryte | Azure MVP | Dutchie
Reference:
Paulus, D. (2020). Deepdive with Azure Policy and AKS. Available at: https://danielpaulus.com/deepdive-with-azure-policy-and-aks/ [Accessed: 8th July 2021]