List view formatting in combination with the out-of-the-box list WebParts can be very powerful, enabling us to create very nice page experiences.
It is possible to render a view that uses view formatting in the list WebParts, and also at the same time use the dynamic filter feature to filter content on a WebPart based on the selection from another WebPart on the same page.
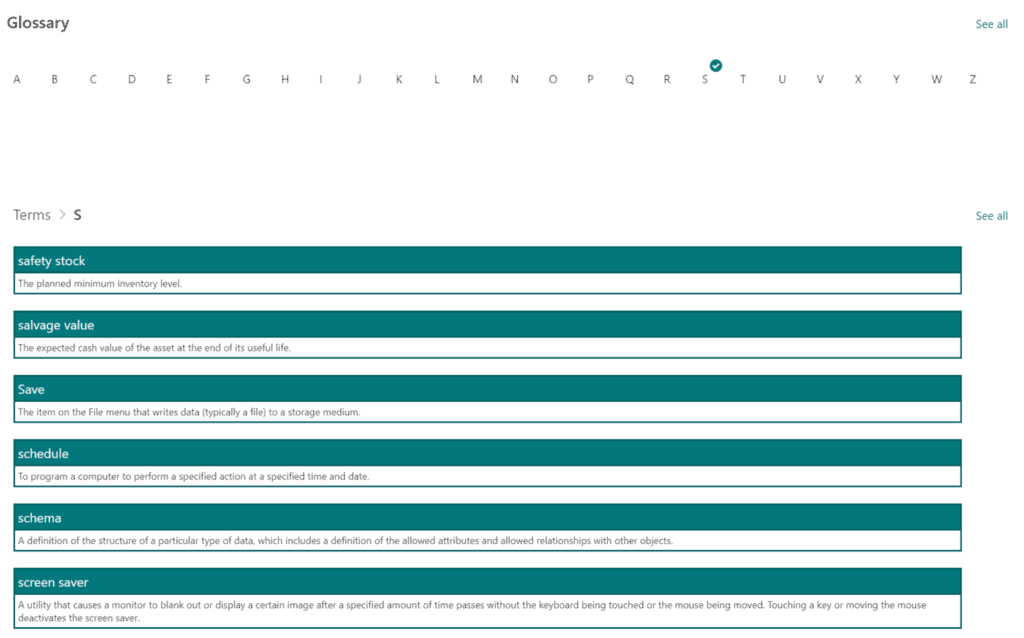
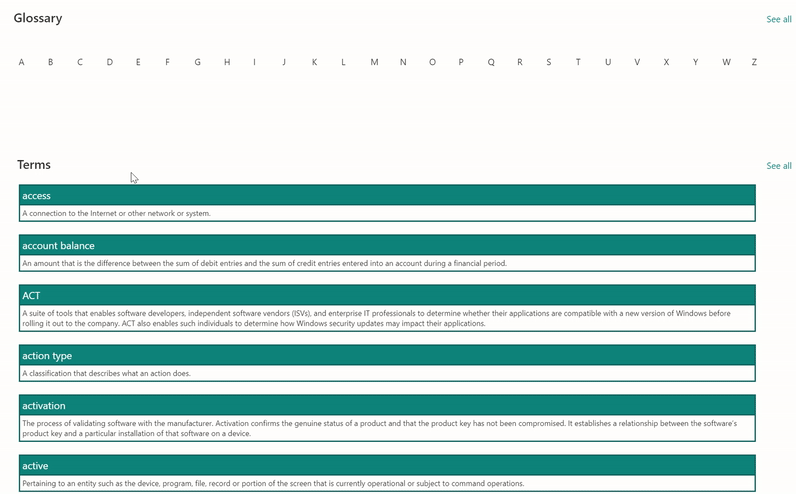
In this blog post, I will show a simple example where we can combine connected WebParts and List View formatting to build a Glossary page like the example below:
To build this example, two lists will be needed:
List 1: Glossary Filter
This list will use only the default Title field. In this list we need to store all the alphabet letters from A to Z (or your country language variation of the alphabet if preferred) to be used later as filters:
After the proper content is added to the list, create a new view as a Gallery view, and use the following JSON content to format it (select Format current view then Advanced mode):
{
  "$schema": "https://developer.microsoft.com/json-schemas/sp/v2/tile-formatting.schema.json",
  "height": 75,
  "width": 37,
  "hideSelection": false,
  "fillHorizontally": true,
  "formatter": {
    "elmType": "div",
    "children": [
      {
        "elmType": "div",
        "attributes": {
          "class": "ms-bgColor-white sp-css-borderColor-neutralLight"
        },
        "style": {
          "text-align": "left"
        },
        "children": [
          {
            "elmType": "div",
            "attributes": {
              "class": "sp-card-lastTextColumnContainer"
            },
            "style": {
              "text-align": "left"
            },
            "children": [
              {
                "elmType": "p",
                "attributes": {
                  "title": "[$Title]",
                  "class": "ms-fontColor-neutralPrimary ms-fontSize-11"
                },
                "txtContent": "=if ([$Title] == '', '–', [$Title])"
              }
            ]
          }
        ]
      }
    ]
  }
}
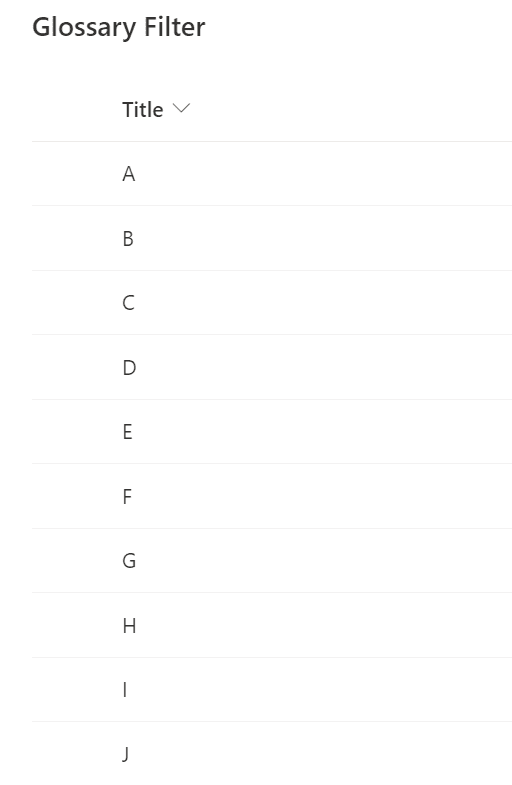
The new view will have the following look:

List 2: Glossary Terms
This is the list used to store all terms and its descriptions. This list will consist of 3 fields:
- Title – (default Title field) Single line of text field: used to store the term
- Description – Multiple lines of text field, no rich text enabled: Used to store the description
- FirstChar – Calculated field: To show the first character of the term. This will be the key for the whole functionality. Set it to use an output of ‘Single line of text’ and use as the formula: =LEFT(Title,1).
This will extract only the first character from the Title field and use it as the value.
When the fields are already set up, a new view is needed, to be formatted as the glossary view.
Create a view of type List. Edit the view and add the three fields, Title, Description and FirstChar field to it.
After the list is populated with some content you will notice the calculated field being properly updated:

Next, use the following JSON content as the view formatter:
{
  "$schema": "https://developer.microsoft.com/json-schemas/sp/view-formatting.schema.json",
  "hideListHeader": true,
  "hideSelection": true,
  "rowFormatter": {
    "elmType": "div",
    "style": {
      "display": "flex",
      "flex-direction": "column",
      "align-items": "flex-start"
    },
    "children": [
      {
        "elmType": "div",
        "attributes": {
          "class": "ms-bgColor-themePrimary ms-borderColor-themeDark ms-fontColor-white ms-fontSize-16"
        },
        "style": {
          "border-width": "2px",
          "border-style": "solid",
          "width": "95%",
          "padding": "4px"
        },
        "children": [
          {
            "elmType": "span",
            "txtContent": "[$Title]"
          }
        ]
      },
      {
        "elmType": "div",
        "attributes": {
          "class": "ms-borderColor-themeDark ms-fontSize-12"
        },
        "style": {
          "padding-left": "40px",
          "width": "95%",
          "border-width": "2px",
          "border-style": "solid",
          "padding": "4px",
          "border-top-width": "0",
          "margin-bottom": "20px"
        },
        "children": [
          {
            "elmType": "span",
            "txtContent": "[$Description]"
          }
        ]
      }
    ]
  }
}
To apply it, the process is similar to the first list, just select the ‘Format current view‘ option, choose ‘Advanced mode‘, and apply the JSON formatter.
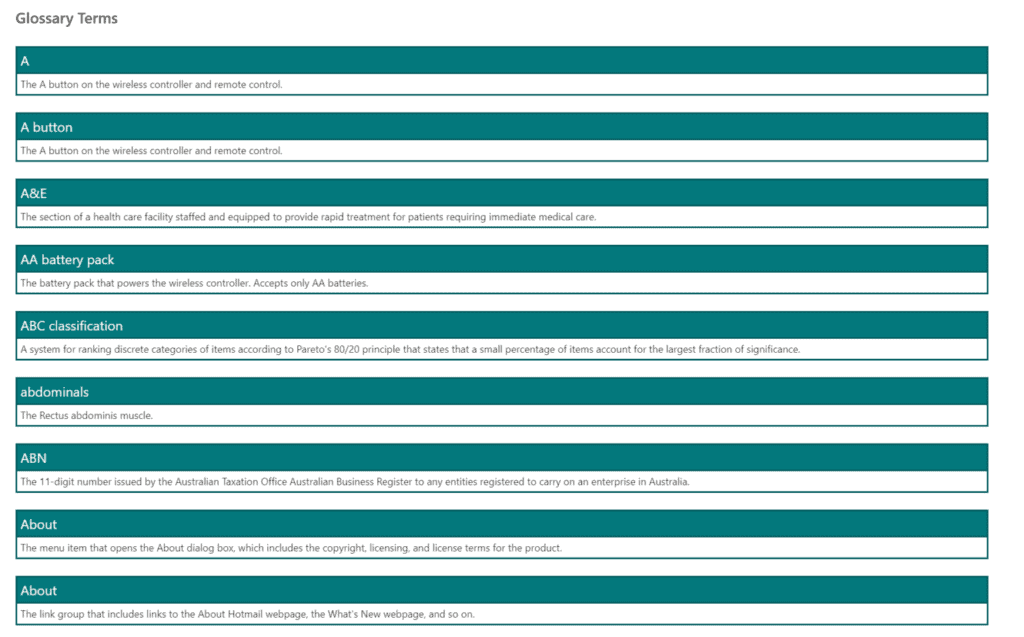
The following layout will apply to the view:
Creating and configuring the glossary page
Create a new blank page under your site and add a single column section.
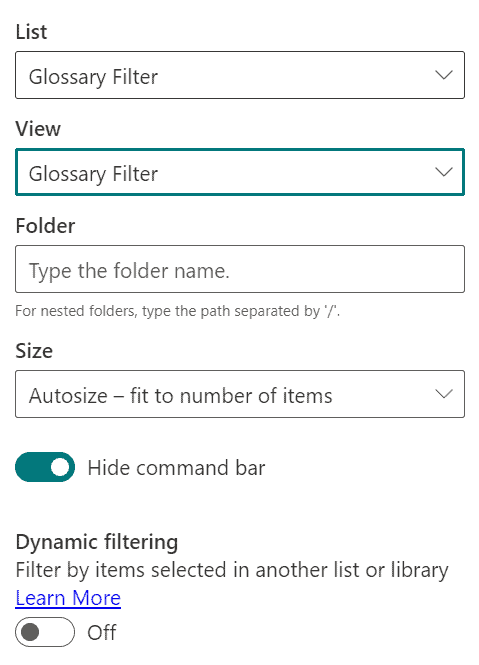
On this section, add a first List WebPart for the Glossary Filter list and use the following settings for the WebPart (hide the command bar so only the view content is shown):


Now add another list WebPart below it, but now select the Glossary Terms list, with the following settings (remember to hide the command bar so only the custom view will be shown):
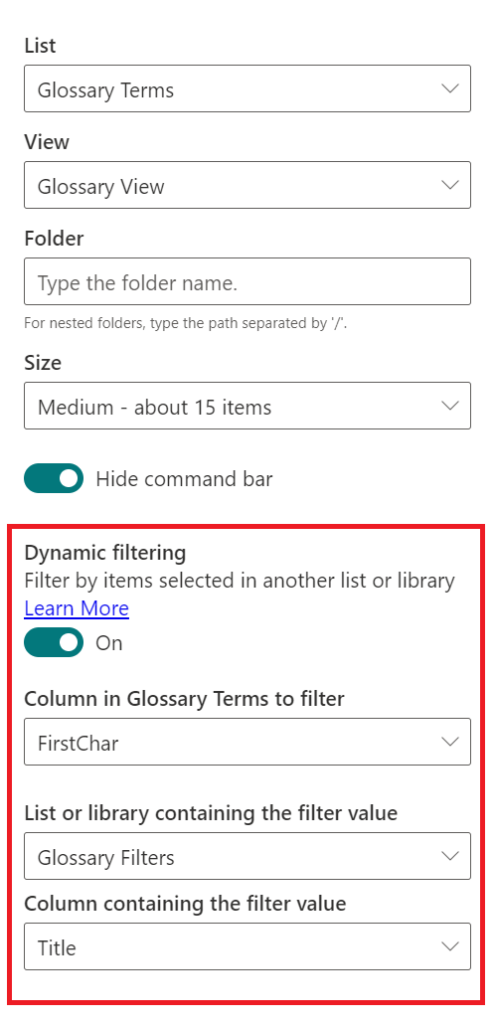
It is important to set up the dynamic filtering as above, as this is what will make the trick to filter the glossary view. When choosing the filters, select apply to preview the changes, save the change to view it working.
Also, a final touch to make the final page make more sense, edit the page and rename the WebParts on the page from:
- Glossary Terms to Terms
- Glossary Filters to Glossary
Save and publish your page to get the correct settings applied.
When selecting characters on the list view WebPart reading from the ‘Glossary Filters‘ list, the Glossary Terms will be properly filtered:
Conclusion
By using list sample view formatting in combination with dynamic filtering, we can create nice and reusable custom page experiences quickly.
References:
- Glossary content: Microsoft Terminology Collection
- JSON for Glossary view was adapted from the FAQ Sample from PnP GitHub Samples
This blog is part of SharePoint Week. For more great content, click here
About the Author:
SharePoint/Microsoft 365 Consultant
Microsoft techologies enthusiast
Follow Michel on Twitter @michelcarlo
Reference:
Mendes, M. (2021). How to build a SharePoint glossary page using view formatting and connected list WebParts. Available at: https://michelcarlo.com/2021/04/09/how-to-build-a-sharepoint-glossary-page-using-view-formatting-and-connected-list-webparts/ [Accessed: 13th September 2021].