When you deploy a SharePoint solution, especially if this is a public facing site or large intranet, you will have content authors, some of which have zero knowledge of HTML and web technologies, author content on the site. Hence we will explore how to create Web Part Styles.
For situations like this – you want to make sure your content authors use pre-defined styles when adding content to content editor web parts etc.
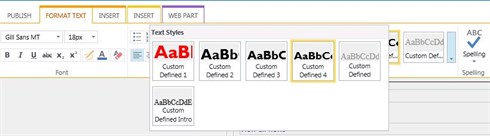
Today, I’ll show you how to add custom content editor web part styles to your site, so that your authors can chose them like this:
We’ll use SharePoint designer for this, but obviously everything here is transferable to Visual Studio concepts.
First create your custom style definitions; you can use existing CSS which is linked to the master page or create new CSS file. Here is the contents of my CSS file:
.custom-rteStyle-Heading1
{-ms-name:”Custom Defined 1″;
color:#FF0000;
font-size:30px;
font-family:”Gill Sans MT”;
font-weight:bold;}
.custom-rteStyle-Heading2
{-ms-name:”Custom Defined 2″;
color:#000000;
font-size:24px;
font-family:”Gill Sans MT”;
font-weight:bold;}
….
Above you basically define your styles and name them however you wish, in my case it’s “Custom Defined X”, in your case it might be a company name etc.
That’s not all, you also need to ensure that instances of content editor web part are set to use this style definition.
To do that, you can use below JavaScript in your masterpage or in script editor web part (if you want to run a quick test). Obviously if you want content editor web parts anywhere on the site inherit this style – use the script in the masterpage.
Below, also make sure you have a proper name for jQuery reference and CSS file which has your style definitions (my CSS reference is _layouts15MyProject1Styles.css, so make sure you use your own whether it’s in the library or _layouts folder).
< script src=”http://code.jquery.com/jquery-1.10.2.min.js” type=”text/javascript”></script>
< script type=”text/javascript”>
ExecuteOrDelayUntilScriptLoaded(function() {

var id = $(this).attr(“RteRedirect”),
editSettings = $(“#” + id);
if(editSettings.length > 0 && editSettings[0].PrefixStyleSheet != ‘custom-rte’)
{
editSettings[0][‘PrefixStyleSheet’] = ‘custom-rte’;
editSettings[0][‘StyleSheet’] = ‘u002f_layoutsu002f15u002fMyProject1u002fStyles.css’;
RTE.Canvas.fixRegion(id, false);
}
});
}, “sp.ribbon.js”);
< /script>
That’s it!
The result is this:

Nothing extraordinary, just a content editor using our custom styles.
Enjoy!

 About the Author: Yaroslav Pentsarskyy has been architecting and implementing SharePoint solutions since its 2003 release. Yaroslav has extensive .NET and SharePoint development experience working with medium-sized businesses, nonprofits, and government organizations.
As a recipient of the Microsoft Most Valuable Professional (MVP) 2009 and 2010 Award, Yaroslav is also a developer audience leader for VanSPUG (Vancouver SharePoint Usergroup) and actively contributes to local and not-so-local technical communities by presenting at technology events and sharing his findings in his almost-daily blog: www.sharemuch.com.
You can follow Yaroslav on Twitter!