Background
In a recent project, I developed a portal for the Project Management function of a global multinational. One of the key design principles we took into the engagement was not to simply make an electronic version of a Project Management manual. Instead, the solution had to be a source of new and timely information that would keep people coming back, as well as actively contributing.
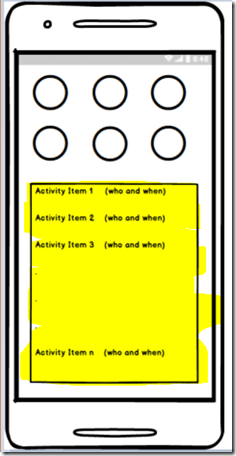
One of the many things done to achieve this goal was to create a PowerApp to compliment the portal. This app, among other things, allows users to submit project tips, lessons learnt, participate in pulse surveys, and receive notifications when particular topics (for example risk management or project controls) have new or updated information. A key feature of the app is an activity feed showing the latest information across the portal. The basic idea is shown in the wireframe below, where under the main navigation represented by the round icons, users can view and click on any new activity that interests them. Activity reports include new or updated content, newly submitted tips, photos, and lessons learnt.
Activity Reports
The data for this application is stored in SharePoint, so activity occurs across multiple lists/libraries. Therefore to produce an activity feed, PowerApps needs to talk to SharePoint search. Search, via the concept of a Result Source, allows us to specify exactly what lists and libraries are used in search results. This is important because we also want to exclude some SharePoint content from the feed. After all, if you maintain a list that is used to store and manage configuration data, it’s unlikely that you want blast out changes to that list to all users via an activity feed.
Result Sources also allow us to specify the ranking model on the results, which for an activity feed is usually based on date modified (i.e. recency rather than relevance).
Now I can’t show you the actual solution for confidentiality reasons, but luckily for all of us, my cat-obsessed daughter Ashlee (of fidget spinner fame), created a PowerApp called the CAT-alogue which is shown below. So in this post, I will explain the approach to the activity feed using the CAT-alogue via a feature called the (ahem) “Mewsfeed”…
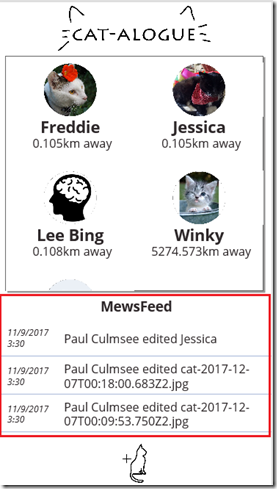
Mewsfeed
The Solution
Below is a diagram of the approach I ended up taking.
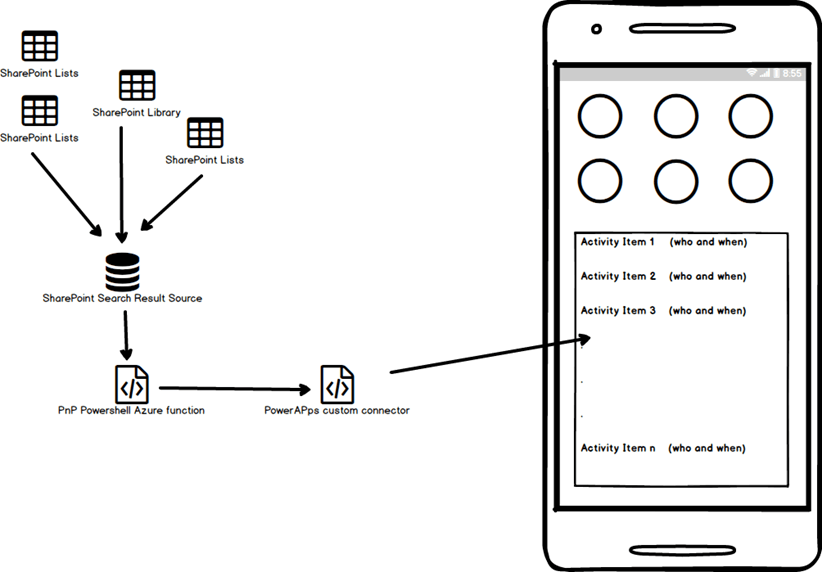
The approach
As you can see, the main components are:
- A custom SharePoint Search Result Source
- An Azure function (leveraging PnP PowerShell)
- A PowerApps custom connector
Now I should say this was not my original approach. I started off assuming that I’d query SharePoint search via Flow, using HTTP actions to talk to the SharePoint Search REST webservice. This approach has worked well for me when I needed to leverage unsupported SharePoint functions in PowerApps or Flow. But there was one major issue that was search specific. That is, when you talk to SharePoint REST API using Flow, you need to register and specify an App Principal for authentication. Now this is supported in SharePoint online search, but has an implication. There is no security trimming of search results. Quoting from the referenced article…
When you are using SharePoint Online search APIs with app-only permissions, you will need to request full permissions to the tenant when you are registering the add-in/app for the tenant. This will grant needed permissions to query information from the Office 365 tenant without security trimming applied.
For some scenarios this might be fine, but in my case, the idea of an app being able to query any/all SharePoint content in the entire tenant was never going to fly. My alternate approach uses the more traditional technique of a dedicated user account to access SharePoint. Thus, if the account only has access to this site, we have the search security trimming we need.
Right! Lets get down to business then. I have broken this into 5 parts across a few articles:
- Setting up SharePoint search
- Querying the search index via a PnP PowerShell script
- Creating the Azure function
- Creating the custom connector
- Testing in PowerApps
By the way, don’t let the length of this series put you off. I have tried to explain things as best I can with liberal use of screenshots.
1. Setting up SharePoint Search
The first step is to make a SharePoint result source which specifies the content that will be viewed in an activity feed. In my developer tenant, my daughter’s CAT-alogue app uses a list called Cat Directory, a list called CatImageRegister and a library called CatImages. If any activity happens in any of these lists, we want to see it on her app.
I decided to create a Search result source, using the List IDs as the filter. Note that this is not the only approach to take for this result source, but will suffice for my needs. To get the IDs of the lists in question, I used PnP PowerShell. After connecting to my tenant, I used the Get-PnPList command to find all lists with the word “Cat” in their Title like so…
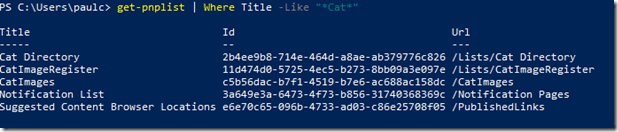
Cat in the title
PS C:\Users\paulc> get-pnplist | Where Title -Like "*Cat*"

Title                               Id                                   Url
 -----                               --                                   ---
 Cat Directory                       2b4ee9b8-714e-464d-a8ae-ab379776c826 /Lists/Cat Directory
 CatImageRegister                    11d474d0-5725-4ec5-b273-8bb09a3e097e /Lists/CatImageRegister
 CatImages                           c5b56dac-b7f1-4519-b7e6-ac688ac158dc /CatImages
 Notification List                   3a649e3a-6473-4f73-b856-31740368369c /Notification Pages
 Suggested Content Browser Locations e6e70c65-096b-4733-ad03-c86e25708f05 /PublishedLinks
I strongly suggest you use this method to get to know the awesomeness that is PnP PowerShell if you are new to it. But for the holdouts who think PowerShell is for developers, if you want to get the list ID’s via the SharePoint UI, you just need to go to List Settings and check the URL as shown below.
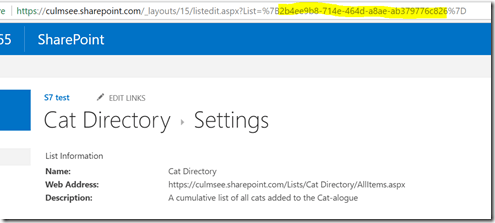
Cat directory – settings
Once you have assembled your list ID’s, you can create a result source. Go to Site Settings > Site Collection Administration > Search Result Sources and choose to create a New Result Source. Give your result source a name. Ashlee made me call it “Mewsfeed” – honest!
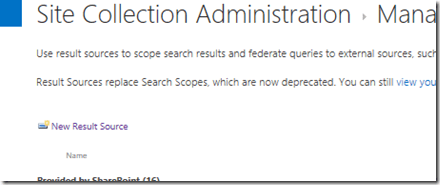
Site collection administration
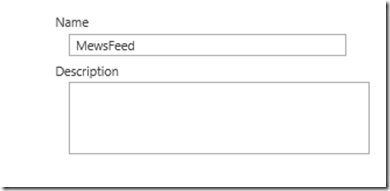
MewsFeed
Scroll down and find the Launch Query Builder button. From the Property Filter dropdown, choose –Show all managed properties– and find the ListID property. In the property filter, choose Contains and choose Manual Value from the Select Value dropdown. Specify the ID of one of the lists as shown below:
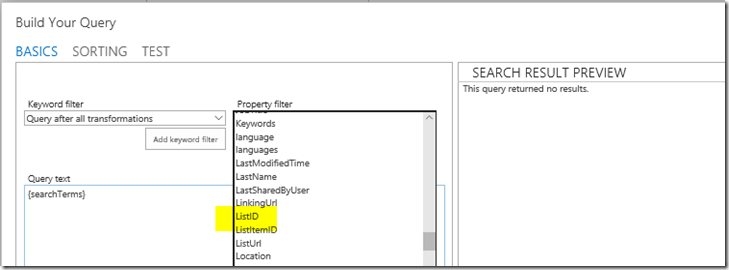
Build your Query
Basics
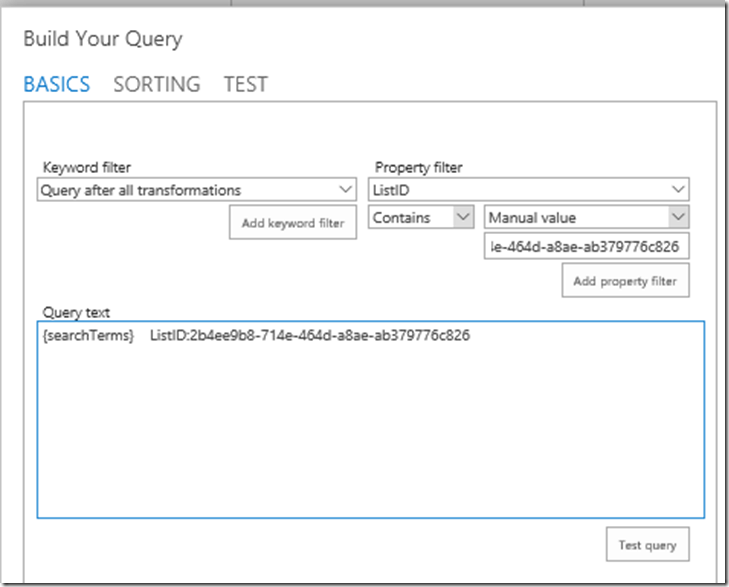
Repeat these steps for each list ID and click the Test query button to validate you are getting results.
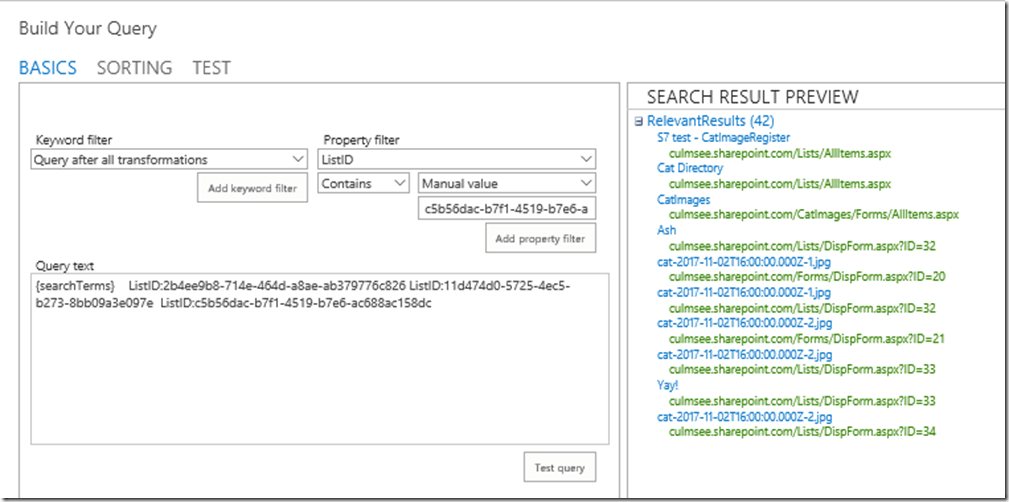
Search result preview
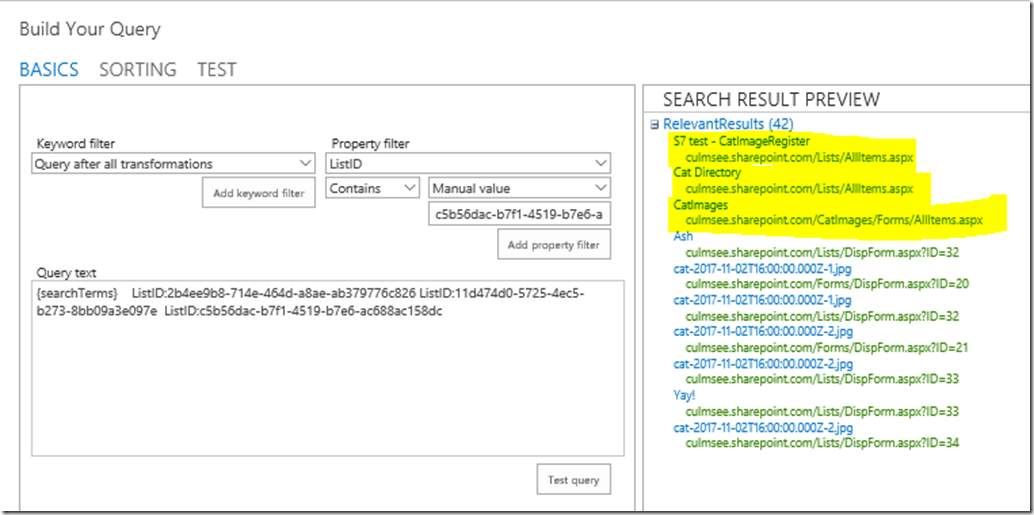
At this point, if you look closely at the search results, you will likely see items that should not be included in an activity feed. In the picture below I’ve demonstrated this by highlighting some results I’d rather not see. To address this, let’s refine the result source to only bring back list items, rather than the list views themselves. From the Property Filter dropdown, choose contentclass property. In the property filter, choose Equals and choose Manual Value from the Select Value dropdown. Set the value to “STS_ListItem_GenericList” as shown below:
Search result preview
Basics

Now re-test your results. You should see that the unwanted pages are now excluded from results. Go ahead and save your result source with an appropriate name.
FIlters
2. Querying the search index via a PnP PowerShell script
Now that we have our result source, we need to write a PowerShell script to query it. First up, we need to get the ID of the result source we just created because it is needed by the PowerShell cmdlet we are going to use. To do so, select the result source and grab the ID from the URL as highlighted below…
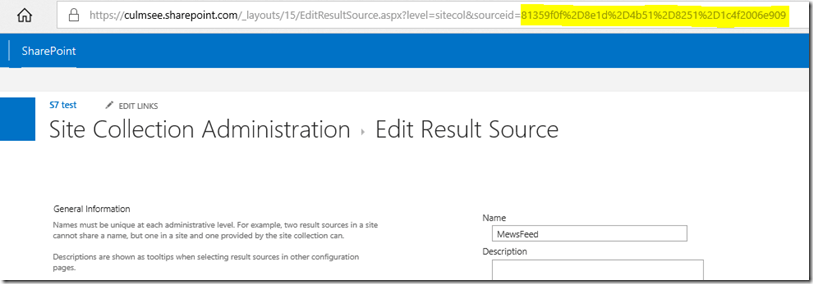
Site collection administration
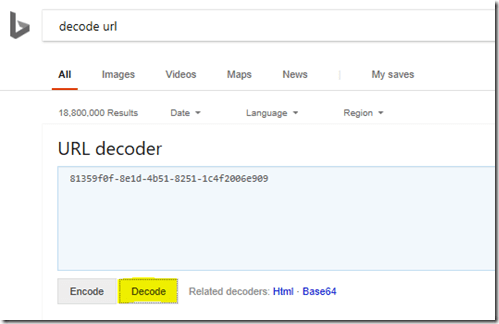
The ID has been encoded, so the best step is to use an online decoder to get the ID in the right format. Bing has one built in so just paste the ID into it and click Decode.
Decode URL
Next step is the script which, thanks to the PowerShell PnP project, is really simple since PnP includes a dedicated command that we can use, namely Submit-PnPSearchQuery. If you are using PowerShell interactively, a search can be performed in a couple of lines: E.g.
1. Connect-PnPonline https://culmsee.sharepoint.com
 2. $result = Submit-PnPSearchQuery -Query "*" -MaxResults 20 -SourceId "0bfa50f5-041d-40af-a6e1-8b01124eca69" -SortList @{"LastModifiedTime" = "Descending"} -RelevantResults
 3. $output = $result | ConvertTo-Json
The first command connects to the tenant and will prompt for credentials.
The second command performs a wilcard search (-Query “*”), returns 20 results (-MaxResults 20) and specifies the result source set up earlier (-SourceId “0bfa50f5-041d-40af-a6e1-8b01124eca69” ). We sort the results via recency (-SortList @{“LastModifiedTime” = “Descending”} and instruct the command to strip out extra detail and bring back just the results (–RelevantResults).
The third command converts the output to Json format and stores it in the $output variable, which is important because this is what we will send back to PowerApps.
To test that this is working as expected, I compared the results of a more simplified search. In the example below I have searched for the term “Jessica” – the name of one of Ashlee’s cats. First, I tested via the Result Source in SharePoint by returning to the query builder, navigating to the Test tab and clicking Show more…

Show more
I entered “Jessica” into the search term and found 11 relevant results…
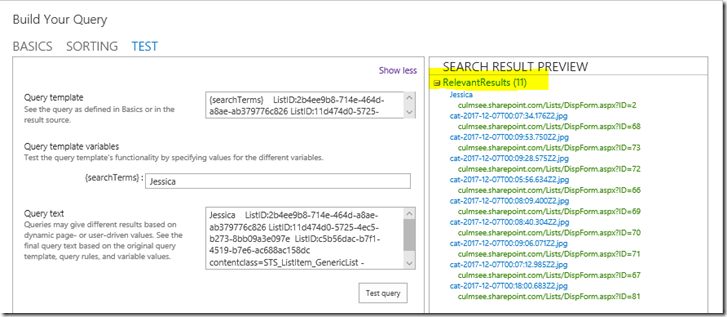
Test
Now in PowerShell we see the same search for “Jessica” and take a peek at the Json. Sure enough, we have the same 11 results as the Result Source test above.
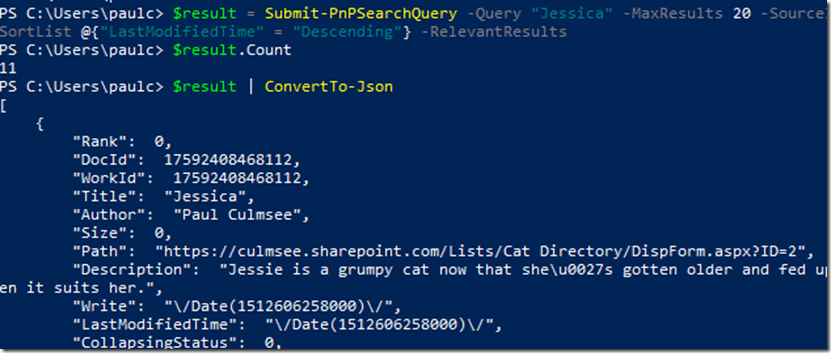
ConvertTo-Json
So now that we have confirmed we are executing the correct search, we need to go and make ourselves an Azure function to run the script. We will do this in part 2…
Thanks for reading…
About the Author:
I am IT veteran of 25+ years, business strategist, Microsoft MVP, sensemaker, author and the director of Seven Sigma Business Solutions. Based in Perth, Western Australia. I specialise in sensemaking, design thinking, strategic planning, complex decision making, digital transformation, IT governance, and all facets of Office 365/SharePoint delivery. More recently I have developed significant skills in Microsoft PowerApps, Flow, Cognitive Services and Azure Functions. This has culminated in running PowerApps hackathons in Australia and New Zealand.
Reference
Culmsee, P. (2018). How to make a PowerApps Activity Feed via SharePoint Search – Part 1. [online] Available at: http://www.cleverworkarounds.com/2017/12/28/how-to-make-a-powerapps-activity-feed-via-sharepoint-search-part-1/ [Accessed 19 November 2018]