In this first blog post of two, I will cover how to manage ownerless Microsoft Teams and Microsoft 365 groups using board tools from Microsoft. Ownerless Microsoft 365 groups or teams are quite common and often seen in the wild.
A few weeks ago, Martina Grom tweeted about a new feature in the Microsoft Admin Center to find these ownerless Microsoft 365 groups or Microsoft Teams. It allows active members to be notified by mail when the team, or rather the Microsoft 365 group, no longer has an owner. This tweet brought this feature to my attention.
I will show you this option and an alternative way to notify someone about ownerless teams, like the IT staff for example, by a scripted solution in a second post.
What makes a Microsoft 365 group owner so special
An owner of a Microsoft 365 group has some special permissions and tasks. They can add new members to a private M365 group, rename the display name of a M365 group, set and remove a sensitivity label, enable/disable Private Channels and do some other things.
Normally, you cannot remove the last owner or downgrade him/her to a member in a Microsoft Teams.

Even as Teams Administrator you are not able to remove the last owner from a Team.
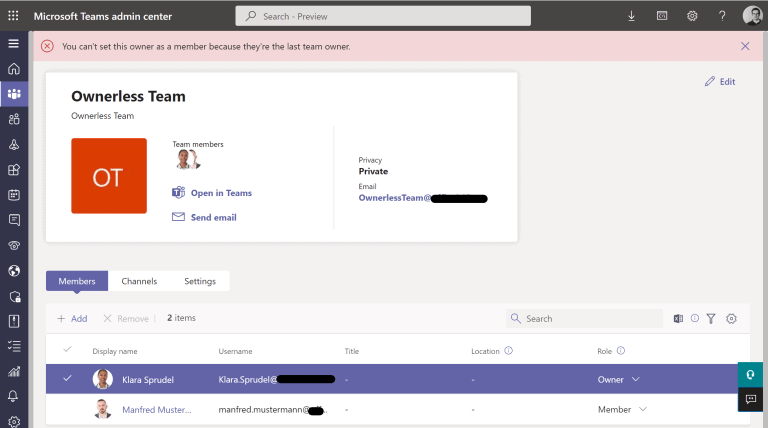
But there are situations where a Microsoft Team or M365 group becomes ownerless. For example, if you remove a user from Azure AD and this user was owner of a team.
An ownerless team is not so problematic in the first step. All members can still access the team and they can work as usual. But it becomes a problem if you like to add new members to this team, for example.
Find ownerless Microsoft 365 groups and inform active team members – a new feature
As described in the introduction of this post, you can enable a new feature in the Microsoft 365 admin centre. By enabling this feature, the Microsoft platform detects ownerless Microsoft 365 groups and sends an invitation mail to the five most active members. The invitation allows a member to overtake the ownership of the group.
Please notice:
- guests are never invited to become the owner
- the “take ownership”-action is logged in the Microsoft Compliance portal audit
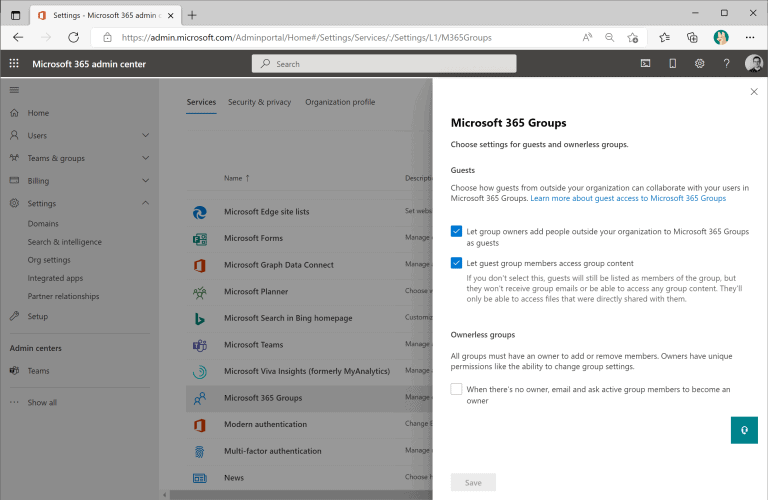
You must be a Global Administrator to enable this new feature in the Microsoft Admin Centre and you will find this option under Settings -> Microsoft 365 Groups -> Ownerless groups.
It takes 24 hours after the policy creation to get this option active. The Microsoft 365 platform will detect ownerless Microsoft 365 groups automatically and will notify members of these groups.
The default policy settings after enablement are:
- notify the five most active members in a team
- notify weekly for four weeks
- all active members can receive this notification
- the global administrator sends the notification
Configure the ownerless Microsoft 365 group policy settings
Of course, you can edit the default settings, so they fit better to your needs. To start the configuration wizard, you find a Configure policy in the menu.

The wizard starts with the configuration of the notification settings. By default, the five most active users will get the mail notification. You can change this behaviour and select to include or block a special security group for this notification mails.
But please notice: If you like to configure this feature (selecting special groups), you need an Azure AD Premium license.
Also, you can change the number of active users (max. 90 users) and for what period the notification will be sent.

In the third step, you can edit the subject and body text of the message. You can use placeholder for the display name of the user ($User.DisplayName) and the ownerless group ($Group.Name) itself.

In the last step, you can configure to apply the policy to all groups or only to specific groups.

The new feature cannot be enabled
As of writing this blog post, the feature is still in rollout. Even when you can see this option in your tenant, the deployment could still be in progress. This results in the following situation: you enable the feature in your tenant, and you get a notice that the change was successfully. But after a page refresh, the feature is still inactive. That’s what happened to me.
So, I’ve opened a support ticket at Microsoft and the support engineer advised me to enable the feature and directly start the policy configuration, click through the wizard and close it. After you went through the configuration wizard, even without any change, the ownerless group policy is now active.
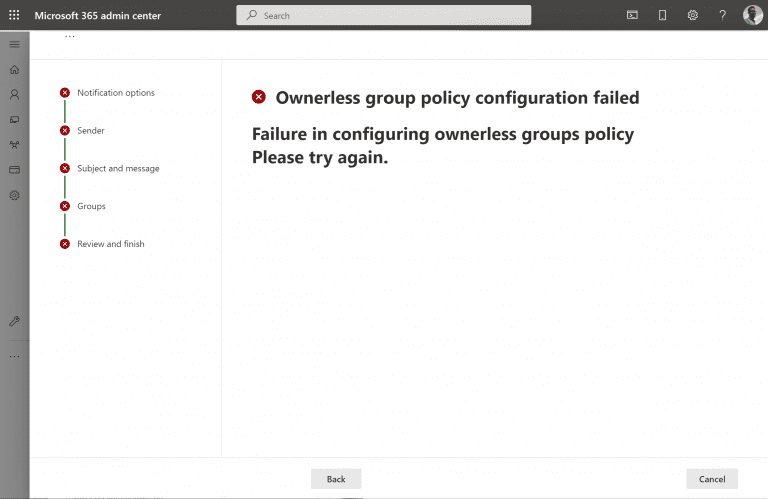
Even when you get an error message on the last configuration page, just cancel the wizard and the feature is active.
Good to know
Just a few words and my experiences about this new feature.
In some situation it may be not the best solution to give members the owner role based on their activity. The owner has some important tasks, rights, and responsibility for the team. Therefor it is still good practise to train the user for their role as team owner. And an algorithm cannot decide if the most active users have this knowledge.
Next, please be aware of the license requirement if you like to change the default behaviour for the mail notifications. By default, the policy invites the most active members to overtake the ownership. You need the Azure AD Premium license to exclude or include some users from this option to become an owner based on their activity.
This blog post is part of Microsoft Teams Week. Find loads of dedicated Microsoft Teams content over on Your Guide to Microsoft Teams.
About the Author:
My name is Thorsten Pickhan and I’m living in the beautiful North Rhine Westphalia on the edge of the Ruhrgebiet.
I started my IT career about 20 years ago as a trainee in a small IT shop. There I had my first contact with Microsoft Windows and build the first simple Active Directory infrastructures based on Windows Server 2000 for customers.
After some smaller projects, I had my first bigger Microsoft installations and get in touch with Exchange and SharePoint as a collaboration platform. Read further.
Reference:
Pickhan, T. (2022). How to manage ownerless Microsoft Teams – Part 1. Available at: https://office365.thorpick.de/how-to-find-ownerless-microsoft-teams [Accessed: 8th September 2022].