If you’re asking yourself “What is Microsoft Flow?”, it is one of the most exciting technologies in the world today: it enables users to create business processes in a quick and convenient way, but this can become a problem for system admins.
Even business users can create simple to medium-complex Flows, without any previous training. However, this huge advantage of Microsoft Flow can easily become a huge nightmare for those who are tasked with keeping the system intact and safe.
In previous blog posts I have focused on introducing the concept of environments and explaining what is inside environments. In this blog post, I will focus on managing Microsoft Flows using PowerShell.
Where are my Microsoft Flows?
The largest advantage of Microsoft Flow is that anyone with appropriate permissions and licenses can create flows easily, but this can turn into a real problem for administrators. How many flows do we have across the environments? Who has created them? Who can edit them? What connectors are these Flows using? All this info is not that easy to get from the web portal. Automating the Flow management is, at the moment of writing this blog post, hardly supported through the web interface at all.
Well, that’s why we have PowerShell. In a previous blog post, Intro to Environments and How to Manage them with PowerShell, I described what you need to do in order to use PowerShell in your Microsoft PowerApps and Microsoft Flow environments, and I will assume that you have all the PowerShell modules installed and that you are connected to your environment.
To get all the flows, across all the environments, we will use the simple “Get-AdminFlow” cmdlet:
Get-AdminFlow
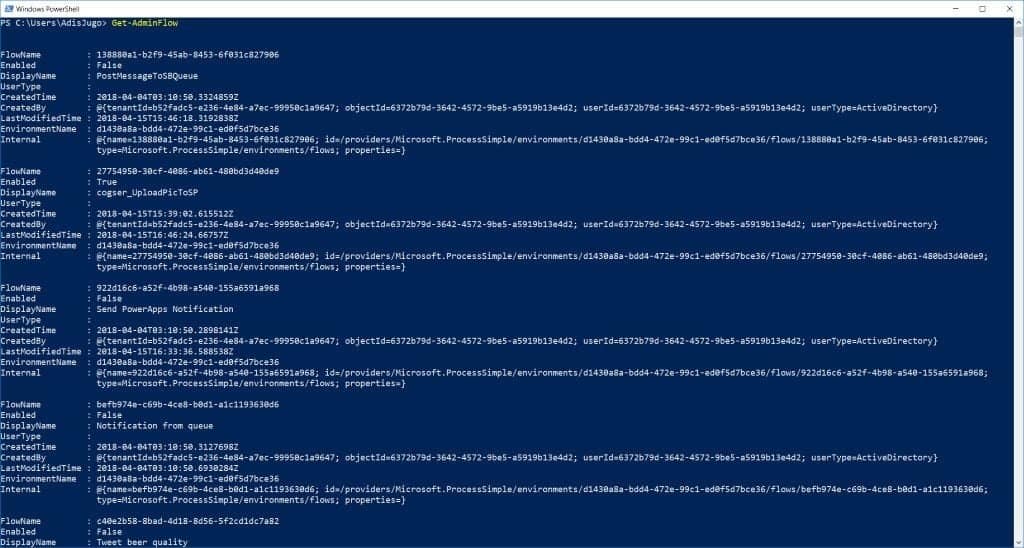
In the screenshot above, we see the output of the Get-AdminFlow cmdlet: all the Flows are listed, with all the data we need, across environments and users.
If you use a lot of Microsoft Flows in a large organization, this can become clumsy, so of course you will want to refine these results.
If we want to get all the Microsoft Flows per Environment, we will use the following command:
Get-AdminFlow | Where-Object {$_.EnvironmentName -eq $YourEnvironmentId } | Format-Table -Property DisplayName, CreatedTime, Enabled, EnvironmentName

As we see in the screenshot above, this cmdlet will list all the Flows from the specified environment. Of course, you will need to set the variable $YourEnvironmentId to the ID of your environment prior to executing this cmdlet.
You can combine the where clauses in this cmdlet, to get more specific results. For example, the following cmdlet will return only the enabled Flows from the specific environment:
Get-AdminFlow | Where-Object {$_.EnvironmentName -eq $YourEnvironmentId -and $_.Enabled -eq $true } | Format-Table -Property DisplayName, CreatedTime, Enabled, EnvironmentName
If you want to get the Flows by user, you can easily expand the CreatedBy property and use it in the Where clause. Please note that the CreatedBy property does not give you the user’s Display Name, but rather a User ID from the Azure Active Directory, so you will have to pack another cmdlet here to actually resolve the user.
The following cmdlet might be helpful if you want to list all the users with Flows, grouped by user. This way you can figure out who is making Flows in your environments:
Get-AdminFlow | Select –ExpandProperty CreatedBy | Select –ExpandProperty UserId | Group
Enabling and Disabling Microsoft Flows, Deleting Approvals
Now when you have found all the Flows that are flowing around, let’s see how you can manage them. The first and most obvious task will be disabling and enabling Flows. This is fairly simple, since we will need to pass only two parameters to the “Enable-AdminFlow” and “Disable-AdminFlow” cmdlets:
Disable-AdminFlow -EnvironmentName $YourEnvironmentId -FlowName $YourFlowId
Enable-AdminFlow -EnvironmentName $YourEnvironmentId -FlowName $YourFlowId
Again, please set the “YourEnvironmentId” and “YourFlowId” variables prior to executing these two cmdlets. Please note that you will use the Flow’s ID, and not the display name in these cmdlets.
The first cmdlet will disable, and the second cmdlet will enable the Flow with the given ID. The same is true for removing Flows – the following cmdlet will completely remove the flow:
Remove-AdminFlow -EnvironmentName $YourEnvironmentId -FlowName $YourFlowId
After executing the cmdlet above, the Flow will be completely removed.
It gets more interesting when working with approvals. The only option we have here is actually to delete ALL the approvals processes in the environment:
Remove-AdminFlowApprovals -EnvironmentName $YourEnvironmentId

Microsoft Flow Portals and User Profile Data
When a user logs into the Flow portal, and creates Flows, his or her profile data is stored in the portal.
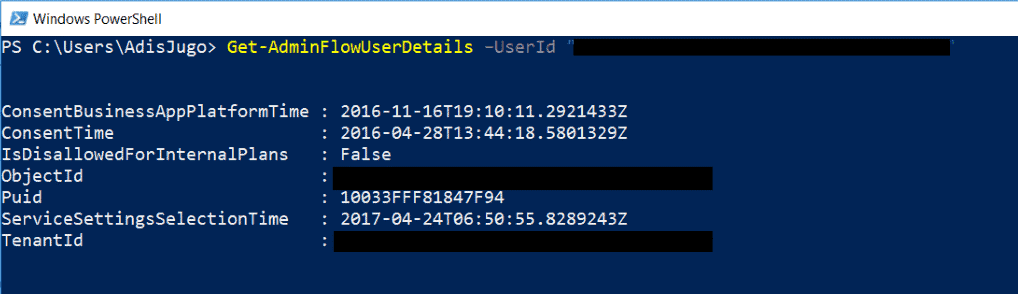
With the “Get-AdminFlowUserDetails” cmdlet, we can find out what the Flow portal knows about the user, such as when the consent for the Business Apps Platform has been given etc.
Get-AdminFlowUserDetails –UserId $YourUserId
If you need to remove those details from the system (hint: GDPR!), you can use the following cmdlet:
Remove-AdminFlowUserDetails –UserId $YourUserId
Important: prior to this, you need to remove all the Flows created by this user, otherwise, the “Remove-AdminFlowUserDetails” cmdlet will fail.
Managing Microsoft Flow Edit and View Permissions
Besides the information about Flow creators, you can see and manage the information of who can edit and view the Flows in your environments.
The first thing you will typically want to find out, is to check the current permissions. We are going to do that with the “Get-AdminFlowOwnerRole” cmdlet. For example, the following cmdlet is going to list out all the roles for the requested Flow:
Get-AdminFlowOwnerRole -EnvironmentName $YourEnvironmentId -FlowName $YourFlowId
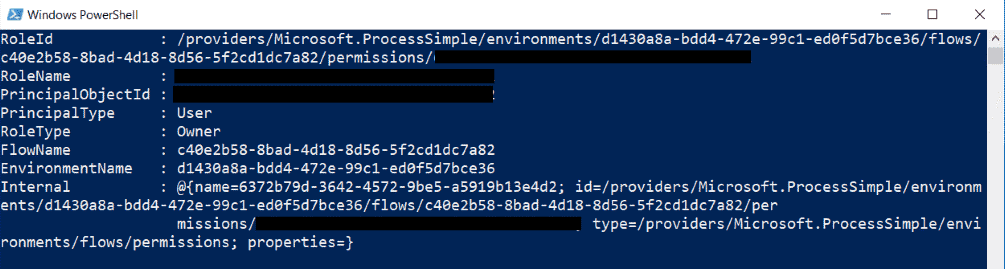
We can see here a few interesting things. When dealing with permissions in our PowerApps/Flow admin cmdlets, the RoleId is a descriptive string which contains all the information we need to know: the environment name, Flow name and the principal ID. Note: this RoleId string will be needed later.
In the screenshot above, we can see that we have only one user here, and that user is an Owner.
Now, let’s assign a new user to this Flow, with editing rights. We are going to use the following cmdlet:
Set-AdminFlowOwnerRole -PrincipalType User -PrincipalObjectId $YourUserId -RoleName CanEdit -FlowName $YourFlowId -EnvironmentName $YourEnvironmentId
As a result, if we execute the Get-AdminFlowOwnerRole again, we can see that we now have another user in this Flow, with CanEdit rights:

Please note few things here:
- The PrincipalObjectId parameter has to be the user’s or group’s GUID, which you will get from your Azure Active Directory.
- The PrincipalType parameter can be either “User” or “Group”. If it is “Group”, then you will need an ID of an Azure Active Directory group in the “PrincipalObjectId” parameter.
- The RoleType parameter can be either “CanEdit” or “CanView”. You obviously can’t set another Owner here.
When you want to remove a role for the principal, you will need that long “RoleId” string which you received from the Get-AdminFlowOwnerRole cmdlet:
Remove-AdminFlowOwnerRole -FlowName $YourFlowId -EnvironmentName $YourEnvironmentId -RoleId “/providers/Microsoft.ProcessSimple/environments/d1430a8a-bdd4-472e-99c1-ed0f5d7bce36/flows/c40e2b58-8bad-4d18-8d56-5f2cd1dc7a82/permissions/00000000-0000-0000-0000-ca59a4d167cb”
The “RoleId” parameter in this cmdlet (which is marked yellow) is a part of the result of the Get-AdminFlowOwnerRole cmdlet.
The result of the Remove-AdminFlowOwnerRole cmdlet, if successful, should look like this:

And just like that, the user has no editing rights on this Flow anymore.
Final Thoughts on Microsoft Flow
The admin cmdlets for managing Microsoft Flows already offer some nice gems and features. However, it would be good if the missing bits, such as managing approvals per user/flow, and most of all, handling Flow connectors and connections (available in PowerApps but not in Flows) would find its way to those modules.
In my next blog post, I talk about the Common Data Service, CDS databases, what their role is in the Microsoft Power Platform story and why they are important.
Reference:
Jugo, A. (2019). Managing Microsoft Flows. Available at: https://www.syskit.com/blog/managing-microsoft-powerapps-and-flow-like-a-pro-part-3-managing-flows/ [Accessed: 31st October 2019].