I recently got a request from a client that had a lot of employee engagement around blogging and they wanted to bring that front and center on their intranet home page. We were already rolling up an executive blog to the front page using the Content Query Web Part styled with some custom XSLT. They wanted it styled to look exactly the same, but using the CQWP again was out of the question since these employee blogs were coming from the user My Sites. The CQWP can’t roll content from other site collections, so we will use the new Search display templates in SharePoint 2013 to accomplish this goal of rolling all blog posts from across their environment.

Employee Blog Mockup
If you don’t care about all this, you can download these files and try them out for yourself at the bottom of this post.
First, let’s talk about the structure of display templates. I’m not going to go into a huge amount of detail, that has already been covered on a great blog on Technet. There are two main files that control your display template and this example will update both of those. Essentially, there is a wrapper called Control_SearchResults.html that contains the global formatting and elements for all search results, and lots of files to style individual items. These files are all located in the Master Page gallery > Display Templates > Search folder. I recommend not modifying any of the original files, instead open one of the existing files and save as a new file. I typically do all of this work in SharePoint Designer.
The first thing to do is create a new wrapper file, so I saved Control_SearchResults.hml as a new file called Control_SearchResultsBlogSummary.html. (Creative, right?) Never edit the JavaScript files for your templates, SharePoint creates and maintains those as you edit your HTML file. I didn’t do too much to modify this template with the exception of taking almost all of it out. This is a very basic display and I don’t need much in the way of formatting or detailed info, I just need the title, employee image, and a summary of the post. So, this is what I ended up for the control template:
<html xmlns:mso=”urn:schemas-microsoft-com:office:office” xmlns:msdt=”uuid:C2F41010-65B3-11d1-A29F-00AA00C14882″>
<head>
<title>Blog Summary Result</title>
<!–[if gte mso 9]><xml>
<mso:CustomDocumentProperties>
<mso:TemplateHidden msdt:dt=”string”>0</mso:TemplateHidden>
<mso:MasterPageDescription msdt:dt=”string”>Displays the Search Results control.</mso:MasterPageDescription>
<mso:ContentTypeId msdt:dt=”string”>0x0101002039C03B61C64EC4A04F5361F385106601</mso:ContentTypeId>
<mso:TargetControlType msdt:dt=”string”>;#SearchResults;#</mso:TargetControlType>
<mso:HtmlDesignAssociated msdt:dt=”string”>1</mso:HtmlDesignAssociated>
<mso:HtmlDesignConversionSucceeded msdt:dt=”string”>True</mso:HtmlDesignConversionSucceeded>
<mso:HtmlDesignStatusAndPreview msdt:dt=”string”>https://sharepoint.goodwillsp.org/_catalogs/masterpage/Display Templates/Search/Control_SearchResults_BlogSummary.html, Conversion successful.</mso:HtmlDesignStatusAndPreview>
<mso:CrawlerXSLFile msdt:dt=”string”></mso:CrawlerXSLFile>
<mso:HtmlDesignPreviewUrl msdt:dt=”string”></mso:HtmlDesignPreviewUrl>
</mso:CustomDocumentProperties>
</xml><![endif]–>
</head>
<body>
<div id=”Control_SearchResults”>
<div class=”ms-srch-result” id=”Result” name=”Control” style=”margin-top:1px; width:280px;”>
<div id=”Groups” class=”ms-srch-result-groups”>
<!–#_
ctx.ListDataJSONGroupsKey = “ResultTables”;
_#–>
_#= ctx.RenderGroups(ctx) =#_
</div>
</div>
</div>
</body>
</html>
That dropped the file from over 300 lines down to about 35, so it is much easier to read. The only real thing I added to this file was the styling on the ms-srch-result div. It would have been just as easy to put in my custom CSS file, but for demo purposes, I left it inline. This file calls the template that you configure in your search results web part using the _#= ctx.RenderGroups(ctx) =#_ line, so you can modify this file as needed.
Next, I modified the Item_Discussion.html file to get my display template formatted for my blog roll. I started with that template because it already had most of what I needed in a format that looked pretty close to what I was after.
Again, I mostly stripped out what I didn’t need, but this time I did add some content back in. We needed to have the employee’s picture next to the post to make it a bit more interesting on the page. I’m sure there are better ways to do this using all the search tools, but I banged my head against it for a while and went the easy way. I’ll add in some of the code that is actually new for this file, and you can find the full files available for download below.

{
author = Srch.U.getDisplayNameFromAuthorField(ctx.CurrentItem.AuthorOWSUSER);
var userPersonaId = id + “_peopleUserPersona”;
var authorUsername = Srch.U.getUsernameFromAuthorField(ctx.CurrentItem.AuthorOWSUSER);
var authorPicUrl = “https://mysites.webApplication.com/User%20Photos/Profile%20Pictures/” + authorUsername.split(“”)[1] + “_MThumb.jpg”;
authorPic = “<img src='” + authorPicUrl + “‘ style=’width:70px;height:70px;float:left;margin:0 5px 5px 0;’>”;
}
These lines get the current author from the search results, then just build a URL to the image library on the My Sites web application that stores the images. Since these are stored in a consistent manner based on username, this was the easiest way to go for me. Then, to add the output of that to our template, we just insert _#= authorPic =#_ into the HTML wherever you want the JavaScript variable to render.
<div>_#= authorPic =#_</div>
<div id=”_#= $htmlEncode(id + Srch.U.Ids.body) =#_”>
<div id=”_#= $htmlEncode(id + Srch.U.Ids.title) =#_” class=”ms-srch-item-title”>
<h3 class=”ms-srch-ellipsis” style=”padding-bottom:2px;”>
<a clicktype=”Result” id=”_#= $htmlEncode(id + Srch.U.Ids.titleLink) =#_” href=”_#= $urlHtmlEncode(ctx.CurrentItem.Path) =#_” style=”font-size:15px;” title=”_#= $htmlEncode(ctx.CurrentItem.Title) =#_” onfocus=”_#= showHoverPanelCallback =#_”>
_#= Srch.U.trimTitle(title, maxTitleLengthInChars, termsToUse) =#_
</a>
</h3>
</div>
There are variables in the JavaScript in this page to control how long the blog title and text teaser are, so they are pretty easy to adjust. Once these files are saved and published, it is time to configure the search web part to use them. Just add a Search Results web part to your page, and edit the properties. Open the Query Builder and add ContentType:Post Title<>”Welcome to my blog!” -ContentClass=urn:content-class:SPSPeople as the Query text. This will prevent the default “Welcome to My Blog” posts that everyone gets when a blog is created from showing up on your page.
Set the following options in the Display Templates section and click OK. If all goes according to plan, you should see a nicely formatted blog roll on your page. The options in the drop-down come directly from the <Title> element of your HTML files, so you can name them whatever you want. </p>
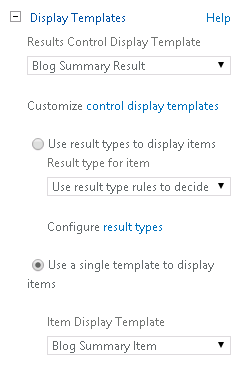
Display Template
Feel free to download these files below. Just note that you will need to modify the URL to point to your My Site web application on line 79 of the Item_BlogSummary.html file.
Search Display Templates Download
If you have any questions on the above blog from C5 Insight please leave a comment below.