Please read through my previous article, Develop First Client-Side Web Part to get started, develop your first SPFx client-side web part, and test it on a local SharePoint workbench. In real-life scenarios, we will have to deploy these SPFx web parts to some hosting environments from where it can be served to SharePoint.
Below are the most commonly followed deployment approaches
- Azure CDN (Previous article)
- Office 365 Public CDN (This article)
- SharePoint Library in your tenant
Any of the document libraries in the SharePoint Online tenant can be promoted as a CDN, which will help to serve the JS files for SPFx client web parts hosted in SharePoint. This CDN location, being public, can be accessed easily.
- Download and install the latest version of SharePoint Online Management Shell from https://www.microsoft.com/en-us/download/details.aspx?id=35588
- Open the SharePoint Online Management Shell
- Connect to SharePoint Online tenant using below cmdlet
- Connect-SPOService -Url https://[tenant]-admin.sharepoint.com
Replace [tenant] with your actual tenant name
- Run below set of commands to review the existing Office 365 public CDN settings on your tenant
- Get-SPOTenantCdnEnabled -CdnType Public
- Get-SPOTenantCdnOrigins -CdnType Public

Administrator SharePoint Online Management Shell
- Get-SPOTenantCdnPolicies -CdnType Public
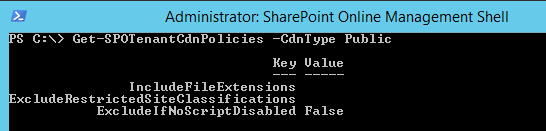
Key Value
- Set-SPOTenantCdnEnabled -CdnType Public

Command
- Get-SPOTenantCdnOrigins -CdnType Public

SharePoint Online Management Shell

SharePoint Online Management Shell
Follow the below steps to setup new CDN location,
- Open SharePoint site (e.g. https://[tenant].sharepoint.com/sites/[site-collection-name]
- Create a document library (e.g. CDN)
- Run below command in SharePoint Online Management Shell
- Add-SPOTenantCdnOrigin -CdnType Public -OriginUrl sites/[site-collection-name]/[document-library]
The Origin URL is a relative URL. New CDN origin configuration will again take 15 to 20 minutes.
- Run Get-SPOTenantCdnOrigins to check the status.
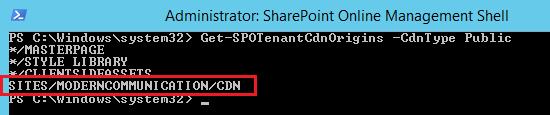
ModernCommunication
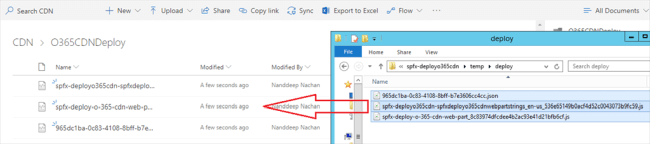
- Create a folder in document library preferably with the name of SPFx web part (e.g. O365CDNDeploy)
- To get the path of CDN type below the URL in the browser.
- https://[tenant].sharepoint.com/_vti_bin/publiccdn.ashx/url?itemurl=https:// [tenant].sharepoint.com/sites/[site-collection-name]/[document-library]/[folder]

- Open command prompt
- In the command prompt, navigate to the SPFx solution folder
- Type “code .” to open the solution in code editor of your choice
- Open package-solution.json file from config folder. This file takes care of solution packaging.
- Set includeClientSideAssets value as false. The client side assets will not be packaged inside the final package (sppkg file) because these will be hosted on external Office 365 public CDN.
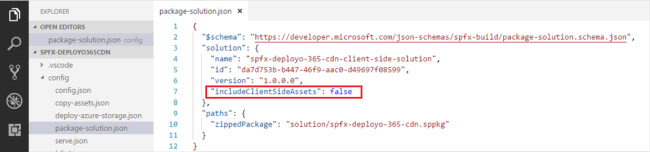
IncludeClientSideAssets
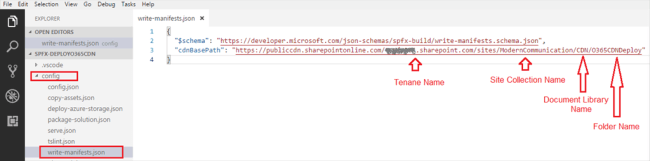
- Open write-manifests.json from config folder
- Update CDN base path as Office 365 CDN end point
- https://publiccdn.sharepointonline.com/[tenant]/sites/[site-collection-name]/[document-library]/[folder]
Config
- gulp bundle –ship
O365CDNDeploy
- gulp package-solution –ship
- Open the SharePoint App catalog site
- Upload the solution package (sppkg) from sharepoint\solution folder to app catalog
- Make sure the URL is pointing to Office 365 CDN
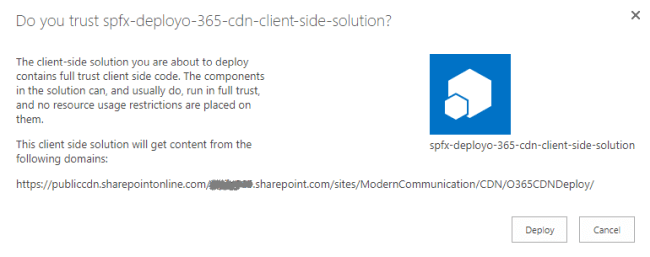
Do you trust SPFx Deploy?
- Click Deploy
- Open any SharePoint site in your tenant
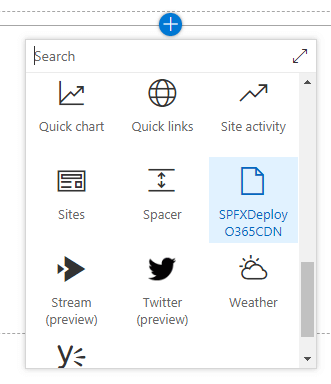
- Add the App to your site from “Add an App” menu
- Edit any page and add the webpart
Add App menu
- Click F12 to open developer toolbar. Confirm that it is served from Office 365 Public CDN
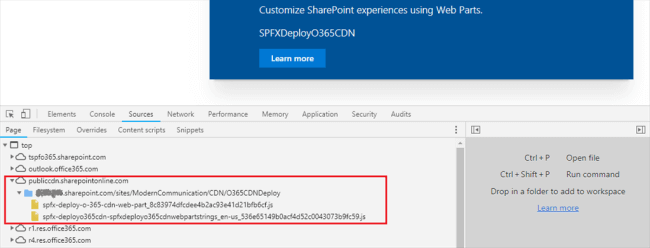
Office 365 Public CDN