Follow this blog post to learn how to switch from O365 end points to Graph API.
The purpose of this article is to learn how easy to switch your application from using multiple Office 365 service end points to one end point – graph.microsoft.com. This will make easy to switch the context of applications using same end point and without requiring authentication token against each end points.
It’s been a while since Microsoft started to focus on Office 365 development platform.
Office 365 has a mix of products like Exchange, SharePoint. Microsoft has been adding many new products in Office 365 suite recently.
When Initially development started, each product has its’ own development APIs. Like
- For Exchange, use EWS or REST APIs.
- For SharePoint, either uses client side object model or REST APIs.
- For Lync becoming Skype, some of the Skype APIs were available.
Now, consider a real-time customer scenario where you have to access email, calendar, tasks and OD4B service from one application and in a sequence.
In this case, the programmer has to write multiple sets of APIs across different platforms. Moreover, each time the platform changes, the programmer has to handle authentication token against end point.
To solve this challenge, Microsoft introduced Unified APIs in the preview. This was released around Mid-2015. The intention was to build a unified model to query across products from one end point. Since this was in preview, not ready for production use, a lot of developers did not build the application using this.
A lot of developers have built the application using the previously recommended and supported model. Now it is a good time to switch the code to Microsoft Graph API.
Let’s get started in action.
When you configure the project with Office 365 API, either the native or web application gets registered with Azure AD. This registration will add details like client id, client secret, tenant id, the domain in the configuration file of the application.
I am considering ASP.NET app here. It can be MVC or web forms.
- First thing, you already have registered your app with Azure AD and set the applications permissions.
- You should change the property SSL Enabled to TRUE if this is not done.
- Now let’s add Microsoft Graph permissions on the app.
- Go to Azure Management Portal and sign in using the organizational account. ( I generally do sign in using global admin user account).
- In the left-hand navigation, click Active Directory.
- Select the directory you share with your Office 365 subscription.
- Locate and select the Application tab on the header/options bar.
- Select the application you created for this lab.
- Open Configure tab
- Scroll down to the permissions to other applications section.
- Click the Add Application button.
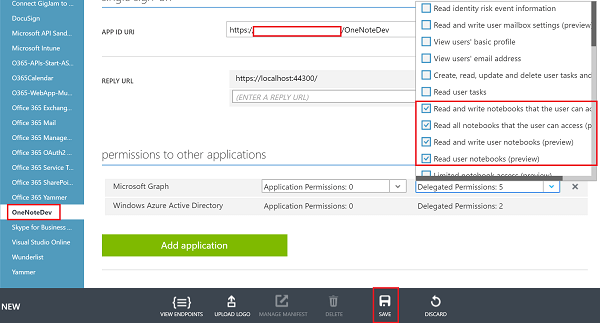
- In the Permissions to other applications dialog, click the PLUS icon next to the Microsoft Graph option.
- Click the CHECK icon in the lower right corner.
- For the new Microsoft Graph application permission entry, select the Delegated Permissions drop-down on the same line and then select the permissions required for your application. (screenshot is for reference only, permissions should be selected based on the required scope)
- Click the Save button at the bottom of the page.
- Now in your Visual Studio solution, add a help class which will help to build the strings from configuration file quickly. Example –
public class SettingsHelper
{
public static string ClientId
{
get { return ConfigurationManager.AppSettings[“ida:ClientId”]; }
}
public static string ClientSecret
{
get { return ConfigurationManager.AppSettings[“ida:ClientSecret”]; }
}
public static string AzureAdInstance
{
get { return ConfigurationManager.AppSettings[“ida:AADInstance”]; }
}
public static string AzureAdTenantId
{
get { return ConfigurationManager.AppSettings[“ida:TenantId”]; }
}
public static string GraphResourceUrl
{
get { return “https://graph.microsoft.com/v1.0/“; }
}
public static string AzureAdGraphResourceURL
{
get { return “https://graph.microsoft.com/“; }
}
public static string AzureAdAuthority
{
get { return AzureAdInstance + AzureAdTenantId; }
}
public static string ClaimTypeObjectIdentifier
{
get { return “http://schemas.microsoft.com/identity/claims/objectidentifier“; }
}
}
- Now, let’s add a function call to get the access token for logged in user for Graph API authentication
public async Task<string> GetGraphAccessTokenAsync()
{
var signInUserId = ClaimsPrincipal.Current.FindFirst(ClaimTypes.NameIdentifier).Value;

var clientCredential = new ClientCredential(SettingsHelper.ClientId, SettingsHelper.ClientSecret);
var userIdentifier = new UserIdentifier(userObjectId, UserIdentifierType.UniqueId);
// create auth context
AuthenticationContext authContext = new AuthenticationContext(SettingsHelper.AzureAdAuthority, new ADALTokenCache(signInUserId));
var result = await authContext.AcquireTokenSilentAsync(SettingsHelper.AzureAdGraphResourceURL, clientCredential, userIdentifier);
return result.AccessToken;
}
- Based on your application type (MVC/Webforms), add the CRUD functions in your form/controller class.
- In my ASP.NET forms application, I have added the function call as in Page Load
RegisterAsyncTask(new PageAsyncTask(GetUserFiles));
And definition was
public async Task GetUserFiles(){}
- Implementation for reading the files from OneDrive for business as
var accessToken = await GetGraphAccessTokenAsync();
var restURL = string.Format(“{0}me/drive/root/children”, SettingsHelper.GraphResourceUrl);
try
{
using (HttpClient client = new HttpClient())
{
var accept = “application/json”;
client.DefaultRequestHeaders.Add(“Accept”, accept);
client.DefaultRequestHeaders.Authorization = new AuthenticationHeaderValue(“Bearer”, accessToken);
using (var response = await client.GetAsync(restURL))
{
if (response.IsSuccessStatusCode)
{
var jsonresult = JObject.Parse(await response.Content.ReadAsStringAsync());
string filesInfo = string.Empty;
foreach (var item in jsonresult[“value”])
{
filesInfo = filesInfo + item?[“name”]?.ToString() + Environment.NewLine ;
}
txtOutput.Text = filesInfo;
//lblGraphSuccess.Text = “Successfully request using graph”;
}
}
}
}
catch (Exception el)
{
//Handle Exception your style
}
- Same way you can apply other APIs and build update/delete methods.
This will help you to get started changing your code from individual end points to one unified end point.
Feel free to post comments if you have any question.
For details on implementation differences, you can look at below articles and git repos.
http://graph.microsoft.io/en-us/docs
https://github.com/OfficeDev/O365-ASPNETMVC-Start
https://github.com/microsoftgraph/aspnet-connect-rest-sample
https://dev.office.com/hands-on-labs/1520
Similar Content from ESPC:
 Ashish is a Senior Consultant focusing on the productivity stack with Kloud Solution in Australia. He has “lived” in the SharePoint world from the days of SharePoint 2003. He specialises in delivering enterprise solutions using technology. Ashish is a passionate developer with a zeal for creating innovative solutions using Office 365 & SharePoint. Ashish is an active community contributor through various channels. He has made contributions towards Microsoft-driven open source projects such as PnP. He is an evangelist of Office 365/Office development. He has also presented at International conferences, for example, Collab365.
Follow Ashish on Twitter: @ashuetawah