There are plenty of great articles that show how to use Azure DevOps or GitHub Actions to build and pack a PCF control into a deployable solution. In this post, I wanted to expand on this concept and cover the scenario that builds multiple PCF controls into a solution.
Here is what we are going to cover in this post:
- Discuss the scenario of deploying multiple PCF controls as a single solution
- Prepare the control and solution projects using the Power Apps CLI
- Create and configure the Azure DevOps build pipeline to build the solution
- Create a task group to make the build tasks re-usable across pipelines
- Create and configure the Azure DevOps release pipeline to deploy the solution
Why Pack and Deploy Multiple PCF Controls in a Single Solution?
The usual practice would be to build and package one control per solution to keep the deployment lean and modular so that no unnecessary build needs to happen if no change has occurred. Ideally, I would keep it this way but with the number of PCF controls increasing in our project, it felt necessary to group the controls into a manageable number of solutions that are identifiable and descriptive. Managing controls this way makes the solution act more like a components library. We have one core set of controls that can be deployed to any Power Apps implementation in the organisation, with more feature or project-specific controls that are managed in separate solutions.
There are advantages and disadvantages to using this approach. As we’ve discussed, benefits include a clear top-down view of controls and easier management of solutions. This works well when multiple controls are kept in a single repository and built using a single build pipeline. The disadvantage is that the size of the solutions may grow over time and that all the controls will need to be built and deployed when only one control has changed.
All that said, let’s set up the projects and build some pipelines!
Preparing the the Project Structure
In the scenario with multiple controls kept in one repository, the folder structure I’ve adopted for the PCF control and solution projects is as follows:
<Your Project>.Pcf/
     Controls/
          SampleAControl/
               SampleAControl.pcfproj
               ...
          SampleBControl/
               SampleBControl.pcfproj
               ...
          SampleCControl/
               SampleCControl.pcfproj
               ...
     Solutions/
          Controls/
               PcfControls.cdsproj
               ...
The PcfControls.cdsproj holds the project references of the PCF controls we want to include in the solution. This is done using the pac solution add-reference --path <path> CLI command. For example, we only want to include Sample A and Sample C controls with this particular solution, then the project references would look like:
<?xml version="1.0" encoding="utf-8"?>
<Project ToolsVersion="15.0" DefaultTargets="Build" xmlns="http://schemas.microsoft.com/developer/msbuild/2003">
  ...

  <ItemGroup>
    <ProjectReference Include="..\..\Controls\SampleAControl\SampleAControl.pcfproj" />
    <ProjectReference Include="..\..\Controls\SampleCControl\SampleCControl.pcfproj" />
  </ItemGroup>

  ...
</Project>
Please take note of the above schema as we will iterate these project references later using PowerShell
Create and Configure the Azure DevOps Build Pipeline
Since there are many great posts out there that explains how to set up an Azure DevOps build pipeline for Power Apps/CDS/Dynamics 365, I won’t cover the details of how to get started here. Just a couple of things, I’ll be using the classic editor experience for setting up the pipeline and will be utilising Power DevOps Tools created by Wael Hamze. Finally, whenever I use the acronym, pac, it refers to Power Apps Component.
The initial setup of the build pipeline looks like this:

The following pipeline variables are configured and are made settable at queue time:
| Variable Name | Variable Value | Description |
|---|---|---|
| MSBuildConfiguration | Release | Set as either Debug or Release as value for MSbuild configuration |
| PacSolutionProjectPath | <your source path>/<your project>.Pcf/Solutions/Controls | Path to the solution project folder |
| SolutionVersionMajor | 0 | Major version number to override the previous major version |
| SolutionVersionMinor | 0 | Minor version number to override the previous minor version |
The following variables are configured in a variable group and linked to the pipeline to be used across multiple pipelines. In our case this would be for build and release pipelines:
| Variable Name | Variable Value | Description |
|---|---|---|
| SolutionExtractFolderName | SolutionExtracted | Folder that will hold the extracted solution under $(Build.ArtifactStagingDirectory) |
| SolutionPackedFolderName | SolutionPacked | Folder that will hold the packed solution under $(Build.ArtifactStagingDirectory) |
To make the pipeline as generic as possible, there are three environment variables that are set at runtime – Solution Version Number, Project Name and Solution Name. These will be explained in the next steps when we dive into what each build task does.
Build Task 1 – PowerShell – Set SolutionVersionNumber variable
This task works out the semantic version to set on the control manifests and the solution. It relies on the previous major and minor number set in the solution.xml file located in the solution project. There is an option to override the major and minor versions when the build is queued by setting the $(SolutionVersionMajor) and/or $(SolutionVersionMinor) variables. The build version will be incremented by 1 each build and it will reset to 0 depending on the minor version number. This script creates the $(SolutionVersionNumber) task variable.
Working Directory: $(PacSolutionProjectPath)
Type: Inline
Script:
# === Define variable to hold solution version number ===
Function GetSolutionVersionNumber {
    param (
        [Parameter(Mandatory)][string] $UnpackedSolutionPath,
        [int] $MajorVersionNumber = 0,
        [int] $MinorVersionNumber = 0
    )

    $xml = [xml](Get-Content "$UnpackedSolutionPath\Other\Solution.xml")
    $preVersion = [version]$xml.ImportExportXml.SolutionManifest.Version
    $major = $preVersion.Major
    $minor = $preVersion.Minor
    $build = $preVersion.Build
    if ($MajorVersionNumber -and $MajorVersionNumber -ne 0) { $major = $MajorVersionNumber }
    if ($MinorVersionNumber -and $MinorVersionNumber -ne 0) { $minor = $MinorVersionNumber }
    if ($minor -gt $preVersion.Minor) { $build = 0 } else { $build = $build + 1 }

    return "$major.$minor.$build"
}
$versionNumber = GetSolutionVersionNumber -UnpackedSolutionPath ".\src" -MajorVersionNumber $(SolutionVersionMajor) -MinorVersionNumber $(SolutionVersionMinor)
Write-Host "SolutionVersionNumber = $versionNumber"
Write-Host "##vso[task.setvariable variable=SolutionVersionNumber]$versionNumber"
Build Task 2 – PowerShell – Set ProjectName variable
This task extracts the solution’s project name with the extension with the intention to use it in a later task. This script creates the $(PacSolutionProjectName) task variable.
Working Directory: $(PacSolutionProjectPath)
Type: Inline
Script:
# === Define variable to hold pac solution project name ===
$projectName = Get-ChildItem -Path .\ -Filter *.cdsproj | %{$_.Name}
Write-Host "PacSolutionProjectName = $projectName"
Write-Host "##vso[task.setvariable variable=PacSolutionProjectName]$projectName"
Build Task 3 – PowerShell – Set SolutionName variable
This task extracts the solution name from the solution project name for use in a later task. When the solution is built, it uses the solution project name to name the solution zip. This script creates the $(SolutionName) task variable.
Working Directory: $(PacSolutionProjectPath)
Type: Inline
Script:
# === Define variable to hold solution name ===
$solutionName = "$(PacSolutionProjectName)" -replace ".cdsproj", ""
Write-Host "SolutionName = $solutionName"
Write-Host "##vso[task.setvariable variable=SolutionName]$solutionName"
Build Task 4 – Power DevOps Tool Installer
This task configures the Power DevOps tools/dependencies required by all of the Power Apps/CDS/Dynamics 365 related tasks
Build Task 5 – Power DevOps Set Version – Set Solution Version
This task sets the version of a Power Apps/CDS/Dynamics 365 solution. When the solution project is created using the pac CLI command, the project directory gets initialised with a src folder. This folder contains an Other folder that holds the Solution.xml file within which we can set the solution version.
Target: Unpacked Solution Customizations
Unpacked Files Folder: $(PacSolutionProjectPath)/src
Version Number: $(SolutionVersionNumber)
Build Task 6 – PowerShell – Iterate npm install for controls
This task iterates all the project references configured in the solution project and runs the npm command to install the package dependencies for each of the control projects. By using the –prefix option, npm will create a node_modules folder at each control project level.
Working Directory: $(PacSolutionProjectPath)
Type: Inline
Script:
Function GetControlProjectReferences {
    param (
        [Parameter(Mandatory)][string] $ProjectFilePath
    )

    $xml = [xml](Get-Content $ProjectFilePath)
    $ns = new-object Xml.XmlNamespaceManager $xml.NameTable
    $ns.AddNamespace("d", "http://schemas.microsoft.com/developer/msbuild/2003")
    return $xml.SelectNodes("/d:Project/d:ItemGroup/d:ProjectReference", $ns) | select-object -expand Include
}
$projectReferences = GetControlProjectReferences -ProjectFilePath $(PacSolutionProjectName)
foreach($reference in $projectReferences) {
    $fullPath = [System.IO.Path]::GetFullPath($reference)
    $dirName = [System.IO.Path]::GetDirectoryName($fullPath)

    npm ci $dirName --prefix $dirName
}
Please note that we are using npm ci command and not npm install command. This is a very important distinction because the ci command relies on the package-lock.json file to be present which will allow more reliable builds. I have tried using the npm install command here and it will consistently fail if you have more than one control due to how dependency trees are built and the pesky fsevent npm package! I'll cover this later in the troubleshoot section if anyone is interested.
Build Task 7 – MSBuild – Build Controls Solutions
This task builds the solution project. Here we utilise the $(MSBuildConfiguration) task variable to determine the build configuration, release or debug. Make sure to set the value to release to optimise the control bundle size.
Project: $(PacSolutionProjectPath)/$(PacSolutionProjectName)
MSBuild Arguments: /t:build /restore /p:configuration=$(MSBuildConfiguration)
Build Task 8 – Power DevOps Extract Solution – Extract Solution
This task unpacks the Power Apps/CDS/Dynamics 365 Solution zip into a target folder.
Unpacked Files Folder: $(Build.ArtifactStagingDirectory)/$(SolutionExtractFolderName)
Package Type: Both
Solution File: $(PacSolutionProjectPath)/bin/$(MSBuildConfiguration)/$(SolutionName).zip
Build Task 9 – PowerShell – Set Control Versions
This task iterates through all the control manifest files that have been unpacked and sets the version number for each control.
Type: Inline
Script:
Function UpdateManifestControlVersionNumber {
    param (
        [Parameter(Mandatory)][string] $ManifestFilePath,
        [Parameter(Mandatory)][string] $VersionNumber
    )
    $xml = [xml](Get-Content $manifestFilePath)
    $xml.SelectSingleNode("/manifest/control").version = $versionNumber
    $xml.Save($manifestFilePath)
}
$files = Get-ChildItem -Path "$(Build.ArtifactStagingDirectory)/$(SolutionExtractFolderName)/Controls" -Filter ControlManifest.xml -Recurse
foreach($file in $files) {
    UpdateManifestControlVersionNumber -ManifestFilePath $file.FullName -VersionNumber "$(SolutionVersionNumber)"
}
Build Task 10 – Power DevOps Pack Solution – Pack Solution

Unpacked Files Folder: $(Build.ArtifactStagingDirectory)/$(SolutionExtractFolderName)
Package Type: Both
Output Path: $(Build.ArtifactStagingDirectory)/$(SolutionPackedFolderName)
Build Task 11 – PowerShell – Commit to Repository
This task commits and pushes the version change made to the solution project file to the source repository.
Build Task 12 – Publish build artifacts- Publish Artifact: drop
This task publishes all the build artifacts, in our case the unpacked solution files and solution zip file, to a location where the release pipelines can pick it up.
Path to publish: $(Build.ArtifactStagingDirectory)
Artifact name: drop
Artifact publish location: Azure Pipelines
OK, if you have got this far that’s great! We are going to make these tasks more reusable by creating a task group.
Let’s Create a Task Group to Make the Build Tasks Reusable!
In my prescribed scenario, there will be more than one solution built to represent multiple libraries of PCF controls. In most cases, the source is kept in different repositories and it would be inefficient to repeat and re-create the above tasks for each setup of the build pipeline. To make these tasks reusable, we can create a task group.
Note: this would be useful for any number of tasks that are reused in your other Power Apps/CDS/Dynamics 365 pipelines.
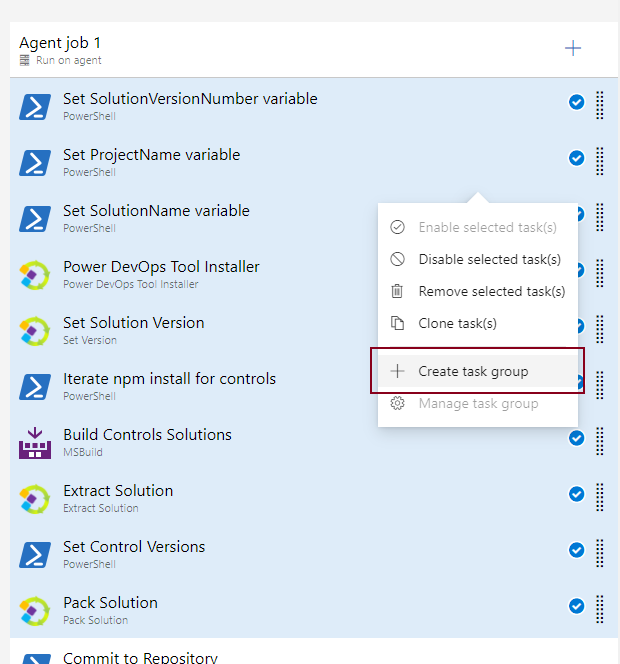
Identify the reusable tasks and select them to create a task group:
In the Create task group dialog, populate the following default values matching the parameter name in the format $(<parameter name>):
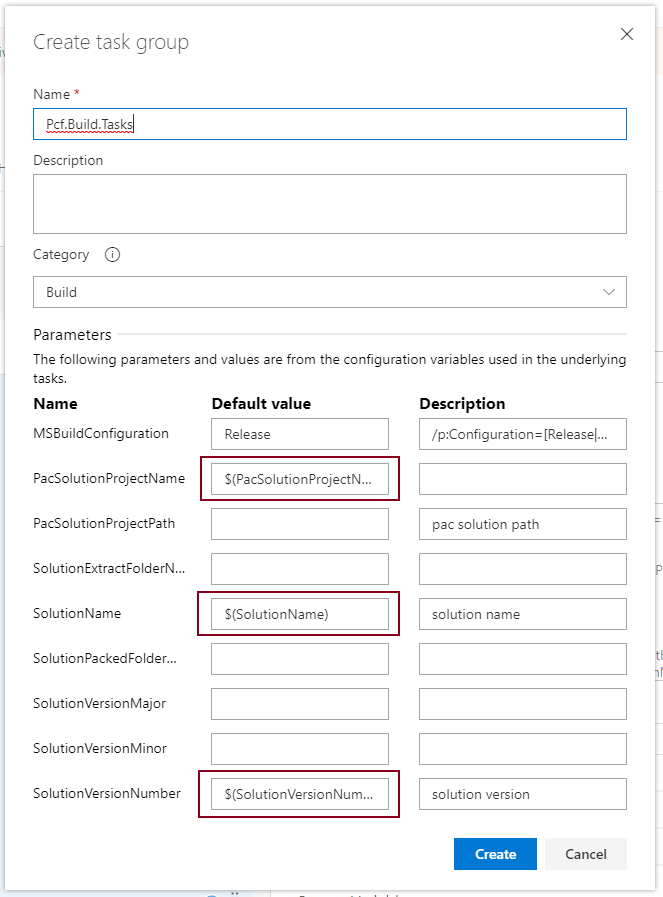
Regardless of whether they are created at runtime or not, all task variables are exposed as parameters to the task group. Currently, there is no way to hide these “internal” variable parameters or make them not mandatory without tweaking the exported task group JSON and re-importing it. To avoid having to set these “internal” variables later, we populate the default value with the actual variable name. This way there will be no uncertainty to what is required when using them in the other pipelines.
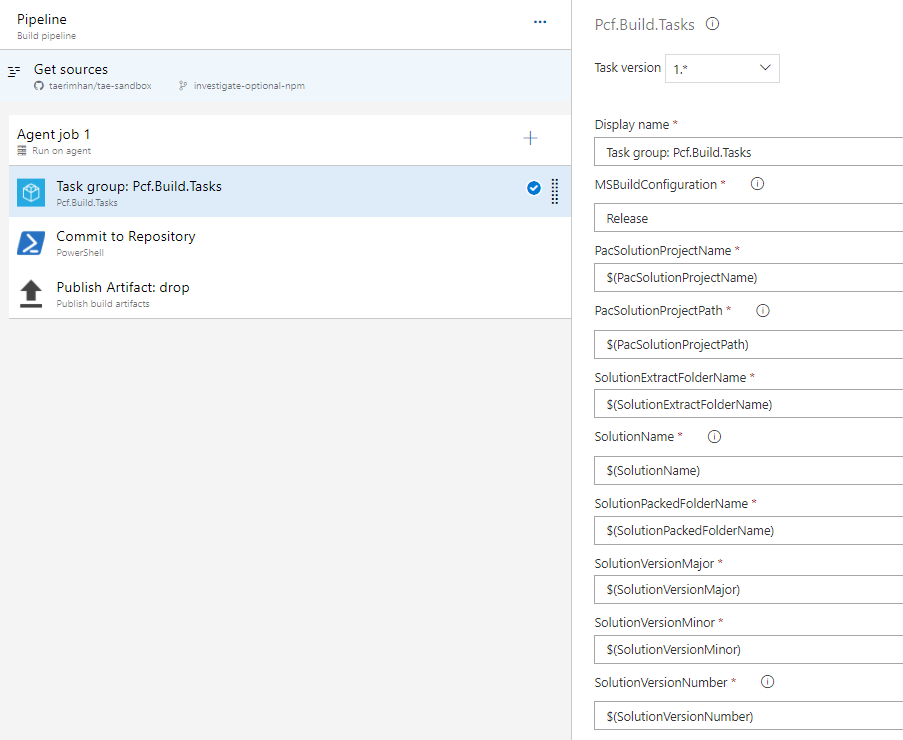
Configure the task group and save:
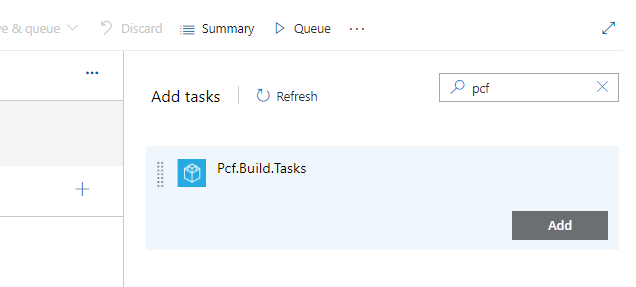
If you want to use this in another pipeline, you can easily find the task group using the search when adding tasks to the pipeline:
Finally… Create and Configure the Azure DevOps Release Pipeline
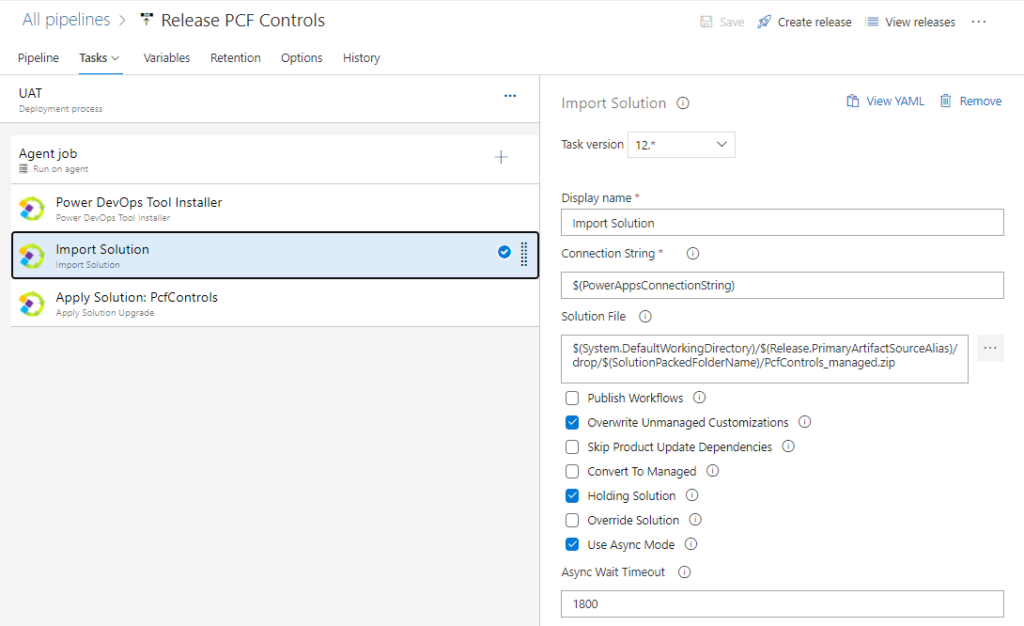
This section is pretty straightforward, so I won’t go into detail. I’m linking the variable groups to the release pipeline to locate the packed solution by the variable name. Afterwards, I deploy the managed solution and then upgrade the solution as part of the release.
A Little Troubleshooting
For any curious and investigative minds, I ran into a very peculiar error when iterating the control projects to install the npm packages. From my investigation, the issue is manifold but originates from the fsevents npm package. This package is required as one of the dependencies of the pcf-start npm package. This should be an optional dependency but causes an error when npm install is run multiple times. I’ve tried npm install --no-optional and also tried declaring the optionalDependencies in the package.json but it didn’t work.
The only reliable way was to use the npm ci command with a package-lock.json file if the fsevents major version is ^2 or use npm ci command with optionalDependencies if the major version is ^1. Bit of a caveat when using the npm ci with the optionalDependencies, if the fsevents version in the package.json differs to what is in the package-lock.json file it will throw an error and quit the process.
Usually, the easiest way to resolve this without depending on the optionalDepedencies is to upgrade the npm packages so that fsevents is ^2 in the package-lock.json file.
Please let me know if you have come across the same issue. I would love to clarify and iron out my assumptions as I could be completely wrong!
Hope you enjoyed the post, let me know your thoughts in the comments below or any of my contact channels

For more great content, check out the Resource Centre
About the Author:
Hi, my name is Tae Rim Han, but most people know me as Tae. I’ve worked with Microsoft Technology for more than a decade as a developer and consultant. I am currently living and working in Sydney, Australia. I love coding, working through hard problems and creating elegant solutions. In a nutshell, I’m passionate about learning, both tech and non-tech things.
My tech journey has been fascinating so far where there has never been a dull moment! That is why I decided to start a developer journal to write down things that I’ve learnt along the way and share it with others who are also passionate about what they do.
In my spare time I love spending time with my husband, drawing, cooking, bush walking and reading. Feel free to connect with me on LinkedIn.
Reference:
Han Rim, T. (2020). Using Azure DevOps to Build and Deploy Multiple PCF Controls. Available at: https://taerimhan.com/using-azure-devops-to-build-and-deploy-multiple-pcf-controls/ [Accessed: 22nd January 2021].