Managing PDF workflows is usually tricky. Documents can arrive in multiple file formats, and they might require processing, updating SharePoint columns, and converting to PDF for long-term archiving. Even if you have traditional tools at hand, one document can take up to 10 minutes to process. But what if you receive dozens or even hundreds of these kinds of documents daily?
This blog will tell you how to easily automate сomplex PDF workflows using Muhimbi and Aquaforest Power Automate connectors.
A Sample Workflow
Let’s first review a sample workflow. Assume you’re dealing with an invoice template, and your customers send you invoices daily using the same document template. This template includes:
- Customer name
- Business address
- Product or service name
- Product ID
- Price
- Product barcode
Typically, you’d have to open the document, copy all the information, and paste it to the corresponding SharePoint columns. Then, you’d convert the invoice to PDF and archive it for future records.
With Aquaforest and Muhimbi Power Automate connectors, you can create and automate the entire workflow in minutes.
Configuring the Power Automate Process
The process of setting up a new workflow is straightforward:
- Set up a trigger to execute automation. It can be any new document arriving in a designated SharePoint folder.
- Automate getting the file content by setting the Identifier (an output of your previously set trigger).
- Use Muhimbi’s Convert action to convert the document to a PDF.
- Then, use Aquaforest’s Get barcode value action to set up extracting the barcode data from the PDF document.
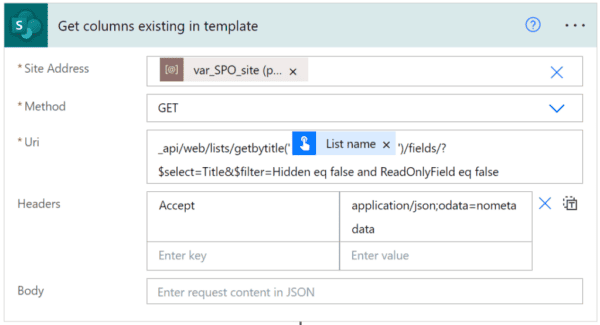
- Next, set Aquaforest’s Get data from PDF action. Indicate the names of the SharePoint columns you want to update with the PDF data. Aquaforest will intelligently look into the PDF document and extract all the values corresponding to the SharePoint column titles.
- Apply security permissions to your document by configuring Muhimbi’s Secure document action. This will allow you to set multiple restrictions, including printing, annotating, and document disassembling.
- Configure SharePoint’s Create file action to automate creating a new PDF with all the security permissions you set in the previous step.
- Use SharePoint’s Update file properties action and set the Processed field to yes so that the new document, when uploaded, won’t trigger the same flow and cause an infinite cycle.
- Finally, set up SharePoint’s Move file. This will automate moving the processed file to the SharePoint folder of your choice.
Once configured, this flow will be automatically executed every time a new invoice pops up in the designated SharePoint folder. Easy, right?
Moreover, Muhimbi and Aquaforest connectors work seamlessly with Dropbox or OneDrive, so you can use them with documents stored in these popular cloud storage solutions.
Muhimbi PDF Converter works well with almost any popular document format. Word, Excel, InfoPath, SharePoint pages, CAD images, HTML pages, and emails can be easily converted to high-fidelity PDFs as part of your automated flow.
Making Image-Based PDFs Searchable Using OCR

If you’re required to comply with industry regulations, this becomes a notable issue — especially considering that some 20 percent of business documents aren’t fully searchable and won’t be found by SharePoint or Office 365 compliance search.
Luckily, OCR (optical character recognition) technology comes to the rescue.
Let’s see how Aquaforest Searchlight for SharePoint can automate making image-based PDFs searchable for your entire PDF library:
- First, connect your SharePoint Site Collection, Site, or Library to Aquaforest Searchlight.
- Set which types of PDFs you want to make searchable. You can apply Searchlight to TIFF, BMP, JPEG, and PNG image files. Plus, you can choose between regular, image-based, and partially searchable PDF documents.
- Set the Archiving and OCR setting to ensure that OCRed documents match your requirements and are archived to the correct SharePoint repository.
- Schedule a time for Searchlight to perform its operations.
OCR is a game changer for enterprises with hundreds of thousands of PDF documents in their archives. Not only can Searchlight be run on a schedule, but it also generates reports to provide updates on which percent of your PDF library is searchable.
Wrapping Up
If you’re interested in learning more, please watch the recording of our recent webinar that features the work of both solutions in more detail.
Find more great free content at the Resource Center.