Do you have a PowerShell GUI that needs to accept text input? Maybe you want to be able to copy and paste a list of computers, ip addresses, user names or some other data. I will show you how to add a text box into your PowerShell GUI to handle that input. If you haven’t created a PowerShell GUI yet but are interested in doing so, check out my previous post on how to make a simple GUI.
Code
Let’s start breaking down the sections of code needed to make this happen. I like to put the input box code inside of a function, but you may decide you don’t want to do that. To see the entire code, look at my GitHub.
The first thing we need to do is create the form via the .NET windows forms namespace. Here we specify the text that we want in the title of the window, as well as what size we want it to be. Some optional settings are to have the window start in the center of the screen, preventing resize of the window and putting the window on top of other open windows.
### Creating the form with the Windows forms namespace
Add-Type -AssemblyName System.Windows.Forms
Add-Type -AssemblyName System.Drawing
$form = New-Object System.Windows.Forms.Form
$form.Text = 'Enter the appropriate information' ### Text to be displayed in the title
$form.Size = New-Object System.Drawing.Size(310,625) ### Size of the window
$form.StartPosition = 'CenterScreen'  ### Optional - specifies where the window should start
$form.FormBorderStyle = [System.Windows.Forms.FormBorderStyle]::FixedToolWindow  ### Optional - prevents resize of the window
$form.Topmost = $true  ### Optional - Opens on top of other windows
Next, we will add an OK button to the bottom of the window. Once the data has been inputted, the user will hit the OK button to pass the input into the next step of the GUI.
### Adding an OK button to the text box window
$OKButton = New-Object System.Windows.Forms.Button
$OKButton.Location = New-Object System.Drawing.Point(155,550) ### Location of where the button will be
$OKButton.Size = New-Object System.Drawing.Size(75,23) ### Size of the button
$OKButton.Text = 'OK' ### Text inside the button
$OKButton.DialogResult = [System.Windows.Forms.DialogResult]::OK
$form.AcceptButton = $OKButton
$form.Controls.Add($OKButton)
Then we will add a cancel button in case the user decides against running the GUI.
### Adding a Cancel button to the text box window
$CancelButton = New-Object System.Windows.Forms.Button
$CancelButton.Location = New-Object System.Drawing.Point(70,550) ### Location of where the button will be
$CancelButton.Size = New-Object System.Drawing.Size(75,23) ### Size of the button
$CancelButton.Text = 'Cancel' ### Text inside the button
$CancelButton.DialogResult = [System.Windows.Forms.DialogResult]::Cancel
$form.CancelButton = $CancelButton
$form.Controls.Add($CancelButton)
In order to avoid confusion and help the user understand what type of data to input, we are going to add a label. This label will be defined by the parameter used when the function is called. If you want to hard code the label text, just replace the $Input_Type with the text that you want displayed.
### Putting a label above the text box
$label = New-Object System.Windows.Forms.Label
$label.Location = New-Object System.Drawing.Point(10,10) ### Location of where the label will be
$label.AutoSize = $True
$Font = New-Object System.Drawing.Font("Arial",12,[System.Drawing.FontStyle]::Bold) ### Formatting text for the label
$label.Font = $Font
$label.Text = $Input_Type ### Text of label, defined by the parameter that was used when the function is called
$label.ForeColor = 'Red' ### Color of the label text
$form.Controls.Add($label)
The last piece of the GUI window is the text box that will be used to accept inputted text.
### Inserting the text box that will accept input
$textBox = New-Object System.Windows.Forms.TextBox
$textBox.Location = New-Object System.Drawing.Point(10,40) ### Location of the text box
$textBox.Size = New-Object System.Drawing.Size(275,500) ### Size of the text box
$textBox.Multiline = $true ### Allows multiple lines of data
$textbox.AcceptsReturn = $true ### By hitting enter it creates a new line
$textBox.ScrollBars = "Vertical" ### Allows for a vertical scroll bar if the list of text is too big for the window
$form.Controls.Add($textBox)
Putting together the finishing touches so that it all works together and cleans up the inputted data.
$form.Add_Shown({$textBox.Select()}) ### Activates the form and sets the focus on it
$result = $form.ShowDialog() ### Displays the form

### If the OK button is selected do the following
if ($result -eq [System.Windows.Forms.DialogResult]::OK)
{
    ### Removing all the spaces and extra lines
    $x = $textBox.Lines | Where{$_} | ForEach{ $_.Trim() }
    ### Putting the array together
    $array = @()
    ### Putting each entry into array as individual objects
    $array = $x -split "`r`n"
    ### Sending back the results while taking out empty objects
    Return $array | Where-Object {$_ -ne ''}
}

### If the cancel button is selected do the following
if ($result -eq [System.Windows.Forms.DialogResult]::Cancel)
{
    Write-Host "User Canceled" -BackgroundColor Red -ForegroundColor White
    Write-Host "Press any key to exit..."
    $Host.UI.RawUI.ReadKey("NoEcho,IncludeKeyDown")
    Exit
}
Calling the Text Box
Now that the code to create the GUI text box is finished, we need to call the text box and return the inputted data. I will share a few examples of how to utilize the text box we just created. The below examples are assuming that you’ve put the text box inside of a function with the use of a parameter.
| 1 | Function GUI_TextBox ($Input_Type){...} |

###############################################################################
### Computer Name(s) example of how to utilize the GUI_TextBox function
###############################################################################
$Computers = GUI_TextBox "Computer Names(s):" ### Calls the text box function with a parameter and puts returned input in variable
$Computer_Count = $Computers | Measure-Object | % {$_.Count} ### Measures how many objects were inputted

If ($Computer_Count -eq 0){ ### If the count returns 0 it will throw and error
    Write-Host "Nothing was inputed..." -BackgroundColor Red -ForegroundColor White
    Return
}
Else { ### If there was actual data returned in the input, the script will continue
    Write-Host "Number of computers entered:" $Computer_Count -BackgroundColor Cyan -ForegroundColor Black
    $Computers
    ### Here is where you would put your specific code to take action on those computers inputted
}
Here is an example of how to use the text box to accept a list of users. This example will just output the list of users inputted to screen. In order to make this useful you will need to add your code to have the script take action on those user. Maybe you need to disable their Active Directory accounts or any number of admin actions.
### Adding an OK button to the text box window
$OKButton = New-Object System.Windows.Forms.Button
$OKButton.Location = New-Object System.Drawing.Point(155,550) ### Location of where the button will be
$OKButton.Size = New-Object System.Drawing.Size(75,23) ### Size of the button
$OKButton.Text = 'OK' ### Text inside the button
$OKButton.DialogResult = [System.Windows.Forms.DialogResult]::OK
$form.AcceptButton = $OKButton
$form.Controls.Add($OKButton)
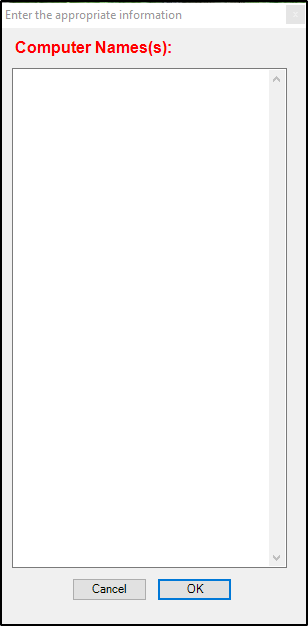
Text Box in Action
When you are done, you should have something that looks like this:
That’s it for now, thanks for reading!
About the Author:
My name is Nick, and I have been in the technology sector since 2005. The goal here is to share some of the knowledge and skills I have learned along the way. Enjoy!
Reference:
Richardson, N. (2020). Create a Text Box to Accept User Input for PowerShell GUI. Available at: https://spiderzebra.com/2020/06/17/create-a-text-box-to-accept-user-input-for-powershell-gui/ [Accessed: 2nd February 2021].