I’ve always been quite impatient with the progress of technology. In the year 2020, if I’m honest I thought we’d be way further ahead than we are right now. I didn’t expect to be enlisting in Starfleet that’s for sure, but I thought that I might at least have a working hoverboard and a flying car powered by Mr Fusion.
Now, before anyone retorts, “but there are hover boards”, don’t try and sell me that rubbish. They’ve got wheels for heavens sake. And don’t even get me started on “wireless charging”, you can’t actually use your phone when it’s sat on a pad, but you can happily do so with a wire sticking out of it. It’s 2020, where is my power over Wi-Fi??
So what is the point of this rant I hear you ask? Well, I got thinking about this when I was asked what I knew about Bots. The honest answer was not much. I’d seen that there were Bots available in Teams, and if I’m honest I thought “this is just a modern day clippy”. People of a certain age will remember him. “It looks like you’re writing a letter” anyone?
But, in the spirit of learning new things, I decided to find out more. So, without any more delay, let’s find out more about Bots.
What is a Bot?
In the simplest terms, a Bot is a tool used for conversational search. It is a form of Artificial Intelligence which can be trained to respond to user questions. The most common of these is a chat bot, but there are other types as well such as echo bots. For the purposes of this blog post, we will focus on chat bots, and although a bot can function across many platforms and interfaces, we will concentrate on bots within Microsoft Teams.
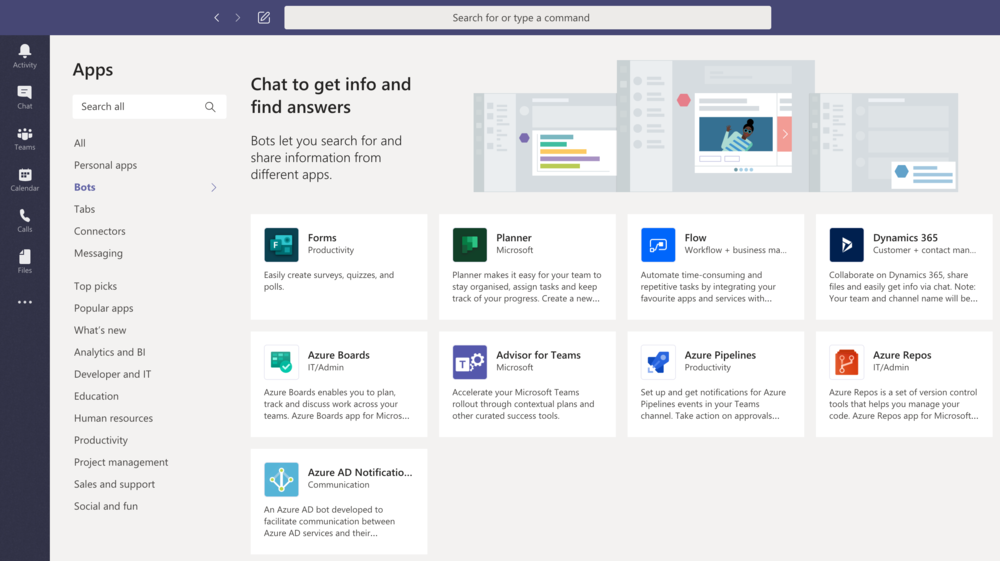
There are many Bots already available within Microsoft Teams, and if you allow them in your organisation, your users will be able to find them and use them quite easily.
Just click on Apps, then choose Bots, and you will see some native Microsoft Bots that you can add, and you can also search for and add third-party Bots.
But what if you want to create and add your own custom Bot? Well, you can do that too (Teams Admin settings permitting of course). Wouldn’t it be tremendously difficult and complex to do such a thing though? Would I not need to be a developer and a master of coding wizardry. Well, it turns out not. Let’s take a look at how anyone without coding experience can create a simple chat bot and add it into Microsoft Teams.
Creating a Chat Bot and adding to Teams
In researching this article, I found that there are a number of different ways that you can do this. Many methods were over complex and frustrating to someone like me who is by no means a coder. The following method is really nice and simple and very “non coder” friendly. So how do we do this?
In order to create our simple Bot, we will need administrative access to Microsoft Azure, and a Teams Administrator role.
Now that we have everything that we need, we can get started.
Step 1 – Create a Knowledge Base
Our chat bot will need a knowledge base to store its possible question and answer sets. We can create a knowledge base from the Microsoft QnA Maker website at https://qnamaker.ai.
Login with your Azure administrator credentials, and you will be taken to the My knowledge bases screen as shown below. You can see that in my QnA Maker, I already have an existing knowledge base setup.

To create a new knowledge base, we need to complete the following steps;
1). Click on Create a knowledge base from the top bar, then select Create a QnA service.
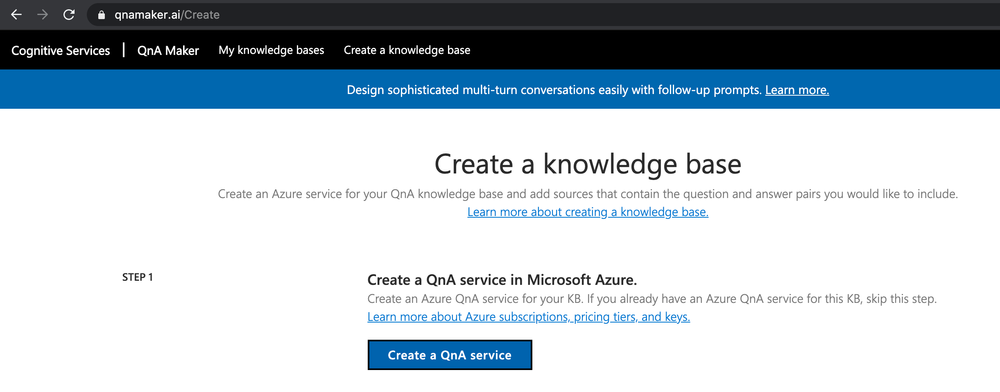
2). Fill in the details to create your service as shown below. You will need to give your service a Name, choose valid Azure Subscription, Resource Group, and Pricing Tier as shown in the following image;

3). Scroll down, and complete the final field choices, then click Create.

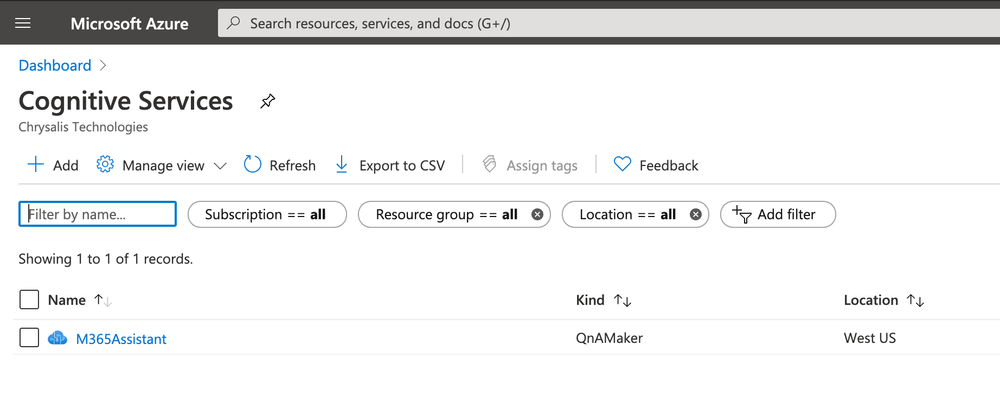
4). You will be taken in to the Cognitive Services page where you will see that your Knowledge base has been successfully created as shown below.
5). Now we need to start planning our Bot. To do this, we need to navigate tohttp://dev.botframework.com/bots/newand this will take us to the following page.
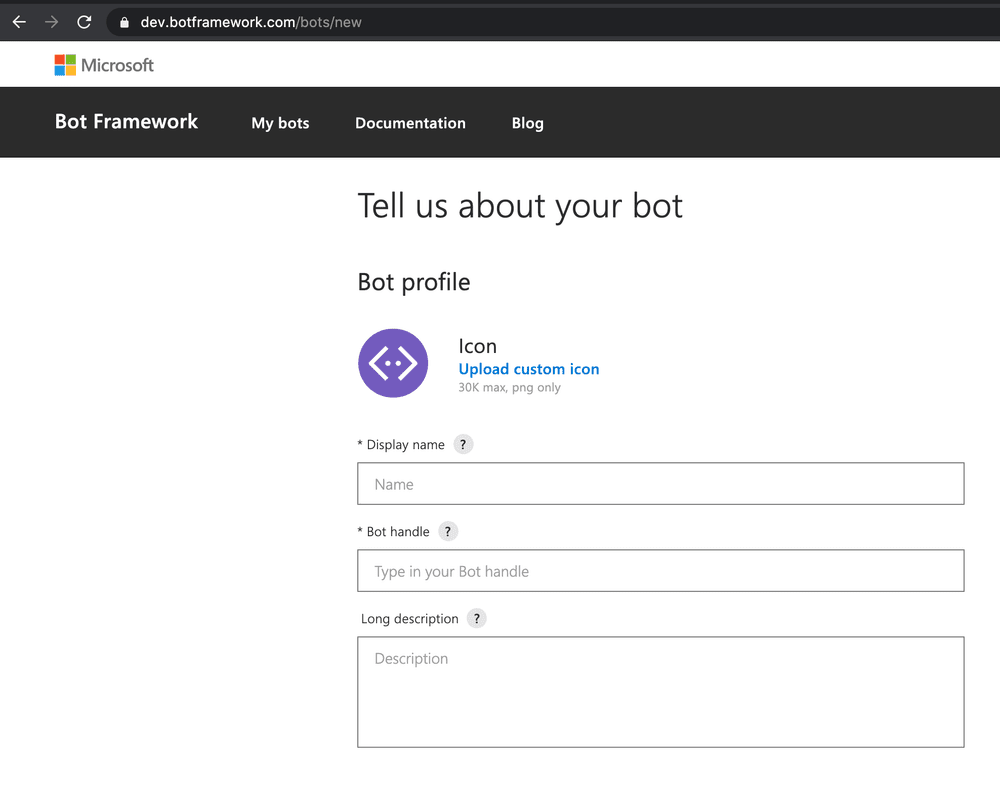
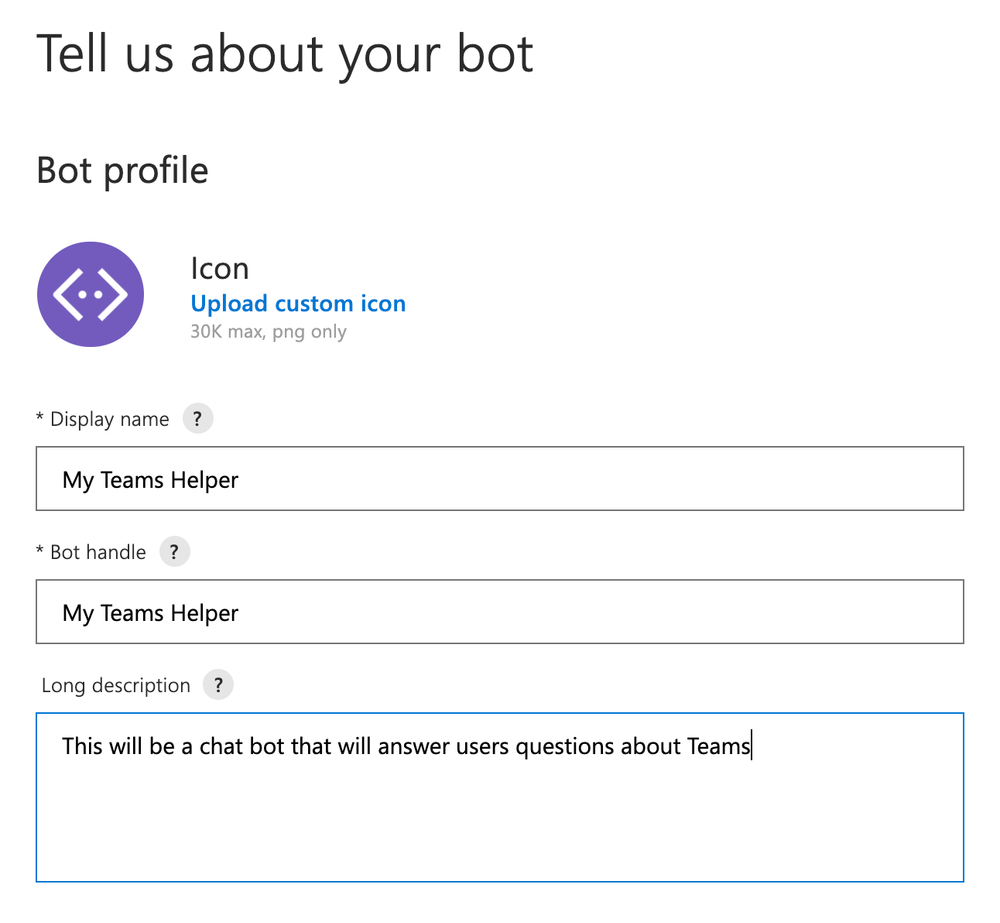
6). I’ve decided that the purpose of my simple chat bot will be to answer users questions about Microsoft Teams, so I have named my bot as shown below.
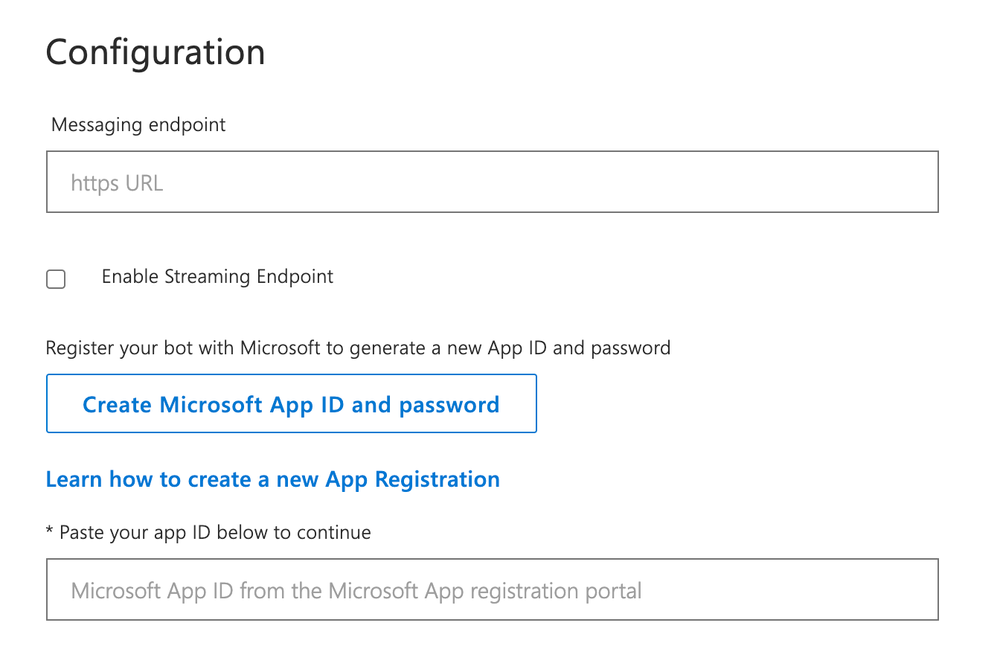
7). Scroll down, ignore the Messaging endpoint field, and click on Create Microsoft App ID and password.
8). This takes us to the App registrations page as shown below.
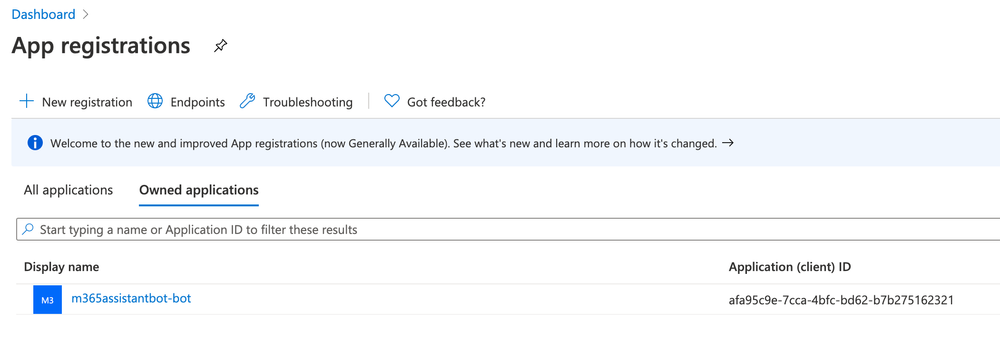
9). Click on New registration, and you will be taken to the Register an application page. I have named my application My Teams helper and chosen to deploy it to all users in my tenant.
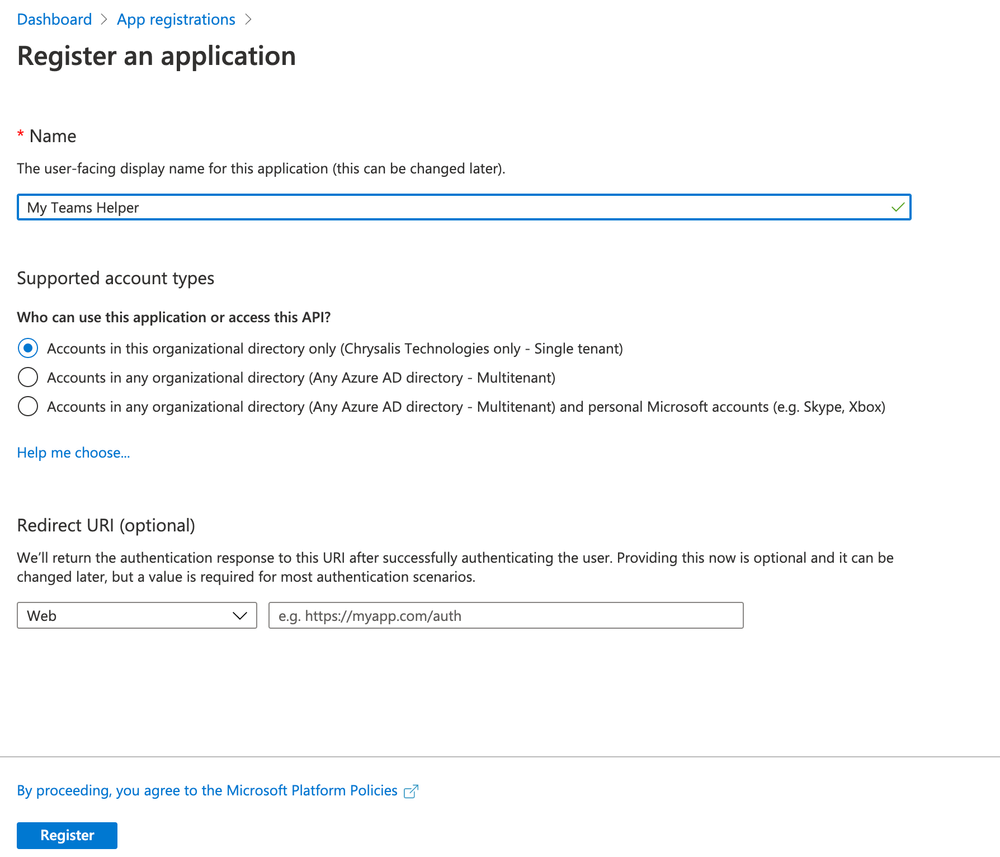
10). Click Register. The app is registered and the required ID’s are generated.
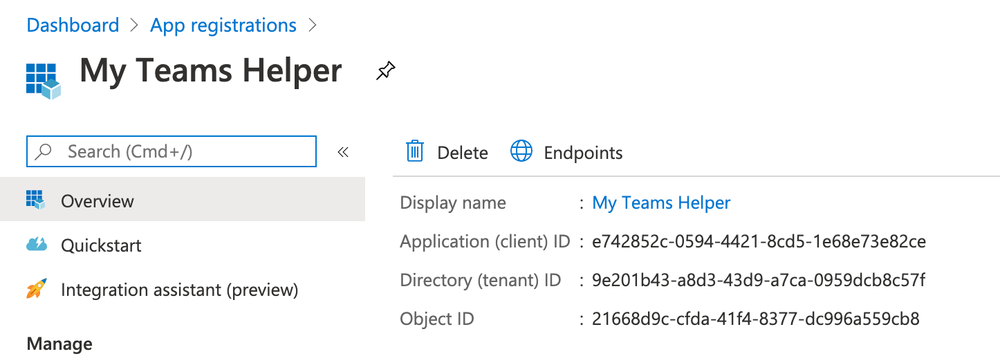
11). Back in our bot creation screen in the QnA Maker, we need to paste in the App ID which was created in the previous step, as shown below.
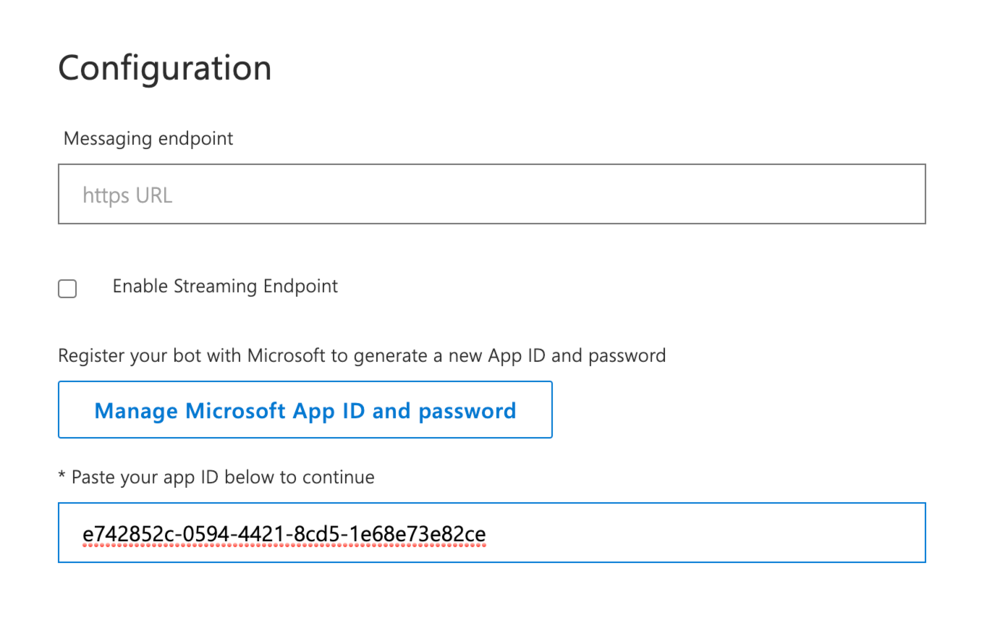
12). Scroll down the bot creation page further and you will see the Analytics section. I have left this blank.

13). Enter the email address of the user you wish to be the owner of the bot (most likely yourself), Click the checkbox to agree to the terms, and then click Register.

14). You should now see the Bot created message as shown below.

15). Now we need to connect our QnA service to our KB. Fill in the details as required. You will need to connect to your Azure Directory ID, choose your subscription, QnA service, and preferred language.
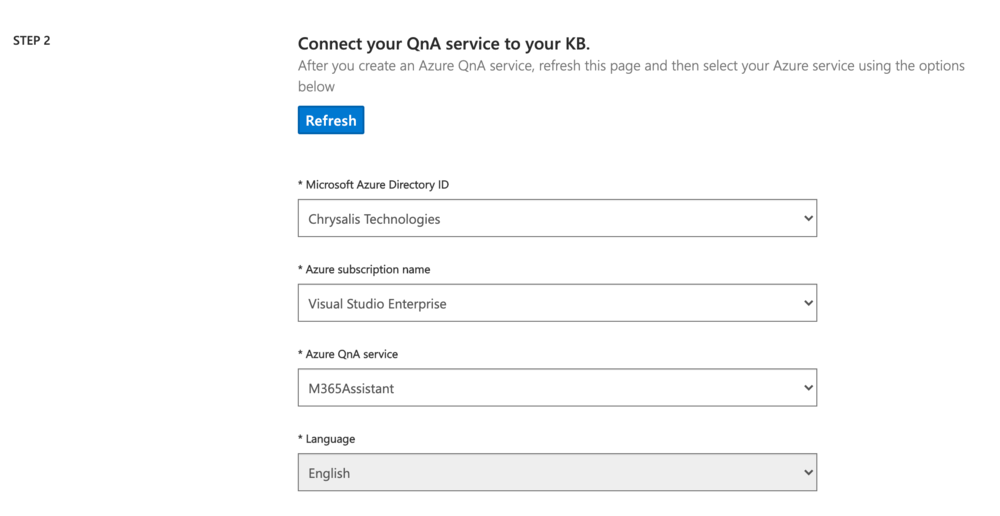
16). Next, enter a name for your KB as shown below.

17). Now we need to populate our KB with some content, from which the questions and answers for the bot will be formed. This is done by adding in relevant URL’s.
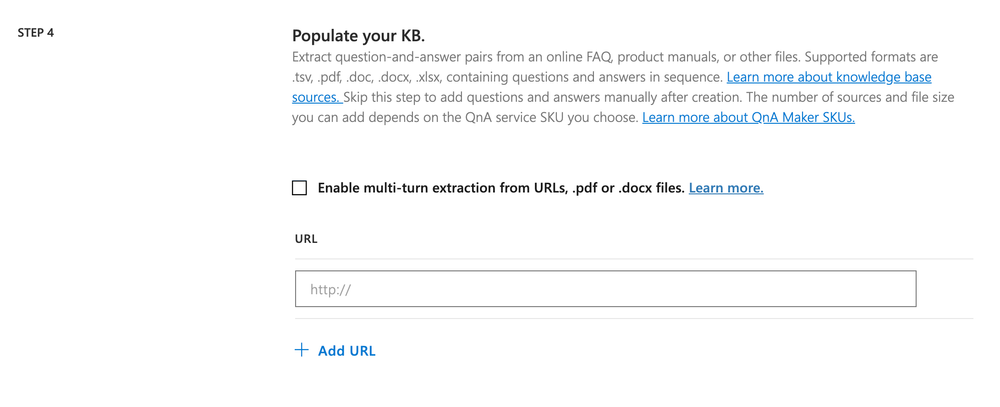
18). As my bot is intended to provide conversational help to my users about Microsoft Teams, I have added in a URL. with content that will be relevant to such queries.

19). Scrolling down, you can also add files, I have chosen not to for this example. Additionally, you can set the Chit-chat mode for your bot. I have been boring and opted for Professional.
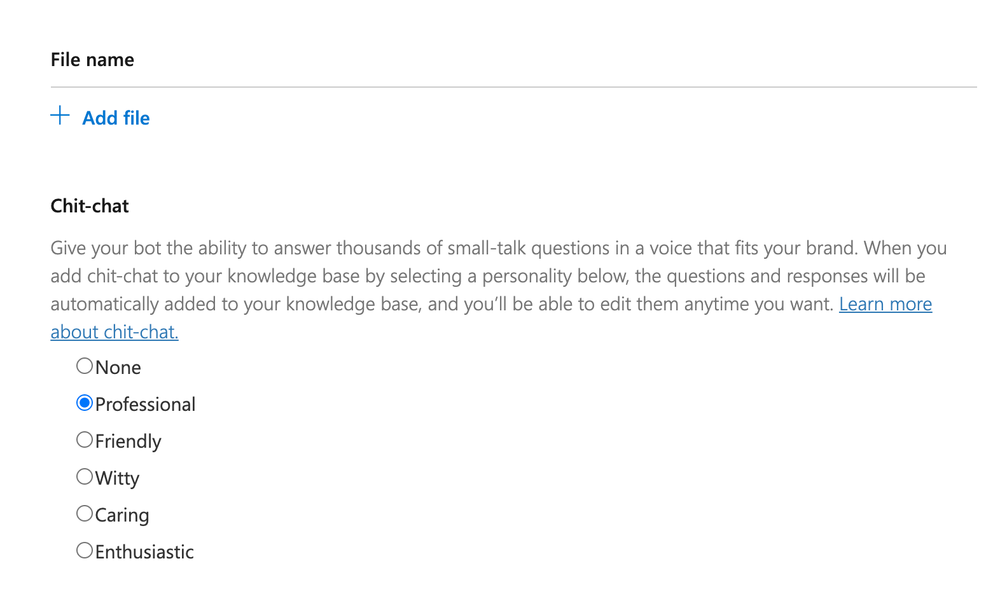
20). We have now completed all of the required inputs within the QnA Maker. To complete the creation, choose Create your KB.

21). The KB will be created and you will see the following while you wait for it to complete.

22). The Knowledge base is created and displayed as shown below. You can see here that the content from the URL that we entered has been split into logical question and answer segments.

23). We can add alternative phrasing to the Question and Answer sets, In the example below, I have added “What is Microsoft 365?” as a question to the first Q&A pairing.

24). When you are happy with your Q&A sets, click on Save and train.

25). Now we can test our KB. I’ve asked the question that I entered as alternative phrasing, and the KB has responded with the correct answer.

26). Now that we have verified that our KB works, we can proceed to publish it by clicking on Publish.

27). We can see that our service has been successfully created.
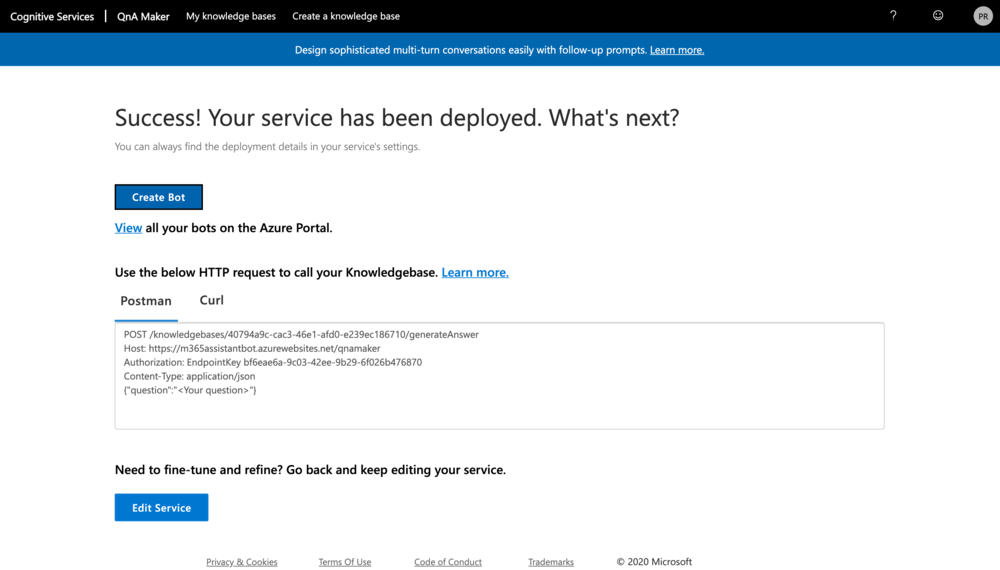
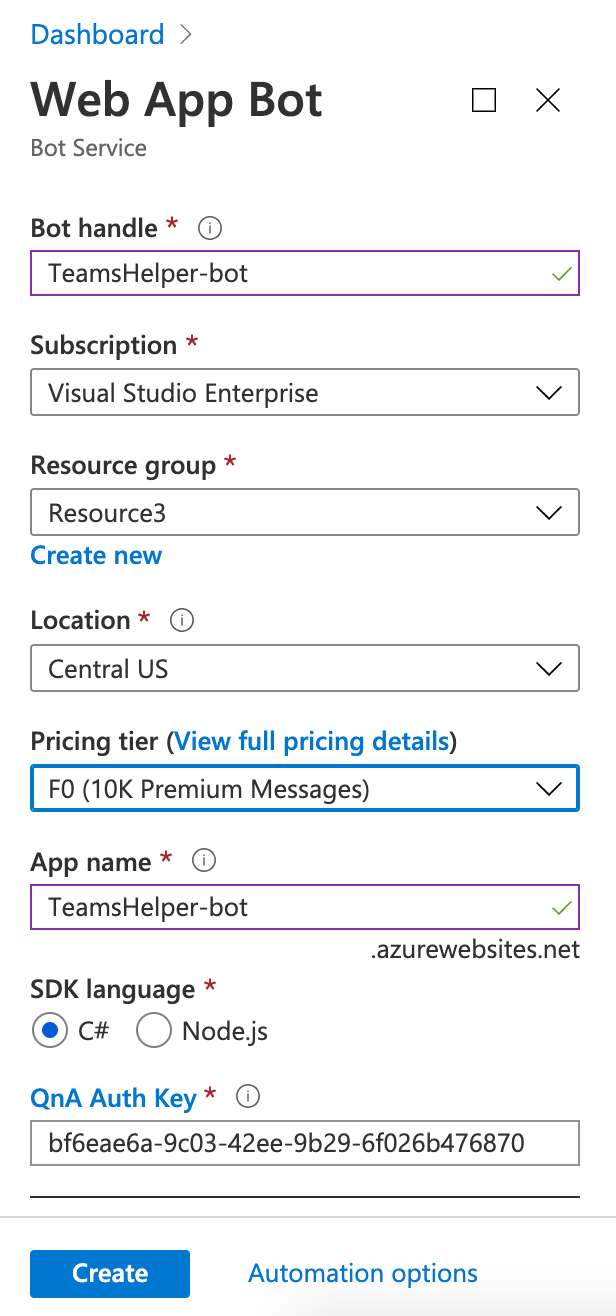
28), Now that we have successfully created our KB and published it, we need to create our Bot. Click on Create Bot and you will see the following. The information required for the Bot is pre-populated for you here. The only thing I have changed here is the pricing tier, which I have changed to the free option. When you are happy with the selections, click Create.

30). Click on your Bot and you will see all of the details and settings as below.

31). We want to connect our Bot and KB. to Microsoft Teams. To do this, we need to click on the Channels section within Bot management.

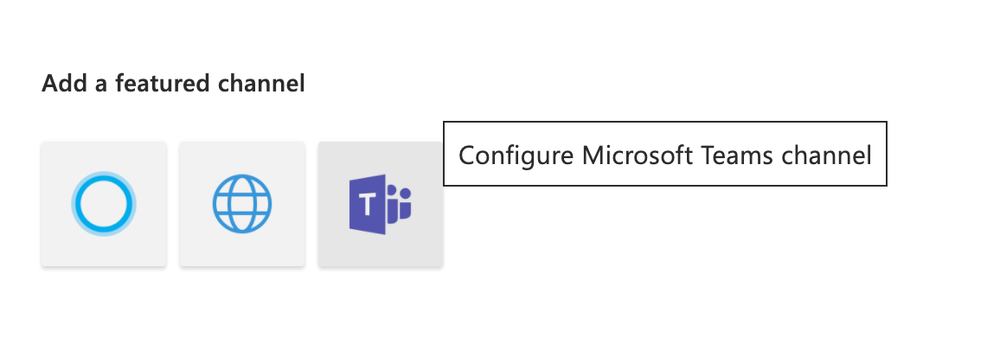
32). From the Add a featured channel section, choose the Teams logo to Configure Microsoft Teams channel.
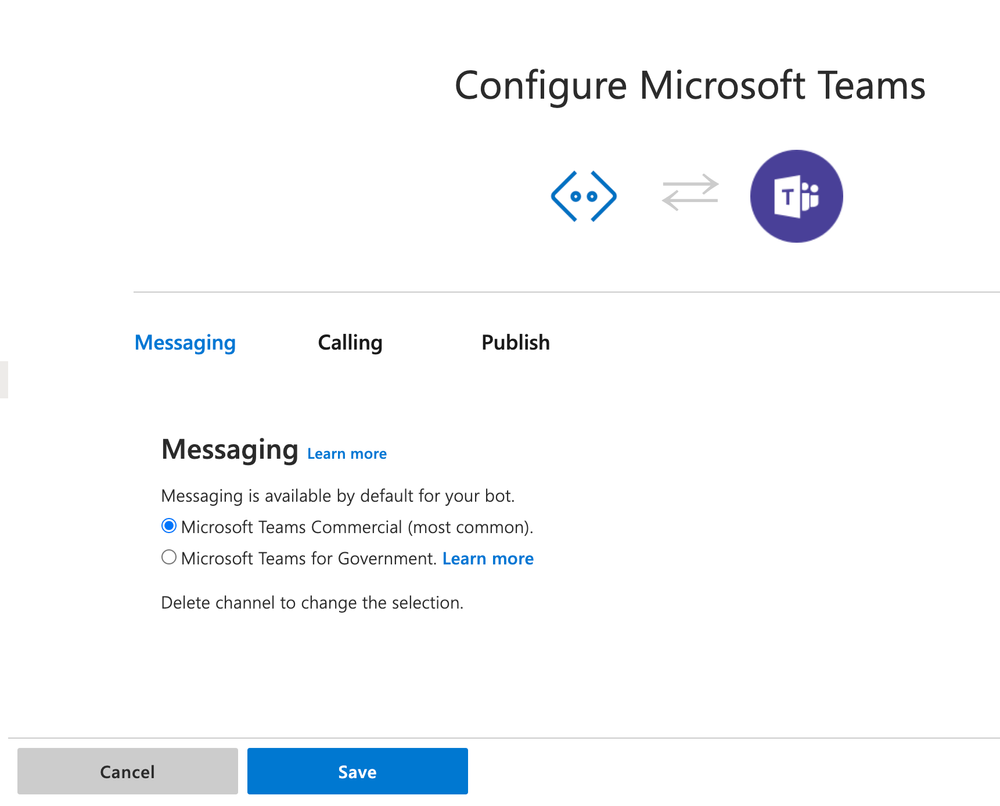
33). Select Microsoft Teams Commercial, and click Save.
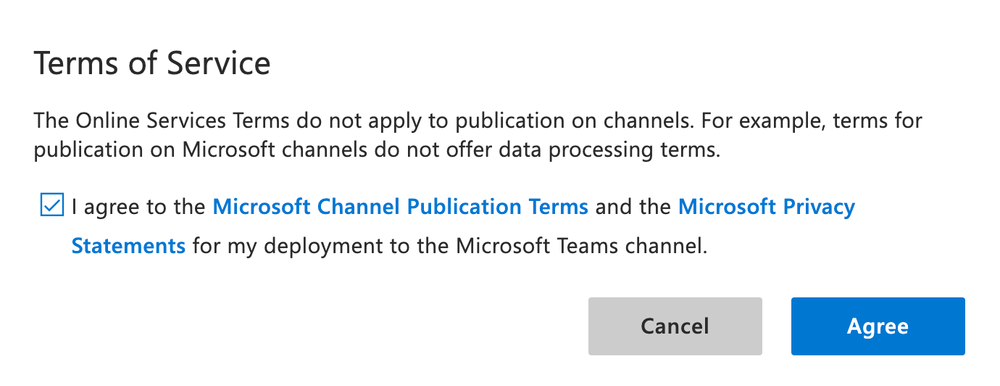
34). Check the box, and click Agree.
35). You will now see Microsoft Teams added as a featured channel as shown below.

36). Now we can test the functionality of our Bot in Microsoft Teams. To do this, click on your newly created Teams featured channel, and when prompted, select Open Microsoft Teams.

37). Your Bot will open in Chat as shown below.

38). And here it is. I asked it some questions, and it responded perfectly.

So, to recap, we’ve create our QnA Maker service, created a knowledge base and connected it to some data which has been broken down into Q&A responses. We’ve created a Bot based on our knowledge base, and added it to Teams as a featured channel.
Now, we need to add our Bot into Teams as a fully fledged Bot App. Let’s take a look at how we do this.
Creating our Bot App in Teams
In order to add our Bot into Teams as an app, we need to be logged into Teams with appropriate. admin access, and ensure that we have the Microsoft App Studio app installed and published. We then need to complete the following steps;
1). From within Teams, click on Apps, and open App Studio.
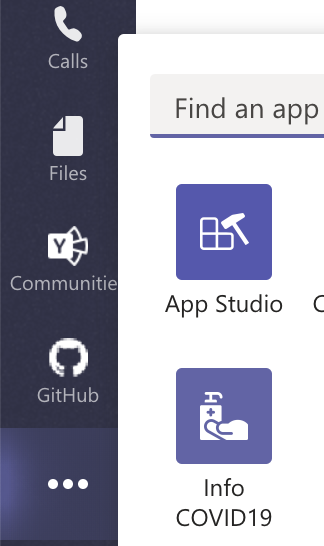
2). Select Manifest editor, then choose Create a new app.
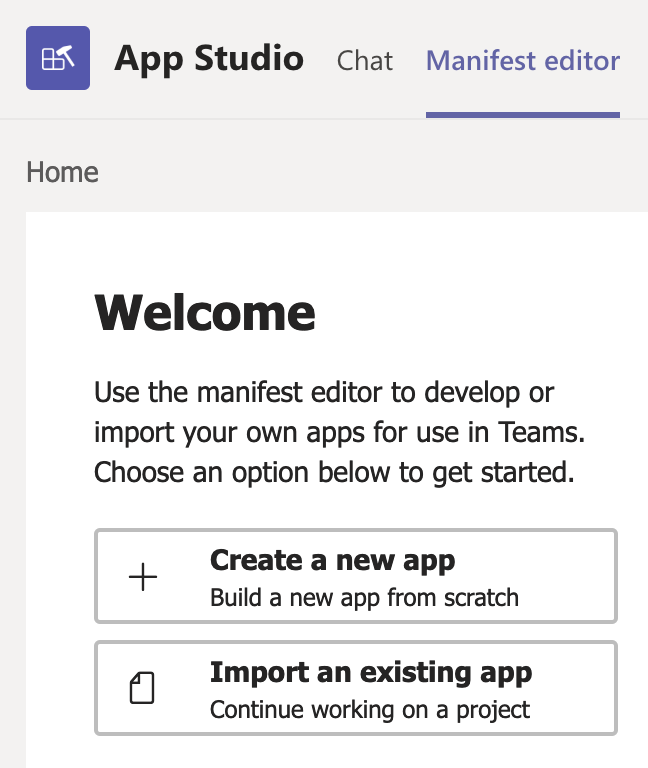
3). In the first step we next to click on App details.

4). In this section, we need to add a Short name and a Full name. These can be whatever you like. We also need a Package Name and Version which you can again name whatever you wish within certain accepted parameters. Finally, we need to generate an App ID. To do this, click Generate.

5). Add some meaningful. descriptions for your. Bot.

6). You may enter some further information about developers, partners, and App URL’s, but this is just for information purposes.

7). Next, you may apply some branding to you Bot if required. I have been lazy here and not added any.

8). Now we can move onto the second step of creating our App by choosing its Capabilities. We are going to choose Bots.

9). Click Set up.

10). On the Set up a bot page, choose Existing bot, and enter the Bot ID. This can be found from when we created our Bot earlier in Azure. Choose the settings that your Bot will support and then click Save.

11). The Bot is setup as below.

12). The third and final step is to set Languages, Domains and permissions, and to Test and Distribute our Bot.

13). Set your Languages settings as required.

14). Enter any domains that your App may need to navigate to.

15). Under Test and Distribute, click Install.

16). Click Add.

17). Voila! Your Bot is now available in Teams as a Custom App, and as you can see it is responding to conversational queries as intended.

So, job done.
Summary
So, that’s Bots in Microsoft Teams. My thoughts on this are that it’s pretty clever, but I personally don’t envisage myself ever using them. Maybe that’s a generational viewpoint, but for me I think the traditional search engine will be the go to for finding information for quite some time yet. So bots are hover boards with wheels for me as things stand. But, AI is here to stay, so I think we need to watch this space.
Thanks for reading.
For more Microsoft Teams news check out our resource centre
About the Author:
During my 25+ year career in IT, I have worked for several IT Solutions Providers and private organisations in a variety of technical roles focusing on Microsoft technologies.
Since 2014, I have specialised in the Microsoft Office 365 platform, and upon joining Softcat PLC in 2016, I have shifted my focus to Microsoft 365 Security and Compliance, and am now a Senior Consultant in Softcat’s Public Cloud Technical Practice.
I hold a number of Microsoft certifications, including MCSE: Productivity, MCSA: Office 365, Microsoft 365 Certified: Enterprise Administrator Expert, Microsoft 365 Certified: Security Administrator Associate, and Microsoft 365 Certified : Teams Administrator Associate.
In October 2020, I was awarded the Microsoft Most Valuable Professional (MVP) Award in the category of Office Apps & Services.
Reference:
Rising, P. (2020). Bot all to do – Creating a chat bot for Teams. Available at: https://www.peterrising.co.uk/blog/bot-all-to-do-creating-a-chat-bot-for-teams [Accessed: 27th November 2020].
Check out more great Microsoft Teams Content here or join our mailing list to stay up to date.


