Why do I need to build a Teams creation process using Power Automate? What’s wrong with the standard Team creation process?
Well when you create Microsoft Teams out of the box there are only limited governance capabilities. For example:
- Limited Teams naming standard
- Teams with duplicate display names can be created
- Only one owner is mandated
- No justification or approval process
This blog describes how you can create Teams using Power Automate plus add governance steps to the workflow to include:
- Apply a tailored Teams naming convention
- Add an approval step
- Stop duplicate Team names
- Add multiple owners
- Add sensitivity label to allow or block guests and external sharing
- Capture additional metadata such as justification, Team type or Team duration
The step by step details on how to create the Power Automate Flow are described below.
Part A – Teams creation using Power Automate – Create your data entry Form and List as data store
Microsoft Form
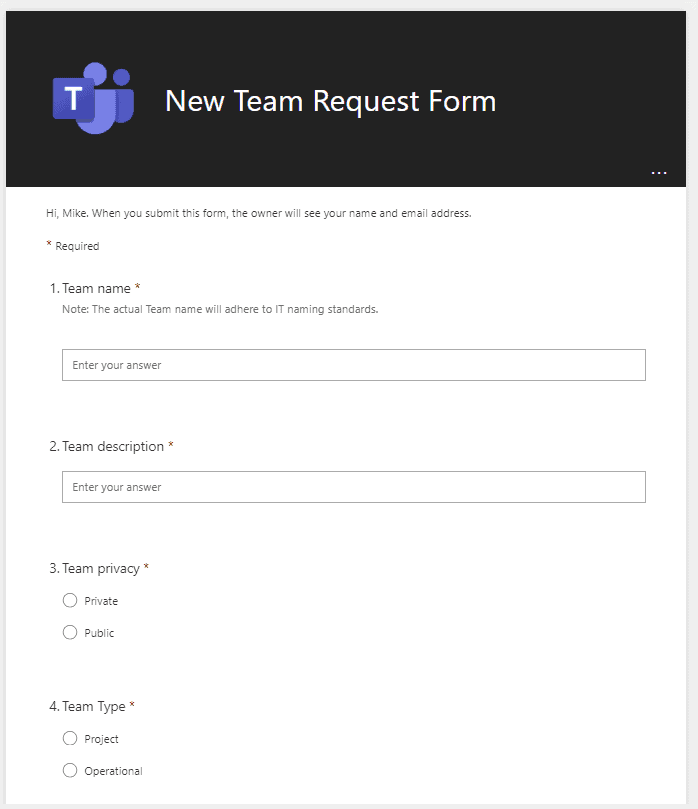
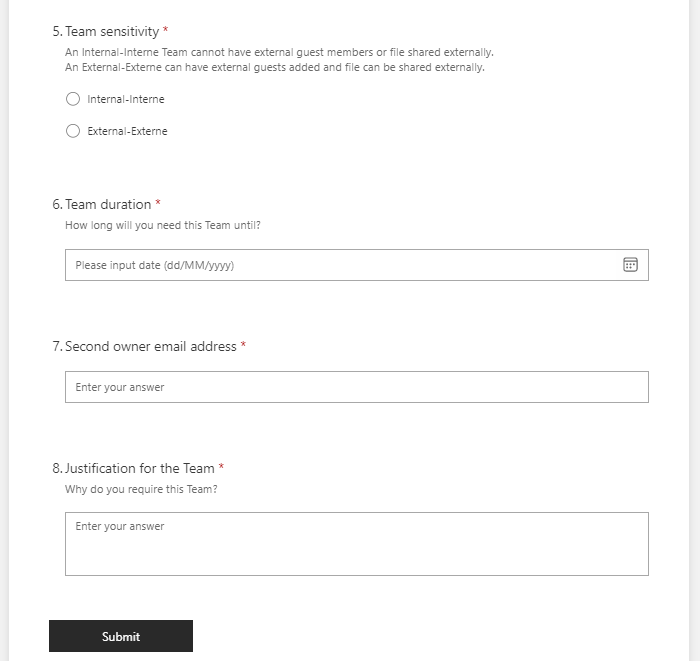
Create a Microsoft Form to capture the basic details for the new Team, such as the Team name, Team description and privacy plus other information to help you both provision the Team and any other metadata that will help you manage the ongoing lifecycle of the Team.
For example
- Sensitivity labels – To add sensitivity labels for sites, Teams and Groups. In this example two labels that control whether the Team have have guests and allow external sharing.
- Team type – if you want to capture attributes about the team whether the teams is operational or project based. In this example I will use this information to add a prefix to the Team name.
- Team duration – how long the Team will be needed for.
- An additional owner – best practice is to always add multiple owners to minimize the risk of ownerless Teams.
- Justification – to provide further information to the approvers as to why the Team is needed
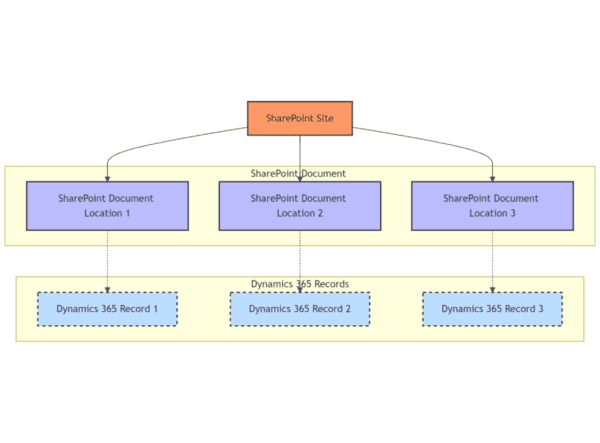
SharePoint List
Create a SharePoint List to store the information entered onto the Form.
Top tip: If you need to change the format of the date columns then go to the site settings and update the regional settings.
Create columns to map onto the data captured on the forms.
- Title – this will store the requested Team name
- Description – multiple lines of text column
- Privacy – single line of text column
- Sensitivity label – single line of text column
- Team type – single line of text column
- Duration – Date column
- Second owner – Person or group column
- Justification – multiple lines of text column
Create columns to store information about the requester, the approval outcome and the final Team
- Requestor – Person or group column
- Requestor country – single line of text column
- Approver – Person or group column
- Approval status – single line of text column
- Approval date – Date column
- Approval comments- multiple lines of text column
- Team ID – single line of text column
Create a calculated columns to derive the Team naming standard
Create a calculated column for the Team Type Prefix code. This will convert the Team type selected in the form and convert the information to shorter Team type code used as the prefix to the Team name.
Example.
- Team type code = calculated column – IF([Team Type]=”Project” ,”PROJ”,”OP”)
Create calculated column for create the Final Team name. This will add the Team Type as a prefix and Requestor country as a suffix to the Team name
- Final Team name=[Team Type code] &”-“&Title&”-“&[Requestor Country]
Example
- Team Type = Project
- Team Type code = PROJ
- Requestor country = UK
- Team Name = Marketing
- Final Team name = PROJ-Marketing-UK
Part B – Teams creation using Power Automate – Create your Power Automate flow
The Power Automate flow summary
- The flow is triggered when a new Form is submitted
- Apply a Team naming convention
- Stop duplicate Teams
- Add an approval step
- Create the team
- Add sensitivity label to allow or block guests and external sharing
- Add multiple owners
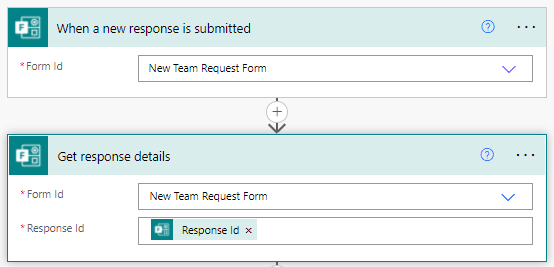
Step 1 – Create a new Power Automate Flow when a new Form is submitted
Trigger = When a new request is submitted. Link this to the Form you created.
Add action Get response details to access the information from the Form response.
Step 2 – Get the user details
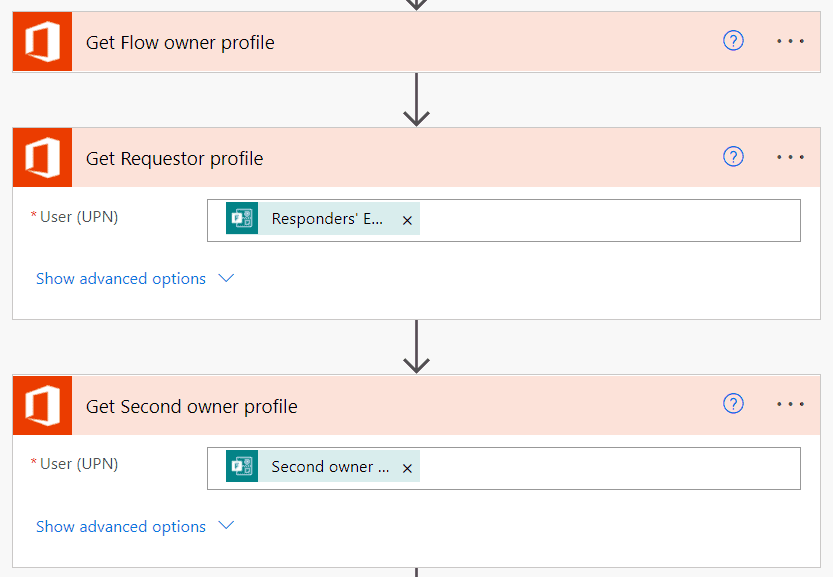
Add the following three actions to get the user profile information,
- Get my details – this will get the Flow owners account profile. The Flow owner is automatically added as a Team owner so we need to remove them from the Team.
- Get user profile – Map to Requestors email from Form. This is the user who submitted the form (the requestor) who will be added as a Team owner
- Get user profile – Map to second owners email from the Form
Step 3 – Initialize variables needed
Add 4 Initialize Variables actions of the type of string
varApprovers = It will hold the list of members in the Approvers Team
Value = blank. This will be set later in the process

varApproversTeam = Team or Group that manages the list of approvers
Value = Add the Team or Group id of the Team where the approval requests will be sent to.
Top Tip you can easily find the Team id by selecting the three dots next to the Team name and selecting Get Link to Team
This returns a URL. Copy the information between groupId= and &tenantId. See example below where the Team id is highlighted in Red

varSensitivitylabel = It hold the Sensitivity label id
Value = blank. This will be set later in the process.

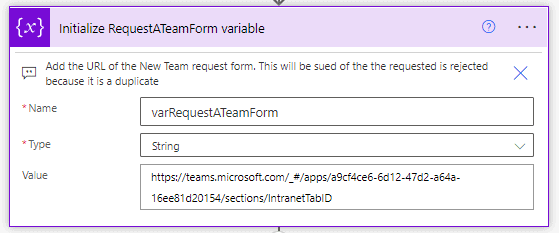
varRequestATeamForm = Will be used if the requestor needs to resubmit their form as there is a duplicate Team.
Value =URL of the Request a Team form we created at the beginning
Step 4 – Add Form response to the SharePoint List
Add a Create Item action.
Populate the Form responses into the SharePoint List by mapping the dynamic content from the Form onto the corresponding SharePoint List columns.
Site Address = Select Team/ SharePoint site where List is located.
List name = select list name from drop down.
Map the following details from the Form
Title = Team Name
Description = Team description
Justification = Justification for Team
Privacy = Team provacy
Sensitivity = Team sensitivity
Team type = Team type
Duration = see additional stepson how to enter the Duration column.
Owner 2 claims = User principle name of Owner 2
Requester claims = User principle name of the requestor
Requestor country = Country of the requestor
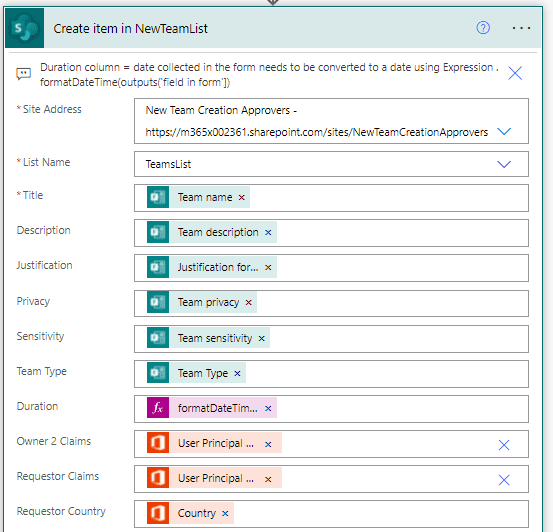
Important. The Team duration date entered in the Form ( as shown below) is entered as a date from the date picker but is NOT actually stored as in a date format.
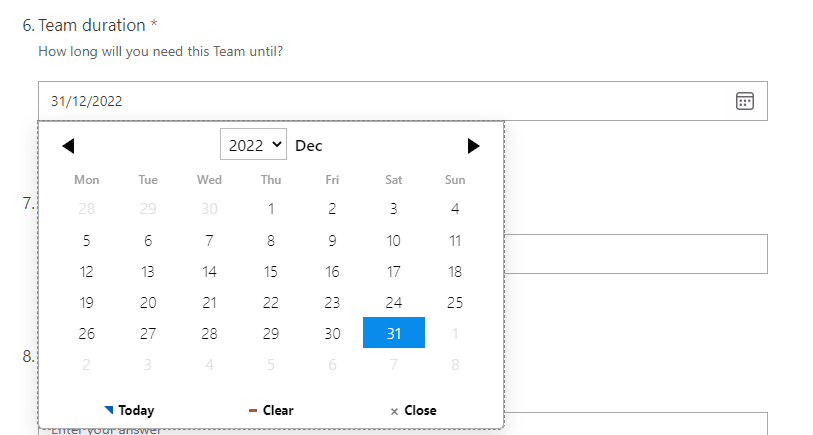
Therefore the dynamic content must be change to the date/time format by using an Expression:
- FormatDateTime(outputs(‘field in form’])

Step 5 – Initialize variables for duplicate checks
Four variables need to be set up for the duplicate checks
varSiteDomain = A String variable that will hold the common part of the site url.
Value = common part of the site url followed by sites or teams. e.g. https://<domain name>.sharepoint.com/teams/

varTeamNameNoSpace = String that holds the Final Team with spaces removed. remember a URL does not have spaces.
Value = Use an Expression to replace the blanks (‘ ‘ with ”)
replace(outputs(,Final Team name dynamic variable,’ ‘,”)
example replace(outputs(‘Create_item_in_NewTeamList’)?[‘body/Team_x0020_Name’],’ ‘,”)

varNewTeamURL = the new Team SharePoint site URL.
Value = this consists of the two previous variables next to each other
varSiteDomain varTeamNameNoSpace

varNewTeamURLExists = to hold the result of does the requested Team SharePoint URL exist.
Value = blank. This will be set later in the process.

Step 6 – Team duplicate check (does Site URL exist)
There is no easy way to check whether a Team name already exists as it is possible to have duplicate Team display names. A better way is to check the SharePoint site URL as a URL is always unique.
This step will look up the proposed SharePoint site URL (variable varNewTeamURL ) for the new Team to see if the URL already exists. If the SharePoint site URL exists then the Team is a duplicate.
If the URL exists = The requestor is sent a message to resubmit form.
If the URL does not exist = then the Team is unique.
To check to see if the URL exists we use the Get Lists action which will look up the proposed SharePoint site URL (variable varNewTeamURL ) to return any SharePoint lists. We are using this action to validate whether the URL is valid or not.

The possible outcomes are:
- Action fails with Status code of 404 = The site URL does not exists. The Team is not a duplicate.
- Action is successful with Status code of 200 =The Site URL exists and the account running the Flow has permissions to access the site so the action will return all Lists in the SharePoint site. This status code denotes a duplicate URL.
- Action fail with an unauthorize error and Status code of 403 = The Site URL exists but the account running the Flow DOES NOT has permissions to access the site. This status code denotes a duplicate URL.
The flow needs to continue whether the action is successful or fails so add a Compose action then select the three dots (…) and Configure Run after

In the box that appears tick Is successful and Has failed. The select Done.
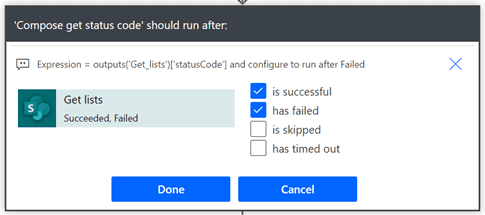
This will change the line above Compose Status code to show with an exclamation mark.
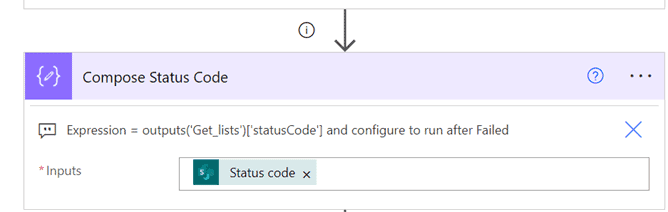
Now in the Compose action add in the Status code dynamic content. Note this only appears after you have completed the previous Configure Run after step.
Add a Switch action to manage the three possible outcomes of the Get Status Code.
You will need 3 cases
- Equals 200 – Add a Set variable varTeamURL exists = expression TRUE (site url exists)
- Equals 403 – Add a Set variable varTeamURL exists = expression TRUE (site url exists)
- Equals 404 – Add a Set variable varTeamURL exists = expression FALSE (site url does not exist)

Add a Condition action that will show what actions to do if the proposed Team site URL already exists (True) or whether the site name does not exist (False)
Condition = varTEAMSiteURL is equal to FALSE
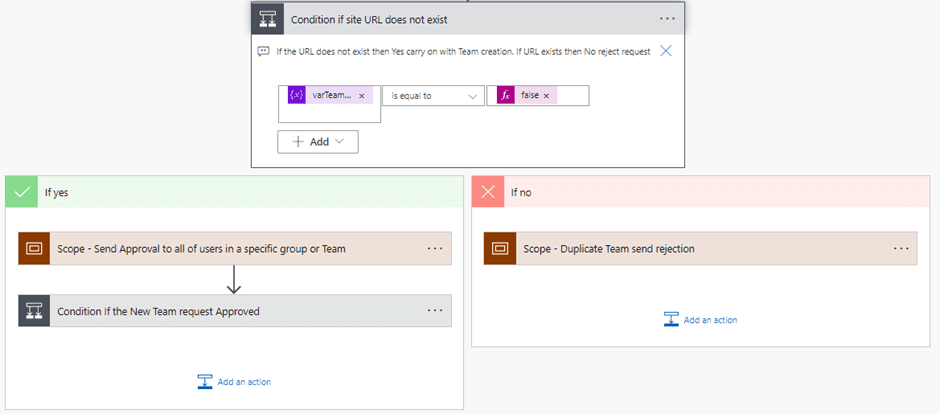
If the outcome = No. The flow will reject the request as it is a duplicate. Go to Step 4 – If NO Duplicate Team name send Rejection
If the outcome = Yes. The flow will send the approval. Go to Step 5 – Send Approval to all of users in a specific group or Team
Step 7 – If Condition = No (Duplicate Team name send Rejection)
Add an Update list to show that the request have been Rejected – duplicate
Approval status = Rejected – Duplicate name
Approval date = Form submission time
Approval comment = text to explain why the request was rejected

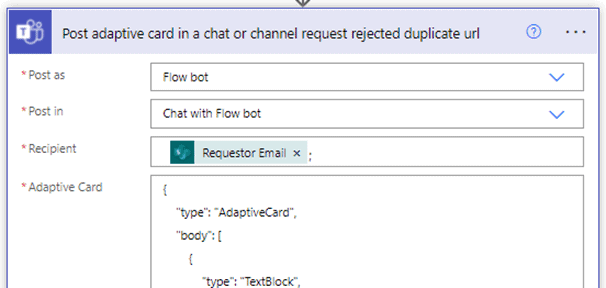
Add a Post Adaptive card in chat or channel to requester notifying them hat there request has been rejected and to resubmit their request.

Post in chat
Recipient = Requestor email
Add adaptive card JSON. Example Adaptive card formats can be found here https://adaptivecards.io/designer/
Example Adaptive card output

Step 8 – If Condition = Yes (Unique Team name proceed with flow & decide who the approval is going to)
Add List Group members action to return the list of all members in a specific Microsoft 365 Group (which could be a Team).
group id = varApproversTeam. This was the variable set earlier for the Group or Team id holding the list of the approvers.

Add an Append Variable action create create a semi colon separated lists of all the members of the Group or Team.
Name = varApprovers
Value = Mail dynamic content from List group members followed by a semi colon (to create a semi colon separated list of email addresses).
Note the For each action will automatically appear so that the Append to variable action repeats for each member of the Group or Team.

Step 9 – Create Approval
Add Start and wait for an approval action
Approval type = Approve/reject – first to approve (we only want one person to approve rather than all approvers).
Assigned to = varApprovers variable.
Details = Add text and dynamic content as appropiate.

Example approval notification

A Condition action is added to check if the outcome of the approval equals Approved.
Condition = Outcome of the approval dynamic content is equal to Approve
No = The request was rejected the Flow updates the List. Go to Step 7 – Update list to show request has been rejected
Yes = The request was approved and the Flow continues to create Team

Step 10 – If No – Update list to show the request was rejected
If the Condition Is the new Team approved = NO then this part of the Flow is actioned.
Add an Update Item action to update the list is updated to show the outcomes of the approval. Note no notification is needed to the requested as they will have received the reject notification from the Approvals step.
As there could be multiple responses from the approval step the For each step is automatically updated.
In this scenario we have only after for the first person to approval so will only be one response.
- Id & Title are required fields need to be added
- Approver claims (this displays their email)
- Approval status
- Approval date
- Approval comments

Step 11 – If Yes Create Team
Add a Create Team action
Team name = Final Team name dynamic content from SharePoint list. Note this is the Team name with naming convention applied.
Description = Description dynamic content from SharePoint list.
Note the owner of the Team is the account used to run the flow. This will be removed later.

Step 12 – Update list to show approval details
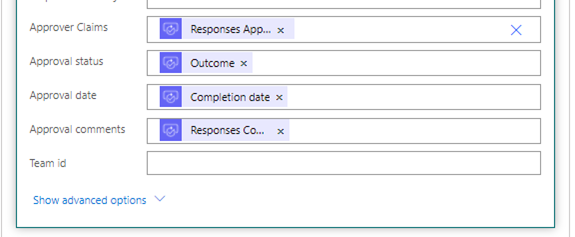
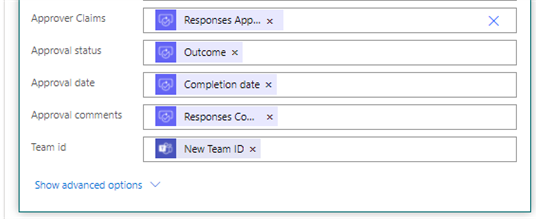
Add Update list action to update the Lists with details of the approval outcome and the Team id. Note an Apply to each action will be automatically added when the Responses Approver id is added as it is an array that could have multiple values.
- Id = ID from List (required field)
- Title = Title from List (required field)
- Approver claims = Responses Approver id
- Approval status = Outcome of approval
- Approval date = Completion date of approval
- Approval comments = Responses comments from approval
- Team id = New Team id from create the Team step.

Add a Delay action for 2 minutes this will allow time for the Team and associate Group to be provisioned.
If the next step fails as it cannot find the Group Id then increase the delay duration.

Step 13 – Add sensitivity label to the Team
To add a sensitivity label to a Team need to use the Id if the sensitivity name and not the display name. You will need to get the ids by using PowerShell Get-Label (ExchangePowerShell) | Microsoft Docs.
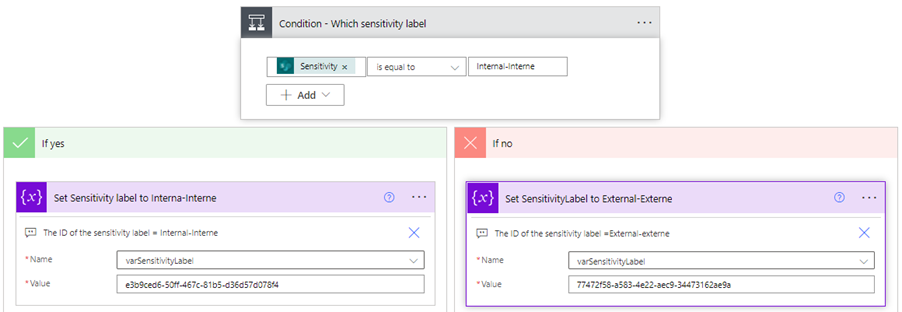
Add Condition action to see if the sensitivity label is Internal-Interne (one of the two sensitivity label choices in the Form).
Condition = Sensitivity label in List is equal to Internal-Interne
If YES Add a Set variable
Name = varSensitivityLabel
Value = add the sensitivity label id for Internal-Interne
If NO If YES Add a Set variable
Name = varSensitivityLabel
Value = add the sensitivity label id for External-Externe
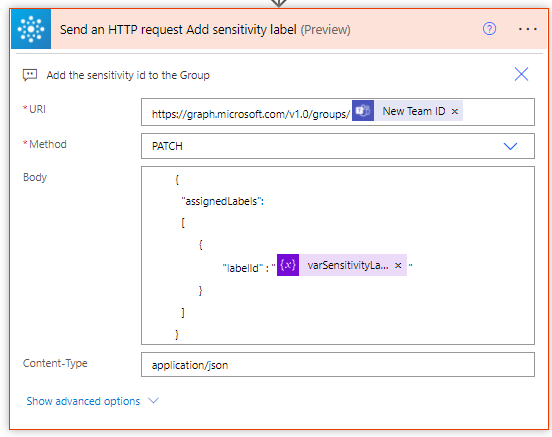
Step 14 – Add sensitivity label to the Group
There is no standard action to add a sensitivity label to a Group of Team so we need to use the Send an HTTP request to a group action. Note this is still in Preview. This will allow us to run more extensive Graph API calls.
Add Send an HTTP request to a group action .
Use the PATCH groups to update the Group and add the sensitivity label id to the group. The sensitivity label needs to be added to the underlying group for the Team.
As there is no direct action to add a sensitivity label use the HTTP action and use Graph API to
URI = https://graph.microsoft.com/v1.0/groups/<add TeamId from the create Team step>
Method = PATCH
Body =
{
“assignedLabels”:
[
{
“labelId” : “<add dynamic content varSensitivitylabel>”
}
]
}
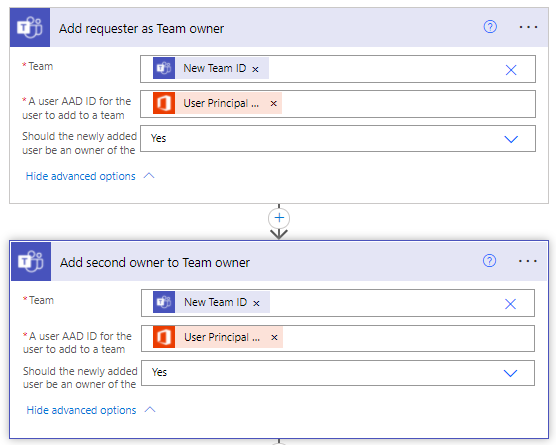
Step 15 – Add Team owners and remove flow account as owner
Add two Team members actions
Team = TeamId created in the Create Team step
A user AAD ID = Add the User Principle Id of the user who submitted the Form (Requestor) and the second owner added to the form (owner 2).
Select the advanced option
Should the newly added user be an owner = Yes (to make sure the users are being added as owners)

Remove Flow owner as owner and member of Team
The account running the flow was made an owner of the Team as part of the create Team action. This is a two-step process to remove the Flow owner as an owner of the Team and then remove them as a member of the Team. This is because just removing a user an owner will leave them as a member.
There is no standard action to remove owners from Groups or Teams so we will use the HTTP request to a Group action and use Graph API.
URI = https://graph.microsoft.com/v1.0/groups/<dynamic content New Team ID>/owners/<dynamic content Flow Owner Id>/$ref
Method = DELETE
Content-Type = application/json

Use a Remove member from group action
To remove the flow owner as a member from the group.

The flow is now complete.
For more great blogs click here
About the Author:
Nikki Chapple works as an Architecture Consultant for NTT Cloud Communications division of NTT Lt and specialises in Microsoft 365 governance, compliance and adoption.
Nikki is a regular speaker and has presented at conferences such as South Coast Summit, Teams Day Online and M365 Chicago as well as user groups.
She has recently joined the organizing committee for Microsoft Teams Day Online and is also an advocate for women in technology.
Nikki has 30 years’ experience covering both IT and business roles and prides herself on delivering a holistic and risk based approach to digital transformations.
Nikki holds multiple certifications from Microsoft including the Certified Enterprise Administrator Expert and is also a TOGAF qualified Enterprise Architect and PROCSI qualified Organisational Change Manager.
Her motto is “Microsoft 365 governance and compliance is not a project it is a lifestyle. It needs to be embedded into the culture of the organization”.
Reference:
Chapple, N. (2021). Create a simple Teams creation workflow using Power Automate. Available at: https://nikkichapple.com/teams-creation-using-power-automate/ [Accessed: 26th January 2022].