Series:
1. Securing React App with Azure AD (this post)
2. Setting Up Azure Key Vault with an Azure Website (Web API)
3. Leveraging Office Pnp Core to run multi tenant specific operations (Create modern site, etc)
4. Creating communication sites templates and applying them to new sites in different tenants.
Last year, I had an idea, I wanted to create a react app which I can use to manage multiple Office 365 tenants, the idea is that later I can create a simple product that I can sell to customers where I can easily create their team sites, communication sites, hub sites with predefined page templates, lists, etc.
The journey has been long, and now I can finally start to see the light, the first part, was to actually make the authentication and authorization works together nicely.
The application components:
1. Azure Web Application, Front END (React), secured with AZ
2. Azure Web Application, Back end (Webapi), the web api its a layer on top of Office PnP CSOM package, here there are multiple operations like Create Modern Site, Create Communication Site, etc, but it has also my own operations to register tenants in my application, so whenever I have a new client, I register it here.
3. Cosmos DB, Some of the data its stored in CosmosDB, for example: list of tenants I manage, list of site collections in a tenant, etc.
4. Azure Key Vault, when using Sharepoint CSOM, there are multiple ways to authenticate and do operations with the tenant, Azure AD App-Only, and SharePoint App-Only. The problem with these is that some operations are restricted, for example, I was not able to create a modern team site if my client context is App Only, for this reason I decided to temporarily use username and password, but the password its stored in Azure Key Vault, I will show you that in the second part of this blog post series.
Azure Active Directory
For now, lets concentrate on this post technical details.
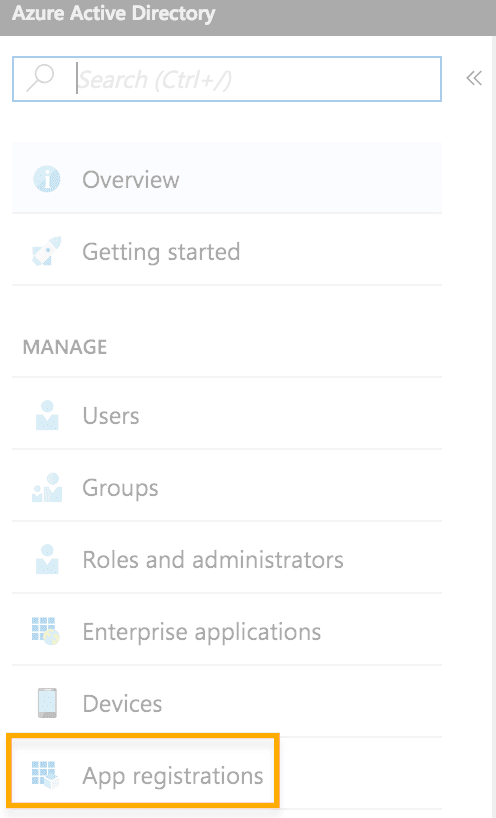
The first thing to do is create an application record in the active Azure directory, as shown in the following images:
Then we create an application with the following data:

clientapp

Application ID
And finally, we must write down the app id.
For this blog post, I am assumming the reader has basic knowledge in react, for my case I bought a React Template in envato market, and I used it as my starting point, then I plugged in the authentication code.
For the authentication, I used the following package: https://github.com/salvoravida/react-adal which was based on the following blog posts:
https://blog.mastykarz.nl/building-office-365-web-applications-react/
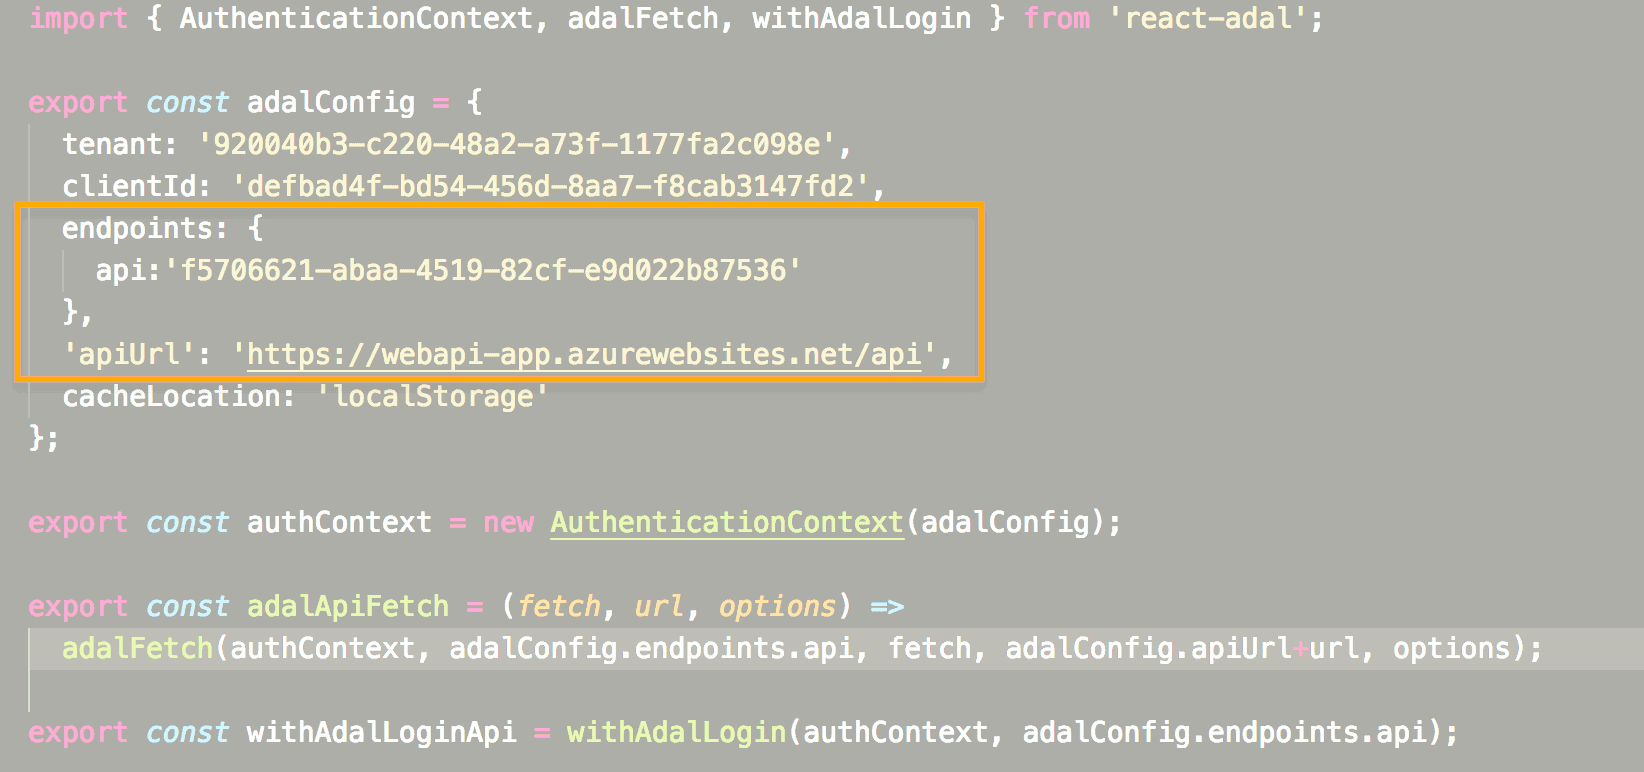
Once you have installed the package via NPM, you need to create the adal-config.js as shown below:
import { AuthenticationContext, adalFetch, withAdalLogin } from 'react-adal';
export const adalConfig = {
tenant: 'aaaaaaaa-c220-48a2-a73f-1177fa2c098e',
clientId: 'aaaaaaa-bd54-456d-8aa7-f8cab3147fd2',
endpoints: {
api:'aaaaaaaa-abaa-4519-82cf-e9d022b87536'
},
'apiUrl': 'https://ourfuturewebappi-app.azurewebsites.net/api',
cacheLocation: 'localStorage'
};
export const authContext = new AuthenticationContext(adalConfig);
export const adalApiFetch = (fetch, url, options) =>
adalFetch(authContext, adalConfig.endpoints.api, fetch, adalConfig.apiUrl+url, options);
export const withAdalLoginApi = withAdalLogin(authContext, adalConfig.endpoints.api);
In this file, you should change with your values:
· Tenant: its the azure ad ID. · clientId: the client id, after you register the app on azure ad. · Endpoints: this is an array of key valye pairs, where we list the API that we want to consume from the react app (these should be secured by Azure AD upfront).
After this and, finally, apiURL is the URL of the web api that we are going to consume (In a moment we will detail more the web configuration part api). Returning to the React application, we must create an index.js file, it is in this file that we use the package previously installed in the text.
import React from 'react';
import ReactDOM from 'react-dom';
import DashApp from './dashApp';
import registerServiceWorker from './registerServiceWorker';
import 'antd/dist/antd.css';
import { runWithAdal } from 'react-adal';
import { authContext } from './adalConfig';
const DO_NOT_LOGIN = false;
runWithAdal(authContext, () => {
ReactDOM.render(<DashApp />, document.getElementById('root'));
// Hot Module Replacement API
if (module.hot) {
module.hot.accept('./dashApp.js', () => {
const NextApp = require('./dashApp').default;
ReactDOM.render(<NextApp />, document.getElementById('root'));
});
}
},DO_NOT_LOGIN);
?
1
registerServiceWorker();
In the previous code, please note the use of the runWithAdal method, and inside the latter the main component DashApp developed in ReactJS is placed and the process is concluded.
When running our application for the first time, the app will be directed to the Microsoft login page, once authenticated, Microsoft will send us back to our local React application with the Bearer token, which will be stored in the browser’s local storage as we configured it in the previous steps.


Create
In order to perform this procedure it is necessary to return to the Azure portal to register a second application, this time, it will be the Reply URL, the Web API that must exist prior to this procedure.
It is important that at the end of the URL of our published Web API, the following should be added: .auth / login / aad / callback. This is necessary so that the authentication of the active Azure directory also works with our web api.
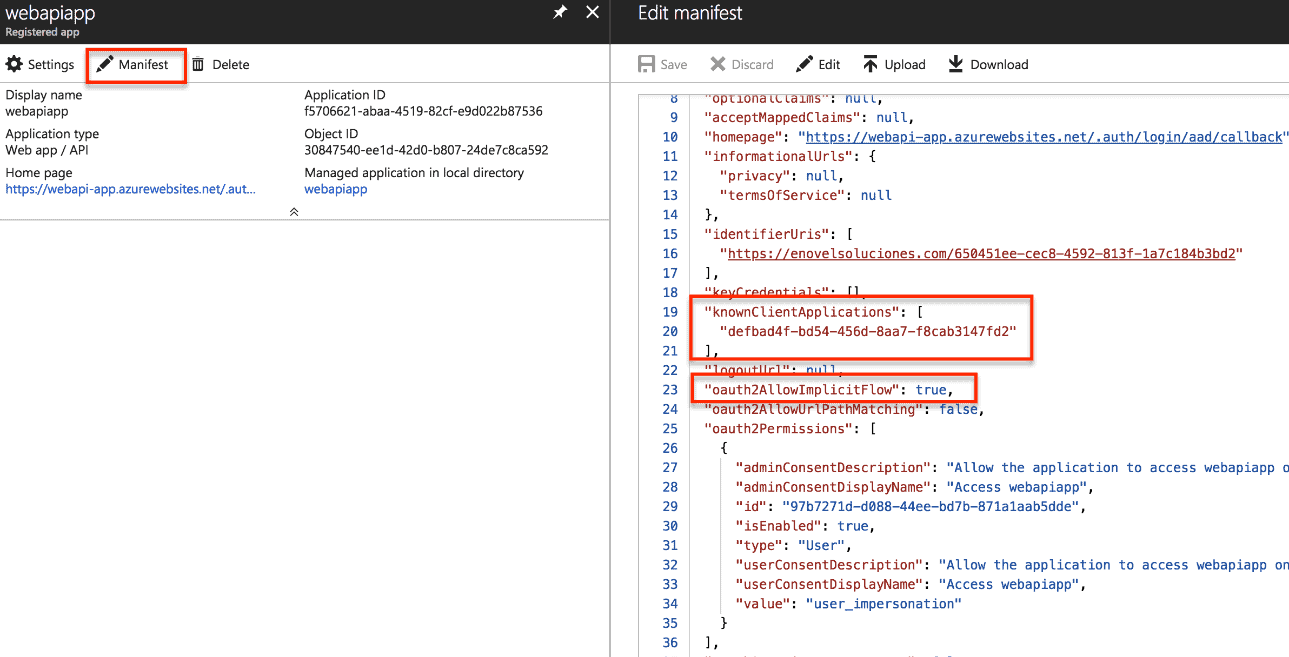
Edit manifest
After this you must edit the manifest of our registered application and it is important to change the configuration shown below, through KnownClientApplications. KnownClientApplications, is an array of applications that can consume our Web API. In our case it is the id of the previously registered application.
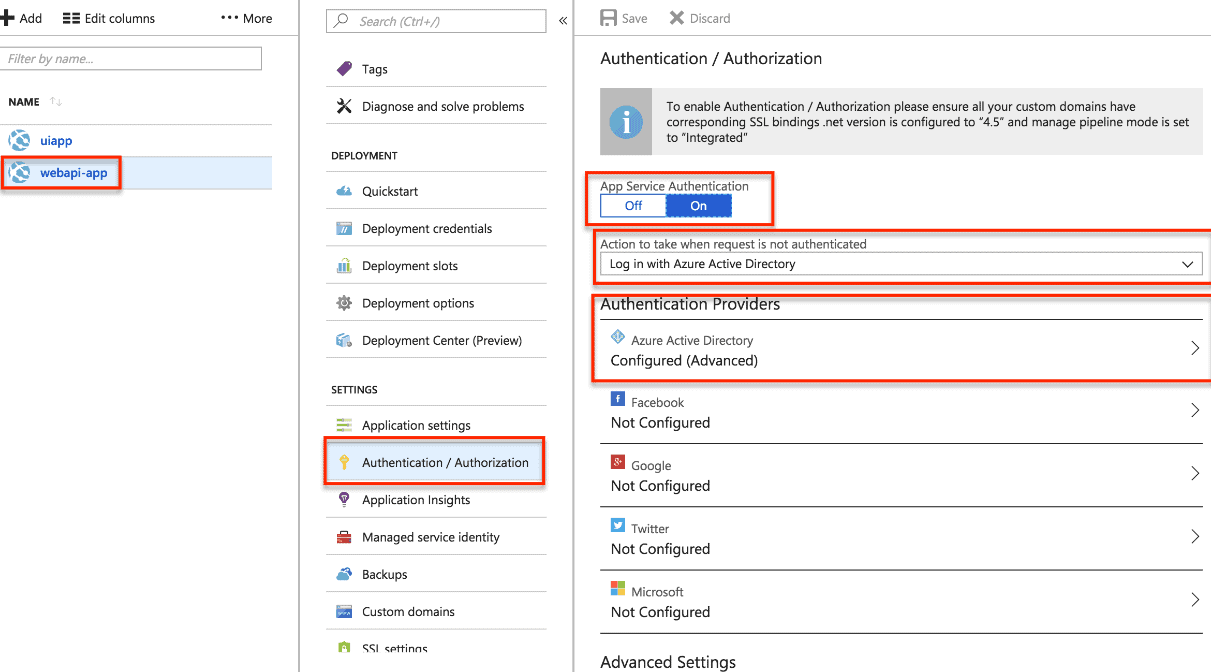
Authentication
Do not leave aside the configuration of our Web API for authentication with the active directory, we select our web app in the portal. And we make sure that the Web API is configured as shown below:
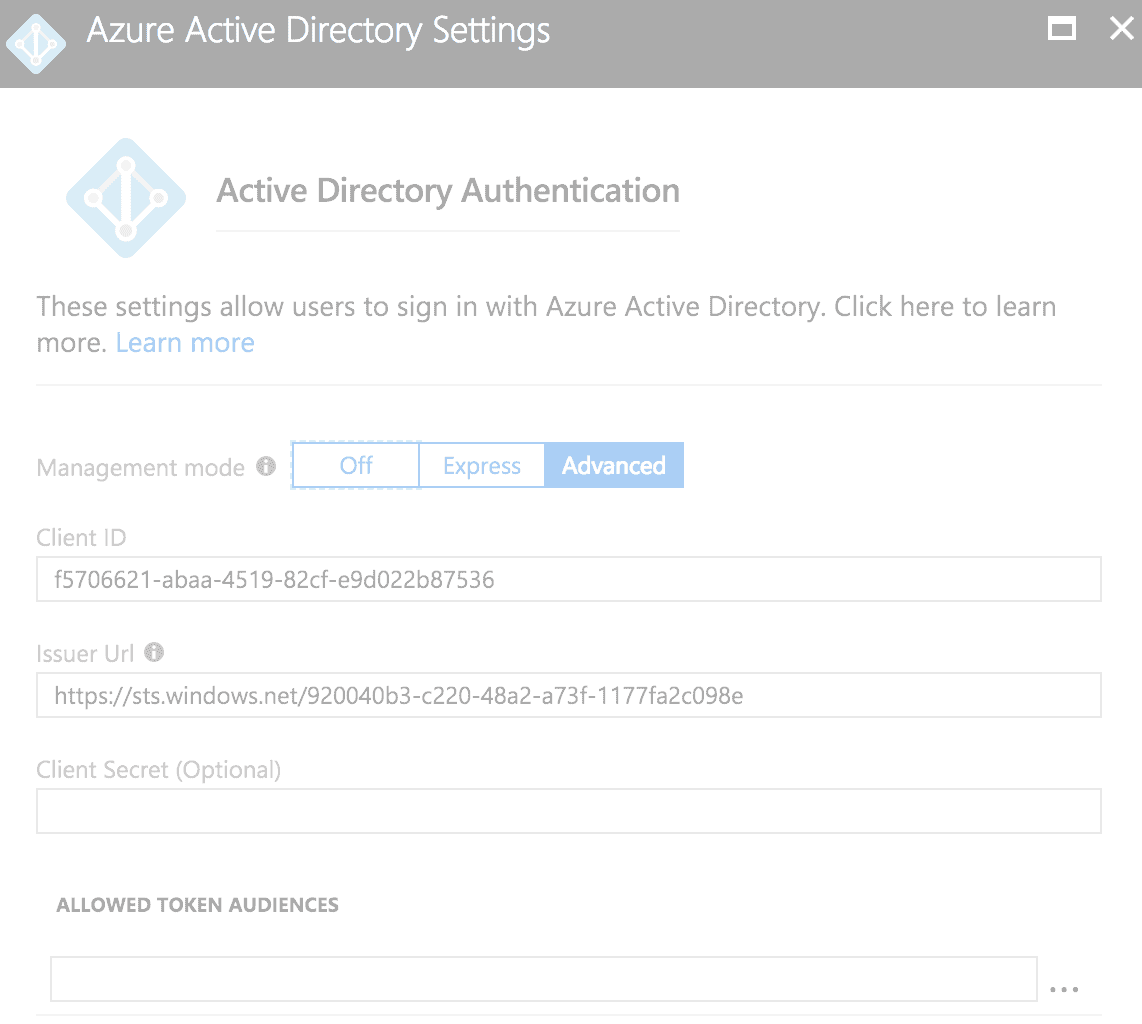
Active Directory Authentication
Endpoints
As previously mentioned, in the adalconfig.js file we must configure the ID of the registered Web API and the URL of the api, as shown below.
Once we do this, we can now use an API controller securely as in the following component:
import React, { Component } from 'react';
import { Row, Col } from 'antd';
import PageHeader from '../../components/utility/pageHeader';
import Box from '../../components/utility/box';
import LayoutWrapper from '../../components/utility/layoutWrapper.js';
import ContentHolder from '../../components/utility/contentHolder';
import basicStyle from '../../settings/basicStyle';
import IntlMessages from '../../components/utility/intlMessages';
import { adalApiFetch } from '../../adalConfig';
export default class extends Component {
constructor(props) {
super(props);
this.state = {
data: []
};
}
fetchData = () => {
adalApiFetch(fetch, "/values", {})
.then(response => response.json())
.then(responseJson => {
if (!this.isCancelled) {
this.setState({ data: responseJson });
}
})
.catch(error => {
console.error(error);
});
};
componentDidMount(){
this.fetchData();
}
render() {
const { data } = this.state;
const { rowStyle, colStyle, gutter } = basicStyle;
const radioStyle = {
display: 'block',
height: '30px',
lineHeight: '30px'
};
const plainOptions = ['Apple', 'Pear', 'Orange'];
const options = [
{ label: 'Apple', value: 'Apple' },
{ label: 'Pear', value: 'Pear' },
{ label: 'Orange', value: 'Orange' }
];
const optionsWithDisabled = [
{ label: 'Apple', value: 'Apple' },
{ label: 'Pear', value: 'Pear' },
{ label: 'Orange', value: 'Orange', disabled: false }
];
return (
<div>
<LayoutWrapper>
<PageHeader>{<IntlMessages id="pageTitles.TenantAdministration" />}</PageHeader>
<Row style={rowStyle} gutter={gutter} justify="start">
<Col md={12} sm={12} xs={24} style={colStyle}>
<Box
title={<IntlMessages id="pageTitles.TenantAdministration" />}
subtitle={<IntlMessages id="pageTitles.TenantAdministration" />}
>
<ContentHolder>
<ul>
{data && data.map(item => (
<li>{item}</li>
))}
</ul>
</ContentHolder>
</Box>
</Col>
</Row>
</LayoutWrapper>
</div>
);
}
}
In this last example you can see how you can consume an api web that simply returns two values (value1, value2), but the interesting thing about this is that this api web is protected with Azure AD as well as the application that consumes it. The token that is obtained when authenticating for the first time in the ReactJS application, is reused when consuming the Web API, and therefore a second authentication is not necessary.
This article serves as a reference for the construction of a ReactJS application which consumes all its functionality through a web api, in order to make any application, I hope it is useful for the reader.
In the second post of this series, I will show how to setup Azure Key Vault to store securely the tenant credentials, and in our third post I will show, how to use those credentials to run tenant operations securely for each registered tenant.
Stay tuned.
About the Author:
Luis Valencia, CTO at Software Estrategico, Medellin, Colombia, independent blogger and still a coder, after 17 years of experience in the field and regardless of my position, and mostly with SharePoint/Office Products, I still love to code, open Visual Studio and bring solutions to users and to the community its what makes me wake up every morning.
Feel free to contact me via twitter direct messages, @levalencia
Reference:
Valencia, V. (2019). Securing a React Application with Azure AD which Consumes a REST API also Secured with Azure AD to Manage Office 365 Tenants. Available at: http://www.luisevalencia.com/2019/01/18/securing-a-react-application-with-azure-ad-which-consumes-a-rest-api-also-secured-with-azure-ad-to-manage-office-365-tenants/ [Accessed at: 1st March 2019].