As the saying goes “Failing to plan is planning to fail”, we started a quest for a planning tool. Requirements? Well, we had plenty of them. The planning tool should be flexible, should provide reports, should be accessible for everyone and should be configurable to our needs. Along the way, we tried out the Office 365 Planner, a member of the Office 365 suite. For our goals, it is a promising tool. And so, we would like to share our vision on it and explain you how you can set up your own Planner.
From the Microsoft website:
“Take the chaos out of teamwork and get more done! Planner makes it easy for your team to create new plans, organize and assign tasks, share files, chat about what you’re working on, and get updates on progress.”
This sounded promising, so we decided to take the plunge. Now we have been working actively with the Planner tool for a few months. Since the start, we have experienced quite some benefits, as you can easily add tasks, switch the assigned user, update the deadline, report on the progress, and so on. Tasks that normally disappear in the background, now remain visible and there is no lame excuse for forgetting a task. As other teams within LoQutus heard of the tool, they all started to build their plans as well. From that point of view, we wanted everyone to join in on the fun and share our knowledge.
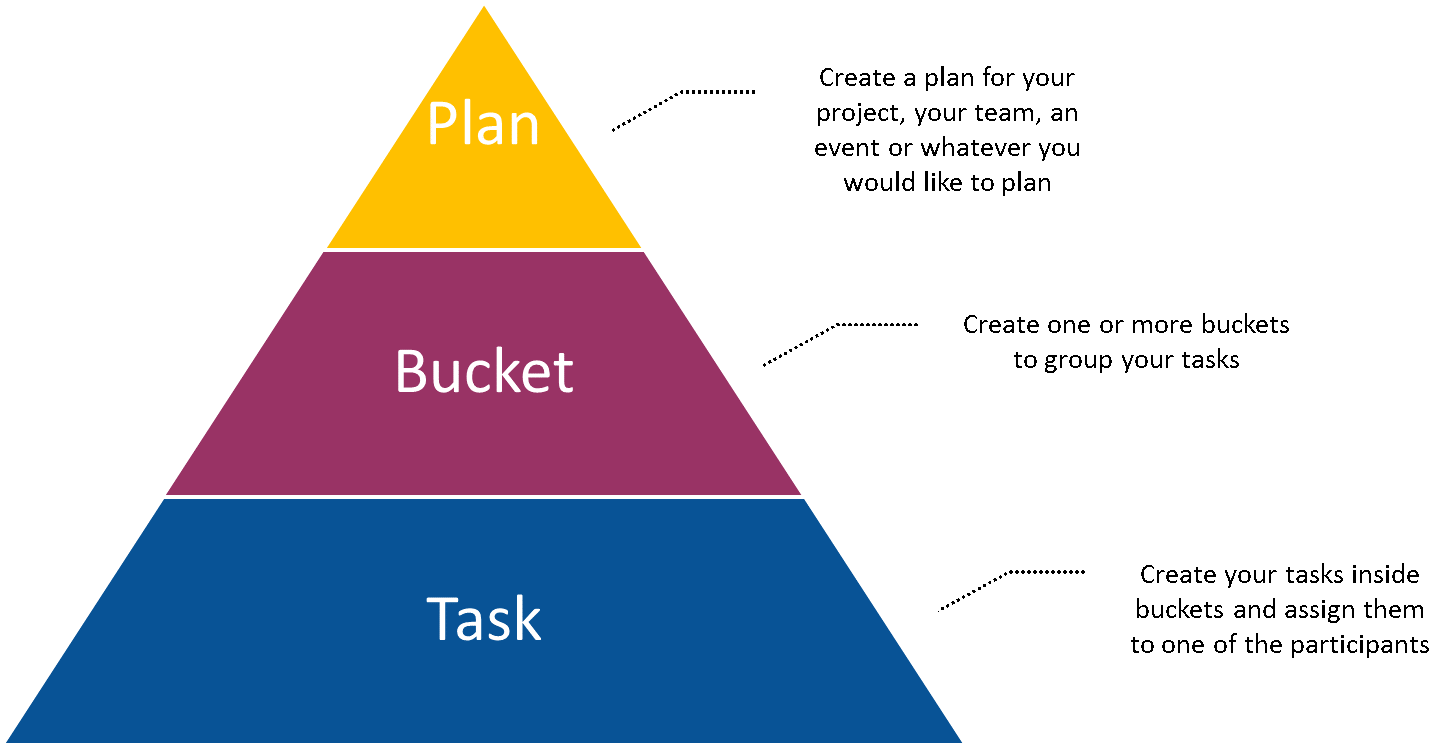
Make a plan
Within Planner, the highest level is a plan. You can create a plan for your project, for your team, for an event, or whatever you would like to plan. For each plan, you define who may participate. This group of people will be able to see the plan, edit the plan and be assigned tasks. Each plan contains buckets. A bucket can be seen as a set of tasks. In your project plan, for example, you can have a bucket ‘Project management’, ‘Analysis’, ‘Development’, ‘Testing’, and so on. Another possibility is to name your buckets after the different teams that should collaborate. The third level are the tasks themselves, created within a bucket.
Project Plan
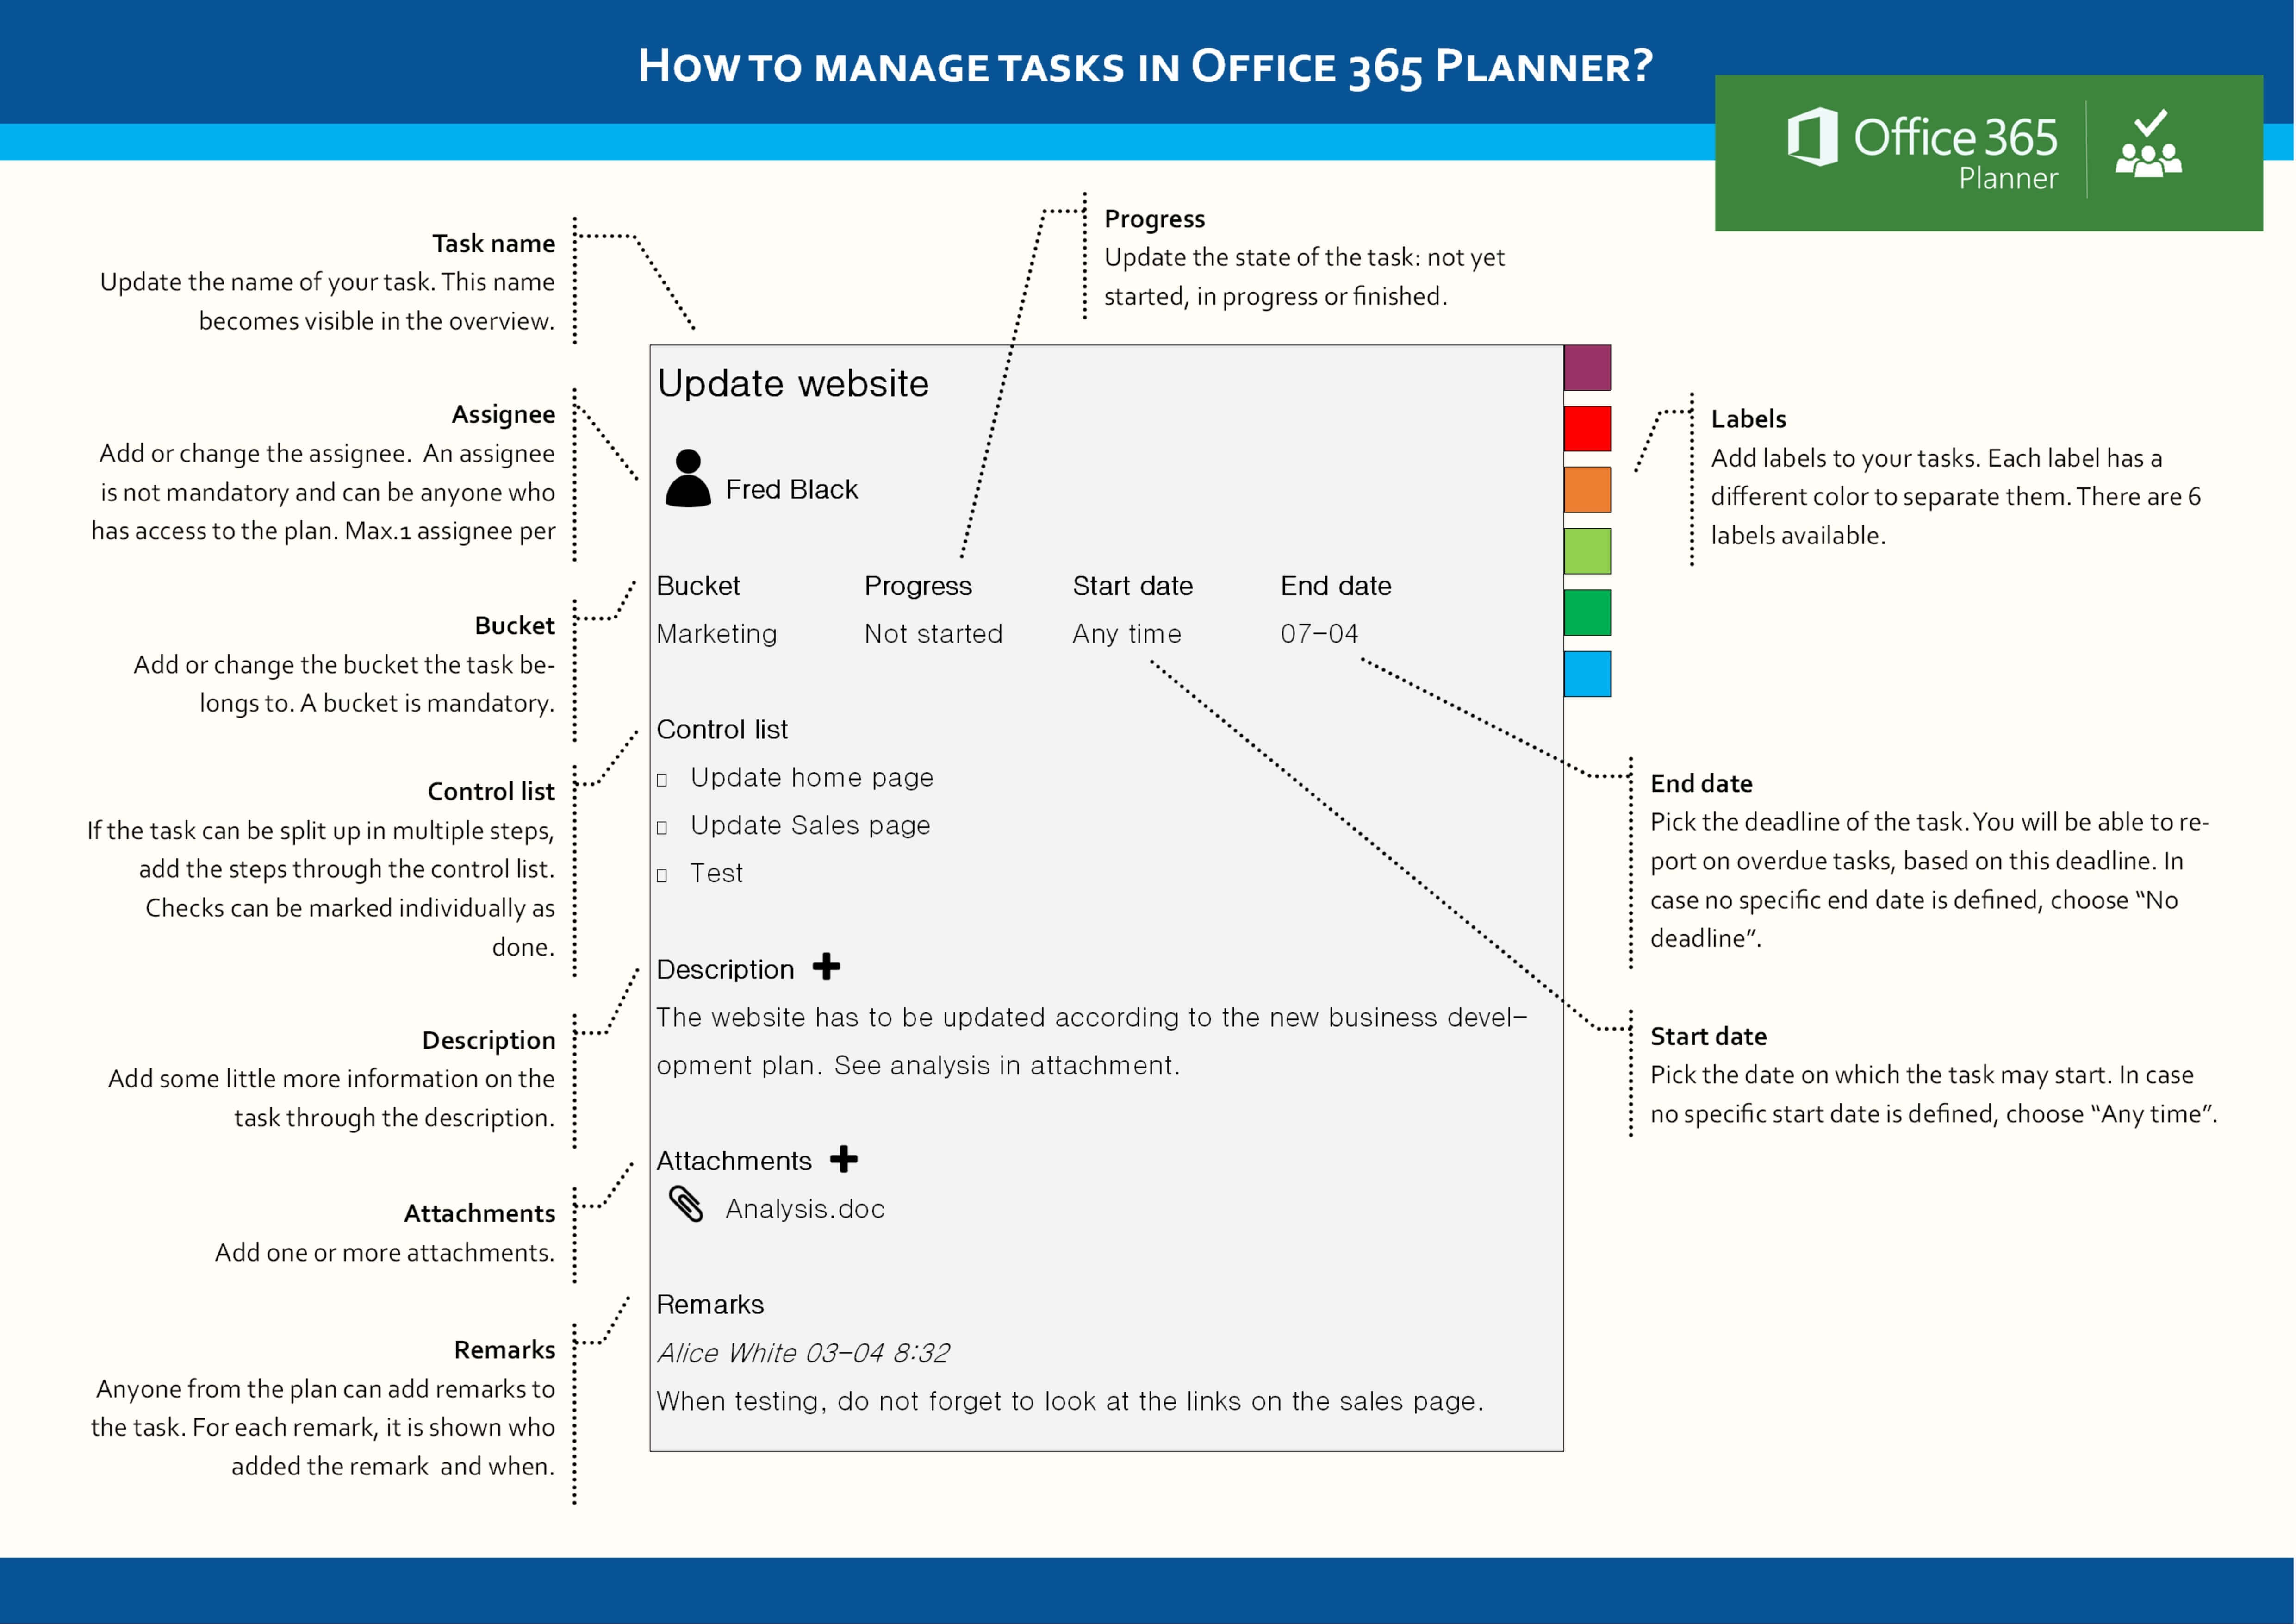
Manage and visualize your tasks
Once we have set up a plan and created our buckets, it is time to add the tasks to our buckets. A task has three main properties: the task name, the assignee and the deadline. Furthermore, within a task, you can keep plenty of additional information in order to keep the whole team informed on the progress, the content, and so on. An example of a task and its properties is shown below.
Office 365 Planner
One of the user-friendly features of the Planner is the visualization of your plan. Assume you have dozens of tasks, spread over more than 10 people in your team with deadlines ranging between today and in a couple of weeks. How do you keep an overview? How does everyone in the team know where to look for his or her tasks? One of the strengths of Planner is that it provides you 3 different views of your plan, without requiring any effort on your side: grouped by bucket, by assignee or by progress. These views are illustrated below:
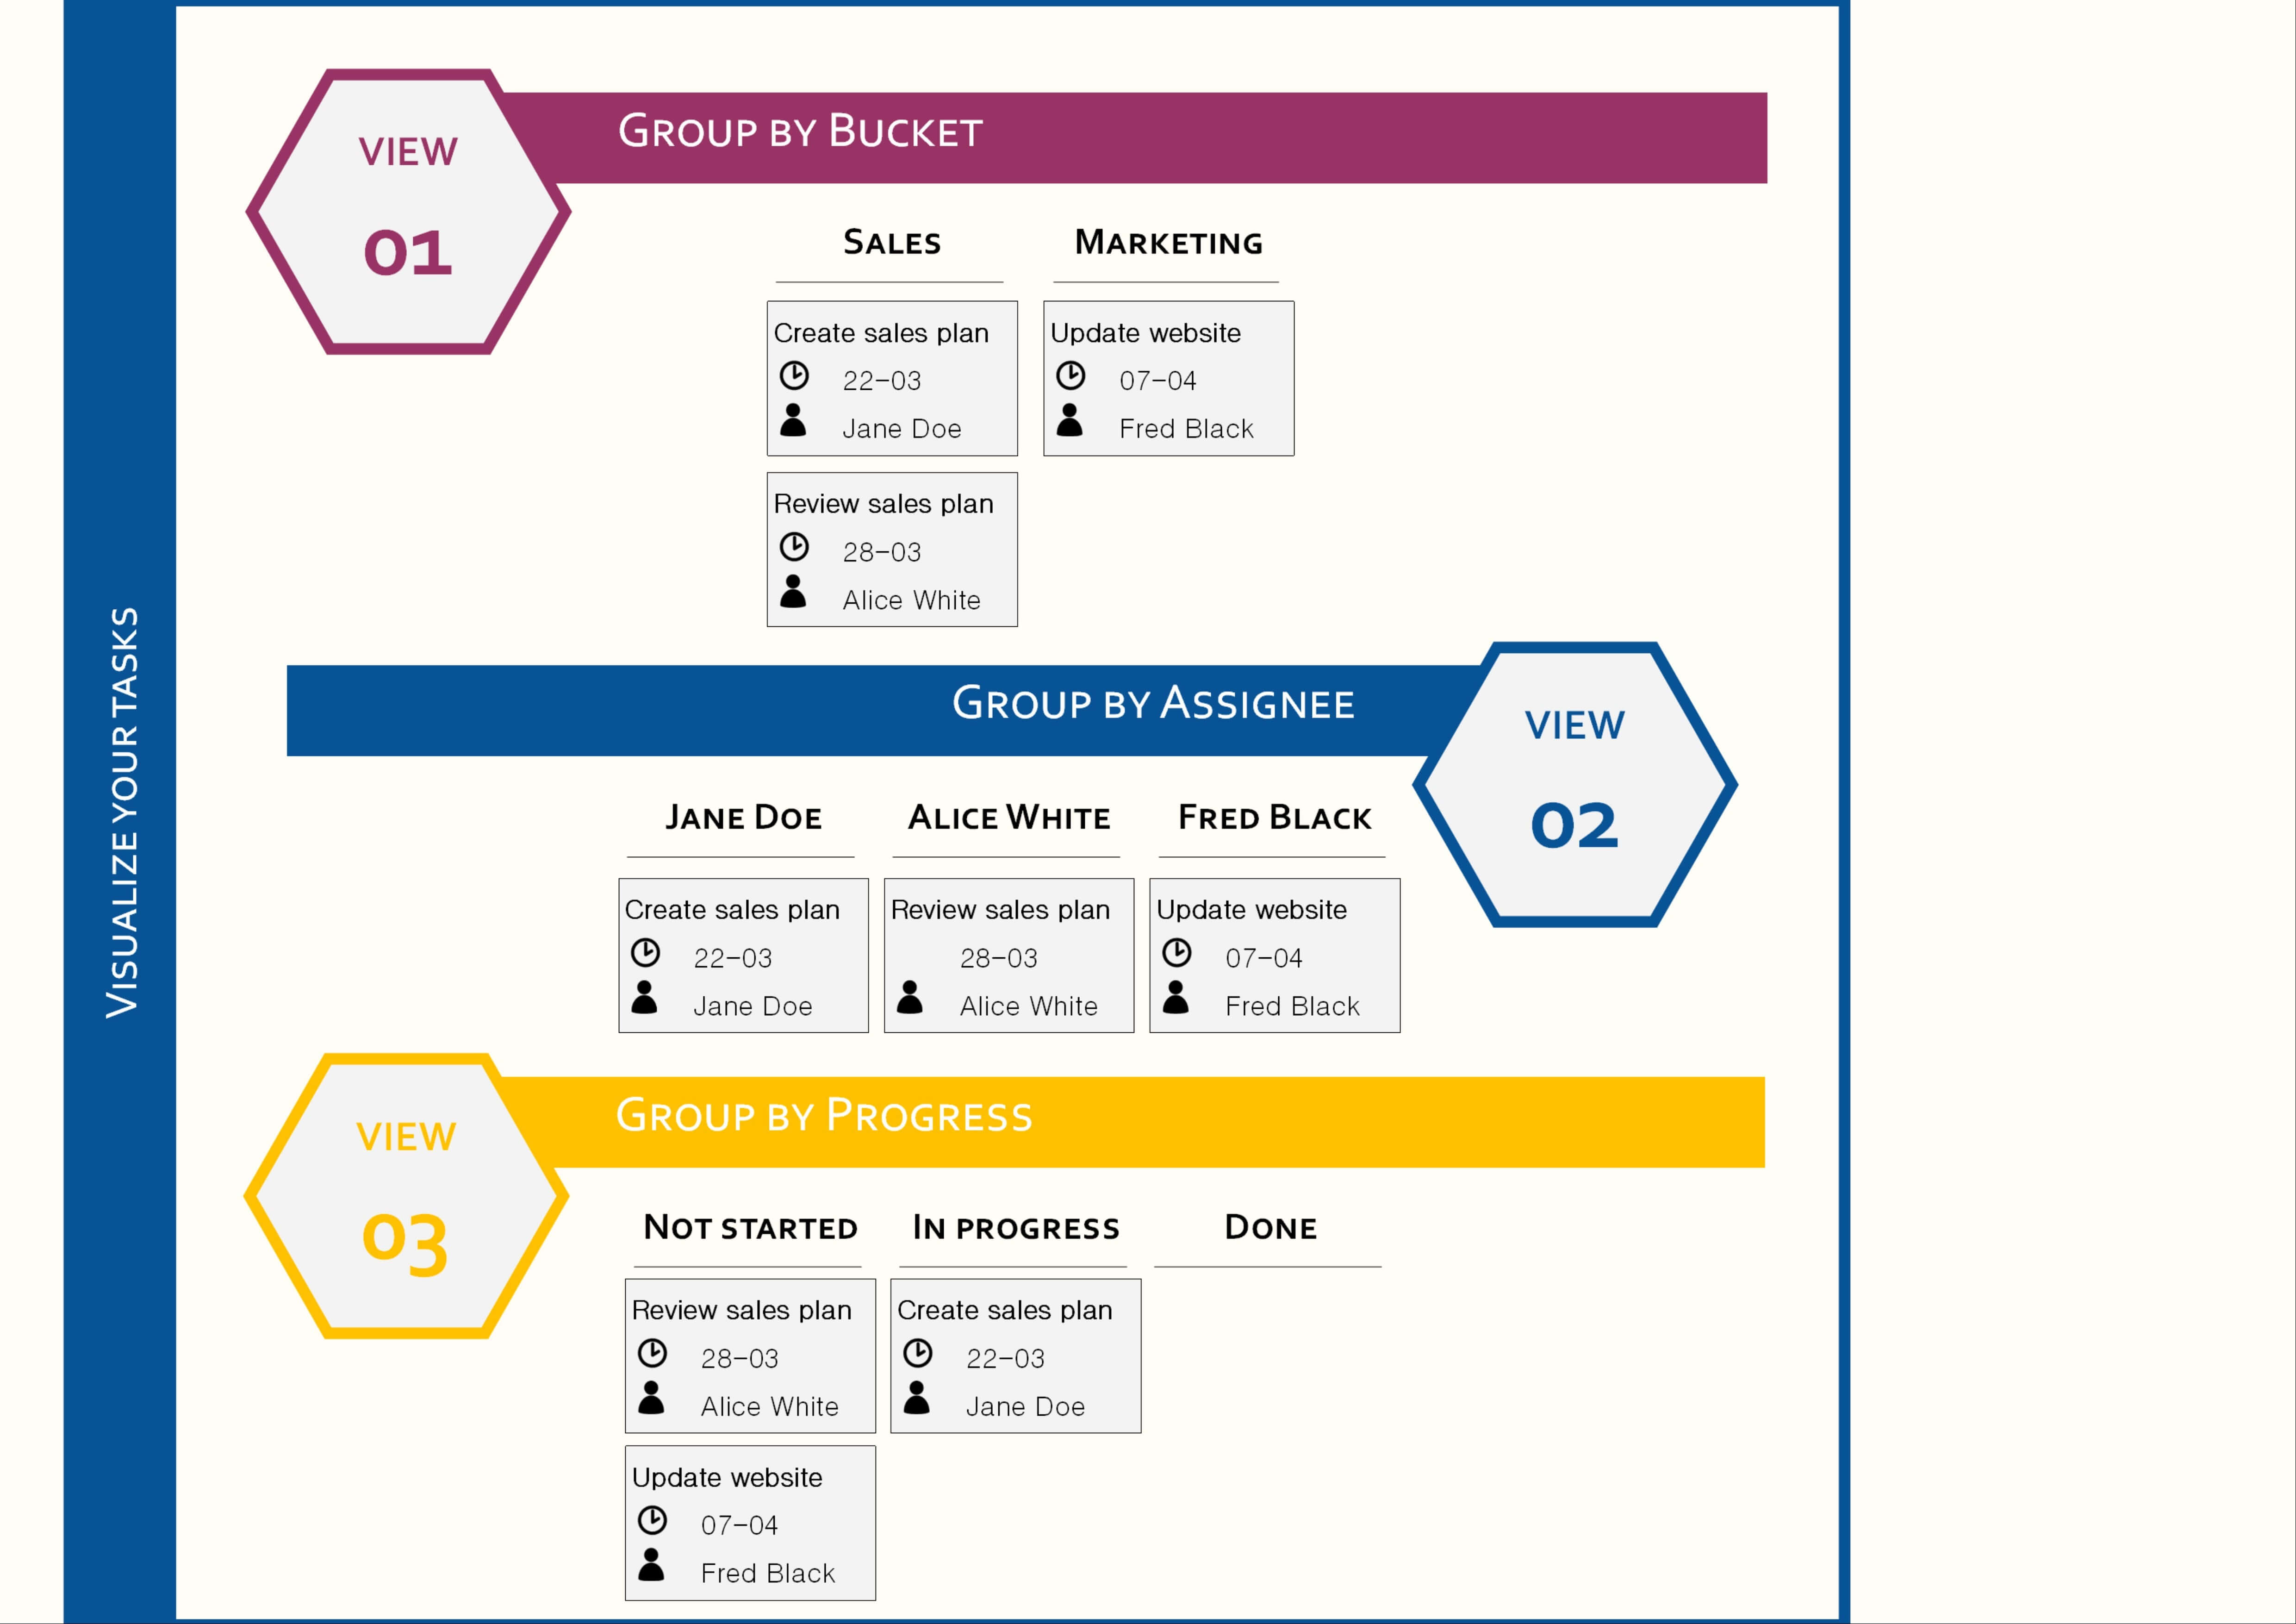
Group by Bucket
When your buckets are named after the teams that are collaborating on the project, grouping by bucket makes sense. It provides you with an overview of all tasks per team, so you can quickly see where potential bottlenecks rise or which team ran out of work. Grouping by assignee is helpful when team members want to consult their own task list. It is more used on an individually base. Everyone can see the list of his tasks with the deadlines. Finally, grouping by progress is effective to have a view on the overall progress of your plan. As Planner also provides a reporting module (see further), this option overlaps with the views in the reporting module.
Finally, there is also a “My Tasks” link available that shows you all of your tasks across plans. Here’s my overview:

My tasks
I’ve grouped it by Plan, but grouping by progress is also available.
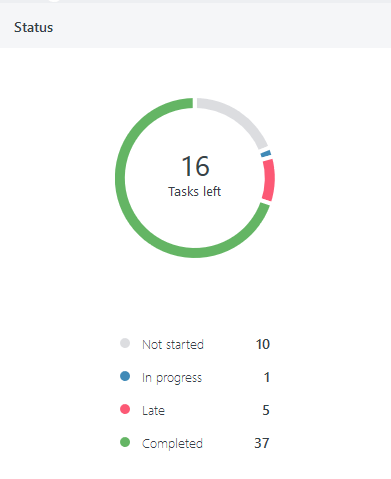
Report on your plan

The first graph shows the progress of your entire plan. You can see how many tasks are not yet started, are in progress, are too late or are completed. By clicking on one of the four colors in the graph, you retrieve a list of the related tasks and you can navigate to the details of a specific task. This graph is very helpful to us, because we can interactively focus on the tasks that are late. In a team meeting, this graph is used to ask questions like “Why is this task too late?”, “What has gone wrong?”, “Are there additional actions required?”, and so on.
An example is shown below.
Reporting on your plan
The second graph is a more detailed version of the first graph: it adds a grouping by assignee. This visualization is suitable for project management, because it answers a lot of questions. E.g. “Who is overwhelmed with work?”, “Who is always delivering late?”, “Who does not have much work?”, and so on. This graph enables transparent communication and collaboration between the team members. Moreover, it enhances spontaneous coherence between your team members. You know what everyone is up to and you can help out where needed. Feels like autonomous teams here? The answer is up to you! An example is shown below.
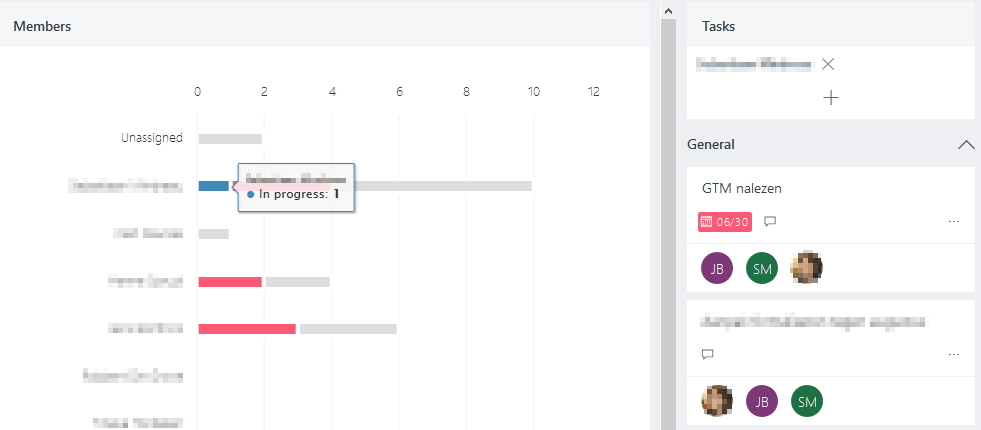
Members
Common pitfalls
By experimenting and our experience in information architecture, we’ve found a few best practices to share as well!
- Don’t use buckets for existing functionality like assignee, use it for teams, or for the different aspects of what you’re planning. E.g. for an event, you might have one for catering, one for content, one for location & decoration, …
- Don’t use the color categories for existing functionality like status. Use them for creating a horizontal. If you decided on teams for your buckets, you might use task priorities or types for cateogries.
- Set up fixed moments, for example weekly, to go over the board together. You discuss open tasks, upcoming deadlines, tasks that are late, … This way you keep the communication channels open, everyone is aware of what’s on the board and you make sure the board stays clean and up to date.
- It is possible to assign multiple people to a task, which is convenient but something to be careful with. Make sure that it is clear to everyone who takes the lead on this task and what is expected of the different assigned people.
Summary
As I have announced at the start of this blog post, I was going to share our knowledge, vision and experiences with you. I hope I got you interested in Office 365 Planner and start experimenting with it, find out its advantages and roll out a new way of planning in your company. The following graphic summarizes Office 365 Planner for you and functions as a quickstart guide into setting up your own plan.
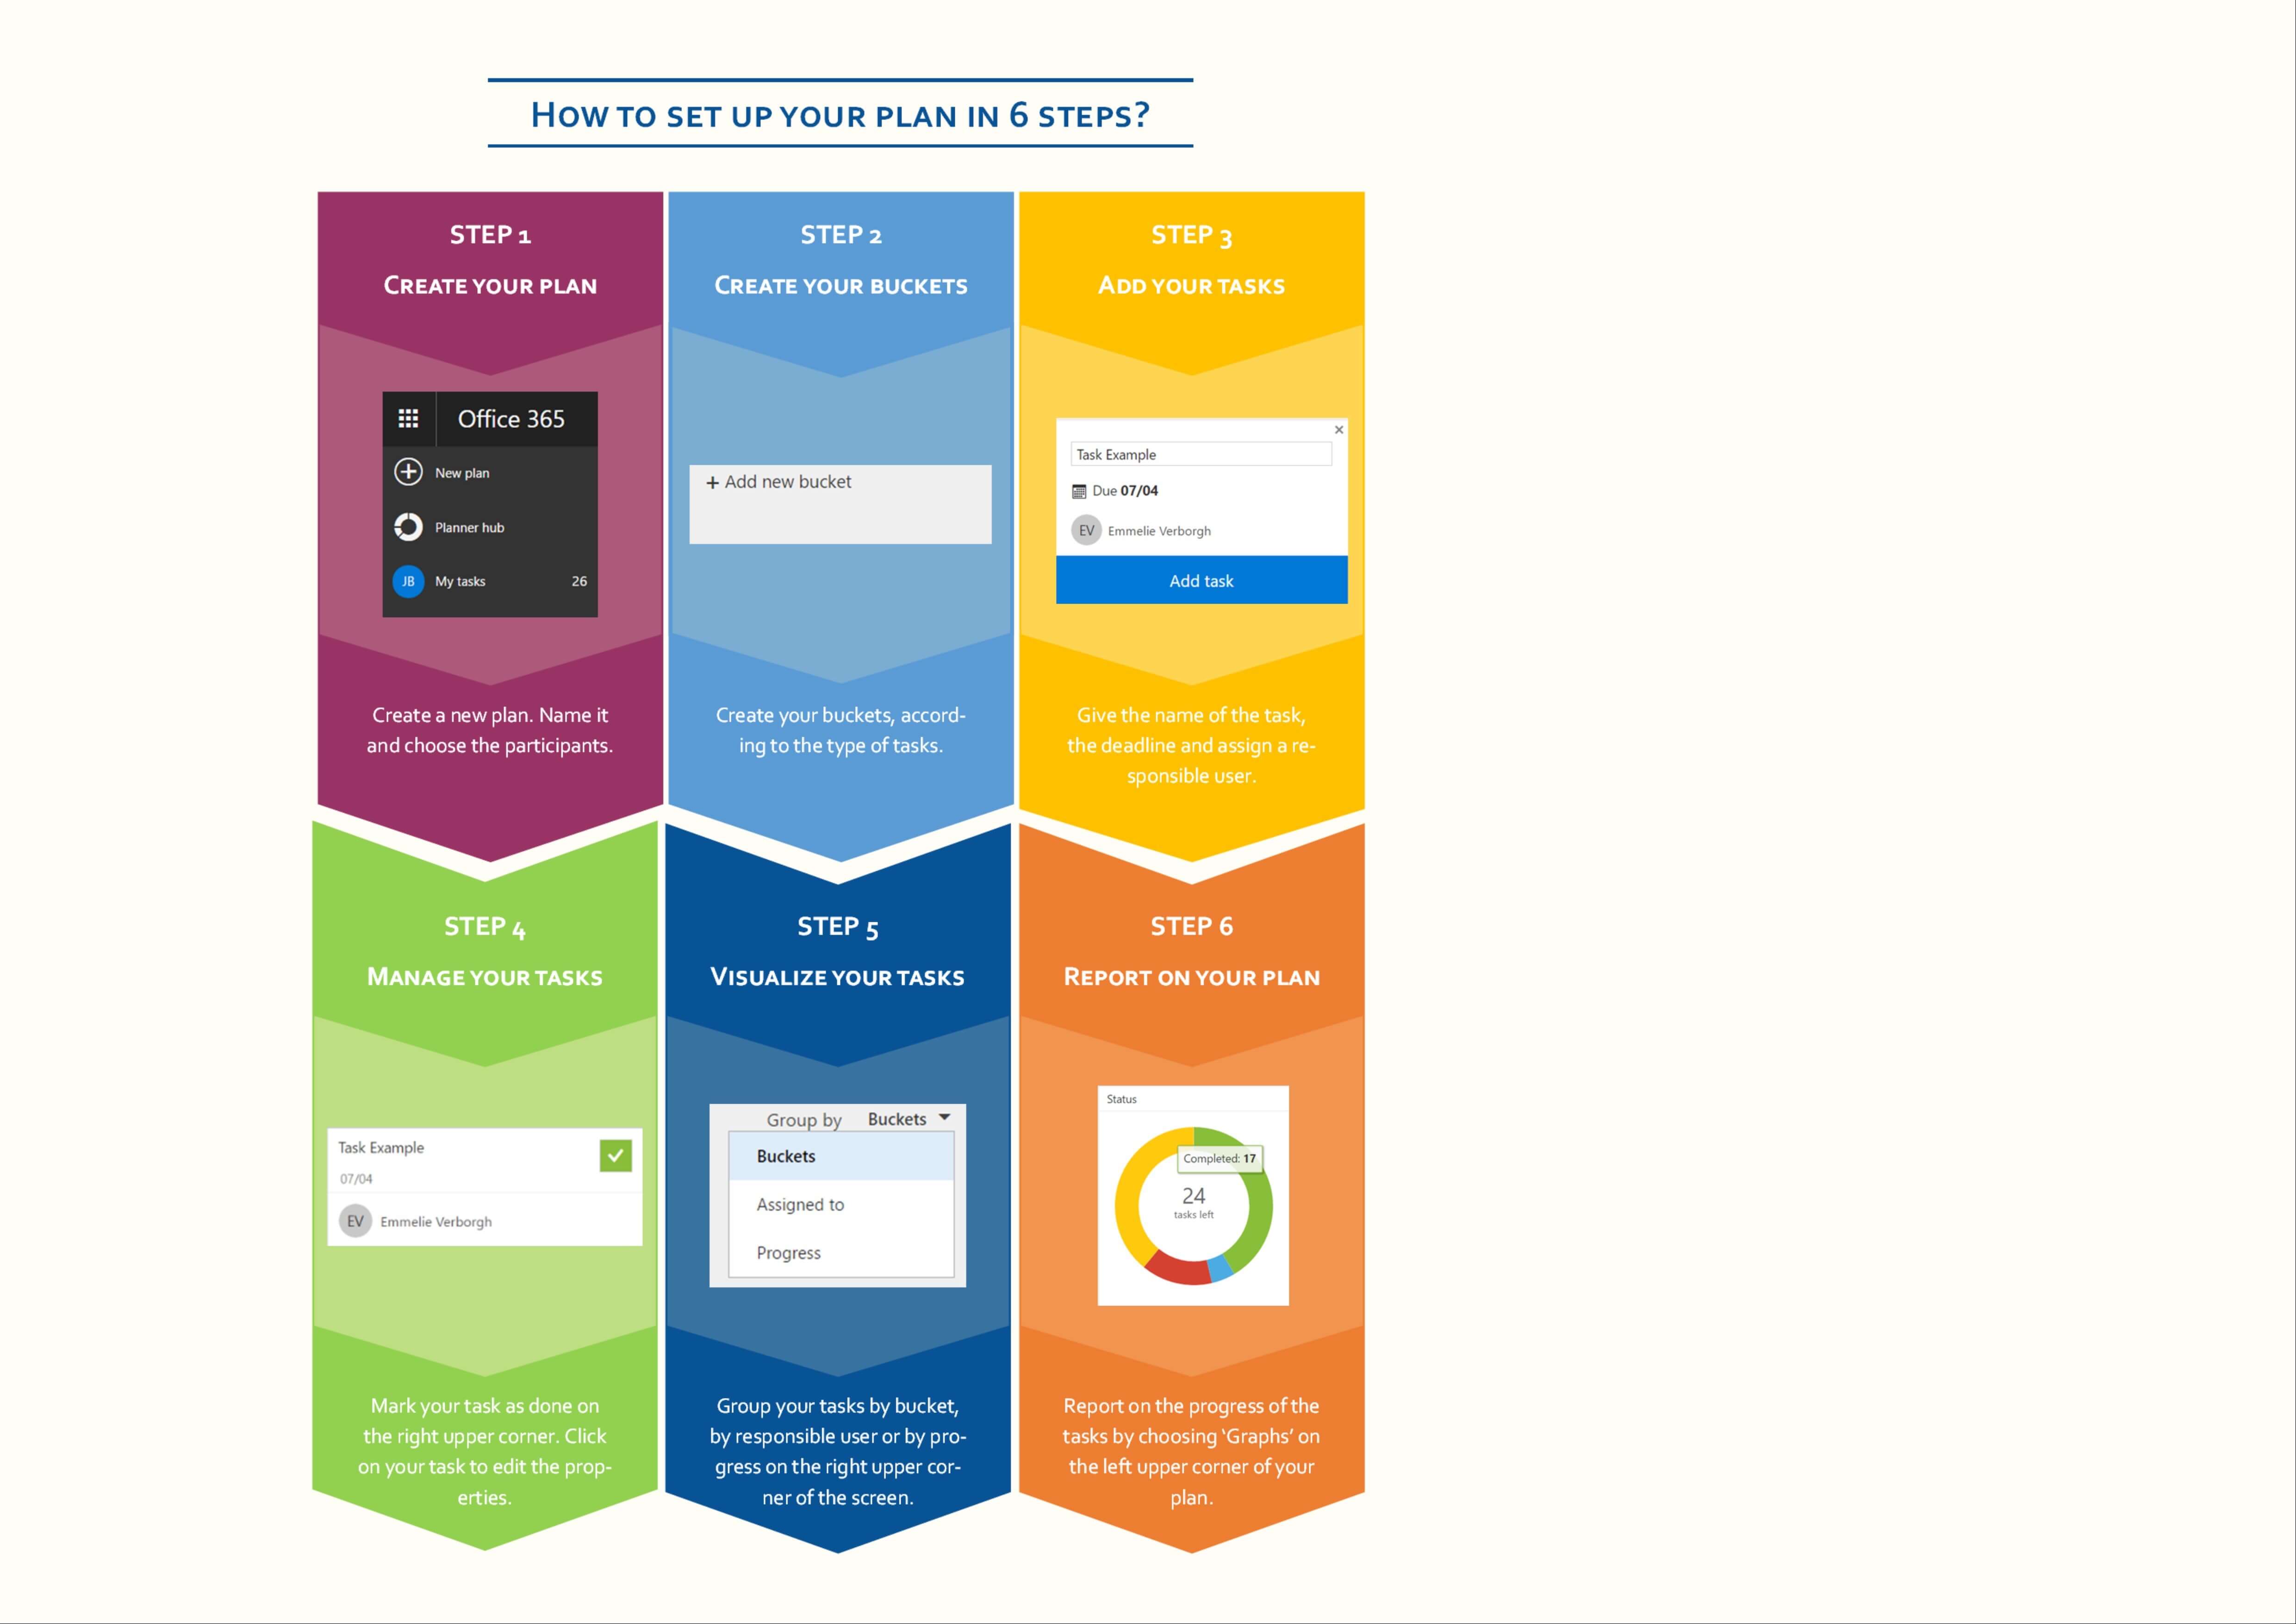
6 Steps to setting your plan
Office 365 Planner is part of many Office 365 subscriptions, go to http://tasks.office.com to see if it’s enabled on your tenant!
Reference:
Mindreau, S. (2018). The Hidden Gem in Office 365: Planner. Available at: http://www.loqutus.com/content/hidden-gem-office-365-planner [Accessed 3 April. 2018].