Microsoft Teams Premium is an add-on to Microsoft 365 and brings additional features. In this blog series we’ll explore each of the 5 categories of features:
- Meeting Customisation
- Meeting Protection
- Meeting AI Features
- Webinars
- Virtual Appointments
I’ve also written an overview of Teams Premium and who needs it and a first steps guide for the public preview or all my Teams Premium articles on one place. The official getting started with Teams Premium guide for Teams Administrators can be found on Microsoft Learn.
NOTE: As this is a long article it has also been published as individual feature blogs for Watermarks, Encryption, Sensitivity labels and Meeting templates.
The Meeting Protection features of Teams Premium include adding a watermark to videos and content shared during a meeting to help protect sensitive information and applying sensitivity labels to meeting to restrict or enforce features available in the meeting such as apply watermarking, limiting lobby bypass, restricting recording, preventing copy & paste from chat. End to End encryption for meetings is also unlocked with a Teams Premium license and can be enforced with a sensitivity label.
With more and more settings becoming available via Meeting Options, it can be challenging for users to pick the best combination options for different meeting types. This is where meeting templates help. As an organization you can set up meeting templates for use in creating meetings by users licensed with Teams Premium to simplify the creating of different types of meetings with the appropriate meeting options pre-selected.
Licensing for the features in this category typically follow the rule that the features are applied to the meeting when it is created/organized by a user licensed for Team Premium.
The watermarking feature and end to end encryption are both available in meetings organized by a user licensed with Teams Premium via the meeting options and applies to all attendees in the meeting regardless of their licenses.
Sensitivity labels require both Teams Premium and Microsoft 365 E5 licenses be assigned to the meeting organizer. The meeting options are then set for the meeting and impact all meeting attendees regardless of their licenses.
This is quite a long article, so here are the sections if you want to jump around:
Meeting Options
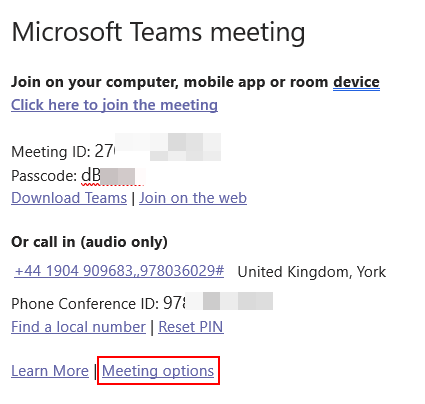
As the features under discussion in this article mainly relate to meeting options, before looking at the meeting protection feature, let’s look at where you can access meeting options.
Applying Meeting Options
- When creating or editing meetings via the Teams client incl desktop, web and mobile
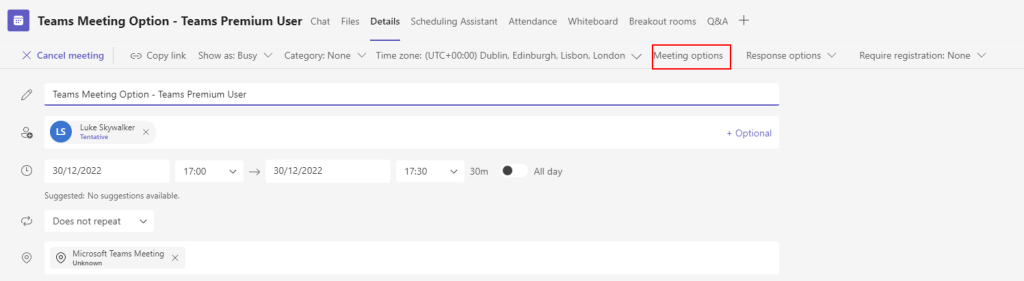
- When creating or editing meeting via Outlook web or desktop client
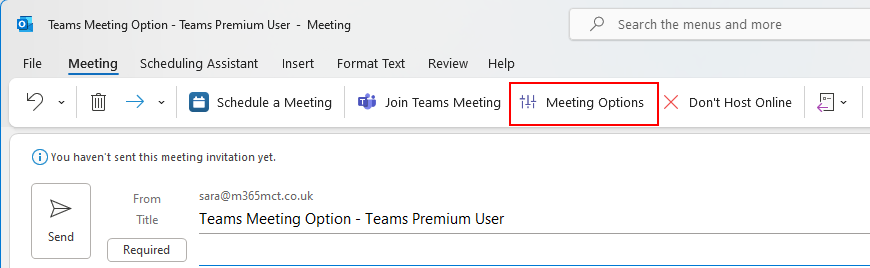
- From the meeting invite
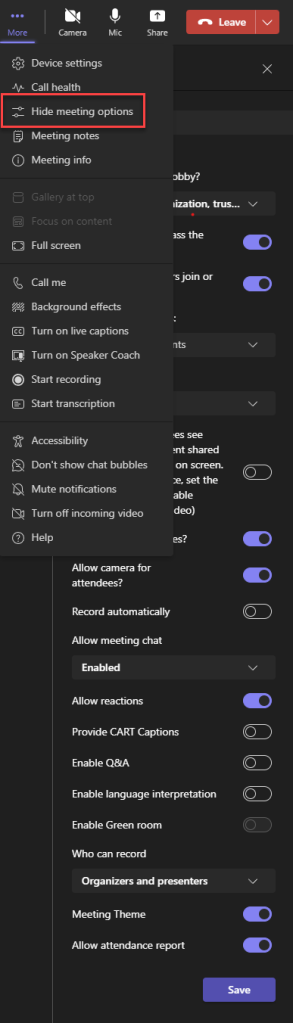
- During a meeting, from the meeting menu you can show/hide meeting options in the side pane
The Teams Premium Difference
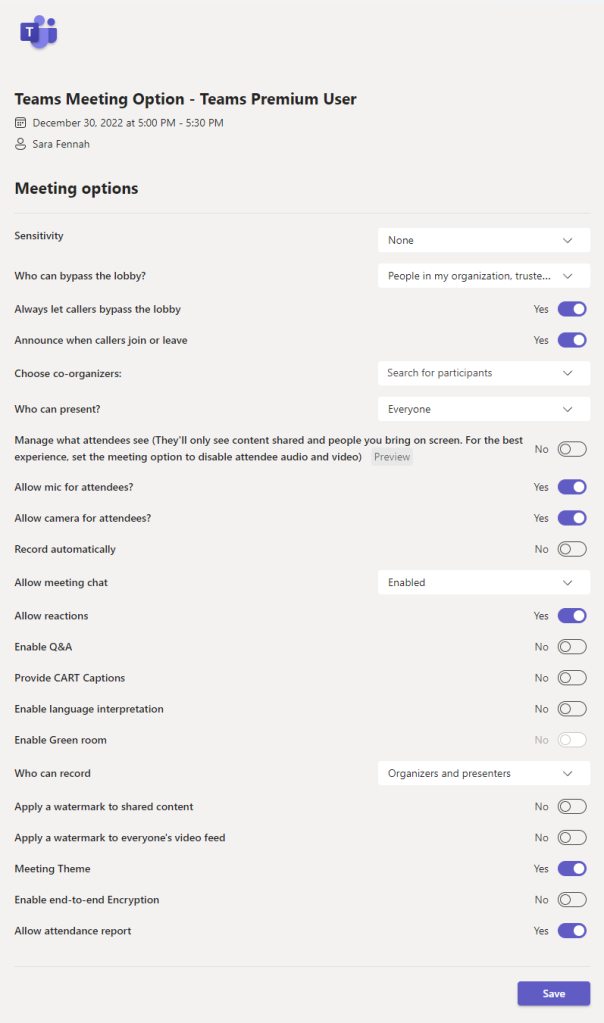
The Meeting Options with Teams Premium License looks like this for a private scheduled meeting ( a standard Teams Meeting)
And for a meeting organised by a user without Teams Premium it looks like this
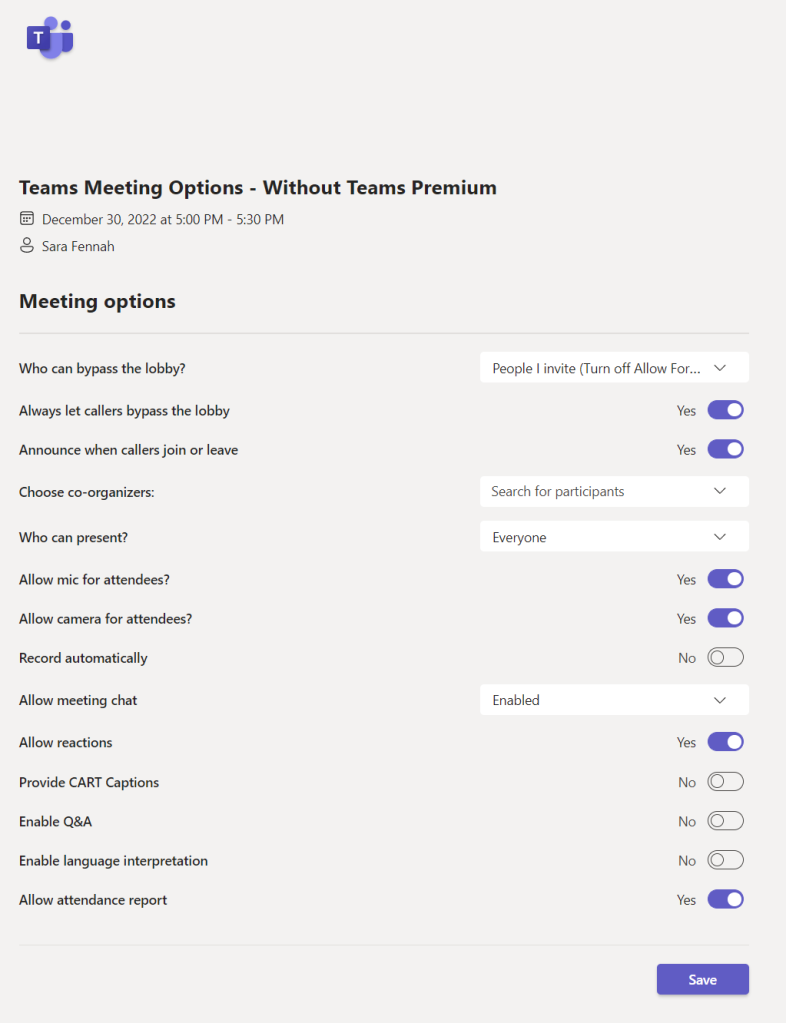
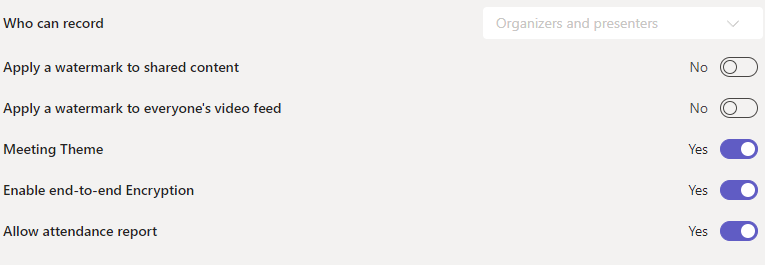
The meeting created by the user with Teams Premium has additional features available in the Meeting Options screen specifically:
- Apply Sensitivity Labels
- Manage What Attendees Can See
- Enable Green Room
- Who can record
- Apply a watermark to shared content
- Apply a watermark to everyone’s video feed
- Meeting Theme
- Enabled end-to-end Encryption
In this article is it is the Sensitivity Labels, watermarks and end-to-end encryption that we will focus on, plus the use of meeting templates to control these.
Watermarking
Watermarking is intended to be used as a deterrent to stop attendees taking and sharing screenshot of meetings and people in the meeting by overlaying their email address onto the incoming video and shared content. This does not block screenshots, but ensures that if screenshots are shared then the source can be easily traced. This is especially useful when using a Teams meeting to share sensitive content or in situations where attendees images should not be shared, such as in education settings.
When watermarks are enabled for either shared content or video feeds the meeting can not be recorded. It appears logical to assume that this is due to challenges determining what watermark should appear on the recording. It will be interesting to see where Microsoft go with this challenge, as I can easily see a situation where you will need both recordings and watermarks.
This is not the only restriction on meeting functionality which comes about from enabling the watermark feature.
When applying a watermark to everyone’s video feed the following features are not available:
- Meeting recording
- Together mode
- Large gallery view
When applying a watermark to shared content the following features are not available:
- Meeting recording
- Together mode
- Large gallery view
- PowerPoint Live
- Whiteboard
- Shared Content from cameras
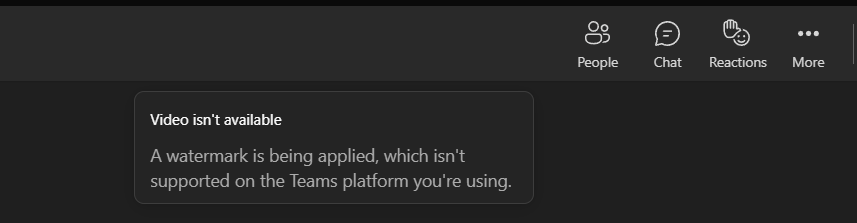
One final limitation is that when users join from a scenario which does not support displaying watermarks, such as web, and VDI, where participant is anonymous or when meeting attendees are in streaming only mode they will have an audio only experience. In the web experience a message is displayed for the user.
Apply a Watermark to a Meeting
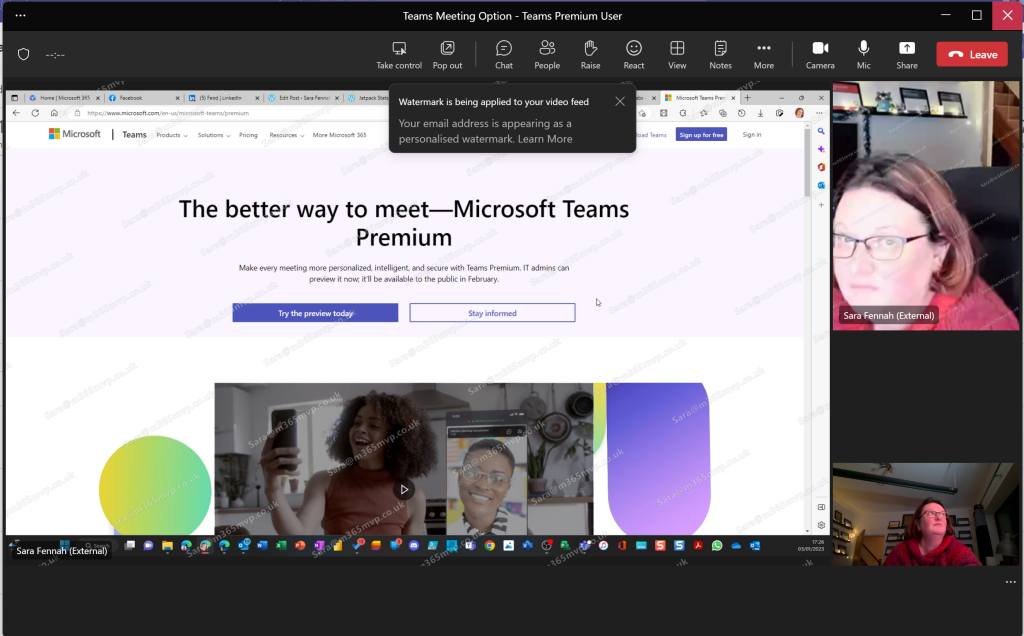
To use watermarking, enable the option in Meeting Options before the meeting starts, the setting can be applied during a meeting but seems to only be applied as people join. Note that recording options are now greyed out.

Once others join the meeting they will see the watermark overlayed on content being shared and others video feeds but not their own. A user sharing their screen will not see the watermark over the content they are sharing. So to test this I need to join from two devices and hence I’m looking in two directions at once in the image below which is taken from the user not sharing the content.
Also note the message displayed at the top of the screen, letting them know the watermark feature is being applied.
Licensing
Only the meeting organiser needs the Teams Premium licence applied for the watermark feature to be applied to the meeting.
Platforms
Watermarks are supported on Teams desktop (Windows & Mac), Teams mobile, Microsoft Teams Rooms on Windows, and Microsoft Teams Rooms on Surface Hub. Watermarks are not supported on Microsoft Teams Rooms on Android, Teams on the Web, VDI or Cloud Video Interop.
Admin and Set up
To ensure the feature is available for users to apply via meeting options it must be enabled in the appropriate Meeting policy/policies.
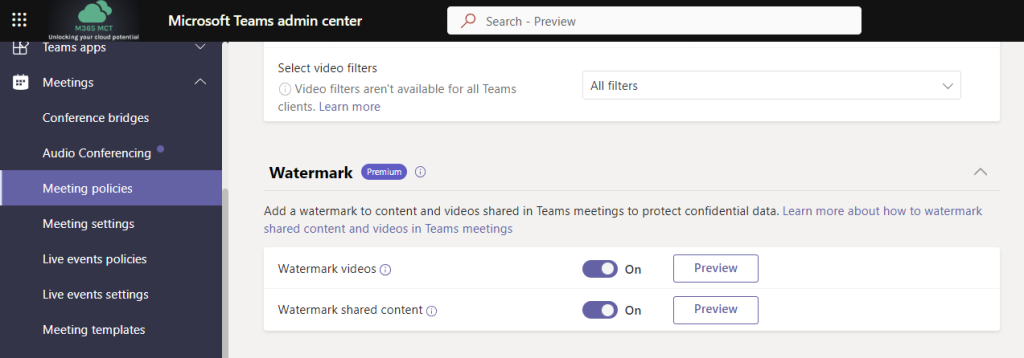
Watermarks can be set manually by the meeting organiser or by an admin in meeting templates and sensitivity labels.
Further Reading
IT Pro: Require a watermark for sensitive Teams meetings
End User: Watermark for Teams meetings – Microsoft Support
End-to-End Encryption
End-to-end encryption for meetings provides an additional layer of security with encryption applied at the start of data transmission and decrypted at the end. Audio, video and screen sharing are all encrypted. Whilst standard Teams meeting encryption involves encrypting data in transit, end-to-end encryption allows users to verify the connection is encrypted along the whole transmission chain.
Not all meeting features are available in an end-to-end encrypted meeting. The following features are not available in encrypted meetings:
- Meeting recording
- Live Transcriptions
- Together mode
- Large gallery view
- Companion Mode
- Breakout Rooms
Encrypting a Meeting
To use end-to-end encryption, enable the option in Meeting Options before the meeting starts. Note that recording options are now greyed out.
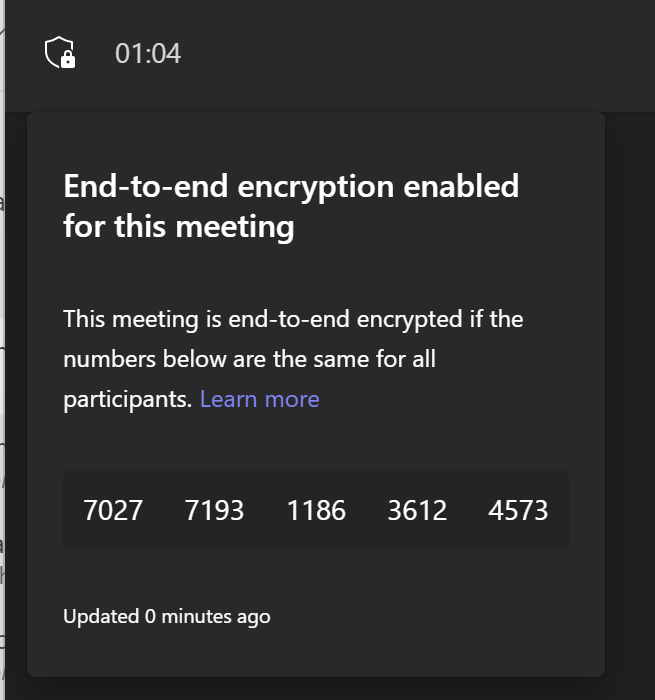
When joining an encrypted meeting you will see a message confirming that the meeting encryption is active.

There is also a secure logo in the top left corner of the meeting window.
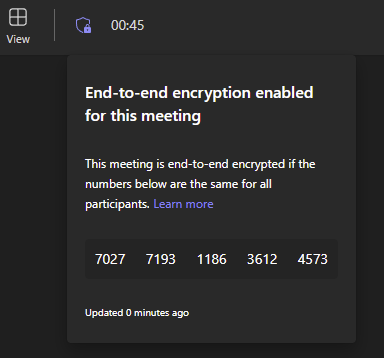
Meeting participants can verify that end-to-end encryption is active by verifying they can see the same number
Licensing
Only the meeting organiser needs the Teams Premium licence applied for the encryption feature to be applied to the meeting.
Platforms
End-to-end encrypted meetings are supported when the parties are on Teams desktop (Windows & Mac), Teams mobile and Microsoft Teams Rooms on Windows.
Admin and Set up
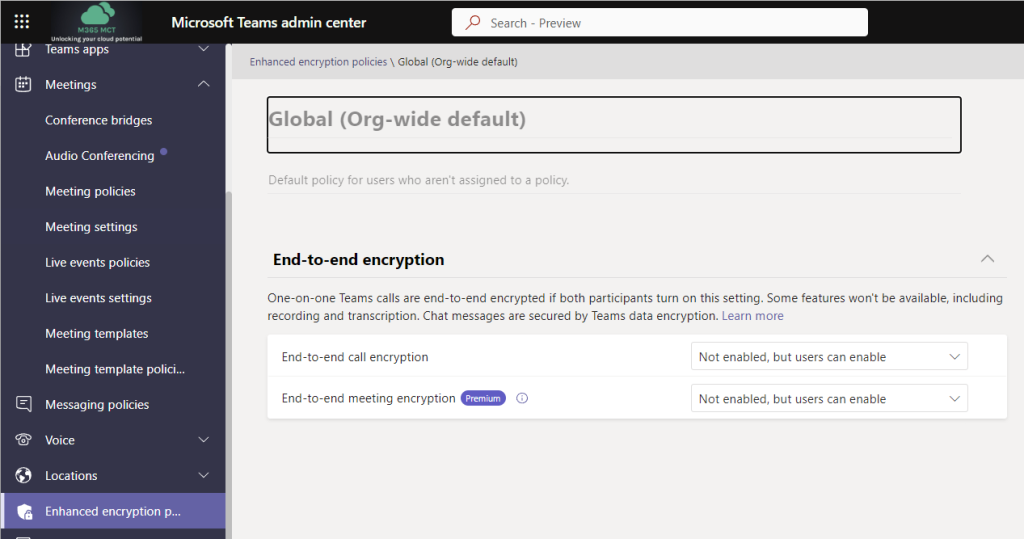
To ensure the feature is available for users to apply via meeting options it must be enabled in the appropriate Enhanced encryption policy/policies.
Further Reading
IT Pro: Require end-to-end encryption for sensitive Teams meetings
End User: Use end-to-end encryption for Teams meetings – Microsoft Support
Sensitivity Labels
Sensitivity labels can now be assigned to meetings. This provides the ability to limit access to the meeting invite and responses in Outlook and Teams as well as the meeting and chat in Teams as well as enforce meeting options for the meeting. Sensitivity Labels will be best used in conjunction with meeting templates for the majority of users, whilst advanced users may wish to manually set the label on the meeting with or without meeting templates. More on meeting templates to follow.
The Sensitivity Label is visible on the meeting in Teams, though not currently in the position shown in the documentation, but rather under the … menu on the meeting edit screen.

In the official documentation, and presumably coming soon this should be showing next to the join button

If the label includes item encryption the meeting invite is encrypted. This encryption works in the same way as email encryption. Meaning that recipients using a mail client which can decrypt the message (such as Outlook) will be able to see the message whilst those using other clients will need to use Outlook on the Web or the encryption portal to access the invite.
There are some practical limitations to consider as well. They key ones:
- Sensitivity labels cannot be applied to instant meetings (Meet Now), Webinars or Live Events
- Automatic labelling is not supported
- Mobile clients cannot decrypt the meeting invite in calendar applications including Outlook mobile and as such a link to the encrypted content will be displayed
- Copy chat restriction is currently not supported for external users, nor in all browsers when using Teams for Web
- If the label is changed during a meeting, the changes will not apply unless the meeting ends & restarts
- Labelling meeting using the graph API is not supported
As these limitations are very likely to change as the product evolves, please do review these here for up to date information.
Create a Meeting Sensitivity Label
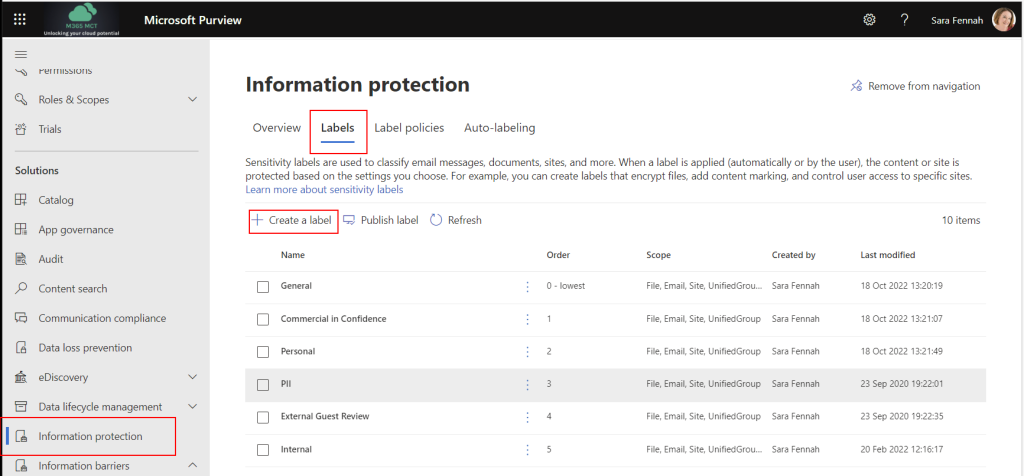
Sensitivity labels are created from the Microsoft Purview Compliance Portal (https://compliance.microsoft.com/) under Information Protection > Labels. General instructions on creating sensitivity labels is available in the documentation on Microsoft Learn.
To create a label for a meeting, choose Create a Label
Enter an appropriate a Name and Display name. The reason for two names is so that the display name can be reused when an updated label is required with different settings (a new version of a label) but to the users it should look the same. For example Name = SensitiveMeetingV1 and Display name = Sensitive Meeting. Add appropriate description for users and include version detail in description for admins. Finally (optional) pick a label colour. Click Next on each screen to advance to the next.

For a meeting label choose a scope of Items and Include meetings. Click Next to advance to the next screen

In protection settings encryption is used to control who can access the meeting invite, content marking is used to put header/footer into the meeting invite and Protect Teams meeting and chats is used to configure the meeting options and protection for meeting chat.
Encrypting the meeting controls access to the meeting invite, meeting details and join link, which can help ensure your meeting join information is not shared further than those invited by the organizer of the meeting. Encryption and content marking settings are the same as for all other item sensitivity labels, so here we will focus on the new settings, those for meetings and chats. Click Next to advance to the next screen

These controls set the meeting options on meetings with the sensitivity label assigned to the values set in this screen and prevent the organizer from altering those settings. After the walk through of creating the label this article discusses these options in more detail. Click Next to advance to the next screen

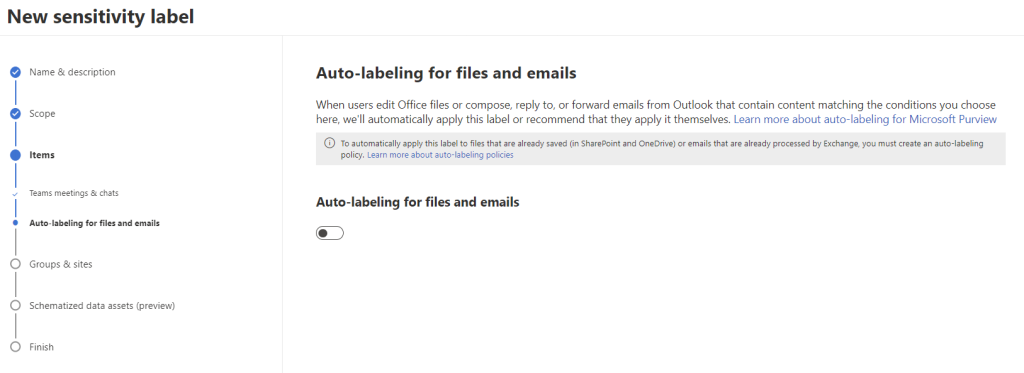
Auto labelling is not supported for meeting labels, so leave this option off. Click Next to advance to the next screen
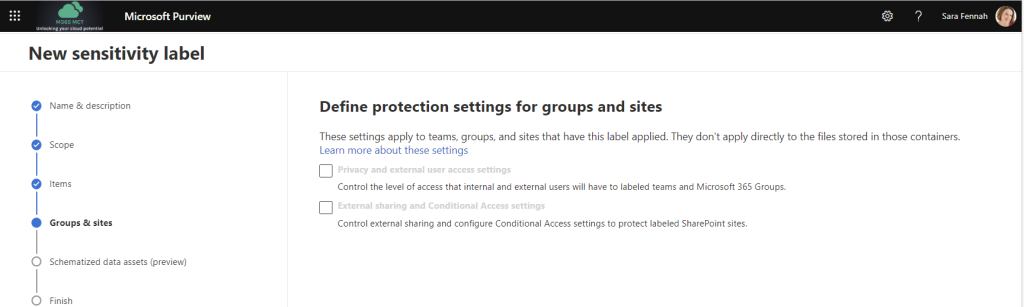
As groups were not selected in the scope at the start, the group options are greyed out. Click Next to advance to the next screen
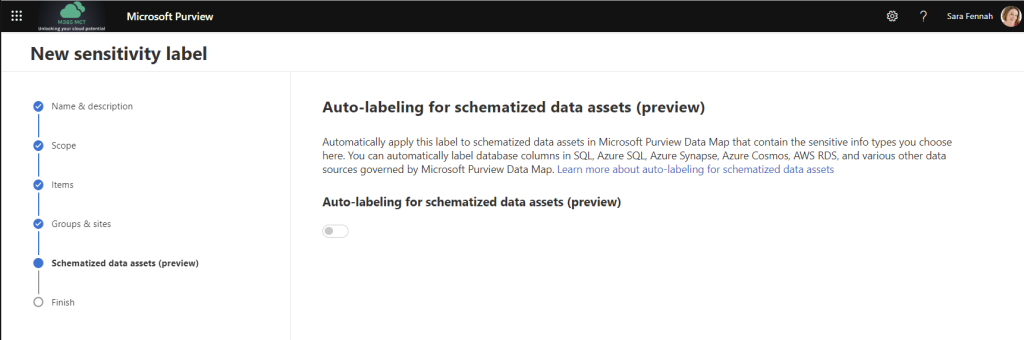
Options for schematized data assets were not selected in the scope at the start, the group options are greyed out. Click Next to advance to the next screen
Review the summary of chosen settings. You can return to any step and edit the settings if they do not look right using the Edit link on each section or click Create label if all settings are correct to create and save your label.

Once the label has been created it needs to be published to be available to users. Publishing a label is no different for a meeting label as other labels. Assuming your organization already uses sensitivity labels and you wish to add this label to an existing policy this is covered later in this article. To learn about label policies and publishing sensitivity labels see the documentation on Microsoft Learn.

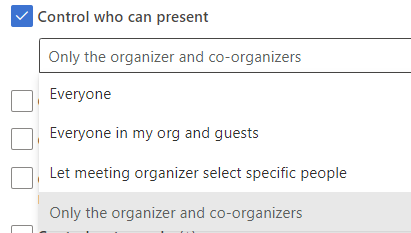
Meeting Options Controls for Meetings & Chats in a Sensitivity Label
At the top of the screen is a link to learn more about these options, which points to Change participant settings for a Teams meeting – Microsoft Support. The controls which can be set within the label are as follows.
The first setting is to set the meeting lobby controls for the meeting.
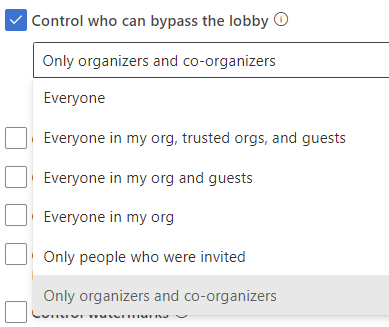
When selecting people who can bypass the lobby to Everyone in my org, trusted orgs and guests, you can also choose to allow dial in users to bypass the lobby


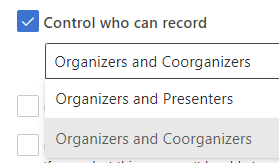
By default anyone from the same organization as the meeting organizer with presenter rights in a meeting can start the recording. The recording will then be stored in the OneDrive of the user who starts the recording with the meeting organizer having owner rights and ability to change permissions, expiry date and video settings. This can lead to confusion, so it can be preferable to limit recording to the meeting organizer and appointed co-organizers.
Automatic recording of meetings is helpful in some situations, such as when the organizer cannot join at the start of the meeting, or when it is important that no-one forgets to start the recording.

Of note on this control is that the wording changes when the toggle is switched. With the setting off the wording reads Don’t record automatically and with the setting off it reads Record automatically.

End-to-end encryption can be enforced from the sensitivity label. This toggle, as with the automatic recording toggle, changes wording as it is set. When off it reads Don’t apply end-to-end encryption.

When enables the setting reads Apply end-to-end encryption. Remember end-to-end encryption disables recording of the meeting and as such encryption must be off to set recording options in a sensitivity label and if recording is set to automatic within the label then encryption cannot be switched on.

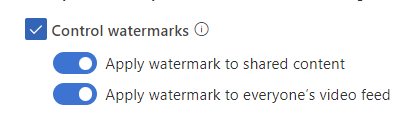
Watermarking can also be set by the sensitivity label. Remember watermarks disable recording of the meeting and as such watermarks must be off to set recording options in a sensitivity label and if recording is set to automatic within the label then watermarks cannot be switched on.

Water mark settings also change their wording within the controls from Don’t apply … to Apply…
As in direct meeting option controls the sensitivity label can be used to limit availability of meeting chat. The chat can be set to be disabled for the meeting, available only during the meeting or Always which means from the time the meeting is created.

A control which is only available via the sensitivity label currently and not directly in meeting options is to prevent the copying of the meeting chat. Please note that this restriction is currently not supported for external users, nor in all browsers when using Teams for Web and it is recommended you read the learn who gets blocked link for more information: Prevent copying chat to the clipboard label setting

Publish a New Label Using an Existing Policy
To add your new label to an existing policy choose Label policies in the Information Protection page within the Microsoft Purview Compliance Portal. Select the label policy to be edited and choose Edit policy

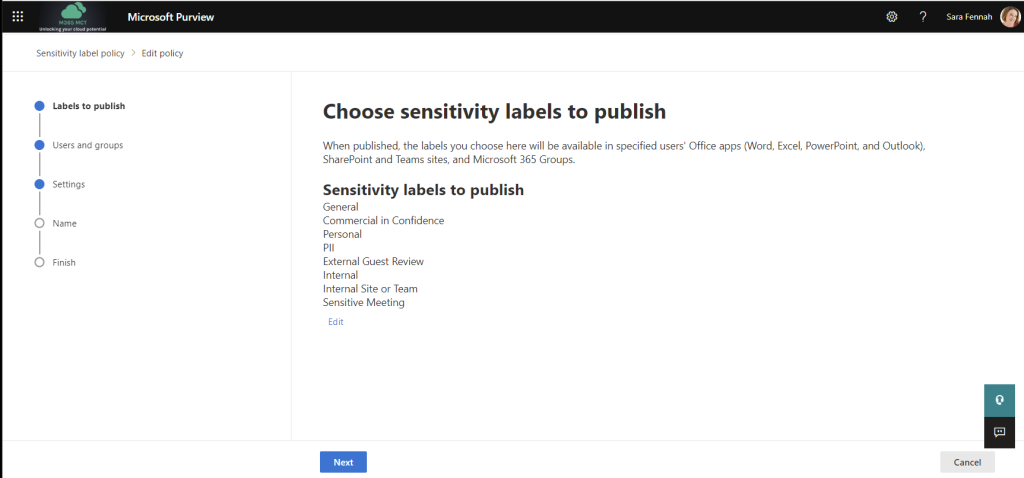
To add a new label move to the Labels to publish page and choose Edit below list of labels

Search for and select the new label then click Add

Verify the list of labels is correct and click Next
Assuming you do not need to make any further changes to the policy at this point other than for meetings click Next until you reach the Default settings for meetings and calendar events, choose the default label to be applied or leave blank. If not all users in your organization will have Teams Premium and E5 licences it is likely to cause confusion setting a default as users without the licenses will not be able to see the sensitivity label assigned not change it, and therefore I would recommend not setting a default.

Review the settings and click Submit if all are correct.

Wait for confirmation that the policy has been updated before navigating away from the page.

Add Sensitivity Label for Channel Meetings
You will first need to create AND SAVE a label that applies to a meeting before choosing that label as a default for channel meetings.
If (and that’s a big if), you want create one sensitivity label to apply to items (incl meetings), groups and channel meetings, you would need to create the label with the scope set to items incl meetings plus groups. Once created you will then edit that same label and set the label itself as the default for channel meetings in a Team with the label applied.
Too muddled? Then just make it simple and don’t set multiple scopes within the same label.
For example to use sensitivity labels to restrict files, meetings, groups, teams and sites to internal use only, I would:
- Create a label called Internal scoped to Items (excl meetings) and applying only encryption, with encryption limiting access to internal users. This label could also include marking with a watermark/header/footer, as required.
- Create a label called Internal Meeting scoped to Items (incl meetings) with encryption enforced and limited to internal users plus meeting options with lobby bypass limited to only People in my organisation, along with any other meeting options you wished to apply. This will limit access to the meeting invite to internal users only and ensure anyone else who is given meeting join codes is sent to the meeting lobby.
- Create a label called Internal Team scoped to Groups & sites with controls on Privacy and external user access settings which sets the group to a Private group and does not allow external users; External sharing and Conditional Access settings which sets sharing to Only people in your organization; and pick the Internal Meeting label as the default for channel meetings.

- Publish the 3 labels to required users
Apply a Meeting Sensitivity Label to an Individual Meeting
To manually assign a sensitivity label to an individual meeting, open the meeting options before the meeting starts and choose a sensitivity label, then Save the changes.

Whilst you can change the sensitivity label from meeting options within the meeting the changes do not apply until the meeting ends. So if you need to change the label during meeting the organizer should make the change and then end the meeting, which will remove everyone from the meeting. When people rejoin the meeting, the updated meeting options will apply.
Licensing
Only the meeting organiser needs the Teams Premium licence applied to be able to set a sensitivity label on a meeting. However they also need to be assigned a Microsoft 365 E5/A5/G5 or Office 365 E5/A5 license.
Platforms
Applying, changing and viewing a sensitivity label on a meeting is supported in Teams for web, Windows and MacOS. You can also manage and view the label applied to a meeting from Outlook for web, Windows and MacOS. However note at time of writing no Outlook for Mac versions have been released with this support, see Requirements for details of supported version numbers.
Admin and Set up
To ensure the feature is available for users to apply via meeting options the labels need to be created and published by a Compliance Administrator. There is not additional set up for the Teams Administrator.
Further Reading
IT Pro:
- Configure Teams meetings with three tiers of protection
- Use sensitivity labels to protect calendar items, Teams meetings, and chat
- Use Teams meeting templates, sensitivity labels, and admin policies together for sensitive meetings
- Licensing Guidance for Sensitivity Labels
End User: Sensitivity labels for Teams meetings – Microsoft Support
Meeting Templates
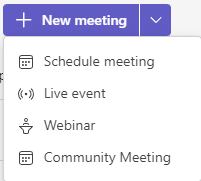
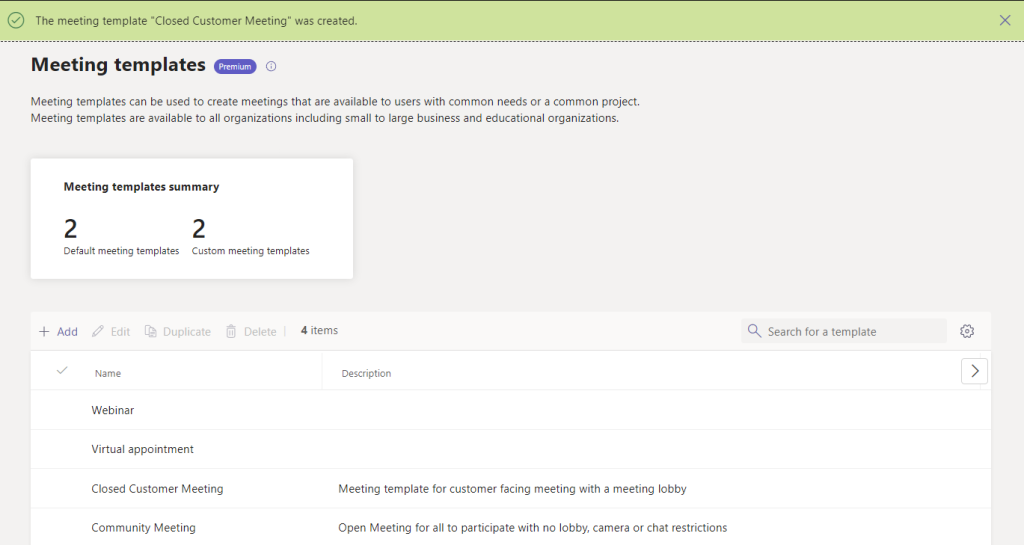
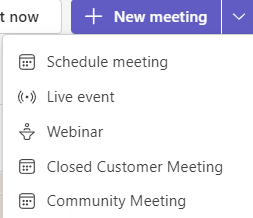
Meeting templates will help users create meetings with the correct settings in meeting options as the template applies those setting automatically. The meeting templates also help with governance as they enforce the meeting options set in the template. Templated meetings published to the user show up on the New Meeting button in the Teams client, which is what the Community Meeting option shown in the image below is.
Create a Meeting Template
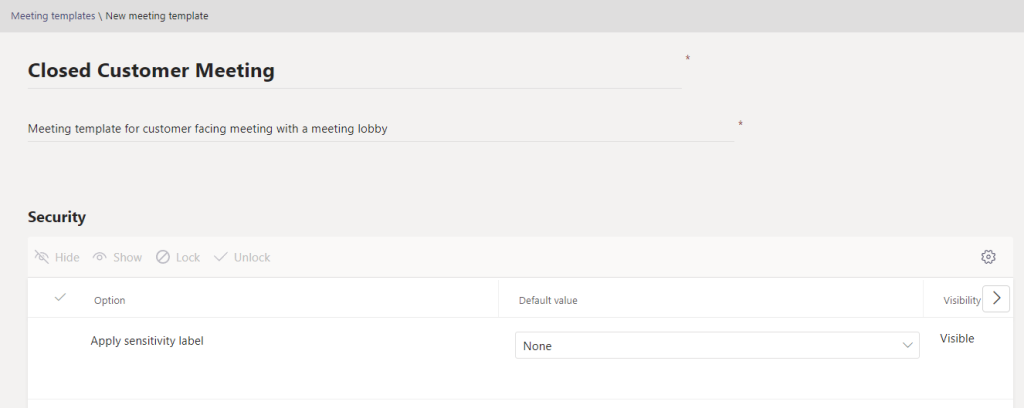
To create a meeting template, in the Teams Admin Center choose Meetings > Meeting Templates and select Add

Add a name and description then select settings as desired, before saving the template. The normal restrictions on which options can be set in combination apply within the meeting template. e.g. Meetings using end-to-end encryption cannot be recorded.
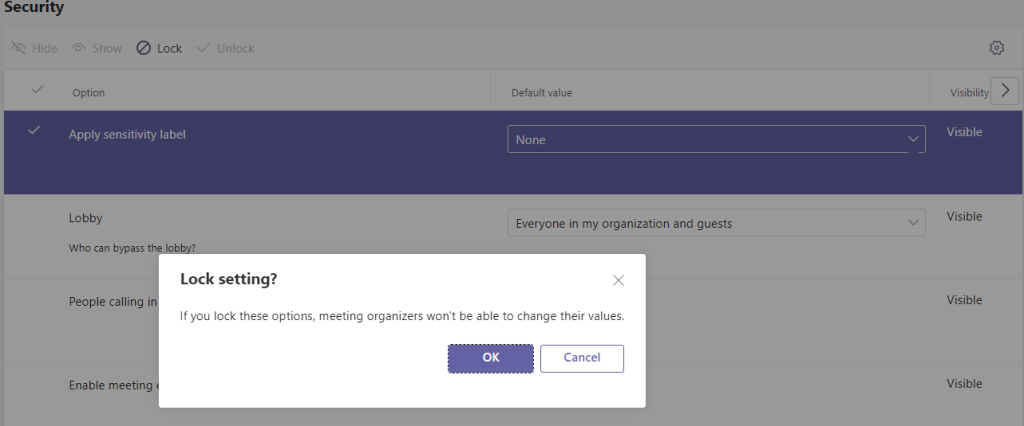
As well as configuring the default settings for each option, the chosen setting can be locked so it cannot be edited by the meeting organiser.
Some settings can also be hidden, effectively making them unavailable for users
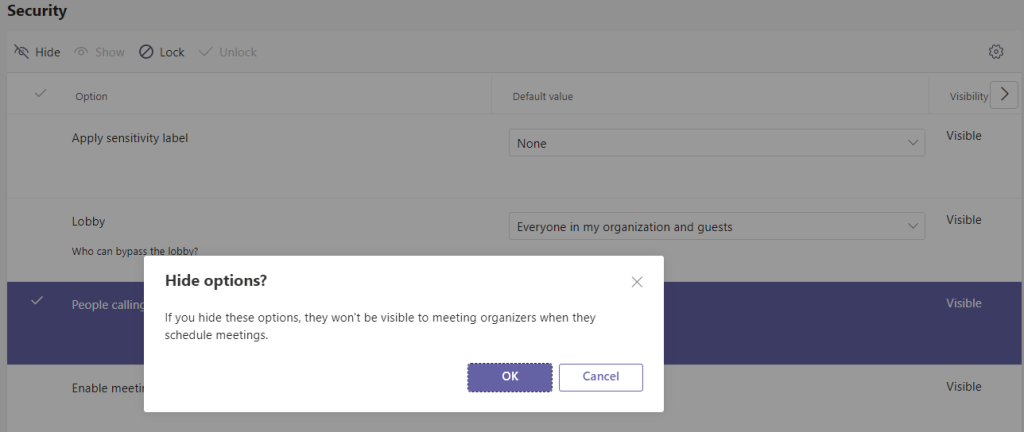
Whilst hiding an option may seem like a good thing to do and minimise the options available to users, it can lead to confusion with users familiar with the meeting options and a lack of clarity as to the features available in the meeting. When users are aware that settings have ben configured for specific security or governance reasons this avoids the belief that there is a bug or problem.
Options are grouped into categories:
- Security
- Audio and Video
- Recording and Transcription
- Roles
- Meeting Engagement
Security Options
Applying a Sensitivity label to a meeting enforces settings for the other options and those options set by the label will be greyed out (unavailable to set, hidden or locked) in the meeting template.
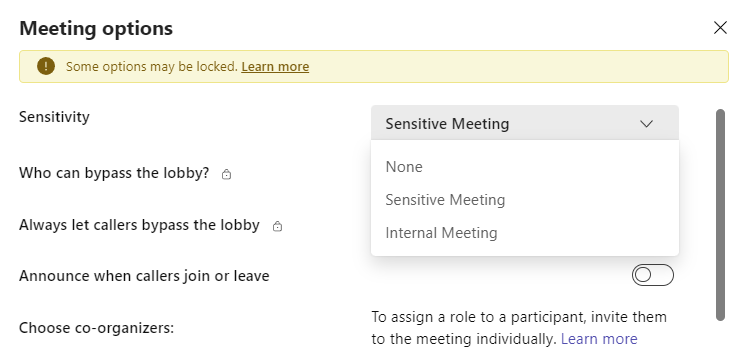
Templates which apply sensitivity labels would be expected to lock the label in place, so it cannot be removed and the options altered, unless the label is a recommended setting. Sensitivity labels are created and managed in the Microsoft Purview Compliance Portal. Available labels will depend on the configuration of labels within your tenant. The sensitivity label option cannot be hidden, but can be locked once set.

Lobby options include all the settings for the lobby in standard meeting options. This option can be hidden and also locked once set.

The option to permit People calling in by phone from bypassing the lobby is controlled partly by the lobby bypass setting chosen. If this option is set from the lobby bypass it cannot be locked nor hidden, if it can be set manually then it can be locked and/or hidden.
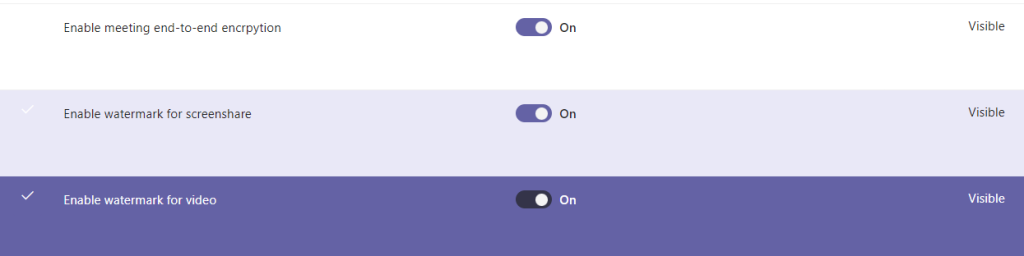
Enable meeting end-to-end encryption, watermark for screenshare and watermark for video can all be locked and hidden.
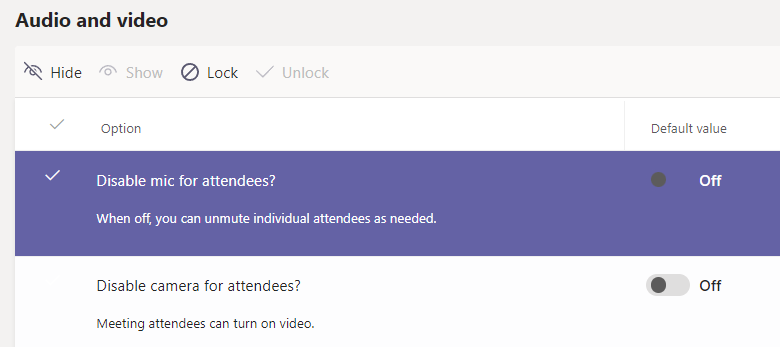
Audio and Video Options
Both disable mic and camera for attendees can be locked and hidden in the template
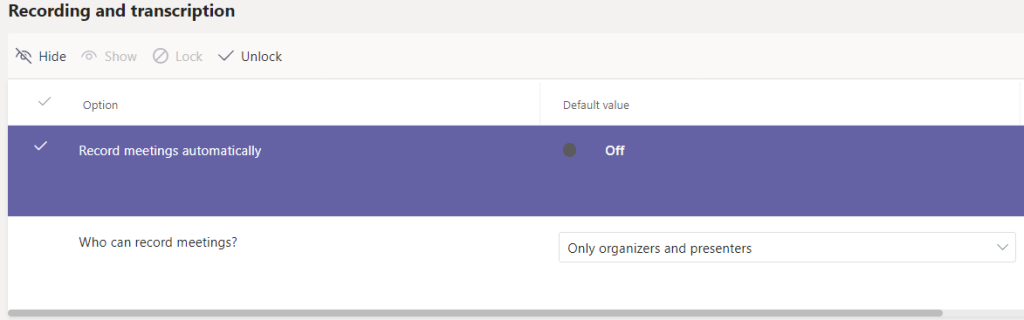
Recording and Transcription Options
Recording and transcription options can both be locked or hidden.
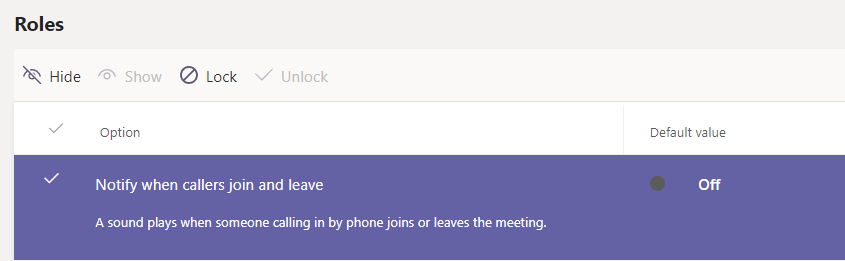
Roles Options
The caller join notification option can be hidden and/or locked.
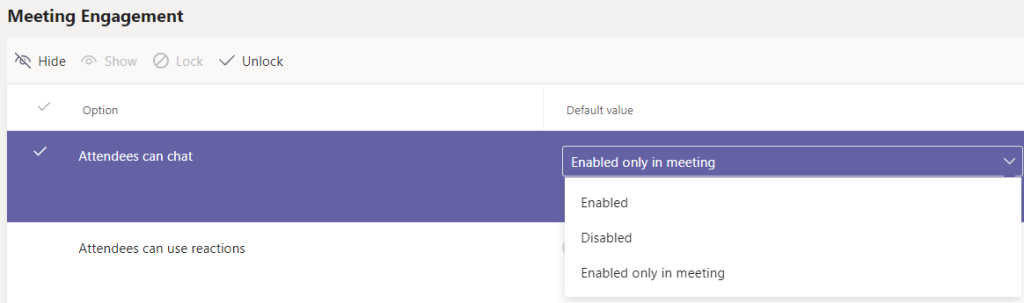
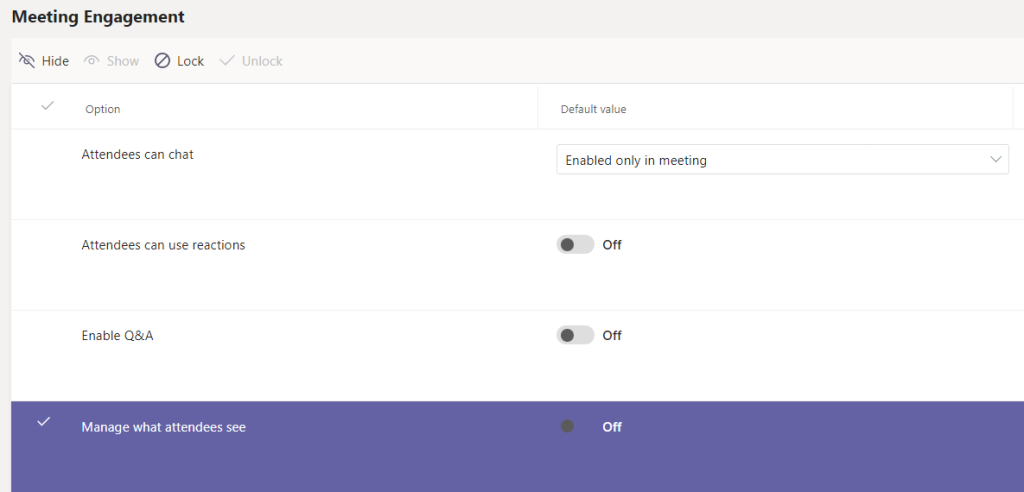
Meeting Engagement Options
Attendee chat option includes standard chat availability settings and can locked and/or hidden.
The remaining three options in the Meeting Engagement category, Reactions, Q&A and manage what attendees can see toggles, can all be hidden and/or locked.
Once the meeting template is saved it needs to be published.
Publishing a Meeting Template
To ensure the availability of a meeting template, in the Teams Admin Center go to Meetings > Meeting Template Policies. By default new templates are automatically added to Global meeting template policy.
Custom meeting template policies can be created and used to give different users different sets of templates.
To create a new meeting template policy select Add. Name the policy and include a description.
To hide a template from the policy, select the template and choose Hide
To move a policy from hidden templates to viewable templates select the template and choose Show
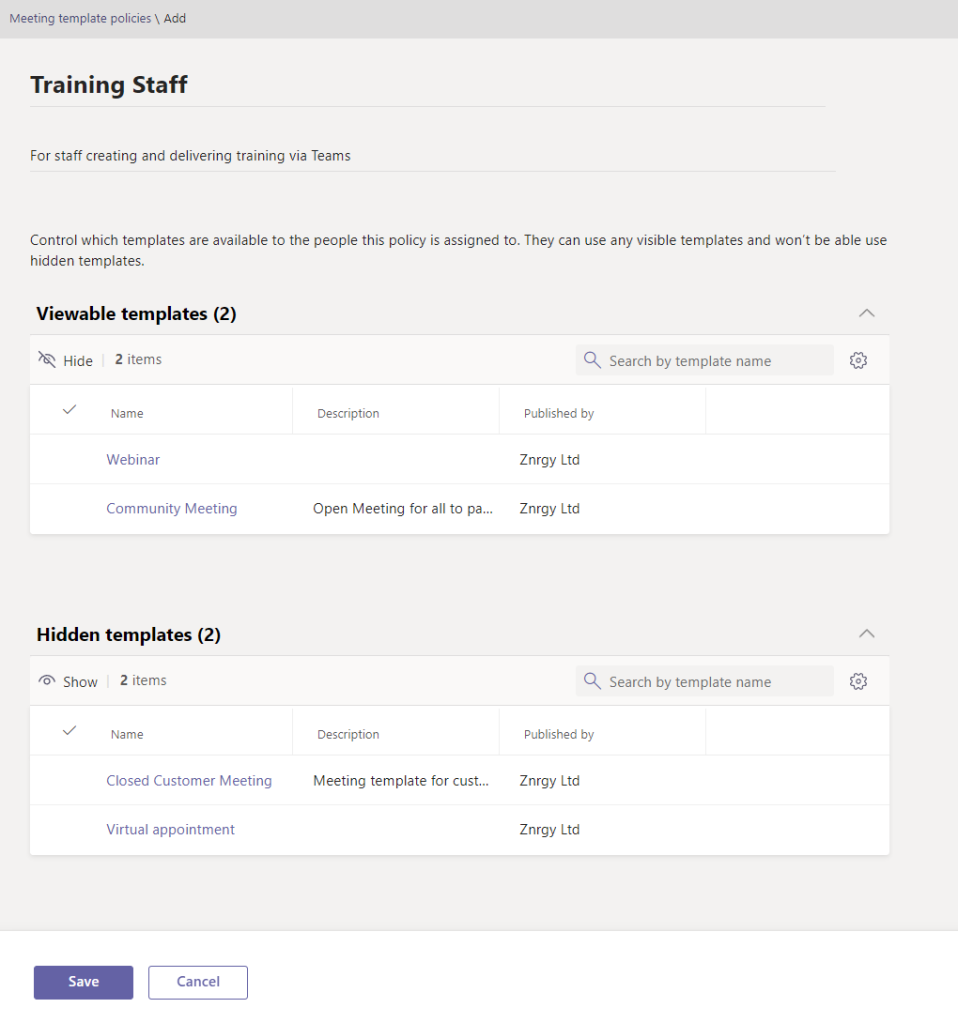
Save the policy and assign to users. Meeting template policies do not support assigning to a group.
New templates do take some time to populate through to users. As with some other policy driven settings this can be between 10 minutes or up to 24 hours.
Create a Meeting from a Meeting Template
To create a new meeting from a template, select the arrow nest to the New meeting button in the Teams calendar and choose the required template.
Create the meeting with title, invitees and other details as normal. In the image below you can see the Closed Customer Meeting template has applied a sensitivity label and is showing the options applied by the label in the options pane.
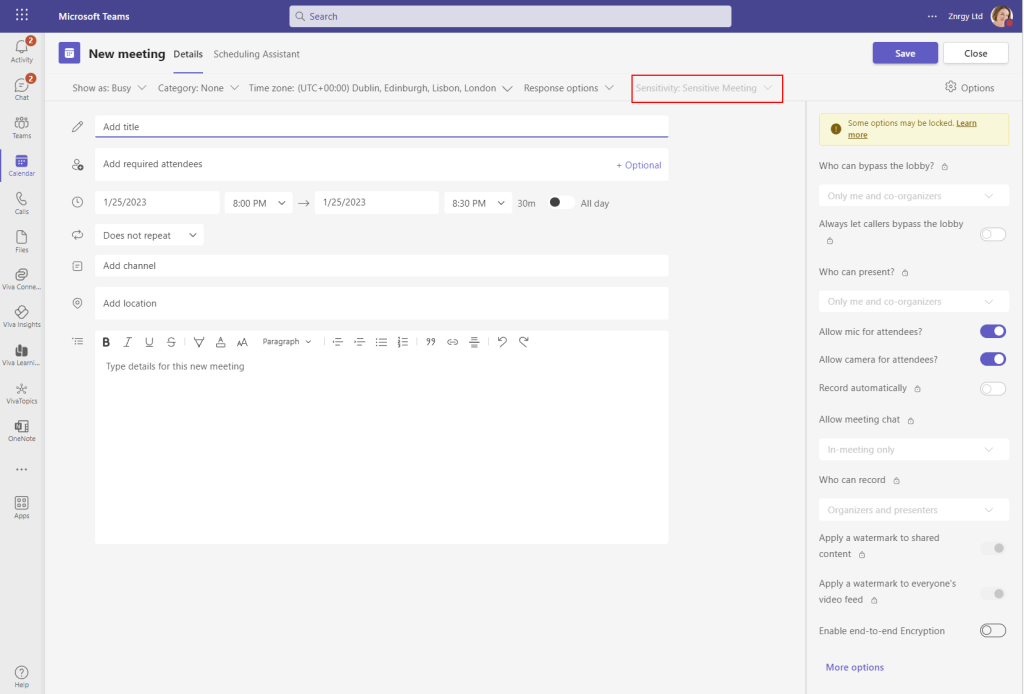
In this case the label is not enforced, so it can be removed and the settings changed.
Licensing
Meeting templates are only available to users who are assigned a Teams Premium license. Any user can join the meetings created with the template, subject to the meeting options defined in the template.
Platforms
Templates are supported across web, windows desktop and MacOS apps for Microsoft Teams, but not yet mobile apps
Admin and Set up
As a Teams admin, you will create templates and then publish them via a template policy to the users. This process is detailed above in this article. Templates including sensitivity labels will require the meeting organiser to also be assigned a Microsoft 365 E5 license, as part of the licensing requirements to use sensitivity labels in meetings.
About the Author
I primarily provide training or consultancy services within the fields of Microsoft365, Office365, SharePoint, Teams and Project incl Project Server and have a lot of experience incorporating business processes into systems training particularly in the Project Management arena.
Reference
Fennah, S., 2023, Teams Premium Meeting Protection, Available at: https://teamsqueen.com/2023/01/27/teams-premium-meeting-protection/ [Accessed on 16 March 2023]