In SharePoint Online, whenever you create a library and turn on “Require check-out” before editing documents option or not, users are able to open files for collaboration in browsers or in their local Office clients. When they do that, the file is getting locked from access that could lead to its metadata changes. If you create Power Automate flow which purpose is to update file’s metadata or approval status it will end up with failure when trying to do so.
THE REASON?
This situation can happen because of multiple scenarios:
- Someone uploads a file and immediately opens it in browser;
- Someone starts a workflow on the file and then someone else opens it to check contents;
- Someone gets task to review the task, opens it but forgets to close before completing the task
- And many more…
The general reason is – the file is locked for shared use at the time flow is trying to update it’s metadata and gets 400 (Bad request) error with details:
The file "file absolute url" is locked for shared use by admin@tenant.onmicrosoft.com.

There is yet no oob solution inside Power Automate, that could be use to help flow check if the file is locked or not. But, with the help from “Run after” configuration and a small trick, you are able to build a solution.
LOCKED FILE CHECKING PATTERN IN POWER AUTOMATE
The solution I am using and would like to share with you is pretty simple. You need to build a do until loop and a variable:
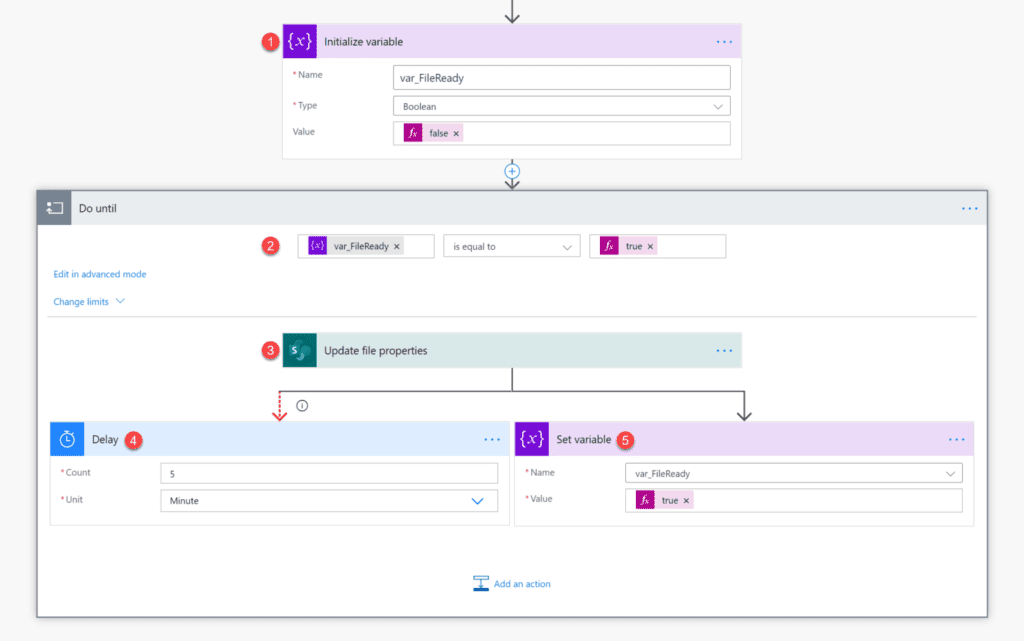
- Initialize boolean variable and set its value to “false”
- Add “Do until” loop and set the condition to:
@equals(variables('YOUR VARIABLE'), true). This means, the loop will run as long as the variable’s value is not set to “true”. - Next add the action that will fail if the file is locked for shared use. Remember, you don’t need to repeat the same pattern if you have more actions updating metadata of the file in your flow. Do this just for the first one in a sequence of these actions.
- Next create parallel branch. In one branch add “Delay” action. Set delay time to eg. 5 minutes. Also, configure it’s “Run after” configuration, so that it is executed only if action from step 3 fails:
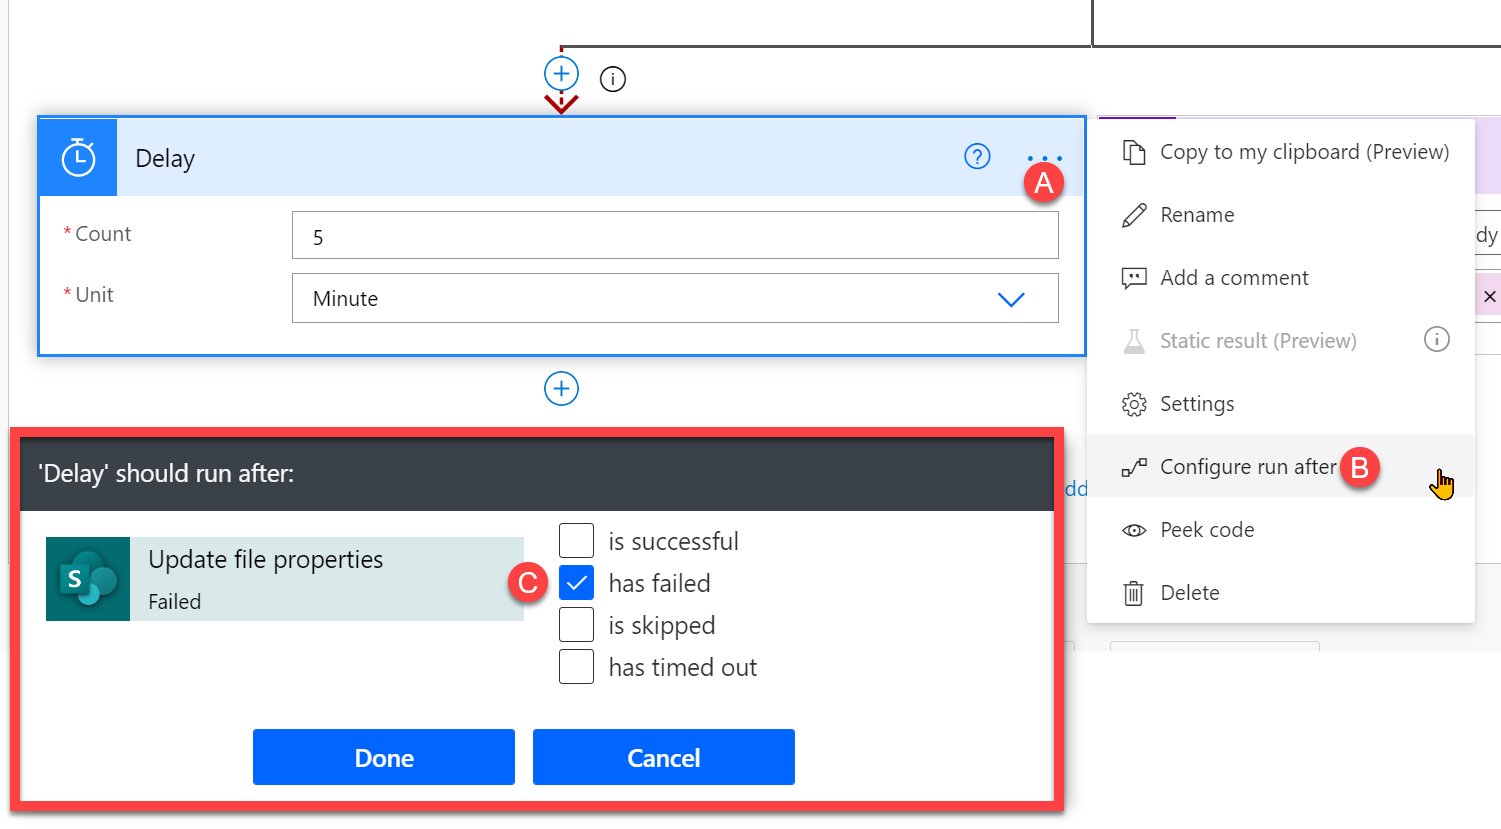
- A. Click the ellipsis icon
- B. Then “Configure run after”
- C. In the form that appears select only option “has failed” and “Done”.
- In the second branch add “Set variable” action and set value of your boolean variable to “true”. This action will only be executed, if setting properties in action no. 3 completes successfully.
And so, this is how it works. The loop will make turns as long as the file is locked for shared use, so as long as the action fails. Once the lock is released and action is able to update its metadata, boolean variable is set to true, loop ends and workflow continues.

If you have any questions regarding this pattern, please let me know in comments!
EXTRAS
_api/web/GetFileByServerRelativeUrl('URL')/lockedByUser to get details about the lock on the file: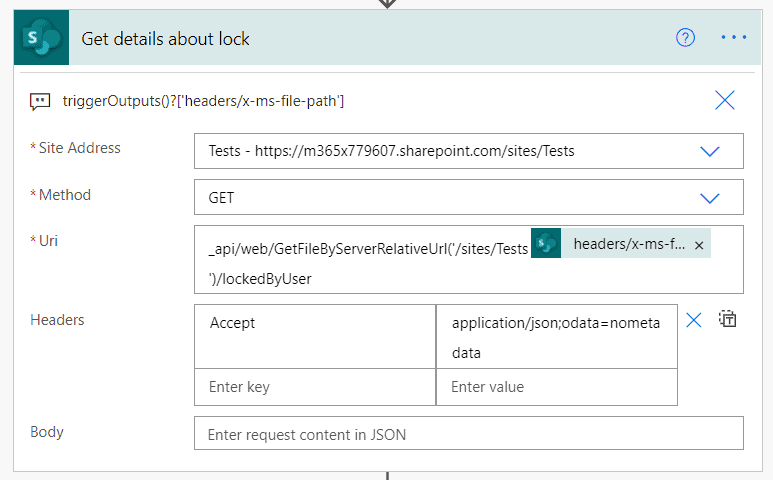
You can then use “Parse JSON” action to get details such as: LoginName, UserPrincipalName, Mail, if user is guest or site admin etc… Having this information you can as well put the flow in loop, until lock is released, however knowing who created the lock you can as well email them with request to close the file on their side.
About the Author:
Hi!
I’m Tomasz Poszytek, Microsoft Business Applications MVP. From more than 10 years now I’m being involved in projects, which aim is production of various applications using SharePoint as a platform. My adventure started absolutely without a purpose, when in the beginning of 2000 I was given FrontPage installation disc and started experimenting with this WYSWIG tool.
Reference:
Poszytek, T. (2021). Available at: https://poszytek.eu/en/microsoft-en/office-365-en/powerautomate-en/locked-file-checking-pattern-in-power-automate/ [ AccessedL 4th March 2021].
Find more great Power Platform content here.


