In 2017, ShareGate spent $250,000 on Azure. Even with an Azure MVP on our team helping us keep costs as low as possible, our bill still increased by 45% in under 12 months. The main culprit, of course, was cloud sprawl.
We knew that massive savings were possible, so we asked our experts to build us a list of practical and effective cloud cost control methods to reduce our Azure spending. The solutions they came up with got us great results, so we compiled our findings in this guide to help everyone identify potential Azure savings in their organization’s environments.
We’ve kept each tip short, actionable and easy to understand. Without further ado, here are the 5 proven tactics that reduced our Azure costs by 30%:
- Consider B-Series virtual machines
- Identify and act on idle resources
- Find the right resource size
- Locate and delete unused disks
- Leverage elastic databases
Obviously, these approaches will only fix the problem short-term. If you want to avoid having to perform these tasks every few months, you should adopt a cloud asset governance plan that will allow you to stay on top of the actions required to keep your cloud in tiptop shape.
- Consider B-Series virtual machines
While platform-as-a-service (PaaS) offerings have been gaining significant ground over the past few years, virtual machines—be it for legacy reasons or due to specific software requirements—still represent a large portion of cloud usage. Cloud-based VMs present a challenge in terms of cost control: they usually require minimal specs to run and are often idle with periodic usage spikes, yet they keep incurring the full cost as long as they’re powered on.
In September 2017, Microsoft announced the B-Series family of virtual machines, also known as burstable virtual machines. These machines are specifically designed for workloads that always need to be available but are typically idle with occasional peaks in use. B-Series VMs offer significant cost-reduction potential: around 40% off the price of an equivalent A-Series VM.
So I should convert all my existing VMs to B-Series and save big?
Careful now! Not all workloads can be converted to B-Series blindly. You need to strike a balance between cost and CPU consumption. B-Series are allocated a baseline amount of CPU power. As long as its usage is below the baseline, the VM accumulates credits, which can then be used to consume CPU exceeding baseline. If your virtual machine becomes too CPU-intensive, however, it’ll be throttled down to baseline performance until enough credits are available.
Baselines and credit limits vary according to the size of each B-Series VM. Additionally, whenever the VM gets powered down, all accumulated credits are lost. As such, B-Series VMs are truly designed for low-use or predictable workloads that are required to be available at all times.
To help you determine if your virtual machine can be safely converted to a B-Series, you can run custom scripts such as Dave Hall’s Azure-Burst-Check script.
- Identify and act on idle resources
Thanks to Azure, it’s never been easier to get a new environment up and running at a moment’s notice whenever it’s time to fulfill a new need for your organization. Fast-forward a few years, however, and you’ll start noticing a buildup of resources in your Azure subscription that are likely racking up a hefty bill. It isn’t always easy to tell which workloads are still being used and which ones can safely be decommissioned.
The best solution would be to go back in time and implement a basic cloud asset governance plan. Check out our primer on creating a cloud cost governance plan for an overview of the core elements to consider: visibility, ownership and permissions, lifecycle, and optimization—or, as we like to call them, VOLO.
In a nutshell, for each resource you create, you’ll want to:
- Categorize how the asset will be used (dev, test, prod, etc.)
- Specify a single owner for the resource (typically the person who requested the resource)
- Determine an expiration or check-up date for the resource (and make sure to follow the schedule and eliminate unnecessary resources promptly)
Once you have this information, it’s a lot easier to determine whether or not a given resource is still needed and act accordingly.
I don’t have a governance plan. Now what?
Azure gives you access to a set of usage statistics that measure how much activity your resources are seeing. These values can be examined from the Azure Portal or by accessing the Azure API and using custom code. By examining these usage numbers, you can identify which assets are no longer in use (or significantly underused) and take appropriate action. Also, keep in mind that cloud cost governance is an iterative process, so it’s never too late to start working on a plan.
- Find the right resource size
A common issue when creating new cloud resources is figuring out the right size to use. Azure offers a large number of options to accommodate different requirements (more RAM, more CPU power, SSD drives, GPUs, etc.), but even within the same family of machines, choosing the right size matters.
Get it wrong, and you’ll either be paying more than you need while your machine idles, or you’ll end up with a machine that’s pinned at 100% CPU usage (or even worse, swapping to virtual memory because it’s run out of physical RAM). All this, of course, can significantly impact application performance. It’s not always easy to figure out a given system’s requirements ahead of time, so it can be tempting to go a bit higher than you need just to be on the safe side. It’s also quite common to then forget about it and leave it oversized, leading to unnecessary costs month after month.
When to downscale
If you believe that this may be the case for your environment, don’t panic! There are a few easy ways to determine whether you should downsize a given VM. The easiest method is to take a look at the CPU Percentage and Memory Percentage graphs for each resource in the Azure Portal.
Typically, instance sizes in Azure double with each tier: an S1 will have 1 CPU core along with 1.75 GB of RAM, while an S2 will have 2 cores and 3.5 GB of RAM. The same pattern also applies to database sizes and DTUs.
In all cases, if you see over a long period of time that both usage statistics are under 50%, you can confidently downscale your instance without worrying about hindering performance.
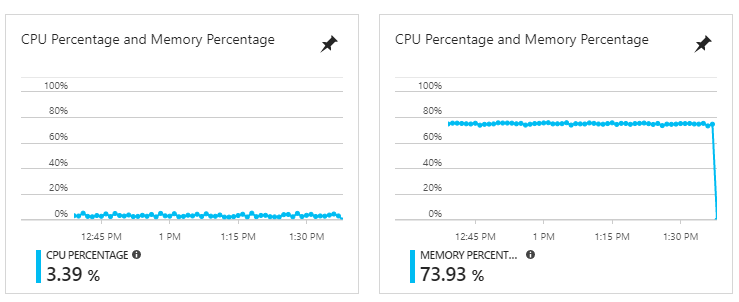
This service shouldn’t be downgraded even though it has low CPU usage because it uses a lot of RAM
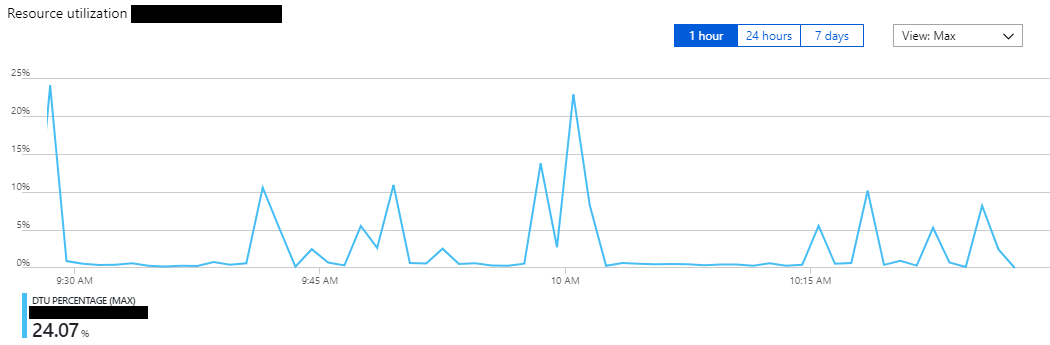
This database can safely be downgraded to a lower tier because the DTU usage is always below 50%
Why can’t I see memory usage for my VM?
Unfortunately, you won’t be getting the Memory Percentage graphs for virtual machines, classic or managed, out of the box. To access this information, you’ll need to enable guest-level monitoring and check the correct Performance Counters. The one you should check specifically is \Memory\Committed Bytes. With this information, you should be able to determine if a service can be downscaled safely or not.
- Locate and delete unused disks
If you’ve been using Azure for a while, you’ve likely created—and deleted—a fair number of virtual machines. But your bill keeps going up, and you’re not quite sure why. One likely culprit is storage disks; specifically, the disks for deleted virtual machines that are still lingering in your account and costing you money month after month. This is even more likely if you’ve been using classic virtual machines rather than the new ARM variety. The reason for this is quite simple: Azure does not systematically delete your disks when you delete a virtual machine. This is to protect you from accidental data loss, but it also means that if you aren’t careful, you’ll keep paying for disks you no longer need.
You can solve this problem from the Azure portal. The procedure will be a bit different depending on whether you’re dealing with managed disks or classic disks.
Managed disks
For managed disks, go to the Azure portal, search for Disks in the search bar, and select “Disks”.


This will display all your managed disks. If the Owner column is empty, it means that the disk is not currently attached to anything and you can probably delete it.

To delete the disk, select the row, go to Overview and click Delete in the top bar.

Classic disks
For classic disks, go to the Azure portal, click in the Search bar up top and search for Disks. Select “Disks (classic)”.

You’ll see all of your disks and a column indicating which VM each disk is currently attached to. If you see a disk that isn’t attached to a VM, you can probably delete it safely.

Deleting classic disks is a bit of a process, as the underlying file (the VHD), which is stored in a storage account, will still be there until you manually remove it. Here are the steps:
- Click on the classic disk and take note of its Storage account and Media link information

- Click Delete and confirm
- Use the Azure search bar to find the Storage account you noted in step 1, then open the Properties pane
- Click Blobs, then select the row with the right storage container

- Check the box with the correct file name, then click Delete in the top menu
Forgotten VHDs
Even if you follow all these steps to identify unattached disks, you still might miss forgotten VHDs that sit abandoned in classic storage. Typically, the Azure Portal creates a “vhds” container and puts them there in a storage account. To locate them, check each classic storage account for a vhds container under Blobs. Inside the container, look at the Lease state column for each file. If it says Available, it means that no VM is currently using that VHD, and it may be safe for you to delete it (but you should always check the contents to make sure!).
- Leverage elastic pool databases
Chances are you started your cloud migration project by moving workloads that were previously hosted on-prem or in a private data center over to Azure. A large number of these workloads probably used SQL Server databases, which tended to be the backbone of most software projects before the rise of the cloud and the NoSQL movement. You also likely noticed that pricing for SQL databases in Azure can get quite high, quite quickly.
While previously you may have used a single database server to host dozens, if not hundreds, of databases for your various projects or customers, the cost of splitting these out into separate Azure SQL databases might be orders of magnitude higher than what you expected. This is due to how databases work in Azure. On-prem, you were used to multiple databases sharing the limited resources of a single server. With Azure SQL, each database has a reserved amount of resources, which you’ll still be charged for even if the database is idle. The model is great if you have multiple databases with consistent, predictable utilization. If you have a large number of databases with a spiky usage pattern, however, you may find the price tag significantly less appealing. This leaves you with two options:
- Use a larger, more expensive database tier to handle peak database usage
- Use a lower tier to save costs, at the expense of performance during peak times
To share resources across databases, early adopters of Azure were forced to create and maintain their own virtual machines with SQL Server installed and essentially replicate the conditions they were run under while on-prem or in a private datacenter. While this method worked fine, it didn’t allow access to all the great features that Azure SQL has to offer, such as:
- Built-in high availability (no need to configure replication)
- Active geo-replication
- Point-in-time restore
These features are not trivial to deploy on your own and can be a challenge to maintain.
Better: Managed instances
Azure offers a newer tier of SQL database services called Managed instances, which are essentially managed virtual machines that host a SQL Server. Managed instances won’t provide you with all of the features that are built into Azure SQL single-database services, but you won’t need to manage the operating system or SQL Server installation either. Basically, you’re getting a virtual machine whose configuration and maintenance is largely handled for you.
Best: SQL elastic pools
But there is another option in Azure for addressing this common scenario: SQL elastic pools. Instead of reserving a certain amount of resources for a single database, SQL elastic pools let you reserve a number of resources and share them across hundreds of databases. This model has all of the benefits of Azure SQL and allows you to properly handle spiky usage patterns across multiple databases. Elastic pools have proven incredibly popular and are an ideal option for multi-tenanted applications.
However, you should be cautious in your use of elastic pools. If you have one or more databases with a significantly higher usage than the other databases in a pool, you may be forced to purchase a more expensive elastic pool tier to handle the usage peaks. In some cases, it can actually be more cost-effective to split out these high-usage databases into single database offerings (taking them out of the pool) and pay for a smaller tier of elastic pool for the remaining lower usage databases. A good rule of thumb is to look at database DTU usage: if a single database is using 40% or more of the elastic pool’s DTUs at any given time, you may be able to save costs by splitting it off from the pool, then scaling down said pool to a less expensive tier.
As always, the Azure portal is your go-to for identifying database usage patterns.
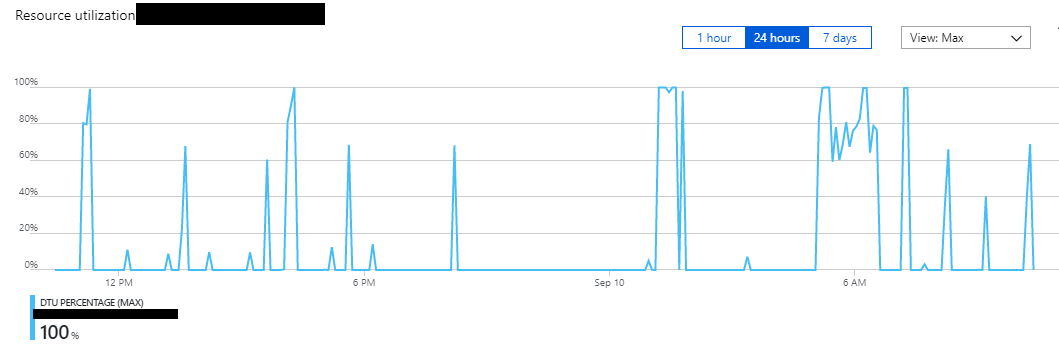
A database with consistently low usage and some spikes will typically be a good candidate for elastic pools.
Databases that have low usage at all times should be downgraded to lower tiers.
Time to take action and start saving on Azure
By acting on the five areas outlined in this guide, our team managed to shrink our Azure spend by 30%. Now, it’s your turn!