This is a note to self kind of article. I found a way of managing the allow list for external sharing of individual SharePoint Online sites via Power Automate. This example shows how you could add domains for a couple of sites at once.
Inspiration
This question from MichelBr:
The second problem I’m facing is to add the domain to the Sharepoint whitelist. I couldn’t find any information how to add a domain to “Limit external sharing by domain”.
Power Users Community thread: Create GuestUser accounts and whitelist domain with approval.
Add domain to allow list of a site
Sharing Settings
You can manage SharePoint Online sharing settings on a organization level or a site level.
However, for a site it must be at the same or more restrictive setting as the organization. If you want to read more about sharing I would suggest to read Manage sharing settings.
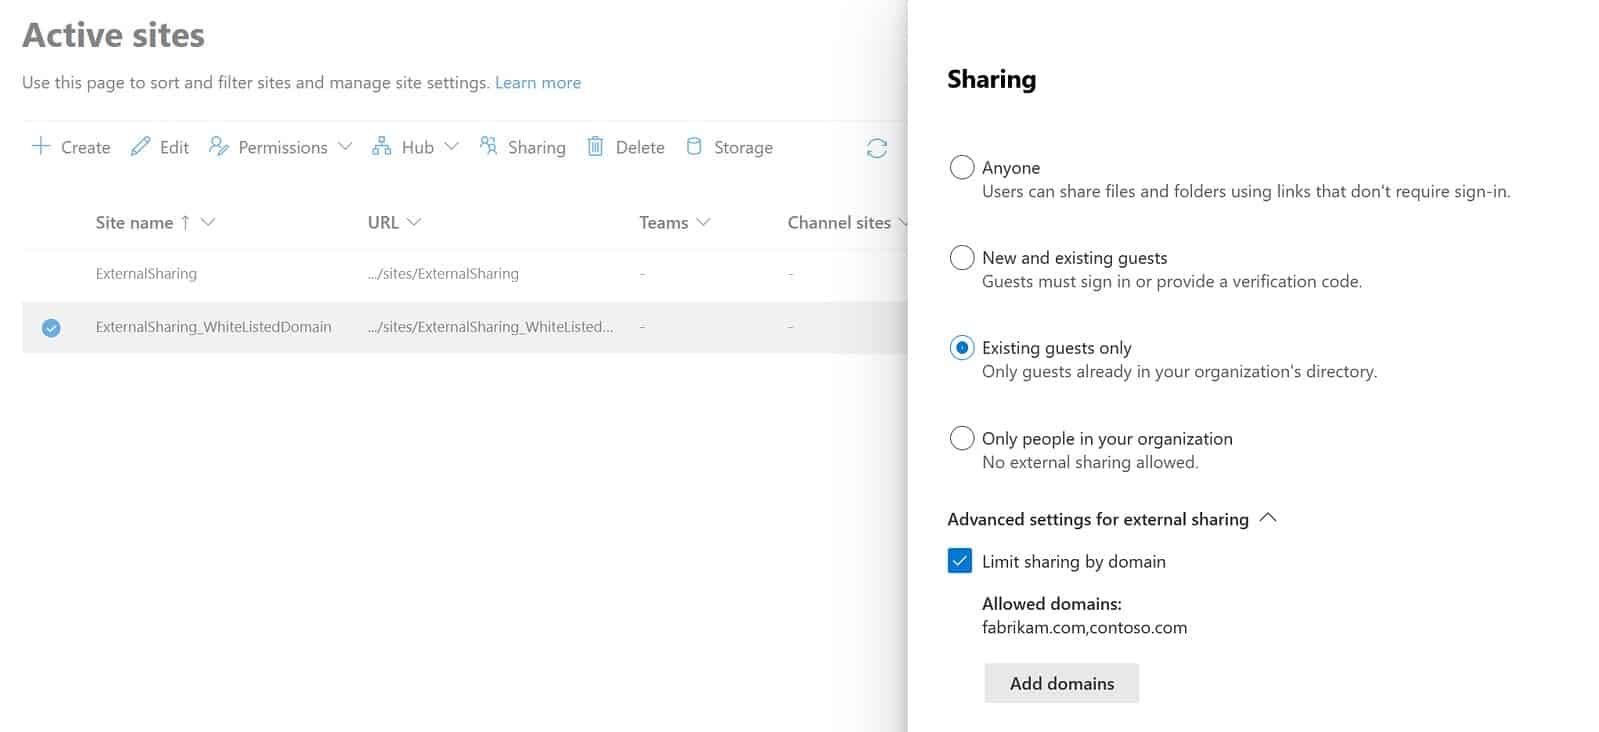
Limit external sharing by domain
In this article we are talking about sharing with external guests. We want to limit the external sharing of the site to only allow sharing with a list of certain domains, which are our trusted partners. A first (preferred) approach would be to set this on organizational level. You could use Microsoft.Online.SharePoint.PowerShell module and the Set-SPOTenant cmdlet for this. Below is an example code snippet of that approach:
| Set-SPOTenant –SharingCapability ExistingExternalUserSharingOnly –SharingDomainRestrictionMode AllowList –SharingAllowedDomainList “fabrikam.com contoso.com“ |
 by
by
It is also possible to manage these settings on a site level. Some requirements might force you to this second approach. In that case you could manage it via the interface, the steps can be found in Restrict sharing of SharePoint and OneDrive content by domain.
Tenant Administration
But I wanted to automate this  After a quick search I discovered you could use a POST Request to interact with the Tenant administration. These requests use the Microsoft.Online.SharePoint.TenantAdministration namespace.
You can use properties like SharingCapability, SharingDomainRestrictionMode & SharingAllowedDomainList to update a individual site.
Flow setup
Before you start: this setup will update the existing SharingAllowedDomainList value of your site. If you already have some existing domains in your list you need to include them in the update as well.
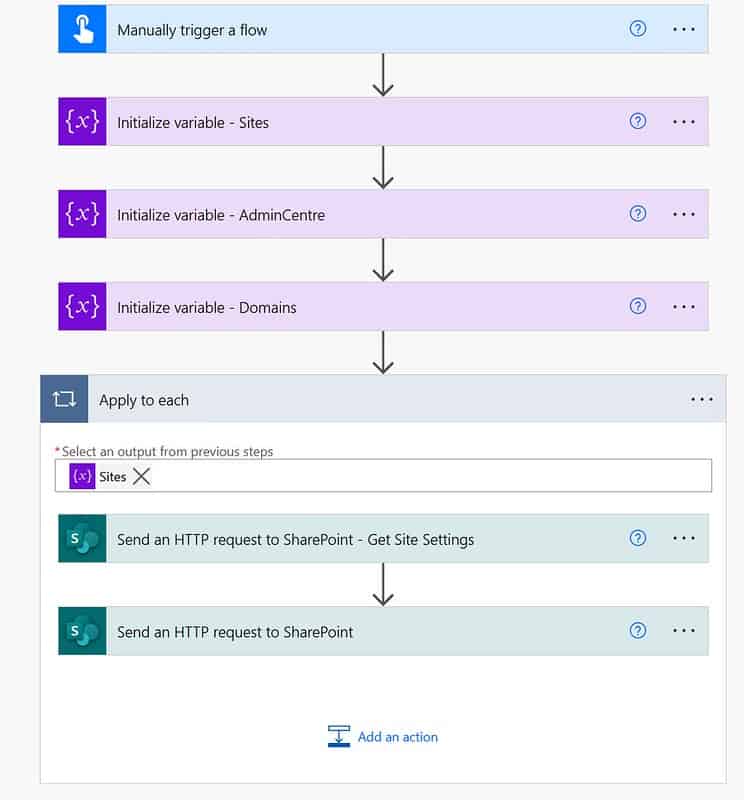
In my example below I will loop through an array of sites and for each site a new allowed domain is added.
Add domain to allow list of a site
1. Add a Manually trigger a flow trigger action.

The list of domains in a HTTP request need a comma delimiter, while in the Set-SPOTenant cmdlet the space character is used as the delimiter for the SharingAllowedDomainList parameter.
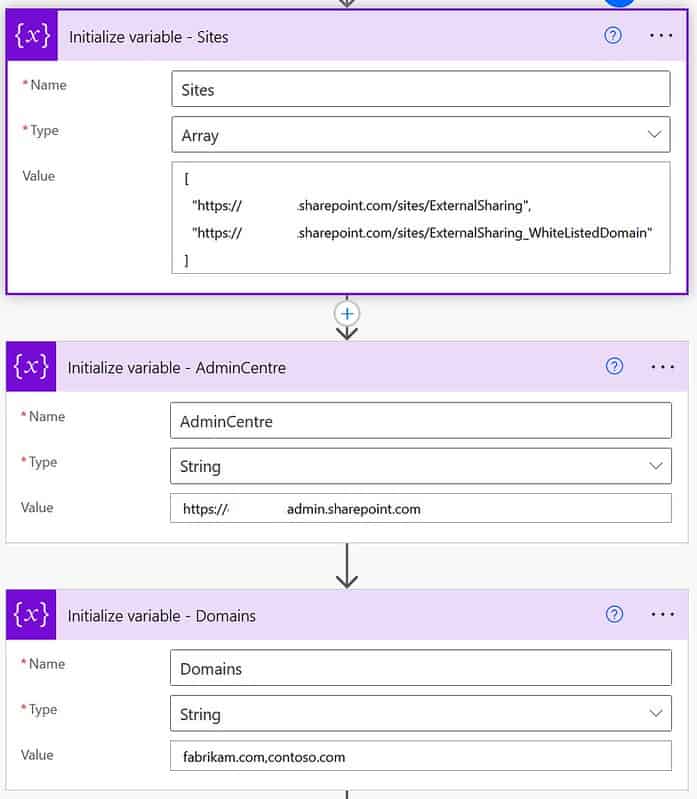
| Name | Type | Value | |
|---|---|---|---|
| Sites | Array | [“SiteUrlA”,”SiteUrlB”] | |
| AdminCentre | String | Your Admin Centre Url | |
| Domains | String | domaina.com,domainb.com |
Add domain to allow list of a site
3. Add an Apply to Each action. Use the Sites variable in the Select an output from previous steps field.
This action will loop through every item of the Site Array variable.
Add domain to allow list of a site
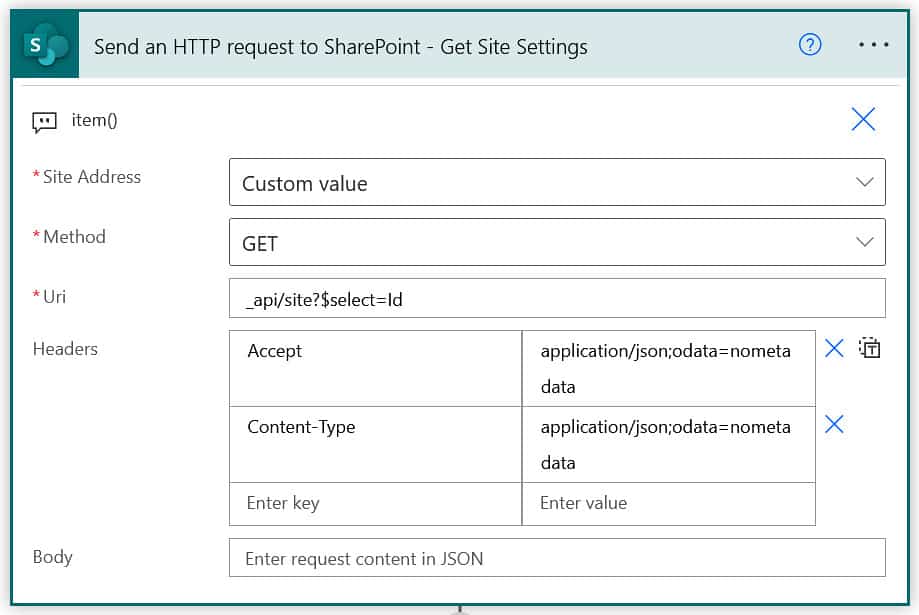
4. Add a Send an HTTP request to SharePoint action within the Apply to Each loop. Use the item() as an expression for the Site Address field.
This action is to retrieve the specific GUID of the site.
Add domain to allow list of a site
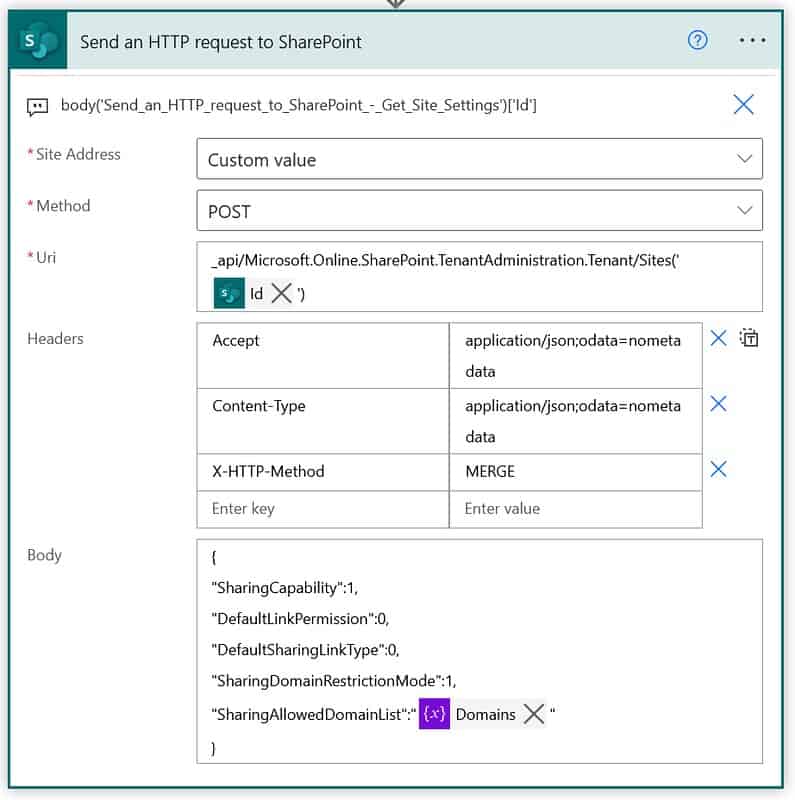
5. Add a second Send an HTTP request to SharePoint action within the Apply to Each loop. Use the Id field of the previous action in the Uri. Also make sure you use the same kind of Body. See the code snippet and screenshot below.
| { | |
| “inputs”: { | |
| “host”: { | |
| “connectionName”: “shared_sharepointonline“, | |
| “operationId”: “HttpRequest“, | |
| “apiId”: “/providers/Microsoft.PowerApps/apis/shared_sharepointonline“ | |
| }, | |
| “parameters”: { | |
| “dataset”: “@variables(‘AdminCentre’)“, | |
| “parameters/method”: “POST“, | |
| “parameters/uri”: “_api/Microsoft.Online.SharePoint.TenantAdministration.Tenant/Sites(‘@{body(‘Send_an_HTTP_request_to_SharePoint_-_Get_Site_Settings’)[‘Id’]}’)“, | |
| “parameters/headers”: { | |
| “Accept”: “application/json;odata=nometadata“, | |
| “Content-Type”: “application/json;odata=nometadata“, | |
| “X-HTTP-Method”: “MERGE“ | |
| }, | |
| “parameters/body”: “{\n\”SharingCapability\”:1,\n\”DefaultLinkPermission\”:0,\n\”DefaultSharingLinkType\”:0,\n\”SharingDomainRestrictionMode\”:1,\n\”SharingAllowedDomainList\”:\”@{variables(‘Domains’)}\”\n}“ | |
| }, | |
| “authentication”: { | |
| “type”: “Raw“, | |
| “value”: “@json(decodeBase64(triggerOutputs().headers[‘X-MS-APIM-Tokens’]))[‘$ConnectionKey’]“ | |
| } | |
| }, | |
| “description”: “body(‘Send_an_HTTP_request_to_SharePoint_-_Get_Site_Settings’)[‘Id’]“, | |
| “runtimeConfiguration”: { | |
| “staticResult”: { | |
| “staticResultOptions”: “Disabled“, | |
| “name”: “Send_an_HTTP_request_to_SharePoint0“ | |
| } | |
| }, | |
| “metadata”: { | |
| “operationMetadataId”: “34bb507e-aa5e-4420-ae66-397b0a665f63“ | |
| } | |
| } |
Add domain to allow list of a site
That should be it for the setup.
Happy testing!
This blog is part of SharePoint Week. Find more here.
About the Author:
My name is Dennis. I am Dutch and I live and work in the UK as an IT consultant. Currently I work a lot with SharePoint online, Microsoft Teams and all the other products of the Office 365 platform. I also like my share of Dynamics 365 and Azure. I try to blog about everything I come across in my daily job. All the content in my blogs are my personal views and experiences.
Reference:
Dennis. (2022). Add domain to allow list of a site. Available at: https://www.expiscornovus.com/2022/03/24/undeclare-a-record-in-place/ [Accessed: 27th April 2022].