When it comes to automation, there are number of scenarios which come to your mind. It may be simply using PowerShell to manage your Azure Firewall (e.g. getting Azure Firewall resources information, retrieving rule collection, adding a new rule or so on). More advanced, it can be a scheduled automation job running to continuously maintain Azure Firewall. And if we were to reflect to DevOps, the automation would be a CICD pipeline for the security operation team to deploy, maintain, update and monitor network/application rules continuously in a collaborative development environment.
The first article of Azure Firewall (Public Preview) Automation series, we will look into using Microsoft PowerShell in order to create, deploy and manage Azure Firewall resources.
Disclaimer: the series is written specifically for Azure Firewall in public preview. Technical information may be out of date when Azure Firewall goes GA (General Availability). I will try to continuously maintain the information to ensure more accurate.
PowerShell module
To work with Azure Firewall (Public Preview) using PowerShell, you must update or install AzureRm.Network 6.4.0-preview. This is the only version where supported cmdlets are available. The module with version 6.4.0 or the latest one (6.4.1) doesn’t include Azure Firewall (Public Preview) cmdlet.
AzureRm.Profile must be equal or greater than 5.3.3 prior to using AzureRm.Network 6.4.0-preview.
Pre-requisites
Before Azure Firewall (Public Preview) cmdlets can be used, you need to register two features name underMicrosoft.Network resource provider:
- AllowRegionalGatewayManagerForSecureGateway
- AzureAzureFirewall
Register-AzureRmProviderFeature -FeatureName AllowRegionalGatewayManagerForSecureGateway -ProviderNamespace Microsoft.Network
Register-AzureRmProviderFeature -FeatureName AllowAzureFirewall -ProviderNamespace Microsoft.Network
To verify, run the following commands and ensure the RegistrationState is Registered.
Get-AzureRmProviderFeature -FeatureName AllowRegionalGatewayManagerForSecureGateway -ProviderNamespace Microsoft.Network
Get-AzureRmProviderFeature -FeatureName AllowAzureFirewall -ProviderNamespace Microsoft.Network
While the above command can be used, you can quickly use try…catch to check the registration state.
try {
$appRegistrationState = Get-AzureRmProviderFeature -FeatureName AllowRegionalGatewayManagerForSecureGateway `
-ProviderNamespace Microsoft.Network
$networkRegistrationState = Get-AzureRmProviderFeature -FeatureName AllowAzureFirewall `
-ProviderNamespace Microsoft.Network
if ($appRegistrationState.RegistrationState -ne "Registered") {
Register-AzureRmProviderFeature -FeatureName AllowRegionalGatewayManagerForSecureGateway -ProviderNamespace Microsoft.Network
}

if ($networkRegistrationState.RegistrationState -ne "Registered") {
Register-AzureRmProviderFeature -FeatureName AllowAzureFirewall -ProviderNamespace Microsoft.Network
}

while ($appRegistrationState.RegistrationState -eq "Unregistered") {
$appRegistrationState = Get-AzureRmProviderFeature -FeatureName AllowRegionalGatewayManagerForSecureGateway `
-ProviderNamespace Microsoft.Network
Write-Host "The Firewall application rule provider is:"$appRegistrationState.RegistrationState""
Start-Sleep -Seconds 3
}

while ($networkRegistrationState.RegistrationState -eq "Registering") {
$networkRegistrationState = Get-AzureRmProviderFeature -FeatureName AllowRegionalGatewayManagerForSecureGateway `
-ProviderNamespace Microsoft.Network
Write-Host "The Firewall network rule provider is:"$networkRegistrationState.RegistrationState""
Start-Sleep -Seconds 3
}
Register-AzureRmResourceProviderR-ProviderNamespace Microsoft.Network
}
catch {
Write-Host $_.Exception.Message -ForegroundColor Yellow
}
List all supported cmdlets
To list all supported cmdlets for Azure Firewall (Public Preview), run the following command:
Get-Command -Name *AzureRmFirewall*
There are 8 cmdlets available in module:
- Get-AzureRmFirewall : used to get Azure Firewall resource information.
- New-AzureRmFirewall : used to create a new Azure Firewall resource.
- New-AzureRmFirewallApplicationRule : used to create a new application rule
- New-AzureRmFirewallApplicationRuleCollection : used to create a new application rule collection
- New-AzureRmFirewallNetworkRule : used to create a new network rule.
- New-AzureRmFirewallNetworkRuleCollection : used to create a new network rule collection
- Remove-AzureRmFirewall : used to remove an existing Azure Firewall resource.
- Set-AzureRmFirewall : used to update Azure Firewall resource including application and network rule and collection rule.
Create a new Azure Firewall
To basically create a new Azure Firewall resource, you can simply run the following script:
$rgName = 'corp-rg'
$location = 'westus'
$vNetName = 'vnet01-sec'
$vNet = Get-AzureRmVirtualNetwork -ResourceGroupName $rgName -Name $vNetName
$fwName = 'fw01'
$pipName = 'fw01-pip'
$pip = Get-AzureRmPublicIpAddress -Name $pipName -ResourceGroupName $rgName

New-AzureRmFirewall -Name $fwName `
                    -ResourceGroupName $rgName `
                    -Location $location `
                    -VirtualNetworkName $vNet.Name `
                    -PublicIpName $pip.Name
The following parameters are required:
- Location (string): region where the new Azure Firewall resource is going to be deployed.
- Name (string): name of the new Azure Firewall resource.
- PublicIPName (string): the reserved public IP address for the new Azure Firewall resource. Ensure it’s Standard SKU and must belong to the same resource group.
- ResourceGroupName (string): name of the resource group which contains your Azure Firewall resource.
- Virtual Network: Specifies the name of the virtual network for which the Firewall will be deployed. Virtual network and Firewall must belong to the same resource
group
Beyond, New–AzureRmFirewall cmdlet also provide the following optional parameters:
- ApplicationRuleCollection (list): the collection of application rules for the new Azure Firewall resource. The collection must be created prior to creating a new Azure Firewall resource.
- NetworkRuleCollection (list): the collection of network rules for the new Azure Firewall resource. It must be created prior to creating a new Azure Firewall resource.
- AsJob: used to run cmdlet in the background
- DefaultProfile: used to specify your Azure context profile
- Force: used to force the command to be run which out asking for user confirmation.
- Tag (hashtable): key-value pairs in the form of a hashtable in order to tag your Azure Firewall resource.
- Confirm: used to prompt for configuration before running the cmdlet
- WhatIf: used to show what would happen if the cmdlet runs.
There are also common parameters such as Verbose, Debug, ErrorAction, ErrorVariable, WarningAction, WarningVariable, OutBuffer, PipelineVariable and OutVariable supported naturally in this cmdlet.
A bit helpful tip to verify resource group name for Public IP address and Virtual Network and AzureFirewallSubnet subnet before creating a new Azure Firewall resource:
$rgName = 'pentest-rg'
$location = 'westus'
$vNetName = 'vnet-sec'
$vNet = Get-AzureRmVirtualNetwork -ResourceGroupName $rgName -Name $vNetName
$fwName = 'fw01'
$pipName = 'azFirewall01'
$pip = Get-AzureRmPublicIpAddress -Name $pipName -ResourceGroupName $rgName

if ($pip.ResourceGroupName -ne $rgName -or $vNet.ResourceGroupName -ne $rgName -and $vnet.Subnets.Name -notcontains "AzureFirewallSunet" ) {
    Write-Output "Can't create Azure Firewall"
}

else {
    New-AzureRmFirewall -Name $fwName `
                        -ResourceGroupName $rgName `
                        -Location $location `
                        -VirtualNetworkName $vNet.Name `
                        -PublicIpName $pip.Name
}
Retrieving Azure Firewall information
Azure Firewall information can be retrieved using Get–AzureRmFirewall cmdlet. This cmdlet only use the following parameters:
- Name: name of the Azure Firewall you need to retrieve
- ResourceGroupName: the resource group your Azure Firewall belongs to
DefaultProfile is still an option. Get-AzureRmFirewall also supports common parameters (e.g. Verbose..).
If you don’t specify name or resource group, the output returns all Azure Firewall resources in the given context of subscription.
If you want to list all Azure Firewall resources in a specific resource group, simply run:
$rgName = 'pentest-rg'
Get-AzureRmFirewall -ResourceGroupName $rgName
If you want to retrieve a specific Azure Firewall resource, provide the name and resource group
$fwName = "fw01"
$rgName = 'pentest-rg'

$azFirewall = Get-AzureRmFirewall -Name $fwName -ResourceGroupName $rgName
Write-Host "Found an Azure Firewall named:" $azFirewall.Name
The output format of the cmdlet is similar to other resources in which you can read to each property to get specific value.
Write-Host "The Azure Firewall name is:" $azFirewall.Name
Write-Host "The Azure Firewall resource id is": $azFirewall.Id
Write-Host "The Azure Firewall belongs to": $azFirewall.ResourceGroupName "resource group"
Write-Host "The Azure Firewall is located": $azFirewall.Location
Create an application rule
Azure Firewall is useless without rules to be run. New-AzureRmFirewallApplicationRule cmdlet allows you to create individual application rule before associating it to an application collection rule. The cmdlet requires the following parameters:
- Name: name of your application rule. This name must be unique inside a rule collection
- Protocol: protocol of the application rule which Azure Firewall is used for filtering. The supported protocols are HTTP and HTTPs.
- SourceAddress: source address of the application rule. It can be set wildcard (*) as All.
- TargetFqdn: it is a domain name of the application rule which Azure Firewall is used for filtering. Review Quick look at Azure Firewall article for some important notes.
The following parameters are optional:
- DefaultProfile: it’s a context of the given subscription
- Description: description of your application rule.
- Confirm: prompts you for confirmation before running the cmdlet
- WhatIf: shows what would happen if the cmdlet runs
Other common parameters such as Verbose, Debug are supported in this cmdlet.
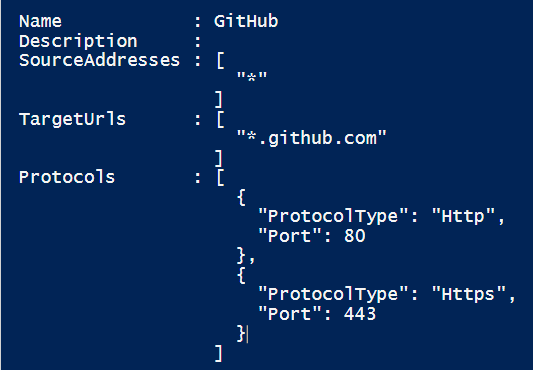
To create a new application rule, simply run:
$rule = New-AzureRmFirewallApplicationRule -Name GitHub `
                                   -SourceAddress * `
                                   -Protocol Http:80, Https:443 `
                                   -TargetFqdn *.github.com
Write-Output $rule
Creating an application rule collection
A collection contains list of grouped application rules, for example a collection of blocked malicious hosts. To create an application rule collection, use New-AzureRmFirewallApplicationRuleCollection cmdlet. The following parameters are required:
- Name: name of the application rule collection (e.g. Blacklist).
- Priority: the priority of this rule. The value can be between 100 and 65000. The smaller the number, the bigger the priority.
- Rule: this is the application rule you already created. The type of this parameter is List so you can assign an individual rule, or a list of rules.
- ActionType: this is the action of the application rule collection. Currently this parameter supports two values: Denyor Allow.

- DefaultProfile: it’s a context of the given subscription
- Confirm: prompts you for confirmation before running the cmdlet
- WhatIf: shows what would happen if the cmdlet runs.
Other common parameters such as Verbose, Debug are supported in this cmdlet.
Followed by the rule you already created earlier, run the following script to create a new application rule collection which contains the rule
$ruleCollection = New-AzureRmFirewallApplicationRuleCollection -Name BlackList `
-Priority 300 `
-Rule $rule  `
-ActionType "Deny"

Write-Output $ruleCollection
Now you have a collection which contains a rule. To set the collection rule for your existing Azure Firewall resource, you can access to ApplicationRuleCollection property to assign the newly created collection rule’s value, then use Set-AzureRmFirewall cmdlet :
$azFirewall.ApplicationRuleCollections = $ruleCollection
Set-AzureRmFirewall -AzureFirewall $azFirewall
Create a network rule
To create a network rule in Azure Firewall, use New-AzureRmFirewallNetworkRule cmdlet. This cmdlet comes with the following required parameters:
- SourceAddress: source addresses of the rule
- DestinationAddress: the destination address of the network rule
- DestinationPort: the destination ports of the network rule
- Name: name of the network rule
- Protocol: protocol to be filtered by Azure Firewall. TCP, UDP, ICMP and Any are supported values. This is case-sensitive value and must be uppercase.
The following parameters are optional:
- DefaultProfile: a context of given subscription
- Description: description of your network rule
- Confirm: prompt you for confirmation before running the cmdlet
- WhatIf: show what would happen if the cmdlet runs.
Other common parameters such as Verbose, Debug are supported in this cmdlet.
To create a new network rule, simply run:
$maliciousAdd = New-AzureRmFirewallNetworkRule -Name "trojan-source" `
-Description "block malicious source" `
-Protocol TCP `
-SourceAddress "*" `
-DestinationAddress 5.135.115.193 `
-DestinationPort 8080
Write-Output $maliciousAdd
Create a network rule collection
A collection contains list of grouped network rules, for example a collection of blocked malicious IP addresses. To create a network rule collection, use New-AzureRmFirewallNetworkRuleCollection . The following parameters are required:
- Name: name of the network rule collection (e.g. IP Blacklist).
- Priority: the priority of this rule. The value can be between 100 and 65000. The smaller the number, the bigger the priority.
- Rule: this is the network rule you already created. The type of this parameter is List so you can assign an individual rule, or a list of rules.
- ActionType: this is the action of the network rule collection. Currently this parameter supports two values: Deny or Allow.
The following parameters are optional:
- DefaultProfile: it’s a context of the given subscription
- Confirm: prompts you for confirmation before running the cmdlet
- WhatIf: shows what would happen if the cmdlet runs.
Other common parameters such as Verbose, Debug are supported in this cmdlet.
Followed by the rule you already created earlier, run the following script to create a new network rule collection which contains the rule:
$ipBlacklistCollection = New-AzureRmFirewallNetworkRuleCollection `
                                -Name "ip-blacklist-collection" `
                                -Priority 300 `
                                -Rule $maliciousAdd `
                                -ActionType "Deny"

Write-Output $ipBlacklistCollection
To set the collection rule for your existing Azure Firewall resource, you can access to ApplicationRuleCollection property to assign the newly created collection rule’s value, then use Set-AzureRmFirewall cmdlet:
$azFirewall.NetworkRuleCollections = $ipBlacklistCollection
Set-AzureRmFirewall -AzureFirewall $azFirewall
Remove Azure Firewall resource
You may not need Azure Firewall running once your test is done because it charges $0.625/Hour which sounds pricey. Use Remove-AzureRmFirewall cmdlet to remove Azure Firewall resource. The cmdlet comes with the following required parameters:
- Name: name of the Azure Firewall resource you want to remove.
- ResourceGroupName: the resource group name where the Azure Firewall belongs to
Beyond, Remove-AzureRmFirewall cmdlet also provide the following optional parameters:
- AsJob: used to run cmdlet in the background
- DefaultProfile: used to specify your Azure context profile
- Force: used to force the command to be run which out asking for user confirmation.
- PassThru: returns an object representing the item with which you are working. By default, this cmdlet does not generate any output.
- Confirm: used to prompt for configuration before running the cmdlet
- WhatIf: used to show what would happen if the cmdlet runs.
There are also common parameters including Verbose, Debug, ErrorAction, ErrorVariable, WarningAction, WarningVariable, OutBuffer, PipelineVariable and OutVariable supported naturally in this cmdlet.
$fwName = "fw01"
$rgName = 'pentest-rg'

Remove-AzureRmFirewall -Name $fwName -ResourceGroupName $rgName
Stop/Start Azure Firewall
One of the very interesting features coming with Azure Firewall – a managed service is that you can deallocate (stop) or allocate (start) your Azure Firewall. If you don’t want to remove Azure Firewall, you can set Deallocated state for the firewall to remove running. With this, charge doesn’t occur.
$fwName = "fw01"
$rgName = 'pentest-rg'

$azFirewall = Get-AzureRmFirewall -ResourceGroupName $rgName -Name $fwName
$azFirewall.Deallocate()
If you want to get it back, simply use Allocate() method
$fwName = "fw01"
$rgName = 'pentest-rg'

$azFirewall = Get-AzureRmFirewall -ResourceGroupName $rgName -Name $fwName
$azFirewall.Allocate()
Conclusion
This article gives you basic command to work with Azure Firewall (Public Preview) resources. The upcoming article will give you more advanced scripts to help you effectively manage and operate your Azure Firewall resource. Stay tuned!
About the Author:
Thuan has nearly 10 years of experience spanning across industry of Information Technology and Services and 4 years of experiences working with Singapore governments in which his responsibilities include technical evangelism, pre-sales activities, proof-of-concept mentoring, technical support, security design to architecting the entire solution, having focused primarily on Microsoft Stack. Playing as an independent technology consultant role, Thuan has had great opportunities to work with large companies from USA, Europe, Japan and Singapore.
Thuan spends his spare time reading awesome books. He is regularly on Twitter (http://twitter.com/nnthuan) and blogs at http://thuansoldier.net
Reference:
Soldier, T (2018). Azure Firewall (Public Preview) Automation – Part 1. Available at: https://thuansoldier.net/7858/. [Accessed 15 August 2018]