In my previous article, I outlined the various components of Temporal and how they interact. Today’s blog builds on this knowledge and demonstrates an example Temporal deployment.
It’s a minimalistic deployment on Azure which combines a managed MySQL database with Azure Container Instances, suitable for simple experimentation and development. Here is a diagram of the cloud infrastructure:
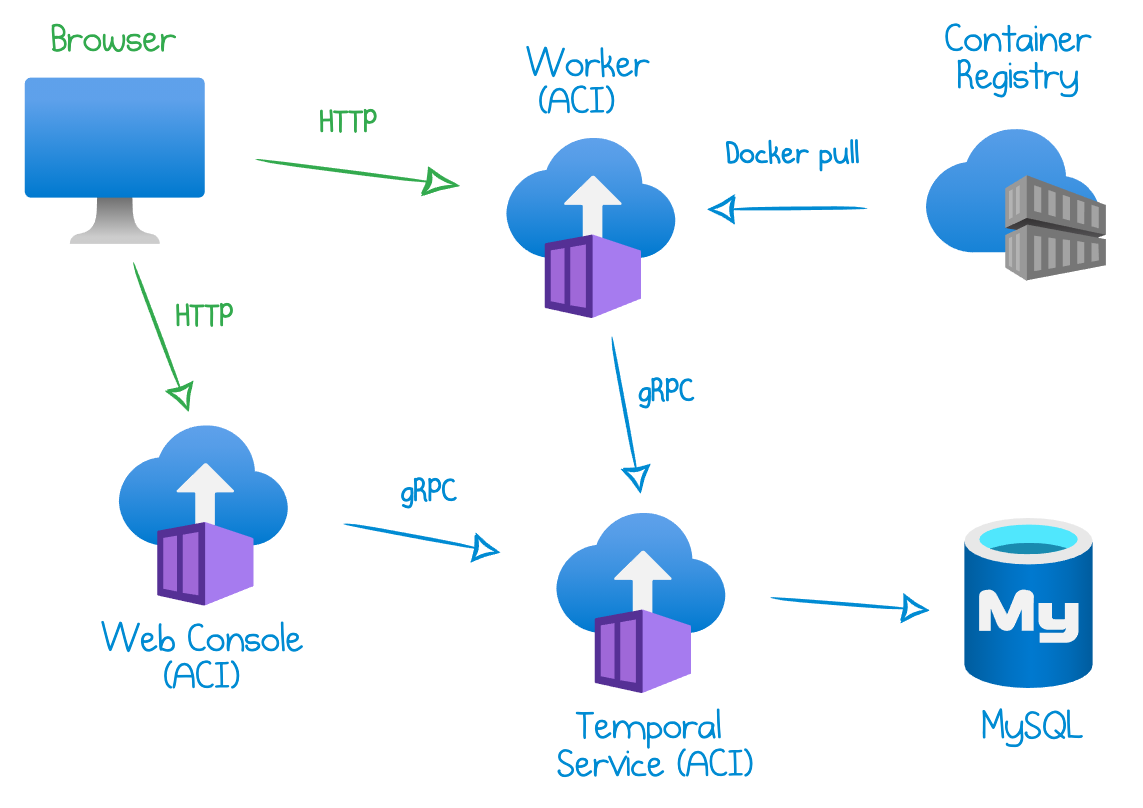
This sample deployment is implemented as a Pulumi program in TypeScript. You can find the full code in my GitHub.
Application Code
The workflow folder contains all of the application code. The application is written with Go and consists of two source files:
helloworld.go– defines a workflow and an activitymain.go– application entry point.
The example deploys a “Hello World” Temporal application copied from this Go sample. Once you get it up and running, you can certainly customize the code with your own workflow and activities.
The main.go file does two things. First, it spins up a worker:
w := worker.New(c, "hello-world", worker.Options{})
w.RegisterWorkflow(helloworld.Workflow)
w.RegisterActivity(helloworld.Activity)
Second, it launches an HTTP server in the same process. The server exposes endpoints to start workflows. The /async?name=<yourname> endpoint starts a new workflow and immediately returns, while the /sync?name=<yourname> blocks and waits for the result of the execution and returns the response. You can find the implementation in the start function.
Docker Image
Since the application is deployed to Azure Container Instances, we need to produce a custom Docker image. The Dockerfile builds the Go application and exposes port 8080 to the outside world so we can access the starter HTTP endpoints.
Pulumi deploys this Dockerfile to Azure in three steps:
- Deploy an Azure Container Registry.
- Retrieve the registry’s admin credentials generated by Azure.
- Publish the application image to the registry.
MySQL Database
There are several persistence options supported by Temporal. A straightforward option in Azure is to deploy an instance of Azure Database for MySQL. It’s a fully managed database service where Azure is responsible for uptime and maintenance, and users pay a flat fee per hour.
My example provisions an instance of MySQL 5.7 at the Basic tier. The database size is limited to 5 GB.
A final tweak is to add a firewall rule for the IP address 0.0.0.0, which enables network access to MySQL from any Azure service. Note that this option isn’t secure for production workloads: read more in Connecting from Azure.
Temporal Service and Web Console
Next, we deploy the Temporal Service and Temporal Web Console as two Azure Container Instances.
The Service container:
- Refers to the
temporalio/serverDocker image provided by Temporal. - Sets up environment variables to connect to MySQL.
- Exposes port
7233to the outside world. Note that this is not secure for a production environment!
The Web Console container:
- Refers to the
temporalio/webDocker image provided by Temporal. - Connects to the gRPC endpoint gathered from the Service container.
- Exposes port
8088to the outside world. Note that this is not secure for a production environment!
Temporal Worker

- Refers to the custom Docker image created above.
- Connects to the gRPC endpoint gathered from the Service container.
- Configures registry credentials to access the private Azure Container Registry.
- Exposes the starter endpoints at the port
8080.
Get Started
The Pulumi Command-Line Interface (CLI) runs the deployment. Install Pulumi, navigate to the folder where you have the example cloned, and run the following commands:
- Create a new stack (a Pulumi deployment environment):
pulumi stack init dev - Login to Azure CLI:
az login - Install NPM dependencies:
npm install - Run
pulumi upand confirm when asked if you want to deploy. Azure resources are provisioned:$ pulumi up ... Performing changes: Type Name Status pulumi:pulumi:Stack temporal-azure-aci-dev created ├─ my:example:MySql mysql created │ ├─ azure-nextgen:dbformysql/latest:Server mysql created │ └─ azure-nextgen:dbformysql/latest:FirewallRule mysql-allow-all created ├─ my:example:Temporal temporal created │ ├─ docker:image:Image temporal-worker created │ ├─ azure-nextgen:containerregistry/latest:Registry registry created │ ├─ azure-nextgen:containerinstance/latest:ContainerGroup temporal-server created │ ├─ azure-nextgen:containerinstance/latest:ContainerGroup temporal-web created │ └─ azure-nextgen:containerinstance/latest:ContainerGroup temporal-worker created ├─ random:index:RandomString resourcegroup-name created ├─ random:index:RandomPassword mysql-password created └─ azure-nextgen:resources/latest:ResourceGroup rg created Outputs: serverEndpoint : "21.55.179.245:7233" starterEndpoint: "http://21.55.177.186:8080/async?name=" webEndpoint : "http://52.136.6.198:8088" Resources: + 13 created Duration: 7m48s - The output above prints the endpoints to interact with the application. Run the following command to start a “Hello World” workflow:
curl $(pulumi stack output starterEndpoint)World Started workflow ID=World, RunID=b4f6db00-bb2f-498b-b620-caad81c91a81%
Now, open the webEndpoint URL in your browser and find the workflow (it’s probably already in the Completed state).
Cost, Security, and Further Steps
The deployment above provisions real Azure resources, so be mindful of the related costs. Here is an estimated calculation for the “West US 2” region:
- Azure Database for MySQL Gen5 Basic with 1 vCore and 5 GB of storage = $25.32/month
- Azure Container Instance with 1 vCPU and 1 GB of RAM: 3 x $32.36/month = $97.08/month
- Azure Container Registry Basic = $5.00/month
The total cost for this example is approximately $127.40 per month.
Whenever you are done experimenting, run pulumi destroy to delete the resources. Note that all the data will be lost after destruction.
As noted in the sections above, the security setup is minimal and is not suitable for any environment that processes real data. In addition to a secure networking setup, a production environment would need to handle scalability, resilience, backups, observability, and so on.
I plan to address those topics in future blog posts. Stay tuned!
You can find the full code in my GitHub.
This blog is part of Azure Week. Check it out for more great content!
About the Author:
Cloud developer and researcher.Software engineer at Pulumi. Microsoft Azure MVP.
Reference:
Shilkov, M. (2021). How To Deploy Temporal to Azure Container Instances. Available at: https://mikhail.io/2020/10/how-to-deploy-temporal-to-azure-container-instances/ [Accessed: 9th July 2021].