PowerShell Arrays are used to store a collection of items. They are a fundamental part of PowerShell, or any programming language because they allow you to store and structure a collection of items into a single variable. We can then use the array to perform a wide range of tasks on each of the items in the array.
In this article, we are going to take a look at the PowerShell Array, and how to use them in your PowerShell scripts.
PowerShell Array
Before we are going to take a look at how to create and use arrays in PowerShell, let’s first briefly look at the advantages of using an array. Arrays are used in every programming language. They allow you to easily perform tasks on multiple items.
For example, if you want to create a script that checks if your servers are online. Instead of writing the code for each individual server, you can create an array with the server names, or IP Addresses, and loop through each item in the array.
Creating Arrays
The easiest and most straightforward way to create an array in PowerShell is to assign multiple items to a single variable. For example, if we want to create an array of fruits, we can simply do:
$fruits = 'apple','raspberry','kiwi'

# Result of $fruits:
apple
raspberry
kiwi
Using the @() notation
A more common way to define or create an array is to use the @() notation, also known as the sub-expression operator. This will create an array of the times inside the parentheses ( ).
For example, to create an array of fruits:
$fruits = @('apple','raspberry','kiwi')The results are the same this was as when you would assign multiple items to a single variable as in our first example. But we can also use this method to create an empty array for example:
$data = @()

# Result
$data.Count
0
Creating PowerShell Array with a specific Type
Arrays in PowerShell can contain any data type. It’s even possible to mix different data types in a single array. For example, we can create an array that contains, integers, strings, and even another array:
$array = @('foo',3,'bar',50,@('apple','kiwi'))
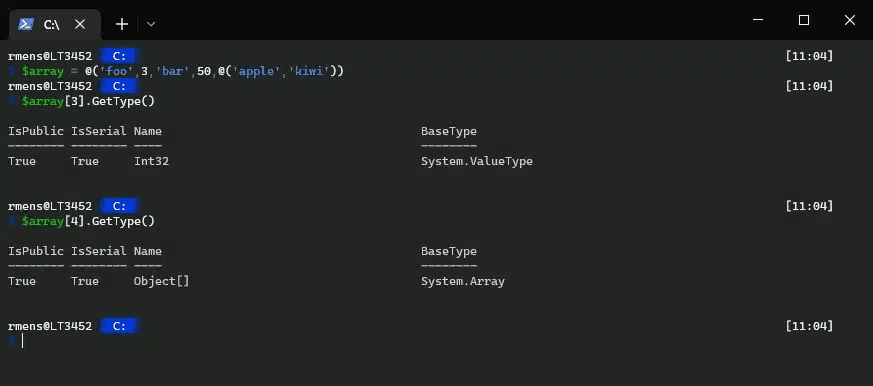
As you can see in the screenshot above, the array contains a string, an integer, and another array.
To prevent this we can create a strongly typed array. This means that we define what kind of data the array can contain. To create a typed array, we need to place the array type in closed brackets before the variable.
For example, to create an array that can only contain integers:
[int32[]]$ints = 10,50,30,20Other commonly used data type options for arrays are:
- String[] – Create an array of strings.
- Int[] – Used to create an array of integers.
- Boolean[] – Array of Boolean values (true or false).
- Byte[] – Used to create an array of bytes.
- Double[] – Creates an array of double-precision floating-point numbers.
- Decimal[] – This is used to create an array of decimal numbers.
- DateTime[] – Used to create an array of dates and times.
- Object[] – Create an array of objects.
- Char[] – This is used to create an array of characters.
- Array[] – Used to create an array of arrays.
It’s possible to create other array types as well, such as custom object types, and specific .NET framework classes, like Diagnostics.Process for example.
Creating Multidimensional Array
A multi-dimensional array is an array that contains other arrays as elements. Creating a multidimensional array in PowerShell is as simple as creating an array and then adding sub-arrays as elements to it. For example, to create a 2-dimensional array:
# Create an empty 2-dimensional array
$myArray = @()

# Add sub-arrays as elements
$myArray += @(1,2,3),@(4,5,6),@(7,8,9)
We can also create the two-dimensional array with a single line, using the comma operator
$myArray = @( (1,2,3), (4,5,6), (7,8,9) )To access the elements in the multidimensional array we need to use the index of the first (parent) array and the sub (nested) array:
# Return the third element (2) of the second array (1):
$myArray[1][2]

# Returns
6
Accessing and Manipulating Array Elements
Now we know how to create an array, let’s take a look at how to access and use the data inside the arrays
Accessing items using the Array Index
Arrays in PowerShell have an index that always starts at 0. We can use this index to retrieve items from the array, simply by specifying the index number between brackets. For the examples below we are going to use the following array:
$fruits = @("Apple", "Banana", "Cherry", "Date", "Elderberry", "Fig", "Grape", "Honeydew", "Kiwi", "Lemon")So to access the first item in the array, the Apple, we specify the index number 0:
$fruits[0]

# Result
Apple
We can also return multiple items from the array, by entering multiple index numbers:
$fruits[3,7,8]

# Result
Date
Honeydew
Kiwi
Another option is to return a range of items from an array. For example, we can return the first 5 items using:
$fruits[0..4]

# Result
Apple
Banana
Cherry
Date
Elderberry
The last option that is good to know, is that you can also count backward from the index. So to get the last item, or last 3 items from the array we can do:
$fruits[-1]

# Result
Lemon

$fruits[-1..-3]

#Result
Lemon
Kiwi
Honeydew
Loop through an Array in PowerShell
The biggest advantage of using an array or hashtables in PowerShell is that you can loop through all the items in an array. This allows you to perform the same action(s) on all the items in the array.
Note
Make sure that you also read this article about For-Each, Do-While another loopts in PowerShell. It will explain the difference and fastest methods.
There are different methods to loop through an array, but the easiest method is to either pipe the ForEach-Object cmdlet behind the variable or use the .ForEach method:
$fruits | ForEach-Object {"Fruit: $_"}

# Result
Fruit: Apple
Fruit: Banana
Fruit: Cherry
Fruit: Date
Fruit: Elderberry
Fruit: Fig
Fruit: Grape
Fruit: Honeydew
Fruit: Kiwi
Fruit: Lemon

# Or:
$fruits.ForEach({"Fruit: $_"})
When you want to keep track of where you are in the array, then the For loop is a good method to use. This method will keep track of the index number where it’s in the array:
for ($i = 0; $i -le ($fruits.length - 1); $i += 1) {
  Write-Host "$($fruits[$i]) is located at index $i"
}
Sort PowerShell Array
We can sort the elements in an array using the Sort-Object cmdlet. This will sort all elements in the array based on their value. By default, it will sort the items in alphabetical order. For example, to sort the array of fruits we can do:
$sortedFruits = $fruits | Sort-Object

-Descending parameter:
$sortedFruits = $fruits | Sort-Object -Descending

# Result
Lemon
Kiwi
Honeydew
Grape
Fig
Elderberry
Date
Cherry
Banana
Good to know is that the Sort-Object cmdlet doesn’t modify the original array, it returns a new sorted array. You can use the -Unique parameter to sort and remove duplicate elements in the array.
Filter an Array in PowerShell
We can use the Where-Object cmdlet to filter an array in PowerShell. It will return only the item that matches the condition of the filter into a new array. For example, let’s get all fruits that end with “rry”:
$filteredFruits = $fruits | Where-Object {$_ -like "*rry"}

# result
Cherry
Elderberry
PowerShell Add to Array
To add items to an array we will need to use the += operator. This will copy the contents of the array and add the new item(s) to it. For example, we can add a new fruit to the $fruits array like this:
$fruits += "Mango"Or we can add multiple items to the array like this:
$fruits += "Mango", "Nectarine", "Orange"Good to know is that technically you can’t add items to an array in PowerShell. When you create an array, it will have a certain length. And that length is fixed, so you can’t add or remove items from it. The += operator however copies everything from the existing array and adds the new item(s) to it.
Some try to use the .add() method to add items to an array, but you can only use this method on an ArrayList.
Remove Elements from an Array
Removing items is technically not possible from an array, just like adding. So to remove items from an array, we will need to create a new array and filter out the item that we don’t want.
For example, to remove Banana from the $fruits array, we copy the array and use the Where-Object cmdlet to filter out the Banana:
$fruits = $fruits | Where-Object {$_ -ne "Banana"}PowerShell ArrayList
There is a better way to add or remove items from an array. For this, we will need to use the PowerShell ArrayList, which is available in the ‘System.Collections.ArrayList’ class. The advantage of the ArrayList compared to the normal array is that we can add and remove items from the array, without the need of copying the array first. This can really increase the performance of your script when you are working with large data sets.
So to create an ArrayList in PowerShell we will need to use the New-Object cmdlet to create the array:
$arrayList = New-Object System.Collections.ArrayListWe can now use the .Add() method to add items to the ArrayList:
$arrayList.Add("Apple")
$arrayList.Add("Banana")
To remove items from the ArrayList we can simply use the .Remove() method:
$arrayList.Remove("Apple")Retrieving items from the ArrayList is the same as with a normal array. You can use the index or loop through all the items in the array using one of the loop methods.
Built-in Array Cmdlets
There are a couple of built-in cmdlets that can be used to perform common array operations. These cmdlets make it easier to work with arrays and allow you to automate tasks. Some of the most commonly used built-in array cmdlets in PowerShell are:
Join operator
The join operator is used to join the elements of an array into a single string. We can specify the separator between the elements, such as a space or a comma. For example, we can join the elements of the $fruits array into a single string like this:
$fruits -join ','

# Result
Apple,Cherry,Date,Elderberry,Fig,Grape,Honeydew,Kiwi,Lemon
Split operator
We can convert a string into an array using the split operator. Just like with the join operator, we can specify the separator of the elements, like a space or comma. So we can for example split the string of fruits back into an array like this:
$fruits = "Apple,Banana,Cherry" -split ','Replace operator
To replace an element, specific text, or characters in a PowerShell array we can use the replace operator. The -replace operator is a regular expression operator that allows you to search for and replace text in the array.
For example, to replace the Apple in the fruits array with Mange we can do the following:
$fruits = $fruits -replace "Apple","Mango"Keep in mind that the -replace operator is case-sensitive, if you want to make it case-insensitive you should use the -ireplace operator.
The operator is not limited to replacing a single element of an array. It can also replace a specific character in all elements of the array. For example, to replace “e” with “E”:
$fruits = $fruits -replace "e","E"

# Result
ApplE
ChErry
DatE
EldErbErry
Fig
GrapE
HonEydEw
Kiwi
LEmon
Wrapping Up
Arrays are an essential tool for scripting and automation in PowerShell. They allow you to automate repetitive tasks in your script, and work with large amounts of data in an efficient way.
I hope you found this article useful, if you have any questions, just drop a comment below.
About the Author:
Hey! I’m Ruud. I work as a SysAdmin in the Netherlands and I love to write about IT, Office 365, Smart Home stuff, and PowerShell.
Reference:
Mens, R. (2023). How to Use PowerShell Array – Complete Guide. Available at: https://lazyadmin.nl/powershell/powershell-array/ [Accessed: 3rd February 2023].