What is a Delta Query?
Have you ever wanted to create a Flow that could monitor something in Office 365 (like a group) and do something if that thing changed? Well, that is what Delta Queries are for. The word “Delta” will refer here to the difference, or change, in a certain quantity – not to the outflow of a river! The Microsoft Graph supports Delta Queries on certain objects, like Azure AD Security Groups. The concept is pretty easy to understand and is very well documented. The pattern is:
- Execute a request to get the initial state of the object.
- The response will contain the resource you requested and a
state token. The token is either:- a
nextLinkindicating that there are additional pages of data - a
deltaLinkindicating that there is no more data and the next request should use thedeltaLinkto determine changes in the resource.
- a
- Execute another request using the
deltaLinkand return to step 2.
There are other nuances as some Azure AD objects support advanced sync features, but for our scenario we will follow this pattern.
In researching this process, I found several very good resources for using the Microsoft Graph with Microsoft Flow. My favorite resource is my great friend Serge Luca, MVP @SergeLuca, he has presented and written a great deal about using Flow. You can find him in the Microsoft Flow Community where he shares advice and regularly publishes helpful articles. Serge helped me to understand how to call the Microsoft Graph. After researching with people like Serge and after reading a mind-numbing number of articles, I created this “basic”” post to save my readers time. Many of the posts in the Flow Community were written before the basics, like how to create your app through https://apps.dev.microsoft.com/, had changed.
So, here we go. In this three-part series we are going create a Flow that monitors an Azure AD Group and then does stuff based on what changed. The goal is to demonstrate the pattern for the Delta Query. I am just going to maintain a SharePoint list, but you can do anything you like with the information. For example, you could send each member in the group a “welcome email” or use the membership in a group to assign licenses to users in a third party app like Spanning Backup for Office 365!
The Three Part Series
Part 1: The App, Consent, and the Plan (this post)
– Everything you need to get ready
– Background info
– App Creation and Registration
– Consent
– Storage Prep
– (We won’t open Flow until the next post.)
Part 2: Authentication and Initial Request
– Create the Flow, Get Authenticated, and make the Initial Request
Part 3: Delta Query and Deleted Objects
– Enhance the Flow, perform a Delta Request, deal with deleted objects
Prerequisites before you create your Flow
Before you dive into Flow, you need to prepare a few things in order for Flow to make a request of the Microsoft Graph. Permissions can be tricky, so be sure that you are logged into the Azure Portal https://portal.azure.com with an account that can grant rights to the resources you want to access. In my case I am logged in with a Global Administrator account.
These are the basic prerequisites:
- Create an App (this is what Flow will use to call the Graph)
- Authorize the App
- Check for your App in Azure
- Plan your Flow
- Configure Storage
Create an App
In order to use the Graph from Flow you have to create an “App” with the appropriate consent that Flow will use to gain access to the items of interest in the graph. This is easy enough (no development skills required) this process is in Preview right now, so if my screenshots are a little off please let me know.
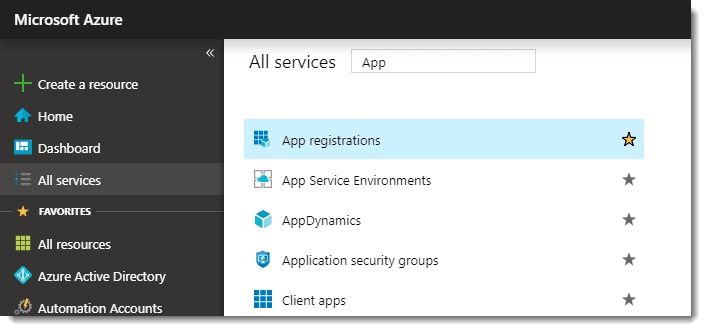
In the Azure Portal, search for App registrations if it is not already in your favorites. Click the link.
On the App registrations page click New application registration
On the Create blade, give your application a Name, Application type, and Sign-on URL as follows:
Name: Flow Delta Query
Application type: Web app / API
Sign-on URL: https://localhost/flowdeltaquery (Note: The URL does not matter, we don’t need it for anything after we give consent later. Just use the value I have here and you’ll see where we need it again later.)
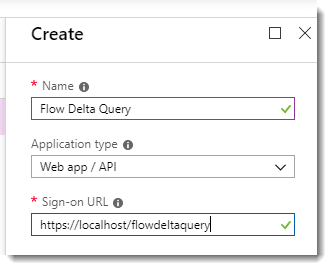
Click Create
Once the App is registered you should see the basic information about your app displayed. Note the Application ID – you will need it later.

Click Settings.
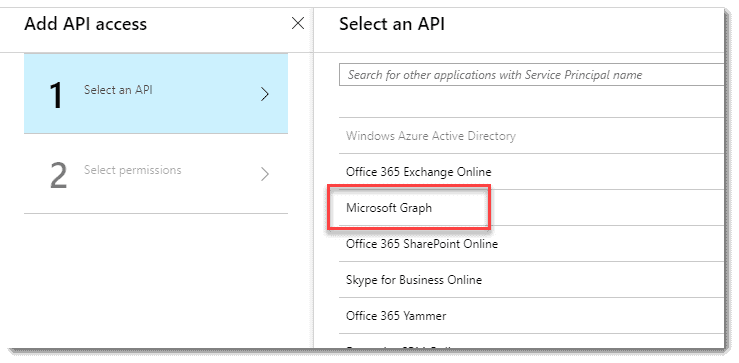
Click Required permissions and choose Add.
In the Add API access blade choose Select an API and select Microsoft Graph. Click Select
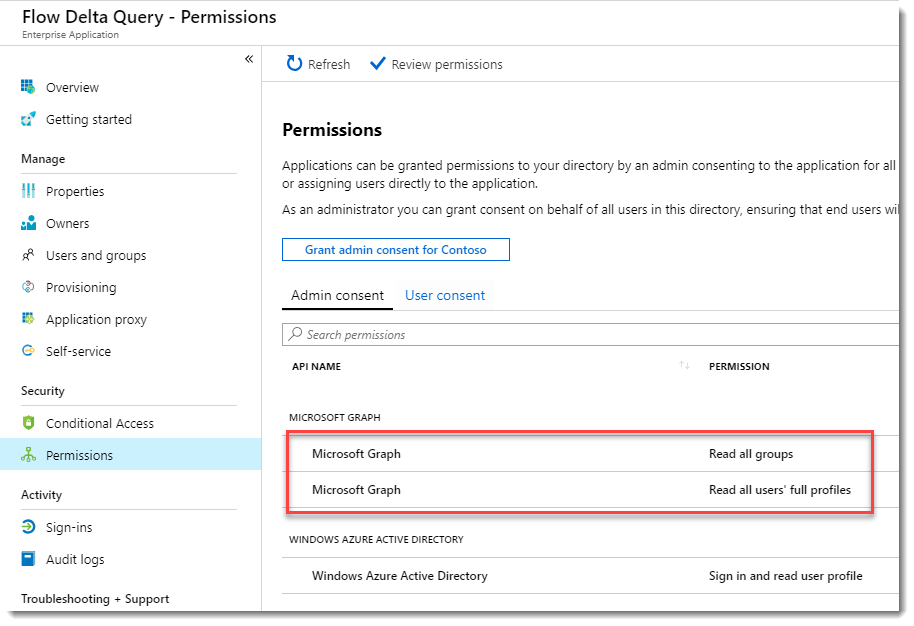
In the Select permissions section choose Read all users’ full profiles and Read all groups. Note: For this use of the Graph I want to Read the Groups and may want to read details about a user like thier name, so I am choosing these two permissions. If you want to do something diferent make the appropriate choice for your needs. Click Select. Click Done.
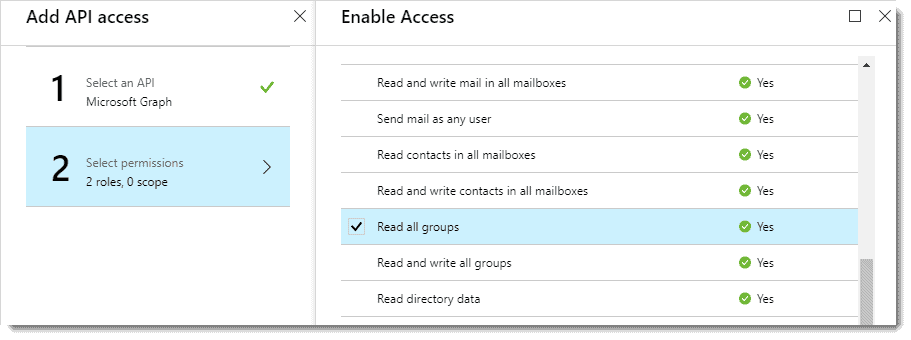
You should now see that your App has two permissions requested from the Microsoft Graph.


Authorize your App
Congratulations! You created an App, and you told the app what things it was going to access in the Graph API. Now you need to Consent to those permissions. Ordinarily you would do this while installing the App. In our case we’re going to “fake it” by sending all of the necessary info like the App ID and Tenant ID along to Azure.
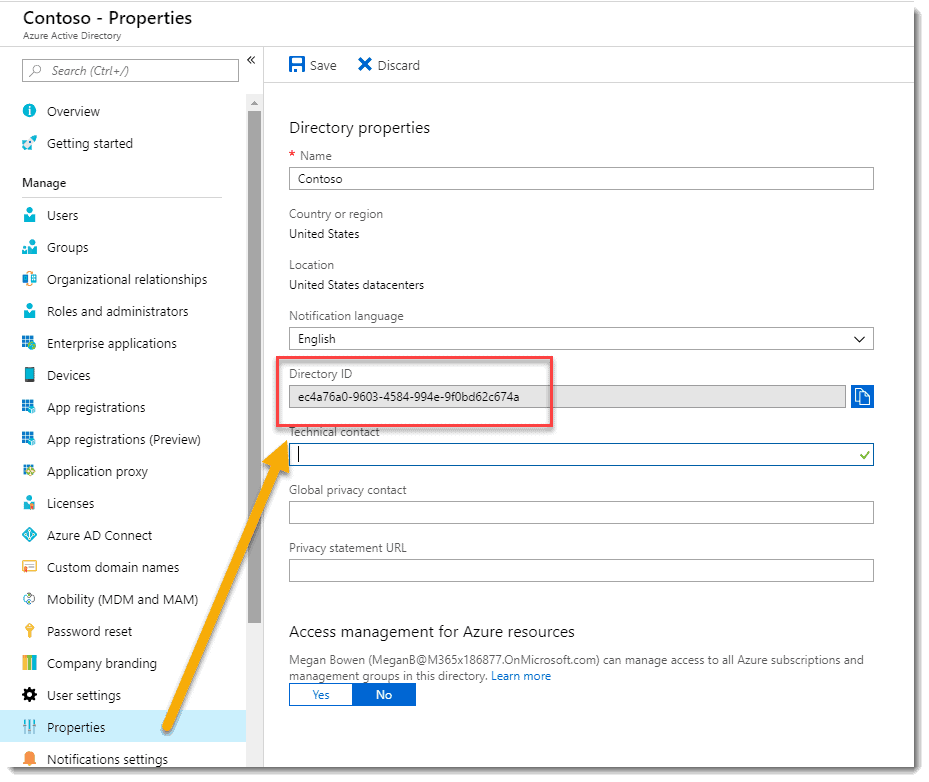
Get your Tenant ID from Azure AD. Choose Properties – your Tenant ID is the Directory ID.
Get your Application ID from your notes when you created your App previously.
In a text editor, edit the following URL and substitute your values for mine as follows:https://login.microsoftonline.com/{Tenant ID}/adminconsent?client_id={App ID}&redirect_uri={Home Page} So if you have been following along my consent URL is:https://login.microsoftonline.com/ec4a76a0-9603-4584-994e-9f0bd62c674a/adminconsent?client_id=4dff8542-c730-4a85-99be-8da4752cac38&redirect_uri=https://localhost/flowdeltaquery
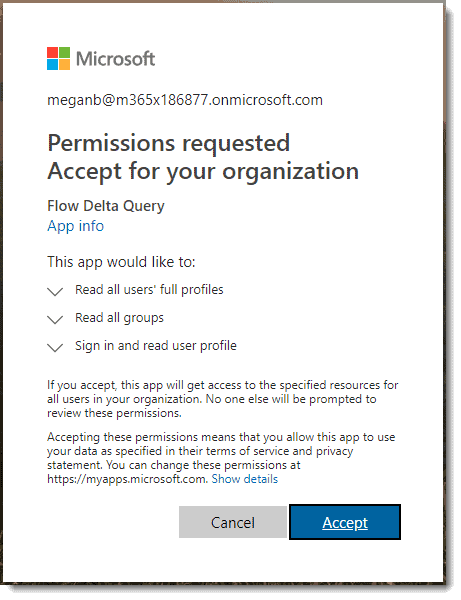
Paste the whole URL into your browser and if you are prompted to authenticate, be sure to use the same credentials for your Azure tenant. You should see the App consent form displayed. Click Accept.
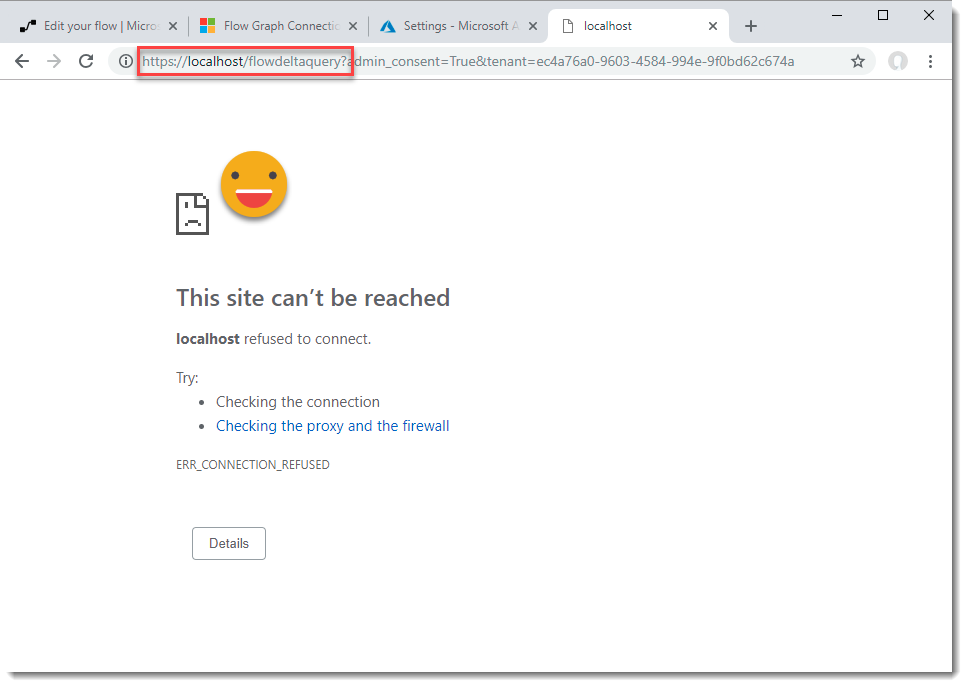
You will be redirected to your Home Page which does not exist don’t panic. It’s OK!
Checking your work in Azure
In Azure Portal, navigate to Enterprise applications.
In the list you should now see Flow Delta Query.
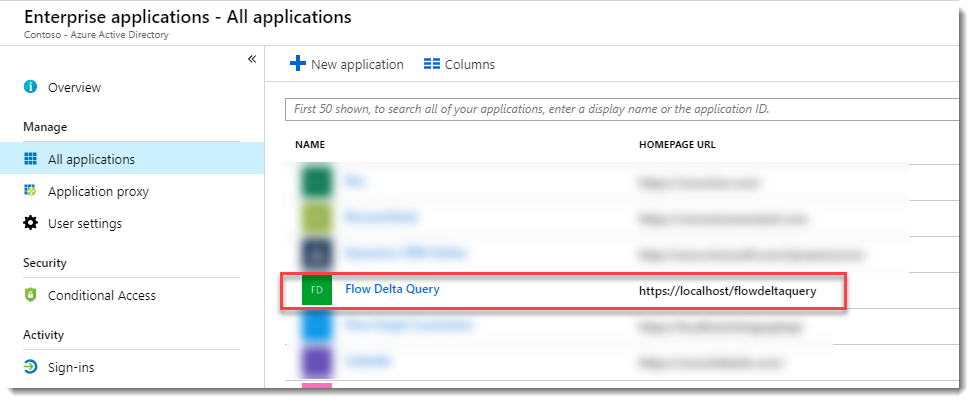
Click the application title to view the details. Choose Permissions and you should see the permissions that you requested and consented to.
Planning Your Flow
After I’ve completed the prerequisites, I find it saves a lot of time if I draw out my workflow plans before diving into Flow. I’ve used Visio – you might use other tools. Below is my Visio drawing that represents the Flow that I plan to create. There are essentially three phases to what I am building:
- Set up the Flow by reading a configuration item to determine if the Query has ever been run before.
- Call the Graph (either for the first time or as a Delta Query) and process the results.
- Write the Delta Link to storage for the next run.
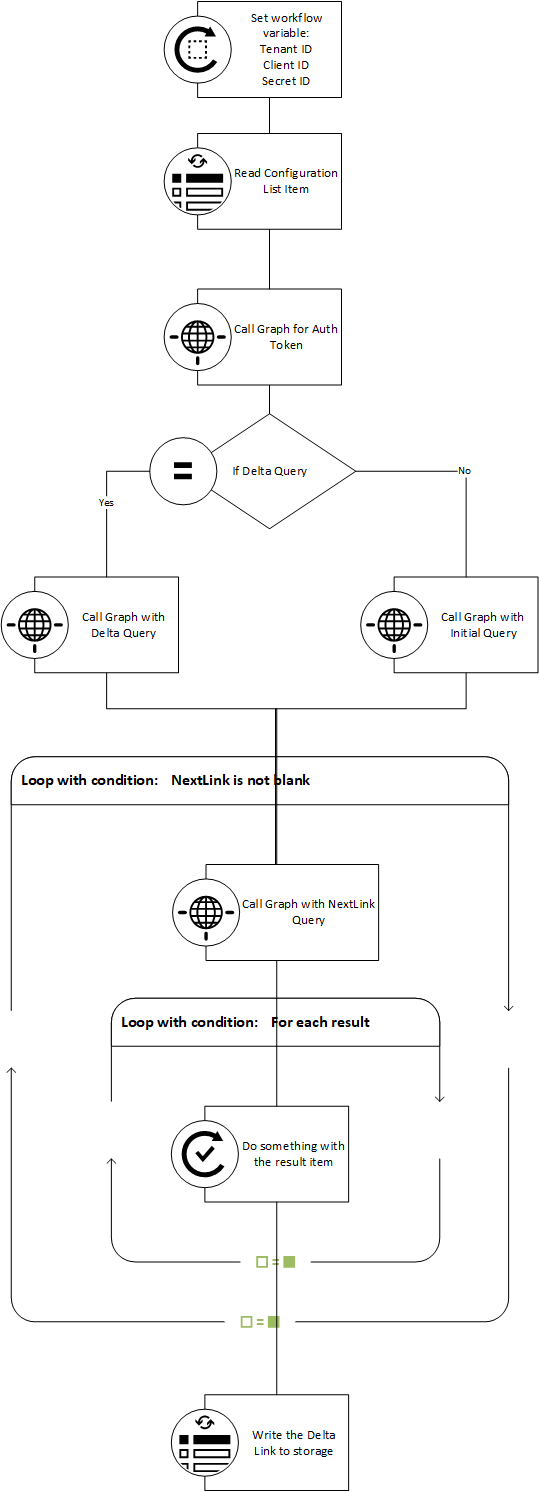
Note that between executions of the flow I will need to store the deltaLink somewhere and then retrieve it on the subsequent execution. I plan to do that in SharePoint, but you could use any service you like since it is just a long string of text.
Provision SharePoint Lists for Storage
In my SharePoint online tenant I created a site collection for storing the results from our delta query. On that site create two lists:
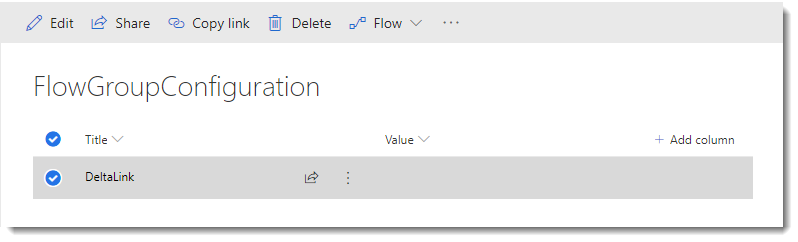
- Create a list titled FlowGroupConfiguration.
- Add a multi-line text field called Value.
- Add one item to the list titled DeltaLink and save the item. Note: This is a shortcut that I often use in my Flows since I can pull configuration from the SharePoint list by item ID. Since this is a new list and a new item, this is item ID #1. If you delete and/or change the items in the list the ID may change. It is up to you to keep track of the IDs used in the Flow.
Create another list called FlowGroups to hold the output of our Flow.
Summary
OK, now you have the basis for the next two posts all set up. In the next post we’ll perform our initial query and store the Delta Link. In the final post we’ll retrieve the Delta Link and submit a Delta Query.
The Video
About the Author
Matthew is a Product Manager at Spanning Cloud Apps He works on the product team for Spanning Backup for Office 365. A 12-time Microsoft Office Apps and Services MVP, he spends his professional time working to build best of breed solutions for Office 365 and Azure. Matthew is a speaker, content author, blogger, and specialist in SharePoint and Office 365 technologies. An accomplished photographer, cook, and bartender, in his spare time Matt spends as much time with his wife as his dog will allow.
Reference:
McDermott, M. (2019). Microsoft Graph Delta Query from Microsoft Flow: Part 1. Available at:
https://ableblue.com/blog/archive/2019/01/17/graph-delta-query-flow-part-1/ [Accessed: 1st May 2019]