Recently I already wrote about Microsoft 365 across applications that can be run in either Teams, Office (Microsoft 365) or Outlook. Since version 1.16 now it is also possible to develop and host those applications in SharePoint with SharePoint Framework (SPFx). So let’s dive into another sample application and see how this can be realized with either a Teams dev application, or based on SharePoint Framework (SPFx). Document generation is done with both technologies. Now let’s add some further lifecycle steps such as review and publish with search-based messaging extensions realized within the existing Teams dev application.
At the time of writing this feature is in Developer preview only. So it’s not supported for productional use, might be subject to change AND needs the Teams client to be enabled in “Developer preview” (even or especially to use in Outlook)
Series
- Pre – Modern SharePoint content type publishing
- Part I – A SharePoint document generator as Microsoft 365 app (yoteams)
- Part II – A SharePoint document generator as Microsoft 365 app (SPFx)
- Part III – A user configured Teams personal app with SPFx
- Part IV – SharePoint document review by search-based messaging extension in Outlook
Content
Setup
I already wrote about the setup of a search-based messaging extension and SSO but let’s repeat it here again as it’s slightly different, especially targeting Microsoft 365 and not only Teams now.
about:blank
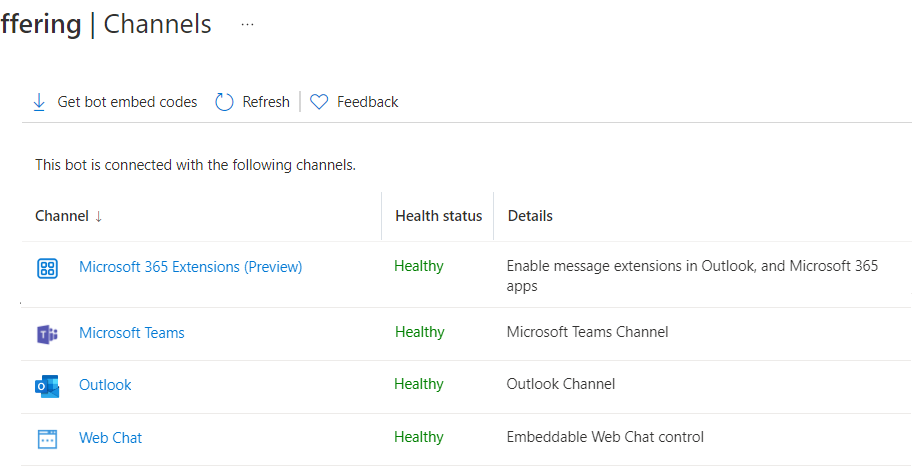
First there is a need to create an Azure Bot. The Bot needs three channels enabled: Teams, Outlook and Microsoft 365 Extensions:
Next in “Configuration” the messaging endpoint needs to be constructed with the app host / ngrok url and /api/messages.
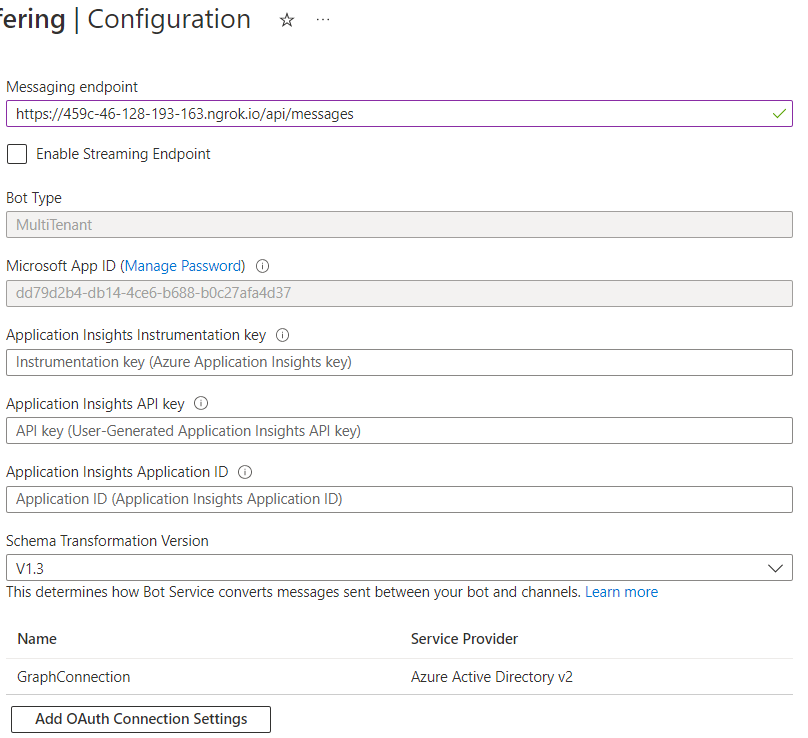
Next in the Azure Bot configuration the Microsoft App registration needs to be configured. “Manage password” (takes you to the Secrets tab of the app registration) needs to be clicked to get there.
Advertisements
about:blank
REPORT THIS ADPRIVACY
The App configuration needs a specific redirect url to cooperate with the bot framework on authentication:

A secret needs to be generated and noted down for two following steps. Under “Expose API” an App URI together with scope and several client IDs needs to be configured:
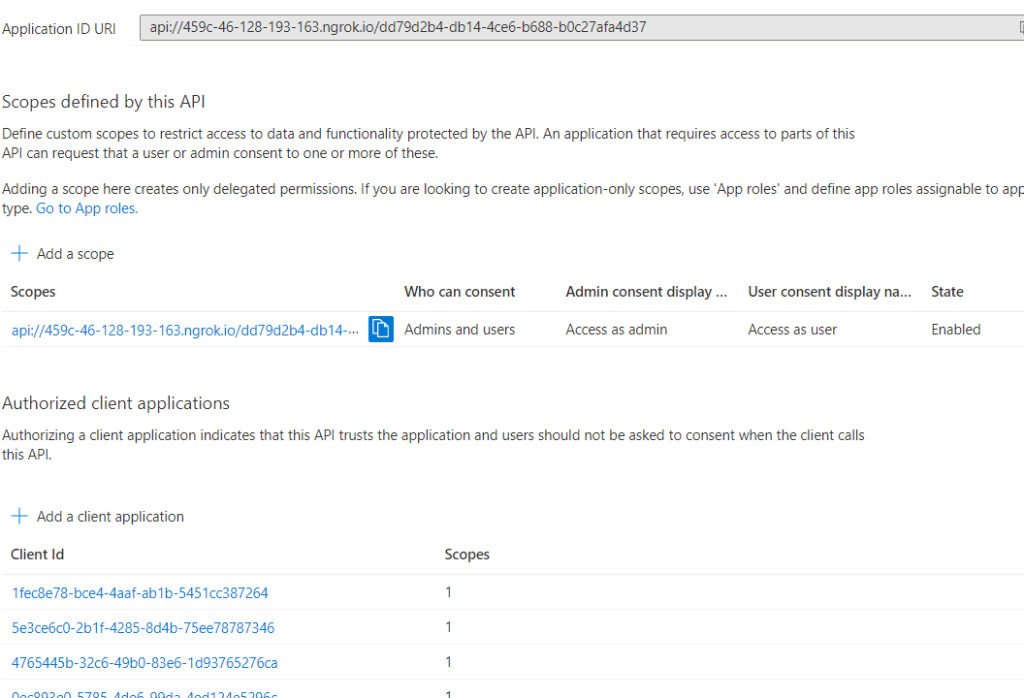
The exact client IDs are:
| Teams desktop, mobile | 1fec8e78-bce4-4aaf-ab1b-5451cc387264 |
| Teams web | 5e3ce6c0-2b1f-4285-8d4b-75ee78787346 |
| 4765445b-32c6-49b0-83e6-1d93765276ca | |
| 0ec893e0-5785-4de6-99da-4ed124e5296c | |
| d3590ed6-52b3-4102-aeff-aad2292ab01c | |
| Outlook desktop, mobile | d3590ed6-52b3-4102-aeff-aad2292ab01c |
| Outlook web | bc59ab01-8403-45c6-8796-ac3ef710b3e3 |
| Outlook web | 00000002-0000-0ff1-ce00-000000000000 |
Microsoft 365 client IDs
For search-based messaging extensions Microsoft 365 app client IDs are not necessary to configure as this is not a valid option to call messaging extensions.
about:blank
For access with Microsoft Graph permissions need to be granted. Against my previous posts in this series I am using Microsoft Graph here. It’s another app registration and the specific scenario (search and update list items) can be perfectly achieved with Microsoft Graph. There is one small exception only but will mention this later.

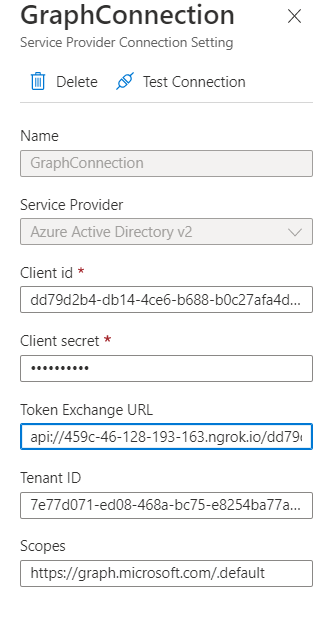
Having that, the OAuth Configuration of the Bot needs to be adjusted finally. Therefore, the client ID and secret, the app uri as Token Exchange URL, the tenant ID and the default scope of Microsoft Graph are needed. As service provider chose Azure Active Directory V2.
Last not least the following configuration values need to be added to the env configuration (while of course I recommend to put sensitive things like an app secret to more secure and robust resources such as Azure Key Vault )
# App Id and App Password for the Bot Framework bot

MICROSOFT_APP_ID=

MICROSOFT_APP_PASSWORD=
# OAuth Connection name in Bot configuration

ConnectionName=GraphConnection


# Site where your offerings are stored
SiteUrl=https://your-tenant.sharepoint.com/sites/Offerings
Manifest
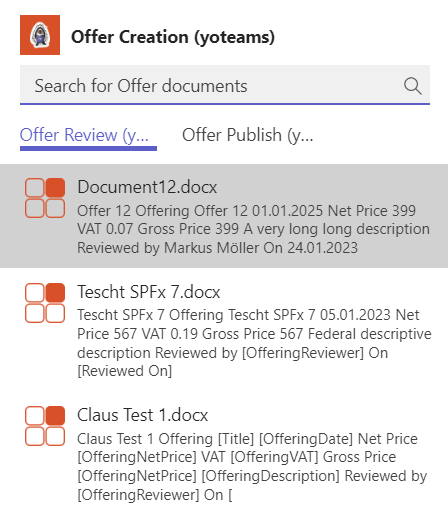
Last not least in the manifest two messaging extensions need to be referenced. So user can switch between selecting documents for “Review” or to “Publish” (see screenshot at the top of the post):
"composeExtensions": [ { "botId": "{{MICROSOFT_APP_ID}}", "canUpdateConfiguration": true, "commands": [ { "id": "offerReviewYoteamsMessageExtension", "title": "Offer Review (yoteams)", "description": "Reviews an offer", "initialRun": true, "parameters": [ { "name": "parameter", "description": "Search for Offer documents", "title": "Parameter" } ], "type": "query" }, { "id": "offerPublishYoteamsMessageExtension", "title": "Offer Publish (yoteams)", "description": "Publishes an offer", "initialRun": true, "parameters": [ { "name": "parameter", "description": "Search for Offer documents", "title": "Parameter" } ], "type": "query" } ] }
Most important: Both refer to the same botId and the bot can detect from the different commandIDs from where the request is coming.
SSO implementation
Implementing SSO for search-based messaging extensions I already illustrated a while ago. Since then, nothing fundamentally changed. Only one point in the past I was struggling with and now works. Basically, a token needs to be generated on behalf of the current user with the help of the configured Bot’s OAuth (see above) authentication.
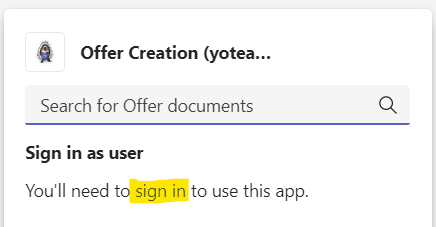
When the Bot is reached, for instance with a search query request, an attempt is made to generate an on-behalf user token. Three things are needed: The Bot’s OAuth connection name, the context and a “so called” magicCode from the request. If the user did not sign in to the Bot, yet, a sign-in request url is sent back to the user instead (now the type=auth works pretty well). Otherwise an access token is available and the Graph API request(s) can begin.
public asynconQuery(context: TurnContext, query: MessagingExtensionQuery): Promise<MessagingExtensionResult> { const adapter: any = context.adapter; const magicCode = (query.state && Number.isInteger(Number(query.state))) ? query.state : ''; const tokenResponse = awaitadapter.getUserToken(context, this.connectionName, magicCode); if(!tokenResponse || !tokenResponse.token) { // There is no token, so the user has not signed in yet. // Retrieve the OAuth Sign in Link to use in the MessagingExtensionResult Suggested Actions const signInLink = awaitadapter.getSignInLink(context, this.connectionName); letcomposeExtension: MessagingExtensionResult = { type: 'auth', suggestedActions: { actions: [{ title: 'Sign in as user', value: signInLink, type: ActionTypes.OpenUrl }] } }; returnPromise.resolve(composeExtension); }// If this point is reached, there is a token and the access to Microsoft Graph can start (see next)
Search Items (Graph)
The files are retrieved with a Microsoft Graph search request for a driveItem and our specific ContentTypeID. Following is the code that happens in the query function after a token was retrieved successfully (see above).
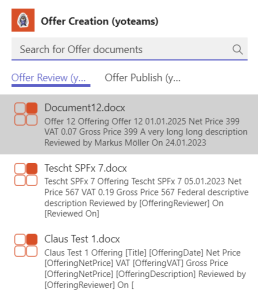
public asynconQuery(context: TurnContext, query: MessagingExtensionQuery): Promise<MessagingExtensionResult> { const attachments: MessagingExtensionAttachment[] = []; ... const tokenResponse = awaitadapter.getUserToken(context, this.connectionName, magicCode); ... letmemberIDs: string[] = []; const memberResponse = awaitTeamsInfo.getPagedMembers(context, 60, ''); memberResponse.members.forEach((m) => { memberIDs.push(m.id!); }); if(query.commandId === 'offerReviewYoteamsMessageExtension') { letdocuments: IOfferDocument[] = []; if(query.parameters && query.parameters[0] && query.parameters[0].name === "initialRun") { const graphService = newGraphSearchService(); documents = awaitgraphService.getFiles(tokenResponse.token); } documents.forEach((doc) => { const card = CardFactory.adaptiveCard(CardService.reviewCardUA(doc, memberIDs)); const preview = { contentType: "application/vnd.microsoft.card.thumbnail", content: { title: doc.name, text: doc.description, images: [ { url: `https://${process.env.PUBLIC_HOSTNAME}/assets/icon.png` } ] } }; attachments.push({ contentType: card.contentType, content: card.content, preview: preview }); }); } ... returnPromise.resolve({ type: "result", attachmentLayout: "list", attachments: attachments } as MessagingExtensionResult); }
After having the token and some memberIDs are grabbed (see later) two checks are done. First the check for the right commandID and 2nd the check if it’s the initialRun (it’s also possible to search for specific documents but we will skip this here as this is only a different search query. The rest of the functionality stays the same). Now the implemented GraphSearchService can retrieve the files. The result is then iterated and transformed to preview and AdaptiveCards. Both are finally returned as a MessagingExtensionResult. Next let’s have a look how to get the files with Microsoft Graph.
public asyncgetFiles(token: string, query: string): Promise<IOfferDocument[]> { letqueryString = 'ContentTypeID:0x0101003656A003937692408E62ADAA56A5AEEF*'; if(query !== "") { queryString += ` AND ${query}`; } const searchResponse = { requests: [ { entityTypes: ['driveItem'], query: { queryString: queryString } } ]}; const requestUrl: string = `https://graph.microsoft.com/v1.0/search/microsoft.graph.query`; returnAxios.post(requestUrl, searchResponse, { headers: { Authorization: `Bearer ${token}` }}) .then(response => { letdocs: IOfferDocument[] = []; response.data.value[0].hitsContainers[0].hits.forEach(element => { docs.push({ name: element.resource.name, description: element.summary, author: element.resource.createdBy.user.displayName, url: element.resource.webUrl, id: element.resource.parentReference.sharepointIds.listItemId, modified: newDate(element.resource.lastModifiedDateTime) }); }); returndocs; }) .catch(err => { log(err); return[]; });}
With a valid access token it is possible to search for a driveItem item with a given ContentTypeID. The request is done as a POST request against the Microsoft graph search endpoint. Having a response it can be iterated and transformed to our given model and finally returned to the requestor. Before an eventual custom search query is added to the request (if not the initialRun)
Update Item (Graph)
On click on the Adaptive Card’s “Reviewed” button an Action.Execute towards the Bot is fired. As there might be several ones, the context.activity.value.action.verb helps to decide what needs to be done. After another SSO token generation and extracting the corresponding doc another Microsoft Graph operation needs to be called that simply updates the doc’s listItem with the current user as reviewer and the current date as review date. Last not least depending on the result a new adaptive card is created and returned.
public asynconActionExecute(context: TurnContext): Promise<AdaptiveCardResponseBody> { const doc: IOfferDocument = context.activity.value.action.data.doc as IOfferDocument; ... const tokenResponse = awaitadapter.getUserToken(context, this.connectionName, magicCode); ... // Get user's Email from the token (as the context.activity only offers display name) const decoded: { [key: string]: any; } = jwtDecode(tokenResponse.token) as { [key: string]: any; }; const graphService = newGraphSearchService(); switch(context.activity.value.action.verb) { case'review': doc = awaitgraphService.reviewItem(tokenResponse.token, doc.id, decoded.upn!, context.activity.from.name); if(doc.reviewer !== "") { card = CardService.reviewedCardUA(doc); } else{ card = CardService.reviewCardUA(doc, context.activity.value.action.data.userIds); } break; ....}

ublic asyncreviewItem(token: string, itemID: string, user: string): Promise<IOfferDocument> { const currentItem = awaitthis.getItem(token, itemID); if(currentItem.reviewer !== '') { letrequestUrl: string = awaitthis.getSiteAndListByPath(token, process.env.SiteUrl!); // Get user LookupID const userInfoListID = awaitthis.getUserInfoListID(token, requestUrl); const userLookupID = awaitthis.getUserLookupID(token, requestUrl, userInfoListID, user); requestUrl += `/${itemID}/fields`; const config: AxiosRequestConfig = { headers: { Authorization: `Bearer ${token}`, 'Content-Type': 'application/json' }}; const fieldValueSet = { OfferingReviewedDate: newDate().toISOString(), OfferingReviewerLookupId: userLookupID }; try{ const response = awaitAxios.patch(requestUrl, fieldValueSet, config ); const reviewedDoc: IOfferDocument = { name: response.data.Title, author: currentItem.author, description: response.data.OfferingDescription, id: response.data.id, modified: newDate(response.data.Modified), url: currentItem.url, reviewedOn: newDate(response.data.OfferingReviewedDate), reviewer: userDisplayName } returnreviewedDoc; } catch(error) { log(error); returncurrentItem; } } else{ returncurrentItem; }}
Get User LookupID
A problem known from one of my basic articles about SharePoint and Microsoft Graph is that to update a People column the local Site’s lookup ID of the user in the local Site’s hidden User Information List is needed. Email, UPN, AADObjectID and so on directly doesn’t help.
about:blank
First there is the need to exactly identify the hidden User Information List. This can be done with a request to the /lists endpoint and $select for system to also retrieve hidden system lists. Before only the general siteUrl including the siteID was taken as “baseline”.
Unfortunately I was not successful with a $filter in the /lists request. This can be the case in some situations with Microsoft Graph and the solution is to iterate the result set and pick the correct item client-side. Luckily usually not much lists can be expected within one site.
privateasyncgetUserInfoListID (accessToken: string, requestUrl: string): Promise<string> { letlistRequestUrl = requestUrl.split('/lists')[0]; listRequestUrl += "/lists?$select=name,webUrl,displayName,Id,system"; try{ const response = awaitAxios.get(listRequestUrl, { headers: { Authorization: `Bearer ${accessToken}` } }); const lists: any[] = response.data.value; letlistID = ""; lists.forEach((l) => { if(l.webUrl.endsWith('/_catalogs/users')) { listID = l.id; } }); returnlistID; } catch(error) { ... }}
Having the listID it can be queried for the given user (mail, login). Unfortunately there is no guarantee every user is already available within that list and this is the little exception where Microsoft Graph cannot really help (mentioned above). Let’s skip this here and assume the user always exists as all site members should exist and otherwise there would be a user permission problem as well. In a previous sample I illustrated the ensureuser endpoint of the SP Rest API which would help here.
Also worth to note that the list is not indexed (and I would not recommend to do so on a system list). So to $filter for the username
'Prefer': 'HonorNonIndexedQueriesWarningMayFailRandomly'// No chance to index User Information List
needs to be added to the header of the request. Finally although querying for a unique username Microsoft Graph returns an array here so pick the first item [0] and it’s ID.
privateasyncgetUserLookupID (accessToken: string, requestUrl: string, listID: string, userName: string): Promise<string> { letlistRequestUrl = requestUrl.split('/lists')[0]; listRequestUrl += `/lists/${listID}/items?$expand=fields&$filter=fields/UserName eq '${userName}'`; try{ const response = awaitAxios.get(listRequestUrl, { headers: { Authorization: `Bearer ${accessToken}`, 'Prefer': 'HonorNonIndexedQueriesWarningMayFailRandomly'// No chance to index User Information List } }); returnresponse.data.value[0].id; } catch(error) { ... }}
Update the Adaptive Card
With the new universal action model (UAM) it is possible to update the Adaptive Card. For this a refresh part needs to exist inside an adaptive card v1.4 or above.
{ type: "AdaptiveCard", $schema: "http://adaptivecards.io/schemas/adaptive-card.json", version: "1.4", refresh: { action: { type: "Action.Execute", title: "Refresh", verb: "alreadyreviewed", data: { doc: doc, userIds: userIds } }, userIds: userIds },
Two things to note here. At first the verb. This is to identify from where the Action.Execute is coming later in the Bot. Second the userIds because only users which are listed here will get the effect of automatic refresh when displaying the card. As userIds all members of the current chat were evaluated (see above). Last not least also the data such as the doc can be transported here.
Once the refresh action is executed, either automatically or manually the following happens inside the Bot:
public asynconActionExecute(context: TurnContext): Promise<AdaptiveCardResponseBody> { const doc: IOfferDocument = context.activity.value.action.data.doc as IOfferDocument; ... const tokenResponse = awaitadapter.getUserToken(context, this.connectionName, magicCode); ... const graphService = newGraphSearchService(); letcard; switch(context.activity.value.action.verb) { case'alreadyreviewed': letcurrentDoc: IOfferDocument; currentDoc = awaitgraphService.getItem(tokenResponse.token, doc.id) .catch(e => { returndoc; // Use card's doc instead }); if(typeofcurrentDoc.reviewer !== 'undefined') { card = CardService.reviewedCardUA(currentDoc); } else { card = CardService.reviewCardUA(currentDoc, context.activity.value.action.data.userIds); } break; } return Promise.resolve({ statusCode: StatusCodes.OK, type: 'application/vnd.microsoft.card.adaptive', value: card });
After the switch for the right verb the given doc is retrieved from the server in the latest state. Depending on review a new card without the “Reviewed” button is returned or the old one still consisting the option to click “Reviewed”.

Same as the “Review” process there is also a “Publish” process. It works quite the same: Pick a document, send as adaptive card, click the button, update metadata in the backend and the card in the frontend. So far so good. The only difference I implemented is the option that additionally the document is converted as a PDF, too, and the card as well as the document get the url to the PDF. How to convert an Office document to PDF with Microsoft Graph was already described here.
In short once again here. A PDF can be generated from any supported file type (note a lot more src and target types coming with the current beta endpoint) by putting /content?format=PDF to the driveItemID request.
privateasyncdownloadTmpFileAsPDF (fileID: string, driveRequestUrl: string, fileName: string, accessToken: string): Promise<any> { driveRequestUrl += `/items/${fileID}/content?format=PDF`; returnAxios.get(driveRequestUrl, { responseType: 'arraybuffer', // no 'blob' as 'blob' only works in browser headers: { Authorization: `Bearer ${accessToken}` }}) .then(response => { const respFile = { data: response.data, name: `${fileName}.pdf`, size: response.data.length }; returnrespFile; }).catch(err => { log(err); returnnull; }); }
Having the PDF as an ArrayBuffer together with a name and size it can simply be uploaded to the site. In this sample a “Published” subfolder is taken.
privateasyncuploadFileToTargetSite (file: File, accessToken: string, driveUrl: string): Promise<string> { driveUrl += `/root:/Published/${file.name}:/content`; if(file.size <(4 * 1024 * 1024)) { const fileBuffer = file as any; returnAxios.put(driveUrl, fileBuffer.data, { headers: { Authorization: `Bearer ${accessToken}` }}) .then(response => { const webUrl = response.data.webUrl; returnwebUrl; }).catch(err => { log(err); returnnull; }); } else{ // File.size>4MB, refer to https://mmsharepoint.wordpress.com/2020/01/12/an-outlook-add-in-with-sharepoint-framework-spfx-storing-mail-with-microsoftgraph/ return""; }}
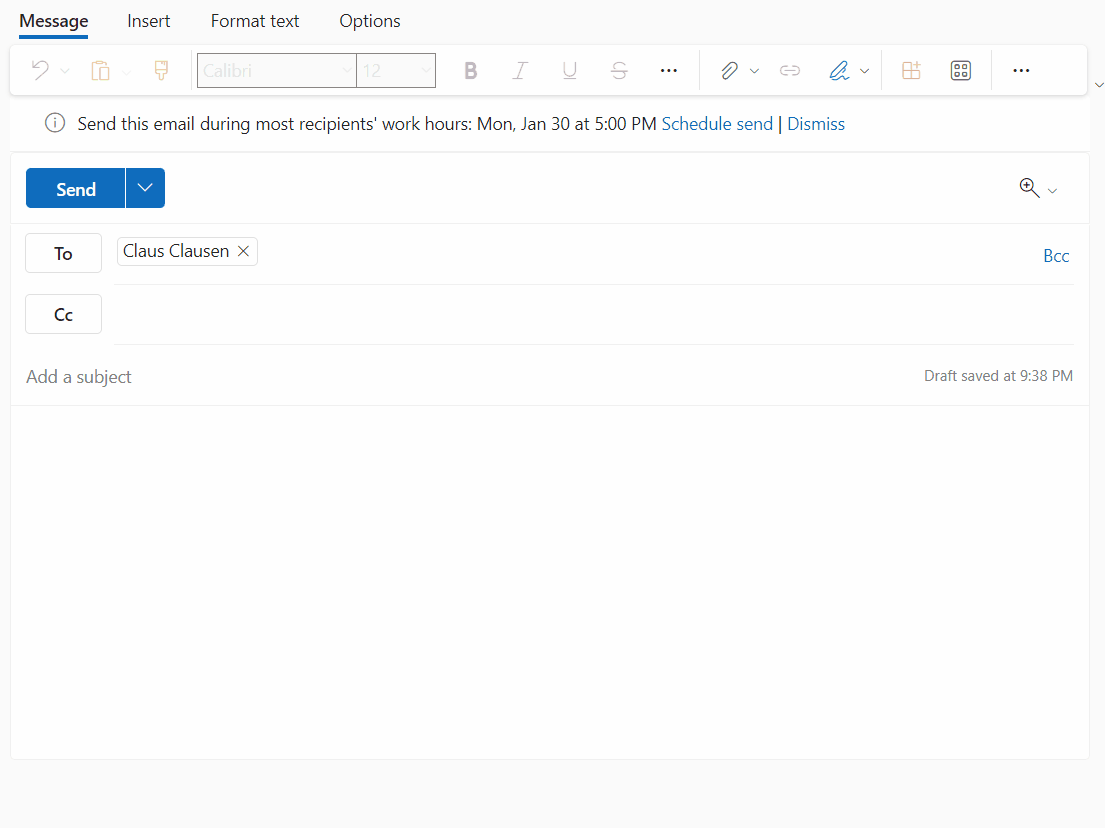
All in all the process looks like this from the beginning (picking the adaptive card) in Outlook:
Of course this sample has some room for improvement but I tried to keep it as rich as possible on the one hand but as simple as possible to establish on the other hand. So I always search for all documents having the content type and not filtering if already reviewed/published. You can do that by simply adding a managed property and change the search query. Also the document template has room for improvement but the functionality is there. Also theoretically the Adaptive Cards can be shared with users having no or only read access to the document(‘s site). A productional solution should handle this, of course.
As always you can find the whole solution for your reference or building a really cool solution out of it in my GitHub repository. Sharing is caring.
Enjoy some more SharePoint week content!
About the Author
Markus is a SharePoint architect and technical consultant with focus on latest technology stack in Microsoft 365 Development. He loves SharePoint Framework but also has a passion for Microsoft Graph and Teams Development.
Reference
Moller, M., 2023, SharePoint document review in Outlook or Teams, mmsharepoint.wordpress.com, Available at: https://mmsharepoint.wordpress.com/2023/02/07/sharepoint-document-review-in-outlook-or-teams/ [Accessed on 5 May 2023]