Filling out and submitting forms in SharePoint is an everyday workflow for many businesses. PDF fillable forms offer a practical and efficient means of capturing, managing, and storing data, which is why they are widely used in modern business operations. Collecting data from hundreds of clients or employees is a long process and it may become even longer if you need to send out those forms outside of SharePoint.
The problem is, that there isn’t an easy and efficient way to create and save the forms back in SharePoint. The current workflow works like this:
- The author has to create the PDF Form using his Local Application and upload the file to SharePoint.
- The end user needs to download the PDF Form, fill it out, give it a unique name, and upload it to SharePoint.
The above workflow has the following back draws:
- It’s time-consuming.
- Every user needs to have a form-filling application installed on the computer.
- Compliance goes out of the window as the data leaves SharePoint.
That’s why it is important to find a solution that will speed up document collaboration and data collection workflow and make it secure, fast, and reliant. It all comes down to two things: 1) you need to have a fillable PDF form that everyone can access and fill their data in, and 2) you need to set up the form submission settings in your SharePoint library so this form cannot be altered and all the form submissions are automatically sent in a designated SharePoint folder.
How to create fillable PDF forms in SharePoint
Using the Muhimbi Editor for SharePoint Online you can directly create the form from the browser by simply dragging and dropping fields to turn PDFs into fillable forms.
If you already have a PDF you can add a new blank page and then add text fields, radio buttons, checkboxes, push buttons, list boxes, combo boxes, text, and signature fields to your document. You can customize the fonts, border style, background color, and more. For more information, read the detailed guide on creating form fields in a PDF.
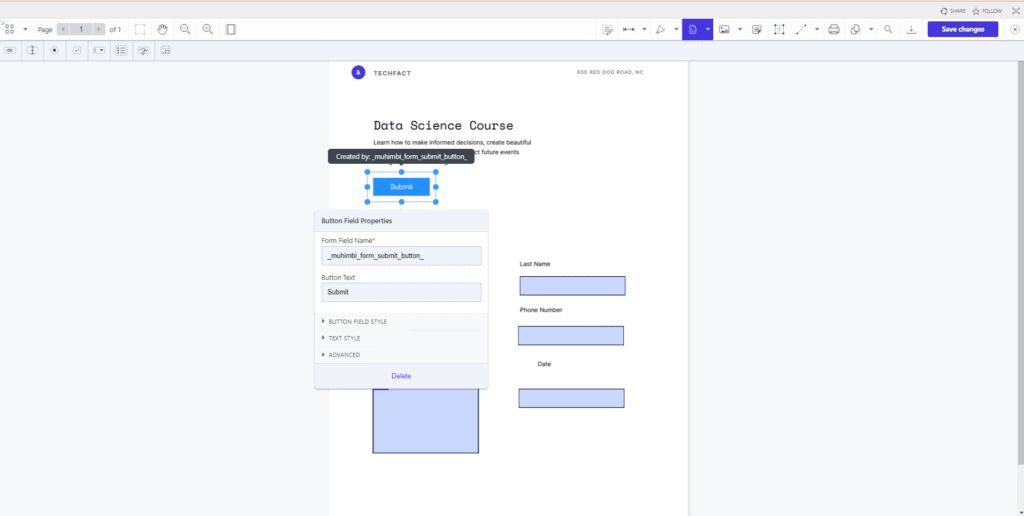
With this tool, you can create forms that can be filled out and submitted in the SharePoint library. During the creation process, make sure you add a Submit button to the form with the following field name: “_muhimbi_form_submit_button_”.
Submit PDF Form to SharePoint Library
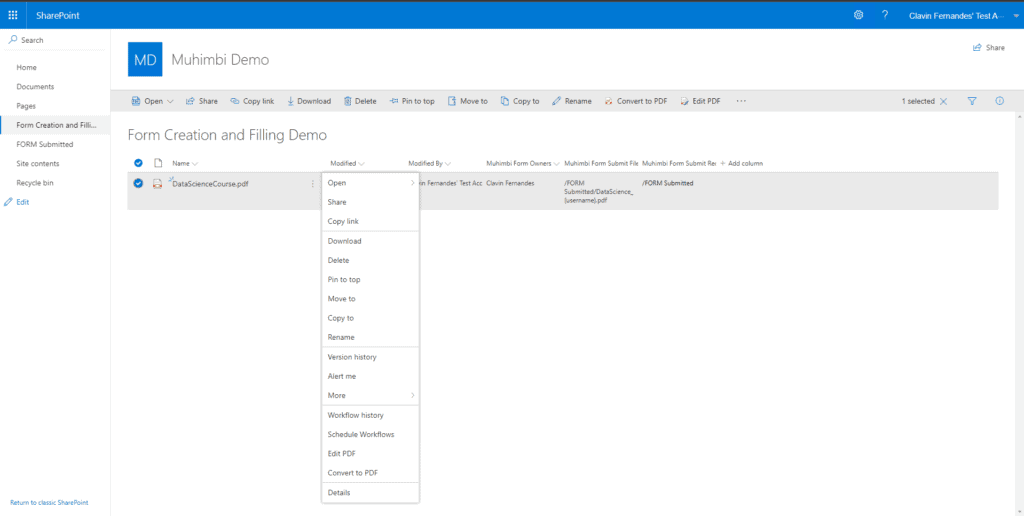
When your form is ready to use, you just need to set up a SharePoint library and create the following metadata columns for the library:
Muhimbi Form Owners– It must be “Person or Group” type. It must allow multiple selections but people only (and not a group). If you don’t specify the owners of the form then anyone can edit the form. If there are owners for the form then only the owners can edit the form. People who are not listed as owners cannot edit or save the form. However, they can download, print, or copy the form, interact with the form elements, and fill out and submit the form.
Muhimbi Form Submit File Path– This must be a “Single line of text” type column. It is a string to specify where this form should be saved when submitted. It can be a filename or file name with a full path, including wildcards. The available wildcards are {originalfilename}, {username}, {loginname} and {datetime}. This latter can contain formatting options as well, for example {datetime:h:mm tt}. Make sure you add a wildcard to identify the submission by time or the user details who submitted the form.

“Filename.pdf”
“{originalfilename}_{datetime}.pdf”
“/Shared Documents/SomeFolder/{originalfilename}_{username}_{datetime}.pdf”
“/sites/sitename/Shared Documents/{originalfilename}_{username}.pdf”
etc.
If this file path is not specified, the submitted PDF form will be saved next to the original PDF and will have a new file name which will contain the exact time of form submission and the username of the person who submitted the form in addition to the original file name. It would look like this: “{originalfilename}_{datetime}_{username}.pdf”
Muhimbi Form Submit Redirect URL– This must be a “Hyperlink or Picture” type column formatted as a Hyperlink. It is a URL that will tell the system where to transfer the user after the form has been submitted. If the redirect URL is not set then the user is transferred back to the original folder after submitting the form. If the redirection URL is set then the user is transferred to that URL after submitting the form. This can be any URL.
Understanding the form submission workflow
After you set up these columns, add a PDF form in the designated library and start collecting PDF form data. The submitted forms will show up in the folder of your choice and only authorized people would be able to edit the forms.
Here is the entire workflow:
- Update the Form owner in a SharePoint column “Muhimbi Form Owners” (as a single user or multiple users) to include yourself.
- If you open a PDF form it will open in the edit mode, anybody else opens it in read-only, filling mode. (As it is read-only the user will not have edit capabilities).
- Store the submission path in the “Muhimbi Form Submit File Path” SharePoint column. For example “site/web/Shared Documents/Submits/SampleFom_{username}_{datetime}.pdf”
- Add the submit button in the PDF form with a special ID of “_muhimbi_form_submit_button_” (it must be the field name and not the display name). This step can also be done during the form creation process.
- Muhimbi PDF Editor will catch the click of the button and save the filled PDF using the submission path.
- After the user submits, a popup message appears- “Your form has been submitted”.
- Redirect users to where they came from or add the SharePoint column “Muhimbi Form Submit Redirect URL” for a custom redirect path after submission.
All done!!! When the user opens the form it will open in the Filling mode. The user will fill in the details in the Form and submit the form using the button you created in the form. The form will be saved in the location specified in the SharePoint “Muhimbi Form Submit File Path” column.
Visit Muhimbi booth at ESPC 🙂