Challenge
Through my daily post on Twitter on Power Platform technology, I was given a challenge to use Power Apps to Upload attachment to a SharePoint list.
What good is learning if it isn’t accompanied with challenges?
While I enthusiastically accepted the challenge, I had to perform some preliminary research on the subject because it was a little hazy at first.
Technologies used
Power Apps is a suite of apps, services, and connectors, as well as a data platform, that provides a rapid development environment to build custom apps for your business needs.
Power Automate is a service that helps you create automated workflows between your favorite apps and services to synchronize files, get notifications ,collect data, and more.
Organizations use Microsoft SharePoint to create websites. You can use it as a secure place to store, organize, share, and access information from any device.
The Processes
Step 1:
Created a SharePoint list (A SharePoint list is simply a collection of data that has some kind of structure to it: it is essentially like a table, a spreadsheet or a simple database).
Step 2: How the App was Built
Created the App using Canvas App (are exactly what they sound like: PowerApps provides you with a blank canvas onto which you can drag and drop components in any formation to design a user interface) in Power Apps
Added Form to my screen, added the Data source from my SharePoint list.
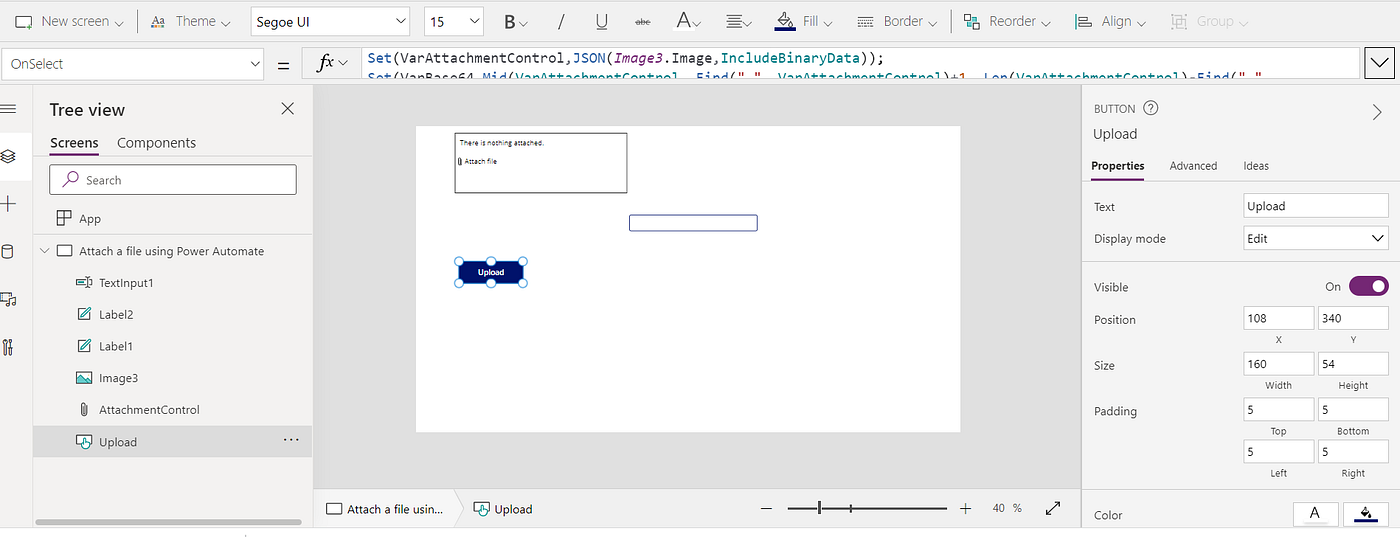
Copied the Attachment and pasted it to the Screen.
Deleted the Form, the reason for this is because in Power Apps Studio there is no Input for attachment.
Added two labels
Added a text Input to use for the formula in the button to run the flow
Added a button to the Screen.
Step 3: Flow in Power Automate
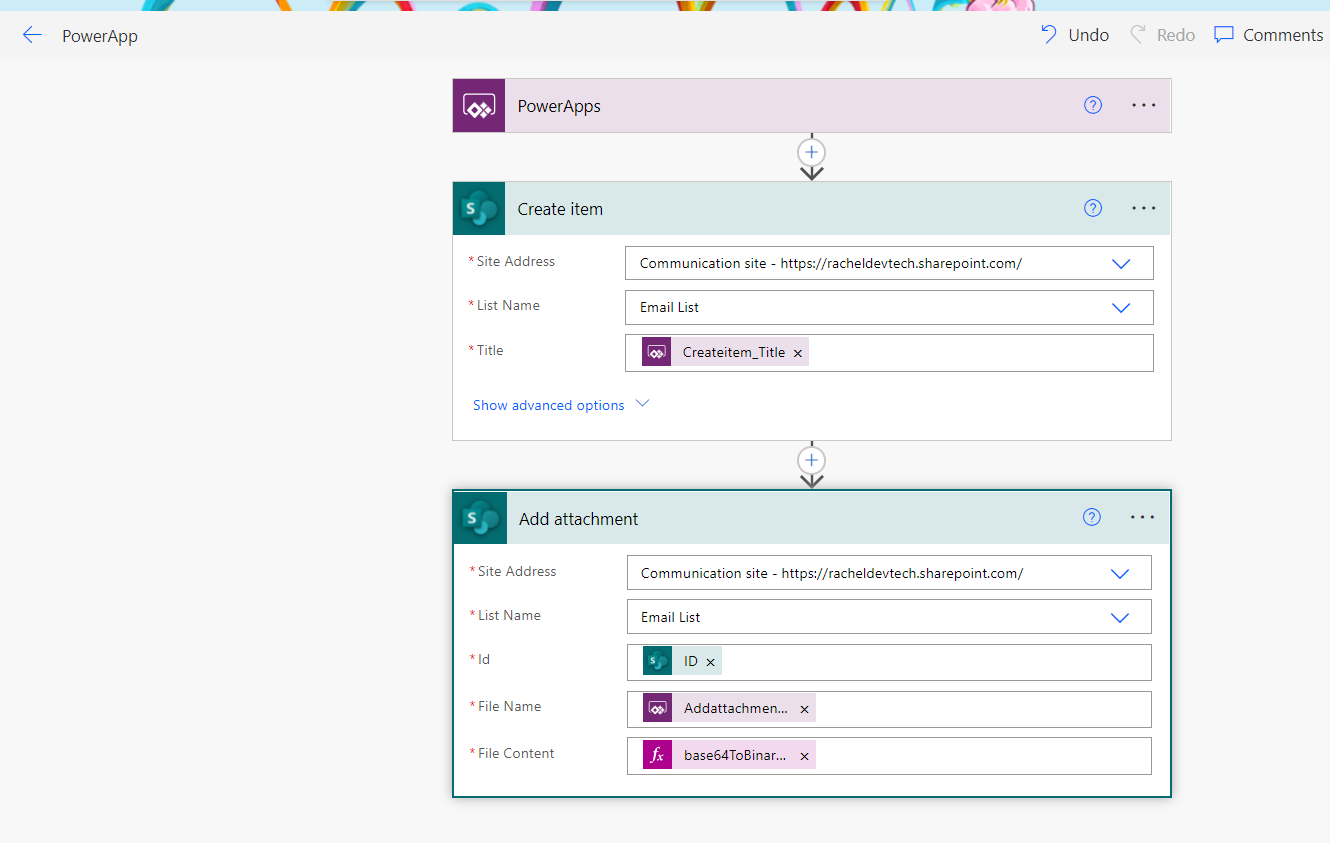
Created a Power Apps Trigger (is the thing (event) that happens that starts the process that’s what you’re asking the workflow to look out for).
Added an action (is the task that’s started when a trigger is invoke) in SharePoint create an item to the flow
Added add attachment action to the flow
Saved
Step 5:
Added the flow to the App by adding Power automate to the button in Power App studio for the flow to run
PowerApp.Run(TextInput1.Text,Last(AttachmentControl.Attachments).Name,VarBase64)
Challenges Encountered
I had an issue with knowing what type of flow I was supposed to use with using a Automated flow recently. He talked about a Trigger in Power Apps starting it So I went for an Instant Cloud flow (a cloud flow when you want your automation to be triggered either automatically, instantly, or via a schedule)
I had no idea on the reason on why I was using an Automated cloud flow, I had to research on the reason and what it meant.
I had an issue with the connection of the Data source (Data is at the core of most apps, including the data you build in Power Apps. Data is stored in a data source, and you bring that data into your app by creating a connection).
I had to use another SharePoint list to check what I did wrong and noticed I needed to add a Form instead of a Gallery with what I wanted.
I noticed my Form was not displaying after Playing the App.
I changed the Default mode from Edit to New.
While creating the flow on Power automate I had an issue after when selecting for Title in the Create item flow,
I had to click on Ask Power Apps in Dynamic Content (In Power Automate, the dynamic contents are the kind of variables produced by triggers and actions that are used in the flow) to get Createitem_Title.
I had an issue with the action Add attachment flow with File Name it was not showing Addattachment in Dynamic Content and when I tried using based64tobinary expression on File content these did not work.
The mistake I was making was that I did not scroll to the end on Dynamic content to get Addattachment and then for the expression (are a set of functions that can be used to perform specific actions within a flow)on File Content, the mistake I was making was that, I was not taking notice of the expression used on the YouTube video.
That after writing the base64ToBinary I had to add parenthesis before adding from Dynamic content to the expression.
base64ToBinary(triggerBody()[‘Addattachement_FileContent’])
base64ToBinary(triggerBody()[‘Addattachment_FileContent’])
After I added Power automate to the Power App studio from Action and used it for the button. After working on the Formula, the flow did not run on Power automate, it failed.
The issue was that I was using binaryto64 expression to automate the Json label but was not using VarBase64 which the binaryto64 used to interpret the Json file to SharePoint.
What I learnt
Through this challenge I learnt a lot and worked with functionalities that have not used before. To mention a few
· The usefulness of binary to a flow and the use of VarBase64 and how to encode and decode VarBase64.
· When to use an automated cloud flow
· How to use to Json format in Power Apps
· How to Run Power automate in a button using VarBase64
· When to change the name of a flow in Power automate
YouTube Video Used
Thanks for Reading!!!
Would love to hear from you!!!
You can find me on Twitter, Linkedln and Github
This blog is part of SharePoint Week. Find more here.
About the Author:
Power Platform Advocate | Power Platform Developer | just a girl doing what she loves
Reference:
Irabor, R. (2022). Updating SharePoint List Via Power Apps With Attachment. Available at: https://rachelirabor8.medium.com/updating-sharepoint-via-powerapps-with-attachment-74ead74ec97e [Accessed: 11th May 2022].