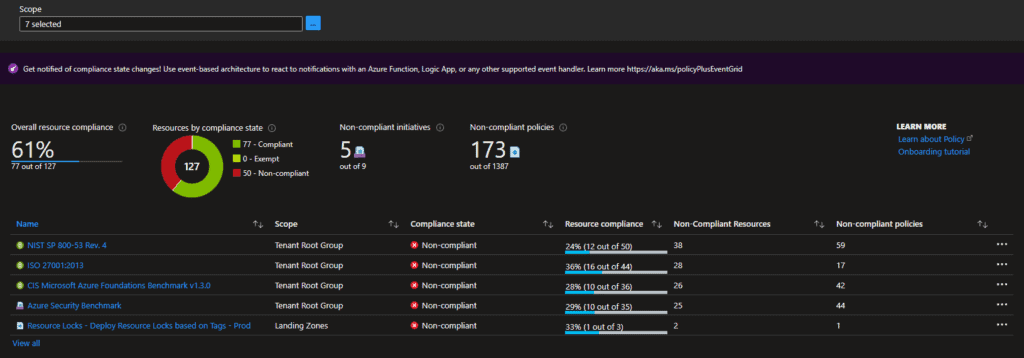
Azure Policy is a way of enforcing standards and guardrails and assessing resource compliance. In Azure, the compliance dashboard offers an aggregated view to validate the state of the platform with additional options to see the resources that are not compliant.
Policy
An Azure Policy itself evaluates resources within Azure based on the rules you specify. The rules are defined in a JSON format and called policy definitions, and policies can also be grouped into so-called policy initiatives. The policies themself can be deployed on several scopes that, of course, keep the standard Azure inheritance in place. The scopes it can be deployed to are:
- Management groups
- Subscriptions
- Resource Groups
- Resources
If there are resources at a scope that can not comply with the guardrails/standards, these resources can be excluded by defining an exclusion on the policy assignment.
The Azure Portal offers a lot of policies OOTB, but in many situations, you want to create your own. This is when the policy rules come in.
Policy Rule Effects
As mentioned above, Azure Policies have rules that have specific effects. At the time of writing this article, the following effects are supported:
- Append: Append additonal information / fields on the resource. Like appending additional rows to an firewall array.
- Audit: Log specific information as warning in the activity log.
- AuditIfNotExists: Audit resource when specific configuration is missing and have gone through the if condition of the rule.
- Deny: Deny creation when some configuration is missing or the configuration is not allowed by the standards.
- DeployIfNotExists: Deploy resources when not configured. This will trigger an template deployment.
- Disabled: Disabled effect means that the policy itself is disabled.
- Modify: Modify an existing deployment to fit the rules specified. This is mainly used to do CRUD operations on properties and tags for subscriptions, resource groups and resources.
When working with policies and custom policies, it is good to know the order of the evaluation process. The below-ordered list shows this:
- Disabled
- Append and Modify
- Deny
- Audit
- AuditIfNotExists and DeployIfNotExists.
When are policies evaluated
Policies are evaluated on multiple occasions and, depending on the way used, will show results in around 30 minutes:
- Manual / On-demand
- At policy assignment
- When changing a policy assignment
- When exemptions are created or updated.
- Default evaluation cycle (once every 24 hours)
- Resource creation or update
For more information about policies, read the Azure Policy documentation.
Creating your own Policy
Creating your policy is done using Bicep or writing the definition in JSON. With the use of Bicep, you can use the standard way of deploying the policies.
We will work on a policy that solves the following problem for this series of posts.
As a administrator I want to make sure that resources that are tagged as production resources are not able to be changed. Unless specific actions are taken.
The above problem can be solved by combining Azure Policies with Azure Resource Locks, especially the read-only lock deployed with the “DeployIfNotExists” effect.
resource bicepDeployResourceLock 'Microsoft.Authorization/policyDefinitions@2021-06-01' = {
  name: 'Deploy read-only resource locks based on tags'
  properties: {}
}
The first part of the policy in Bicep contains the default information, and the policy itself is specified in the properties property. Let’s discuss that in parts.
Policy Metadata
The first section is the metadata. The policy metadata contains all the information about the policy that defines the name, description, category, and everything else. With the help of the ‘securityCenter’ part, you can specify additional feedback for Azure Security Center.
For our use case, these properties are filled with information to identify the policy correctly.
properties: {
    displayName: 'Deploy read-only resource lock on resource groups based on tag'
    description: 'Deploy read-only resource lock on resource groups based on tag'
    policyType: 'Custom'
    mode: 'All'
    metadata: {
      category: 'Custom'
      source: 'Guardrails'
      version: '0.1.0'
      securityCenter: {
        RemediationDescription: 'The resource group should have a resource locks assigned. Go to the resource group and assign a resource lock or adjust the tag value'
        Severity: 'High'
      }
    }
    parameters: {...
    }
    policyRule: {...
    }
}
Policy Parameters
The second part we will discuss is the parameters. Within the policy parameter section, parameters for the policy itself can be defined. Using this adds the ability to supply information when assigning the policies.

properties: {
    metadata: {...
    }
    parameters: {
      tagName: {
        type: 'String'
        metadata: {
          displayName: 'Tag Name'
          description: 'The Tag name to check against (i.e. Environment CostCenter etc.)'
        }
      }
      tagValue: {
        type: 'String'
        metadata: {
          displayName: 'Tag Value'
          description: 'Value of the tag to audit against (i.e. Prod/UAT/TEST 12345 etc.)'
        }
      }
    }
    policyRule: {...
    }
}
Policy Rule
The last part is the most important. This section contains the rule, which is the real heart of the policy. This section defines where to check against and what action (effect) is handled.
properties: {
    metadata: {...
    }
    parameters: {...
    }
    policyRule: {
      if: {
        allOf: [
          {
            field: 'type'
            equals: 'Microsoft.Resources/subscriptions/resourceGroups'
          }
          {
            field: '[concat(\'tags[\', parameters(\'tagName\'), \']\')]'
            equals: '[parameters(\'tagValue\')]'
          }
        ]
      }
      then: {
        effect: 'deployIfNotExists'
        details: {
          type: 'Microsoft.Authorization/locks'
          roleDefinitionIds: [
            '/providers/microsoft.authorization/roleDefinitions/8e3af657-a8ff-443c-a75c-2fe8c4bcb635'
          ]
          existenceCondition: {
            field: 'Microsoft.Authorization/locks/level'
            equals: 'CanNotDelete'
          }
          deployment: {
            properties: {
              mode: 'incremental'
              template: {
                '$schema': 'http://schema.management.azure.com/schemas/2015-01-01/deploymentTemplate.json#'
                contentVersion: '1.0.0.0'
                parameters: {}
                variables: {}
                resources: [
                  {
                    name: 'ReadOnly'
                    type: 'Microsoft.Authorization/locks'
                    apiVersion: '2017-04-01'
                    properties: {
                      level: 'ReadOnly'
                      notes: 'Prevent changes to the resource group and resources'
                    }
                  }
                ]
                outputs: {
                  policy: {
                    type: 'string'
                    value: '[concat(\'Added resource lock\')]'
                  }
                }
              }
            }
          }
        }
      }
    }
In the above rule, we do the following: If the field type is of the type resource group and field tags contains a tag with the specified tag name (the parameter) with the value (the parameter) that is configured, then deploy the specified deployment template, which includes the read-only lock.
The deployment part of the rule contains an ARM template for the deployment.
Remediation
In Azure, you can also remediate existing resources. In our example, remediating a resource group means that the remediation is done when instructing Azure Policy to remediate the resource.
Azure Policy in Bicep
The complete policy in Bicep looks like the snapshot below.
targetScope = 'managementGroup'

param policyCategory string = 'Custom'
param policySource string = 'Guardrails'

resource bicepDeployResourceLock 'Microsoft.Authorization/policyDefinitions@2021-06-01' = {
  name: 'Deploy read-only resource locks based on tags'
  properties: {
    displayName: 'Deploy read-only resource lock on resource groups based on tag'
    description: 'Deploy read-only resource lock on resource groups based on tag'
    policyType: 'Custom'
    mode: 'All'
    metadata: {
      category: policyCategory
      source: policySource
      version: '0.1.0'
      securityCenter: {
        RemediationDescription: 'The resource group should have a read-only resource locks assigned. Go to the resource group and assign a resource lock or adjust the tag value'
        Severity: 'High'
      }
    }
    parameters: {
      tagName: {
        type: 'String'
        metadata: {
          displayName: 'Tag Name'
          description: 'The Tag name to audit against (i.e. Environment CostCenter etc.)'
        }
      }
      tagValue: {
        type: 'String'
        metadata: {
          displayName: 'Tag Value'
          description: 'Value of the tag to audit against (i.e. Prod/UAT/TEST 12345 etc.)'
        }
      }
    }
    policyRule: {
      if: {
        allOf: [
          {
            field: 'type'
            equals: 'Microsoft.Resources/subscriptions/resourceGroups'
          }
          {
            field: '[concat(\'tags[\', parameters(\'tagName\'), \']\')]'
            equals: '[parameters(\'tagValue\')]'
          }
        ]
      }
      then: {
        effect: 'deployIfNotExists'
        details: {
          type: 'Microsoft.Authorization/locks'
          roleDefinitionIds: [
            '/providers/microsoft.authorization/roleDefinitions/8e3af657-a8ff-443c-a75c-2fe8c4bcb635'
          ]
          existenceCondition: {
            field: 'Microsoft.Authorization/locks/level'
            equals: 'ReadOnly'
          }
          deployment: {
            properties: {
              mode: 'incremental'
              template: {
                '$schema': 'http://schema.management.azure.com/schemas/2015-01-01/deploymentTemplate.json#'
                contentVersion: '1.0.0.0'
                parameters: {}
                variables: {}
                resources: [
                  {
                    name: 'ReadOnly'
                    type: 'Microsoft.Authorization/locks'
                    apiVersion: '2020-05-01'
                    properties: {
                      level: 'ReadOnly'
                      notes: 'Prevent changed of the resource group or its resources'
                    }
                  }
                ]
                outputs: {
                  policy: {
                    type: 'string'
                    value: '[concat(\'Added resource lock\')]'
                  }
                }
              }
            }
          }
        }
      }
    }
  }
}

output policyDefId string = bicepDeployResourceLock.id
Deploy the Azure Policy
When the policy is defined in Bicep, it can quickly be deployed with the standard deployment commands on the scope you want. The below snippet shows how to deploy the file on the management group scope.
$tempFile = "..\policy.bicep"
$mgId = "mgid"

New-AzManagementGroupDeployment -Name "DeployPolicy" -ManagementGroupId $mgId -TemplateFile $tempFile -Location "WestEurope"
The definition can also be defined in JSON. When expressed in JSON, the structure is the same. The snipped below shows it defined in JSON.
{
 "properties": {
  "displayName": "Deploy read-only resource lock on resource groups based on tag",
  "policyType": "Custom",
   "mode": "All",
    "metadata": {
      "category": "policyCategory",
      "source": "policySource",
      "version": "0.1.0",
      "securityCenter": {
        "RemediationDescription": "The resource group should have a read-only resource locks assigned. Go to the resource group and assign a resource lock or adjust the tag value",
        "Severity": "High"
      }
    },
  "parameters": {
   "tagName": {
    "type": "String",
    "metadata": {
     "displayName": "Tag Name",
     "description": "The name of the tag to check against."
    }
   },
   "tagValue": {
    "type": "String",
    "metadata": {
     "displayName": "Tag Value",
     "description": "Value of the tag to check against"
    }
   }
  },
  "policyRule": {
   "if": {
    "allOf": [
     {
      "field": "type",
      "equals": "Microsoft.Resources/subscriptions/resourceGroups"
     },
     {
      "field": "[concat('tags[', parameters('tagName'), ']')]",
      "equals": "[parameters('tagValue')]"
     }
    ]
   },
   "then": {
    "effect": "deployIfNotExists",
    "details": {
     "type": "Microsoft.Authorization/locks",
     "roleDefinitionIds": [
      "/providers/microsoft.authorization/roleDefinitions/8e3af657-a8ff-443c-a75c-2fe8c4bcb635"
     ],
     "existenceCondition": {
      "field": "Microsoft.Authorization/locks/level",
      "equals": "ReadOnly"
     },
     "deployment": {
      "properties": {
       "mode": "incremental",
       "template": {
        "$schema": "http://schema.management.azure.com/schemas/2015-01-01/deploymentTemplate.json#",
        "contentVersion": "1.0.0.0",
        "parameters": {},
        "variables": {},
        "resources": [
         {
          "name": "ReadOnly",
          "type": "Microsoft.Authorization/locks",
          "apiVersion": "2017-04-01",
          "properties": {
           "level": "ReadOnly",
           "notes": "Prevent changes of the resourceGroup and its resources"
          }
         }
        ],
        "outputs": {
         "policy": {
          "type": "string",
          "value": "[concat('Added resource lock')]"
         }
        }
       }
      }
     }
    }
   }
  }
 }
}
With the help of the below PowerShell function, the policy definition can be deployed to the Azure Platform.
[CmdletBinding()]
Param(
  [Parameter(Mandatory = $true)]
  [ValidateSet('Subscription', 'Managementgroup')]
  [string]$Scope,
  [Parameter(Mandatory = $true)]
  [string]$ScopeName,
  [Parameter(Mandatory = $true)]
  [string]$PolicyFile,
  [Parameter(Mandatory = $false)]
  [string]$RoleIds
)

$policyDefinitionFileContent = Get-Content -Raw -Path $PolicyFile
$policyDefinitionFile = ConvertFrom-Json $policyDefinitionFileContent
$policyDefinitionName = $policyDefinitionFile.properties.displayName

$parameters = @{}
$parameters.Add("Name", $policyDefinitionName)
switch ($Scope) {
    "ManagementGroup" {
      $parameters.Add("ManagementGroupName", $ScopeName)
    }
    "Subscription" {
        $sub = Get-AzSubscription -SubscriptionName $ScopeName
        $parameters.Add("SubscriptionId", $sub.Id)
    }
}

$definition = Get-AzPolicyDefinition @parameters -ErrorAction SilentlyContinue

$parameters.Add("Policy", $policyDefinitionFileContent)
if($definition){
    Write-Output "Policy definition already exists, policy will be updated"
}else{
    Write-Output "Policy does not exist"
}

New-AzPolicyDefinition @parameters
This blog featured as part of Azure Week. Find more great Azure content here.
About the Author:
Maik van der Gaag is the CTO of 3fifty, an experienced consultancy company with a strong focus on the Microsoft Cloud. He has over 15 years of experience providing architecture, development, training, and design expertise. During his work, he works on a variety of projects ranging from Cloud Transformations to DevOps implementations.
He loves to share his knowledge which was also one of the reasons why he founded the Dutch Cloud Meetup. Maik is a public speaker, who writes blogs, and organizes events. Microsoft has recognized him as Microsoft Azure MVP.
Reference:
van der Gaag, M. (2022). Building your Azure Policies – Part 1. Available at: https://msftplayground.com/2022/03/building-your-azure-policies-part-1/ [Accessed: 30th June 2022].