As many of you already know, the stripe payment option has been integrated into Power Pages. This feature is currently in preview. See additional info in this link Introducing online payments in Power Pages (Preview)| Microsoft Power Page
However, this article is about adding a PayPal payment option on a Power Pages page and updating the invoice status using portal web API.
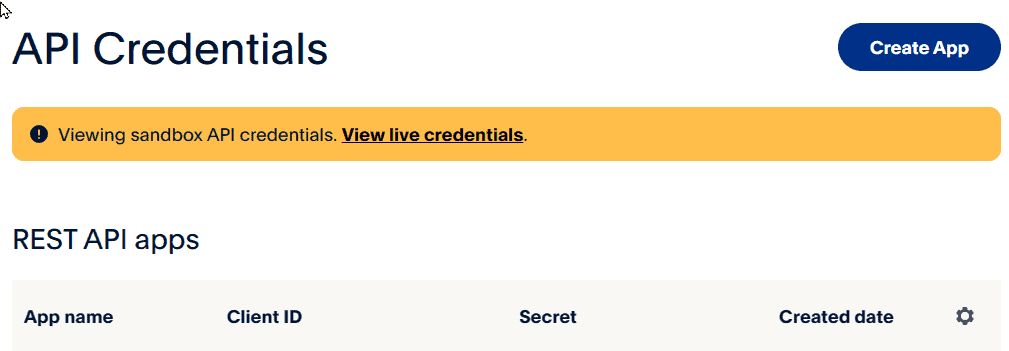
The first step is to sign up with the PayPal Developer portal (https://developer.paypal.com/).
Go to PayPal Developer Dashboard. Set up a client ID and a secret.
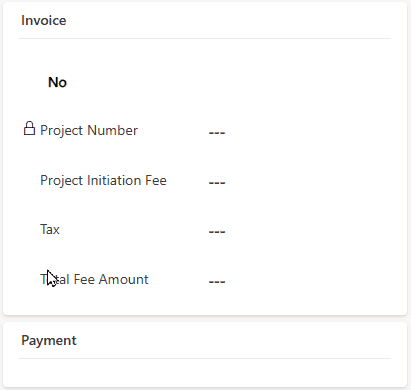
On the DataVerse table entity form, add 2 sections.
One section for displaying your invoice. Name it sec_invoice. Add payment-related data fields into sec_invoice. On the same form, add an empty section for rendering PayPal payment option. Name it sec_pp.
In your web template for your webpage, add the following script to add the PayPal payment SDK JS library.
<script
src="https://www.paypal.com/sdk/js?client-id=<Your Client ID goes here>"> // Required. Replace YOUR_CLIENT_ID with your client ID.
</script>
Extract the record ID from the payment page URL. Sample URL: https://www.xxxx.com/project/invoice/?id=fa91057e-12b8-ee11-92bd-000d3a5a4c3b
{% assign iId = request.params['id'] %}In the web template, append a div that consists of a paragraph (or any type of text field) on the Invoice section to display payment status. Hide the status div on the load of the page.
$('table[data-name="sec_invoice"]').append('<div id="div_status" class="box"><p id="payment_status"></p></div>'); //hide the status $("#div_status").hide()In the empty PayPal section, append a div to display PayPal payment option. Give div an id paypal-button-container.
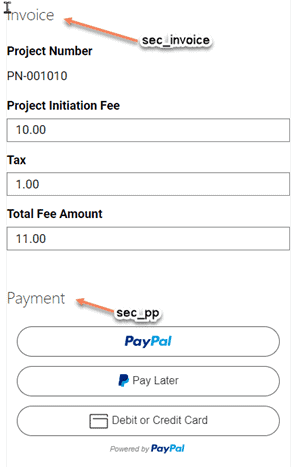
$('table[data-name="sec_pp"]').append('<div class="container" id ="paypal-button-container"></div>'); //get the total paymenet amount. var sTotal = parseFloat($('#publisher_total').val()); //Add Paypal payment option paypal.Buttons({ style: { layout: 'vertical', color: 'white', shape: 'pill', label: 'paypal' }, createOrder: function(data, actions) { // This function sets up the details of the transaction, including the amount and line item details. return actions.order.create({ purchase_units: [{ amount: { value: sTotal } }] }); }, onApprove: function(data, actions) { // This function captures the funds from the transaction. return actions.order.capture().then(function(details) { // This function shows a transaction success message to your buyer. $("#div_status").show(); $('#payment_status').text('Payment has been made successfully.' ); fnUpdStatus(‘payment_status’); //Make a portal webapi call to update dataverse table. }); }, onCancel: function (data) { // Show a cancel page, or return to cart $("#div_status").show(); $('#payment_status').html('Payment has been cancelled.'); }, onError: function (err) { console.log(err); // For example, redirect to a specific error page $("#div_status").show(); $('#payment_status').html('Error processing payment. Please try again.'); } }).render('#paypal-button-container'); }This is how the rendered Power Pages page with the PayPal payment looks like:
Finally, here is the function for updating DataVerse table with the payment status. Note that the publisher is just the solution publisher. DataVerse tables are prefixed with a publisher name.
//iId – Invoice Id – extracted from the page URL //user.id – logged in user id. function fnUpdStatus (sMsgId) { var recordObj = { publisher_total: parseFloat($('#publisher_total').val()), publisher_amt: parseFloat($('#publisher_amt').val()), publisher_tax: parseFloat($('#publisher_tax').val()), publisher_paid: true, "publisher_paidby@odata.bind": "/contacts({{user.id}})" }; appAjax('Updating...', sMsgId, { type: "PATCH", url: "/_api/publisher_projects(" + "{{iId}}" + ")", contentType: "application/json", data: JSON.stringify(recordObj), success: function (res, status, xhr) { $(sMsgId).text('Payment status has been updated.'); } }); }About the Author
References
Naveretnam, N., (2024), ‘How to add a PayPal payment option on a Power Pages page’, available at: https://www.linkedin.com/pulse/how-add-paypal-payment-option-power-pages-page-namasi-naveretnam-1douc/?trackingId=y6oZsYggTnOKM49vM9aN9Q%3D%3D, [accessed on 28th March 2024].