Introduction
Hello amazing developer 🧑💻, before digging into this topic let me give you a small introduction and so instructions. Don’t worry it would be quick and crisp 😉.
I am Suchintan Das, a Full Stack Developer currently working over two startups. I have been into web development for past two years.
Connect me on 👉Linkedin
Blog from: https://dev.to/suchintan/reacttypescripteslint-prettier-full-setup-p7j
Note: I will be using a Windows machine 💻 while doing the process. So, there can be some case where the commands may differ for you if using a different machine. Please help yourself out in that case, though I will try my best to cover all such commands.
Why this configuration 🤔?
Before starting with this tutorial, it’s important to understand why we need this configuration. So, let me introduce you to these stacks individually and help you understand their benefits.
ESLint
Have you ever faced issues due to a messy code written by someone and not following the rules that are supposed to be kept in mind while writing the code 🥲?
A small example –
import axios from 'axios'
const component = () => {
}
Like here the developer forgot to add a line gap between imports and the main functional component. A similar problem is pushing a lot of console logs on production.
These things are small but very irritating when the codebase evolves and many lines of code comes into it 📚. And yes , to maintain clean code they don’t need to put that much efforts, just following some rules every time make a codebase very clean 🧹.
That’s the idea of ESLint and yes, you need it to make your codebase very sweet for any new developer to code 👍.
Prettier
Has the same idea as that of ESLint but their combination is really robust. Many developers likes ESLint + Prettier configuration very good when you want to make you codebase very easy for debugging and onboard .
TypeScript
I know, most of you guys would already are familiar with this framework. It’s very famous after all 🤷. But here’s a small introduction for this framework.
Want to follow a structured format for your codebase where all the props, function returns etc. are setup beforehand so that , it avoids mistake ? Yes, I know it’s very awesome to work on a project where everything works in a structured way and if anything goes out of the structure, you get an error. Saves really a lot of time for debugging❗
TypeScript has interfaces, function types and many more. A small peak of it is here.
apiCall.ts 📝
import axios from "axios";
import { AuthLogin, AuthRegister } from "../models/Auth";
import setAuthToken from "../utils/controllers/setAuthController";

const baseUrl: string = String(process.env.REACT_APP_SERVER_URL);

export const loginauth = async (email: string, password: string) => {
  //   console.log(baseUrl);
  const options: AuthLogin = {
    method: "post",
    url: `${baseUrl}auth/login`,
    data: {
      email,
      password,
    },
  };
  try {
    axios
      .request(options)
      .then((response) => {
        if (response?.status === 200) {
          setAuthToken(response?.data?.token);
        }
        return response?.status as Number;
      })
      .catch();
  } catch (e) {
    // console.log(e);
  }
};
model.ts 📝
export interface AuthLogin {
  method: string;
  url: string;
  data: AuthLoginBody;
}

export interface AuthLoginBody {
  email: string;
  password: string;
}
controller.ts 📝
const setAuthToken = (token: string) => localStorage.setItem("idtoken", token);

export default setAuthToken;
Just see how model defines the structure of the body of api call, controller defines the flow of token and main function connects the flow. How easily you can debug in such a structured codebase 🙂 .
React
This framework is alse one of the famous among developers. If someone wants to build a Single Page Application with JavaScript and that also very easily. Just use this framework. It’s quite good for new users, you divide a page into components so no more reductant code. Use props and write JavaScript logics and HTML code ( It follows JSX which is similar to HTML with some small changes ) .
Believe me ! You will fall in love with it 😍, just give it a try.
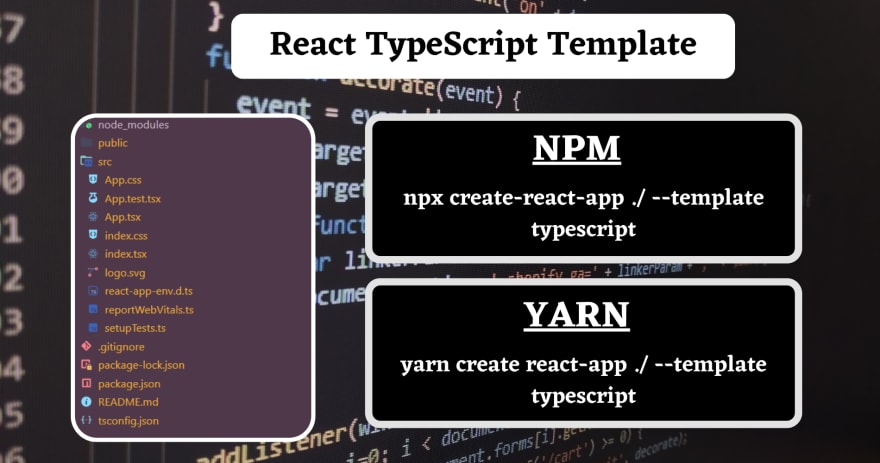
A small peak into the file structure in React-

Configuration 🛠
Yes, now it’s time to start the whole configuration!
There are some prerequisites which you would need on your machine-
- NodeJS installed on the system.
- Git installed on your system. A reference blog if needed help 👉 blog on git and github
- VSCode installed on your system. You can have your own choice as well.
Cool ! Let’s start…
- React TypeScript Template download
----------------npm users-----------------------
npx create-react-app ./ --template typescript

----------------yarn users----------------------
yarn create react-app ./ --template typescript
It would take 1-2 minutes to download the same. If you are facing EPERM error here’s a quick fix for you !
For Windows
- Open
cmd as administrator. - If project is in different drive then use this to switch the drive and navigate to the location
cd /d d:\<project_location> - Use the commands here to download the template.

Open your terminals and let’s configure ESLint on the project.
Use the command 👇
---------npm users-------------
npm init @eslint/config

---------yarn users-------------
yarn create @eslint/config
And here’s the answer to the CLI of ESLint. Let’s answer them together in the same flow.


You can choose some other options on these questions as well based on your needs.
You can see a new file 📝 got created on your root directory named eslintrc.json. This is a sign that the installation is successful !
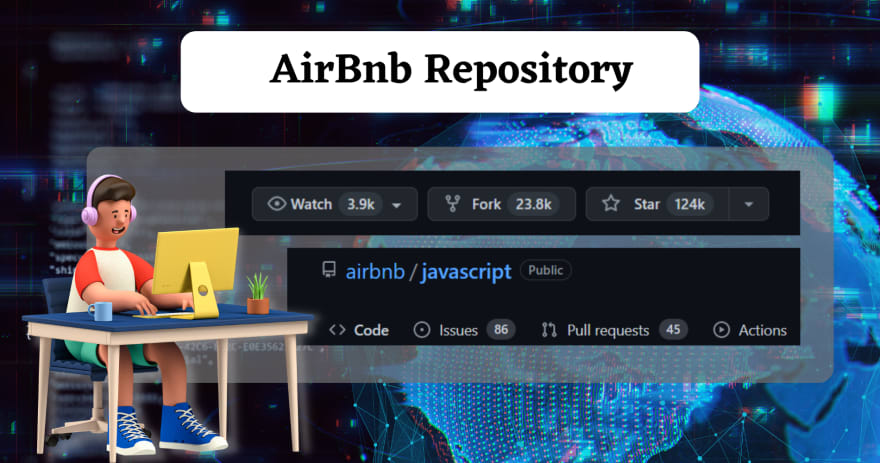
Note: Here we are using the Airbnb template as it is widely known in the developers community. You can have some different options as well. https://github.com/airbnb/javascript to know more !
There are some modules you would need while working with Airbnb . Use the following commands to install them :
npm install eslint-config-airbnb-typescript --save-dev
Now you would have to update some files :
Update the file with these configs 🛠
eslintrc.json 📝

{
    "env": {
        "browser": true,
        "es2021": true,
        "jest": true
    },
    "extends": [
        "react-app",
        "react-app/jest",
        "airbnb",
        "airbnb-typescript",
        "plugin:import/typescript"
    ],
    "parser": "@typescript-eslint/parser",
    "parserOptions": {
        "ecmaFeatures": {
            "jsx": true
        },
        "ecmaVersion": "latest",
        "sourceType": "module",
        "project": "./tsconfig.json"
    },
    "plugins": [
        "react",
        "@typescript-eslint"
    ],
    "rules": {}
}
package.json 📝
Update the scripts with this
"scripts": {
    "start": "react-scripts start",
    "build": "react-scripts build",
    "test": "react-scripts test",
    "eject": "react-scripts eject",
    "lint": "eslint .",
    "lint:fix": "eslint --fix ."
  },
Let’s test 🔬 the ESLint :
Use npm run lint and this should be there on your terminal.
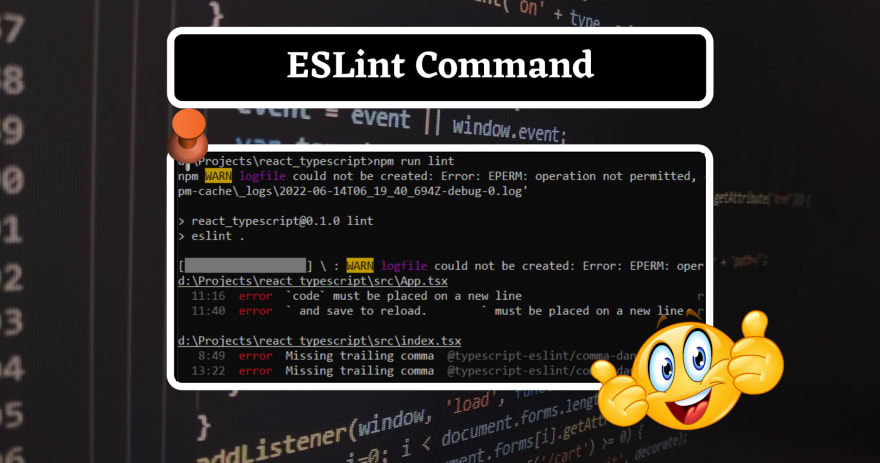
Nice ! So, now you can see there are already some linting problems in the template of react for TypeScript. Don’t worry we will head to it and discuss how to fix them 🛠.
But first let us help us out using the command 👉npm run lint:fix , this command will run the traditional fix provided by ESLint. Like single comma’s to double , but it can’t fix the major ones.
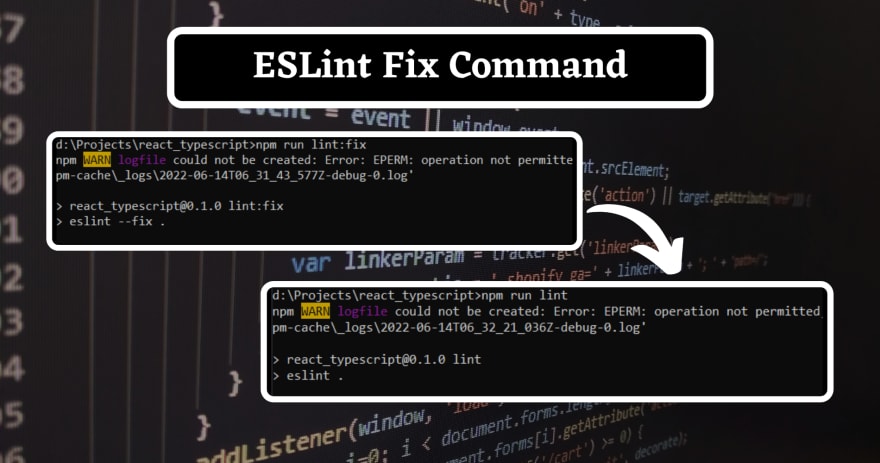
Nice ! It fixed all those errors for you. Yes, ESLint does help you out with fixing these error if you are not able to do so 🤯.
You can control rules over ESLint from eslintrc.json. Here’s some of the rules that I apply mostly and you can update the file with this –
eslintrc.json update rules 📝:
    "rules": {
        "react/react-in-jsx-scope": ["off"],
        "react/jsx-uses-react": ["off"],
        "react/jsx-props-no-spreading": ["warn"],
        "react/no-unescaped-entities": ["off"]
    }
Let’s dive into Prettier now 🌊!
In tech where the things start, it end on that point only. So, let’s move back to our terminals and configure prettier !

Let’s install all the dependencies for the same 👇
---------------------npm users------------------------------------
npm install prettier eslint-config-prettier eslint-plugin-prettier --save-dev

---------------------yarn users-----------------------------------
yarn add prettier eslint-config-prettier eslint-plugin-prettier --dev
I know this time we don’t have any file on our root directory like eslint. So, let’s create one with the name .prettierrc. And, yes the purpose of this file is also same as the earlier one. This is the config file and it would have all the rules and controls you want to have in your project !
And let’s fill it with this code –
.prettierrc 📝
{
    "tabWidth": 2,
    "semi": true,
    "singleQuote": false,
    "trailingComma": "all",
    "printWidth": 80,
    "useTabs": false,
    "endOfLine":"auto"
  }
You can always have your own configs 🛠. For this tutorial I am using the config which is widely used by most developers 🧑💻.
Let’s update the eslintrc.json as well so that it uses prettier now –
eslintrc.json 📝
{
    "env": {
        "browser": true,
        "es2021": true,
        "jest": true
    },
    "extends": [
        "react-app",
        "react-app/jest",
        "airbnb",
        "airbnb-typescript",
        "plugin:import/typescript",
        "plugin:prettier/recommended"
    ],
    "parser": "@typescript-eslint/parser",
    "parserOptions": {
        "ecmaFeatures": {
            "jsx": true
        },
        "ecmaVersion": "latest",
        "sourceType": "module",
        "project": "./tsconfig.json"
    },
    "plugins": [
        "react",
        "@typescript-eslint",
        "prettier"

    ],
    "rules": {
        "react/react-in-jsx-scope": ["off"],
        "react/jsx-uses-react": ["off"],
        "react/jsx-props-no-spreading": ["warn"],
        "react/no-unescaped-entities": ["off"]
    }
}
While coding you may face some issues when you need to update the structure of the file as that of prettier which can go tiring. Here’s a small extension that I use personally and this would make your life easier. So, install it !

To Format the document shortcut keys are 👇
Windows–Shift + Alt + F
Mac–Shift + Options + F
Linux–Ctrl + Shift + I
Manually–Right Click + "Format document with..." + Prettier
So, if you face any errors of prettier don’t forget to use this commands to format the document correctly.
Yes, you are done with the configuration.
Start Project
Use the command 👉npm start and run the project. There will be couple of prettier errors. To fix them go on the file and do the format document with Prettier extension.
And this should start your project like this –

Here’s the link to the GitHub Repository
Thank you
You have made it till the end of this blog 🤗. More such blogs are on the line .
It would be encouraging if a small comment would be there on the blog. I go through each one of them so do comment 😉.
If you want to get a notification 🔔 when it would be published , don’t forget to tap on the follow button ☝.
And at last I want to say 👇
Keep coding #️⃣ , keep rocking 🚀
Find more great blogs here.
About the Author:
Reference:
Das, S. (2022). React + TypeScript + ESLint + Prettier Full Setup. Available at: https://dev.to/suchintan/reacttypescripteslint-prettier-full-setup-p7j [Accessed: 27th June 2022].


