Intro
This blog series will create and maintain Azure resources using GitHub repositories, GitHub Actions, and Terraform. I will use this blog series to build out a new Azure tenant that I have created, and I thought I might share what I was doing along the way. If you have any questions about this blog series, please reach out to me.
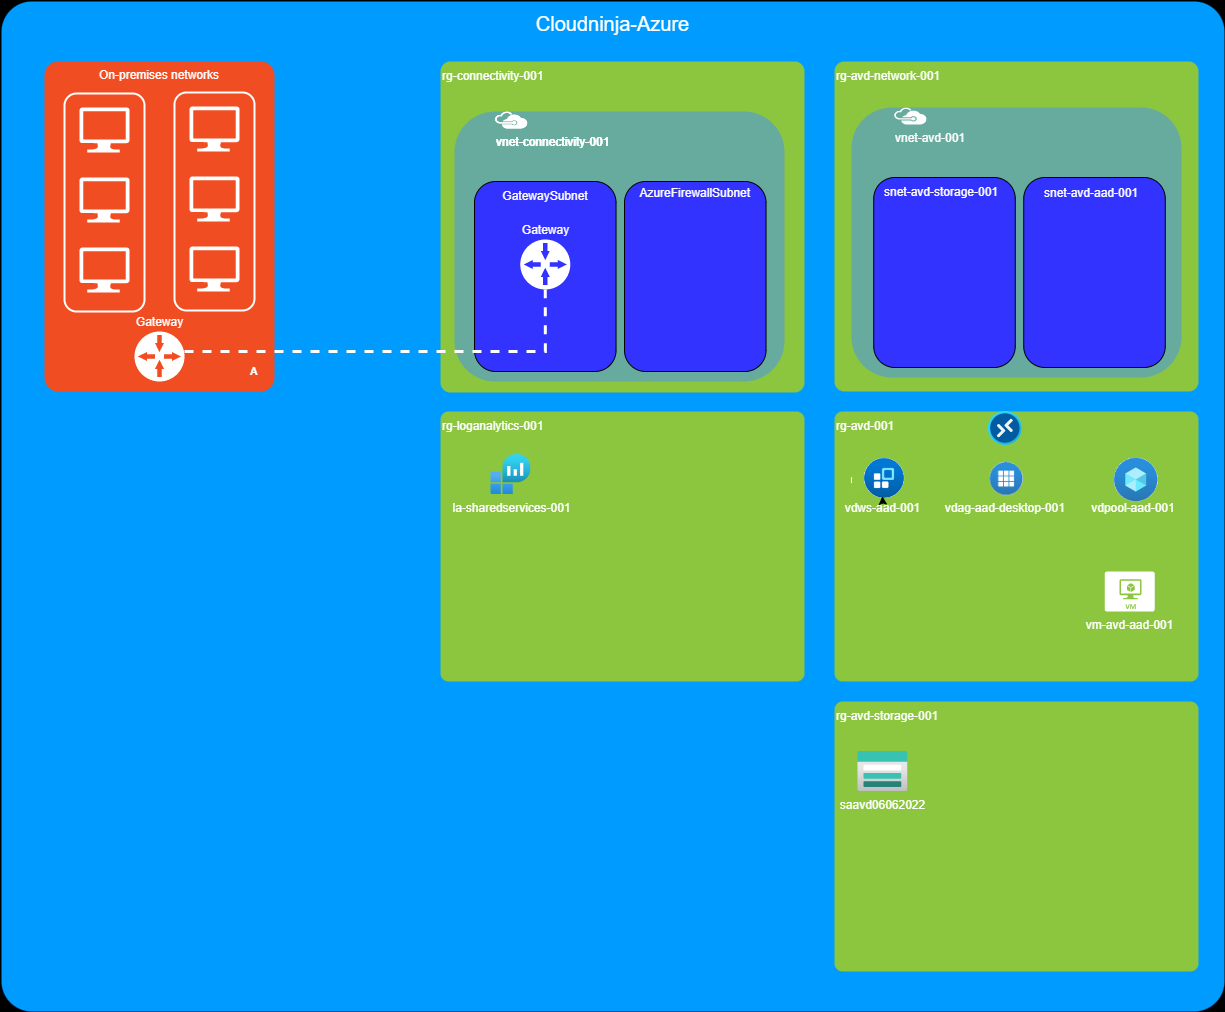
The design I am working on right now is outlined below. I want to create a vNet with access to my home network, a vNet containing an Azure Virtual Desktop environment with a storage account that will have a private endpoint. I also have a log analytics workspace that will gather events from AVD, storage, and network.
I will be starting with the basics in this first part of the series, so only a few resource groups and a couple of GitHub actions will be created here. I will add more resources in the following parts, and the overall design might be changed when I figure out more resources I want to run in my demo environment.
I hope you will join me in learning more about GitHub and Terraform.
Prerequisites
In this blog series, I assume that you already know how to create a new GitHub repository and clone repositories onto your local machine. I intend to make a short post on these two tasks, but they are not on my website at the moment. I also assume that you have downloaded and configured Terraform on your machine. If you haven’t, you can read my blog post on how to do so. https://www.cloudninja.nu/post/2021/05/getting-started-with-azure-and-terraform-part-1/
Create service princial / AppRegistration for GitHub actions
I am using a service principal/app registration to deploy resources from GitHub into Azure. I can create this App registration using Azure CLI. I have used the code below to complete my registration. Remember to insert your subscription ID before you run the command.
az ad sp create-for-rbac --name "SP-GitHubAction-Blog" --role contributor --scopes /subscriptions/{subscriptionid} --sdk-auth
The output is similar to the code below. .
{
  "clientId": "168xxxxx-xxxx-xxxx-xxxx-xxxxxxxxxxxx",
  "clientSecret": "hjlkeq980jkda.dasu9432m,.dau9",
  "subscriptionId": "{subscriptionid}",
  "tenantId": "{tenantid}",
  "activeDirectoryEndpointUrl": "https://login.microsoftonline.com",
  "resourceManagerEndpointUrl": "https://management.azure.com/",
  "activeDirectoryGraphResourceId": "https://graph.windows.net/",
  "sqlManagementEndpointUrl": "https://management.core.windows.net:8443/",
  "galleryEndpointUrl": "https://gallery.azure.com/",
  "managementEndpointUrl": "https://management.core.windows.net/"
}
Creating required GitHub secrets
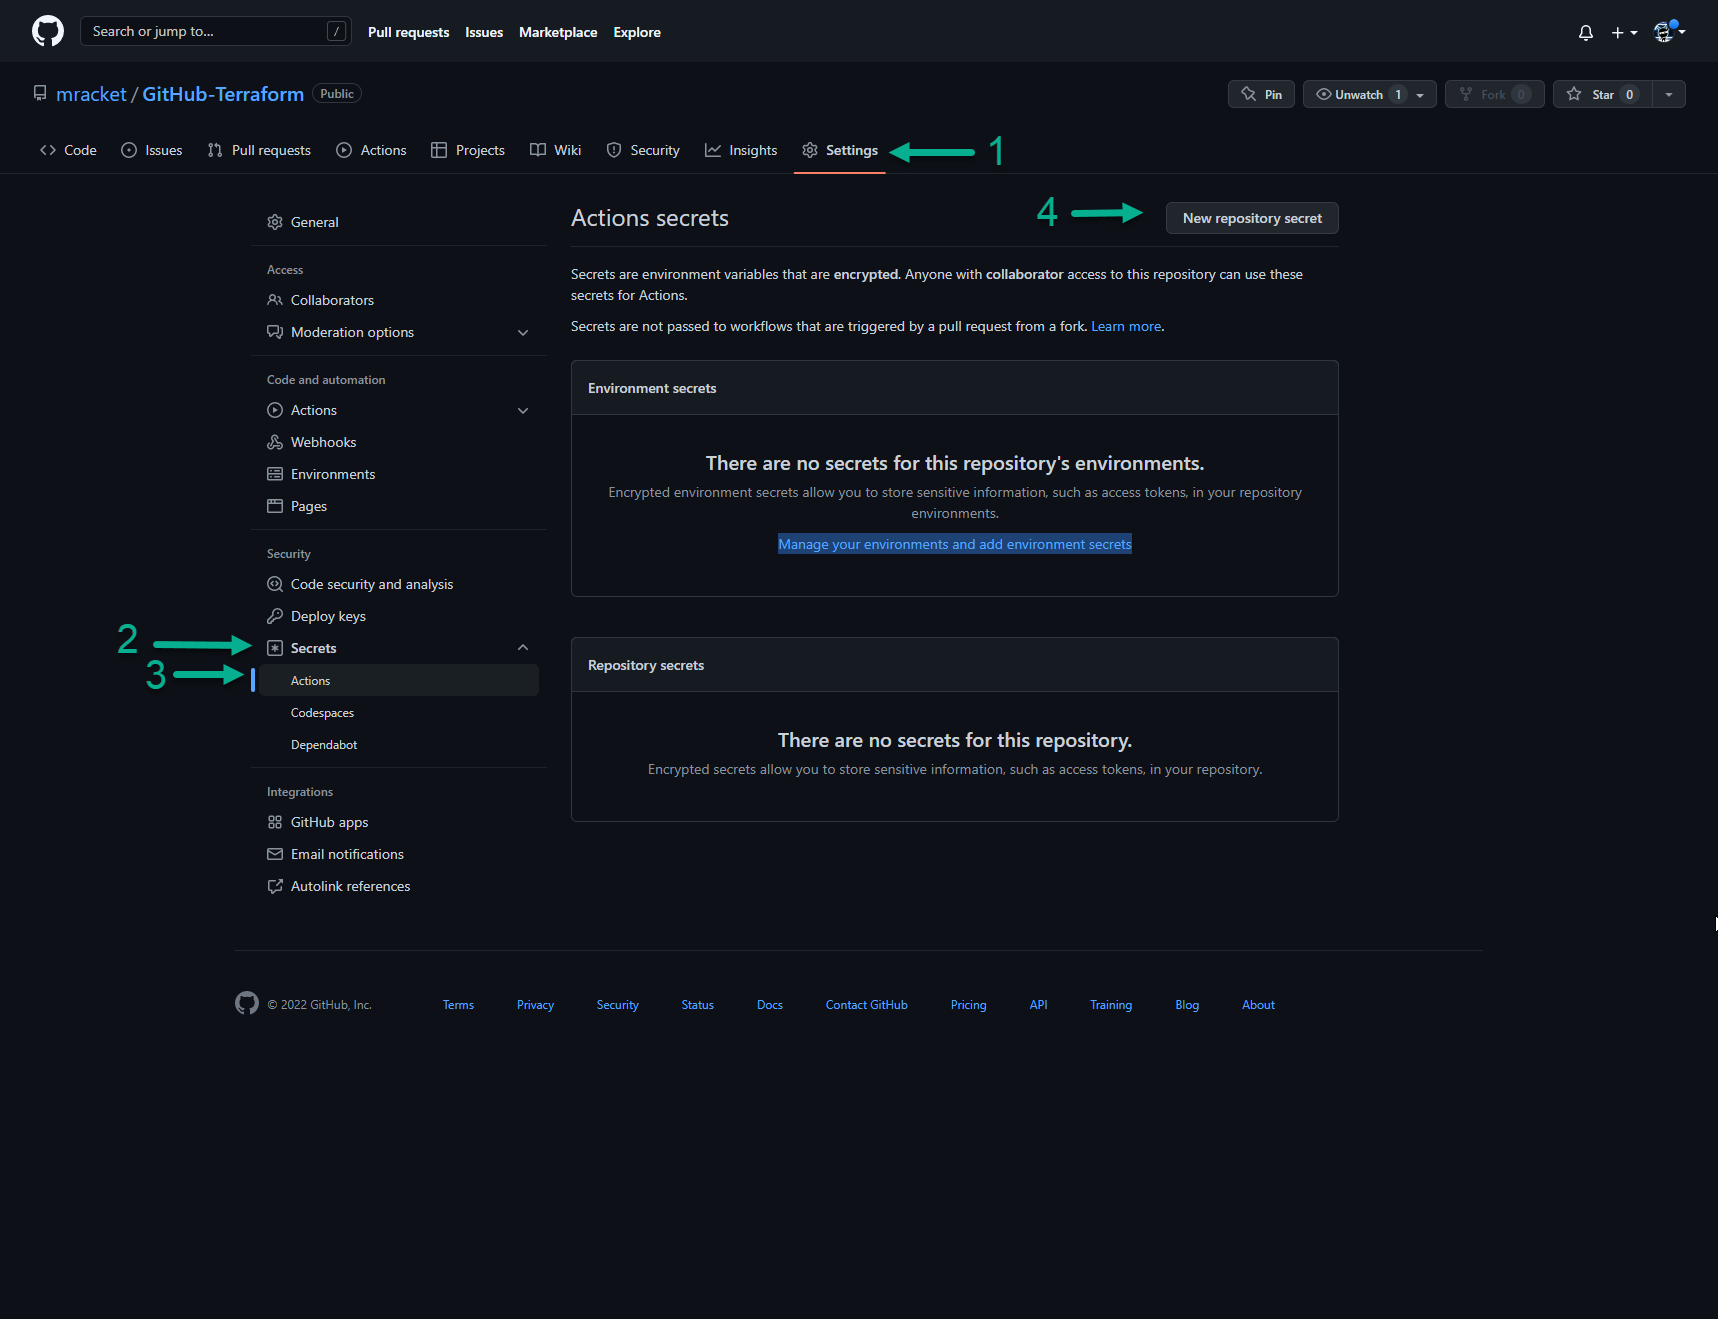
To create the secret in GitHub, I go to my repository and then click on “Settings.” I then click on “Secrets,” “Actions,” and lastly on “New repository secret.”
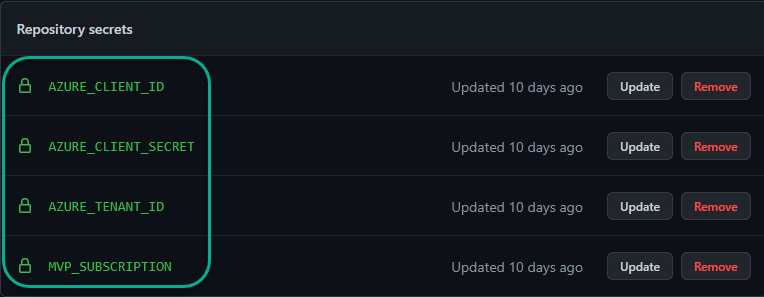
I will create four secrets as shown below.
Each secret uses the corresponding output from the service principal created in the previous section.
AZURE_CLIENT_ID = clientId

AZURE_CLIENT_SECRET = clientSecret

AZURE_TENANT_ID = tenantId

MVP_SUBSCRIPTION = subscriptionId
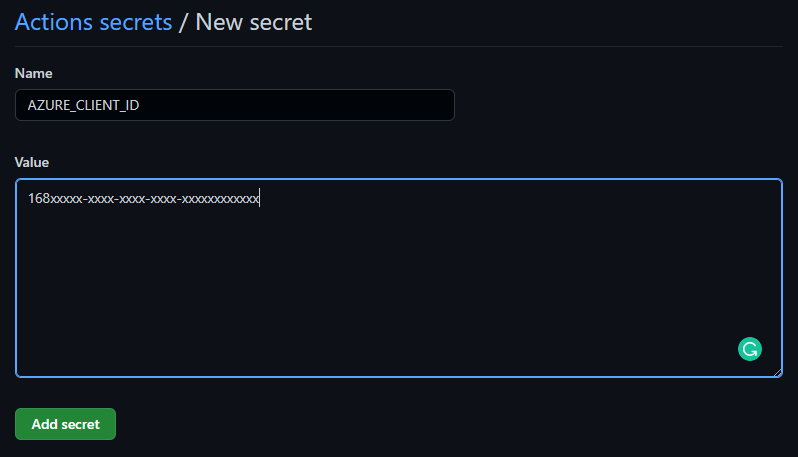
Example of how the client id secret will look like.
Creating the first resource groups
Network resources
First, I want to create a resource group that will contain my network resources in the hub. This resource group will include vnet, nsg, VPN connections, and perhaps a firewall later. I will only create the resource group for now, but the files shown below will later be expanded to contain the other resources.
My variables.tf file contains the following code.
variable "Location" {
    type        = string
    default     = "WestEurope"
}

variable "ResourceGroup" {
    type        = string
    default     = "rg-connectivity-network-001"
}
My main.tf file contains the following code.
resource "azurerm_resource_group" "resourcegroups" {
    name        = var.ResourceGroup
    location    = var.Location
}
My backend.tf file contains the following code.
terraform {
  required_providers {
    azurerm = {
        source  = "hashicorp/azurerm"
        version = "=3.0.0"
    }
  }
  backend "azurerm" {
    resource_group_name     = "rg-terraform-state-001"
    storage_account_name    = "cloudninjaterraformstate"
    container_name          = "tfstate"
    key                     = "GitHub-Terraform-rg-connectivity-001"
  }
}
provider "azurerm" {
  features {}
}
Log analytics
Secondly, I will create a resource group for log analytics, and below is the code I have used for this. Notice minimal changes in the backend, and nothing changes in the main.tf file. All changes to the resource groups are made in the variables.tf file and this enables me to re-use the main.tf across multiple deployments.
My variables.tf file contains the following code.
variable "Location" {
    type        = string
    default     = "WestEurope"
}

variable "ResourceGroup" {
    type        = string
    default     = "rg-loganalytics-001"
}
My main.tf file contains the following code.
resource "azurerm_resource_group" "resourcegroups" {
    name        = var.ResourceGroup
    location    = var.Location
}

terraform {
  required_providers {
    azurerm = {
        source  = "hashicorp/azurerm"
        version = "=3.0.0"
    }
  }
  backend "azurerm" {
    resource_group_name     = "rg-terraform-state-001"
    storage_account_name    = "cloudninjaterraformstate"
    container_name          = "tfstate"
    key                     = "GitHub-Terraform-rg-loganalytics-001"
  }
}
provider "azurerm" {
  features {}
}
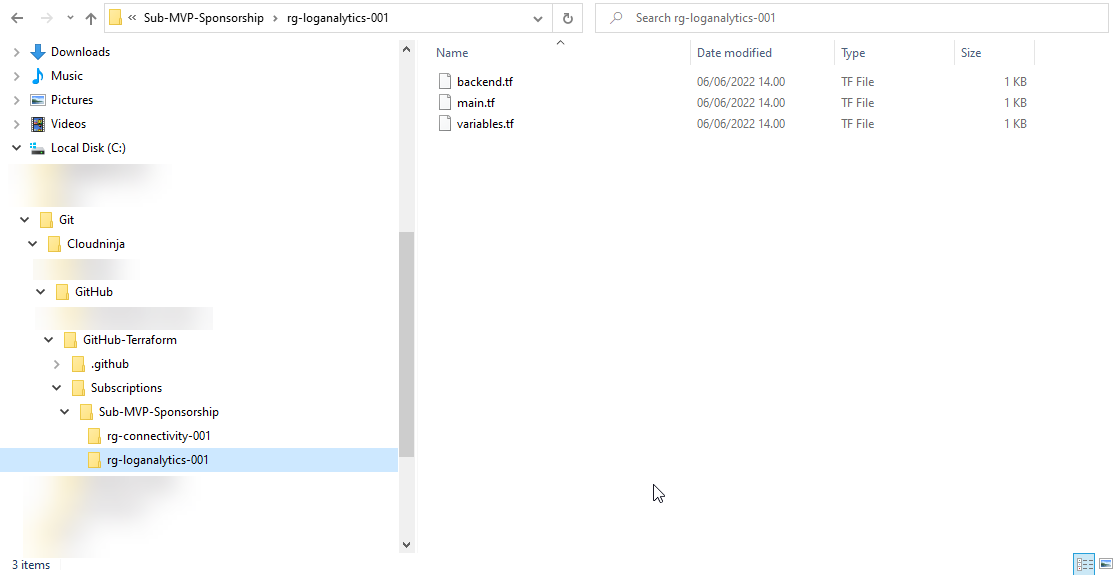
Folder structure for code
I have structured my code as shown below, where I have my code placed under a subscription and then under a resource group. You can do whatever fits your needs.
Code deployment
To deploy the code I showed in the last section, I will use GitHub actions instead of my own command line. I like to keep my deployments small, so I will create a GitHub Action for each of my resource groups to ensure that I can deploy just the resource I need without touching anything else.
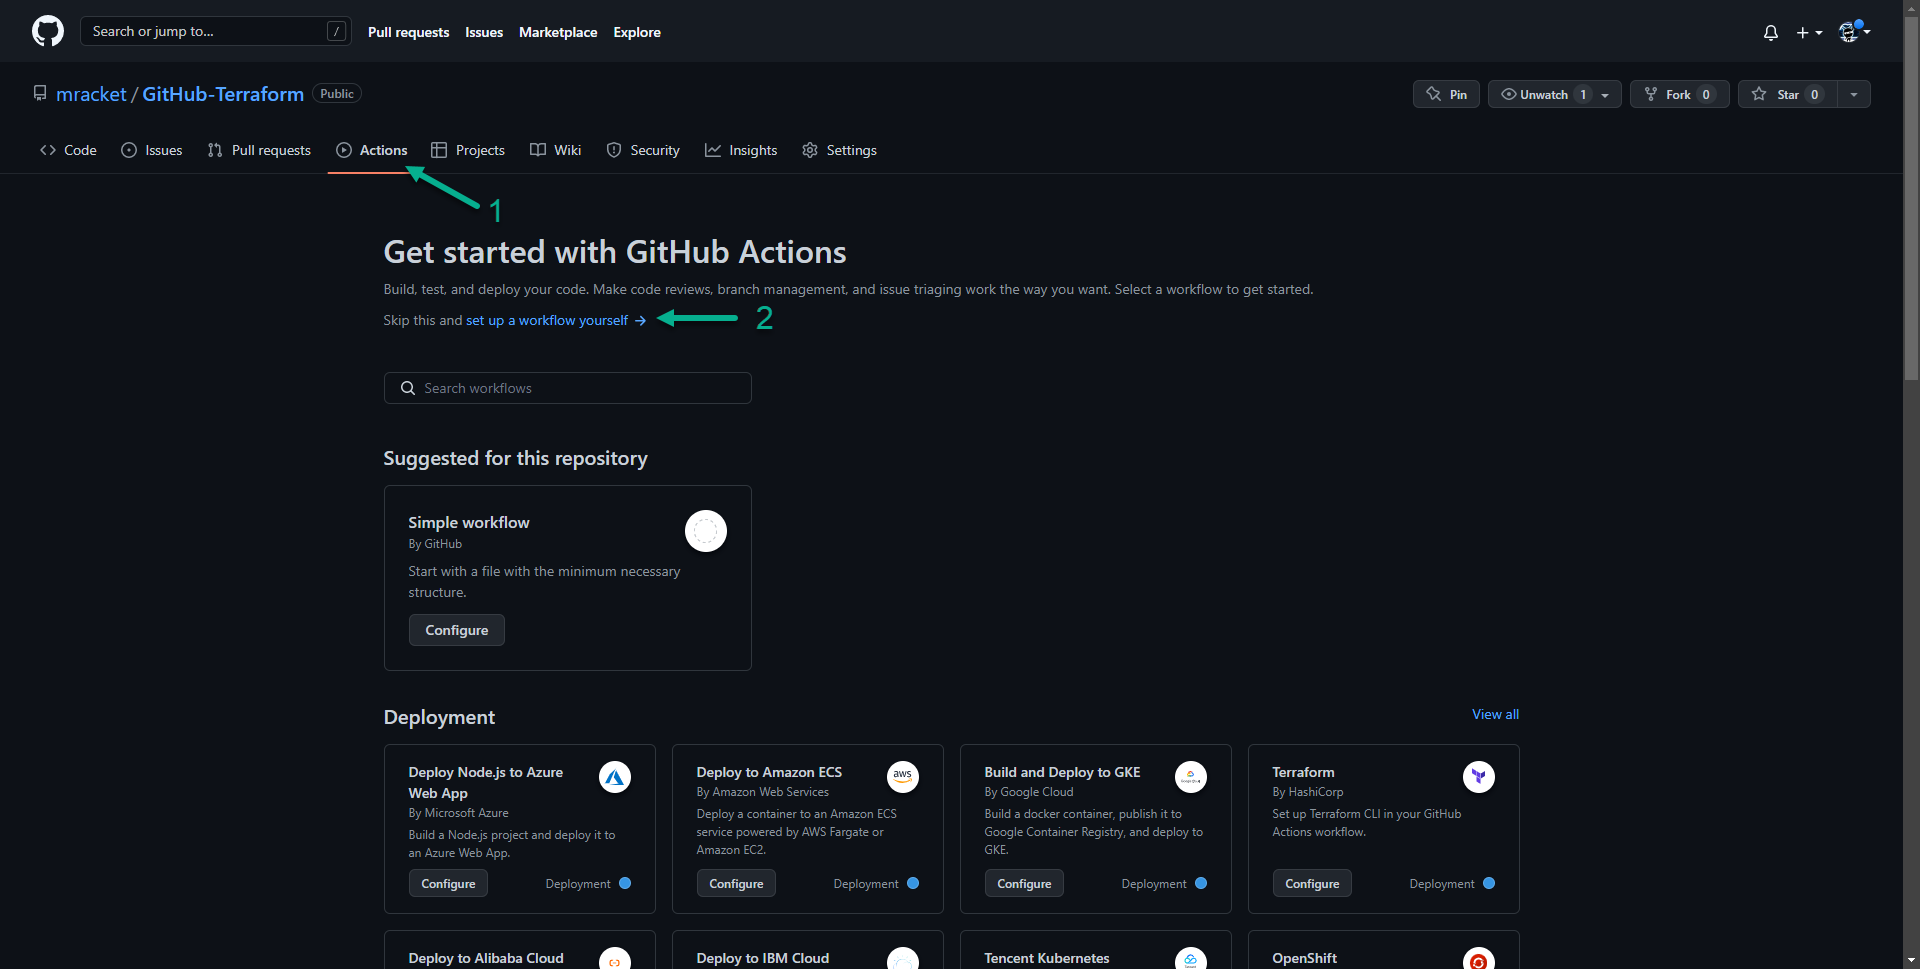
GitHub Action for network resources
I click on “Actions” and then “set up a workflow yourself.”
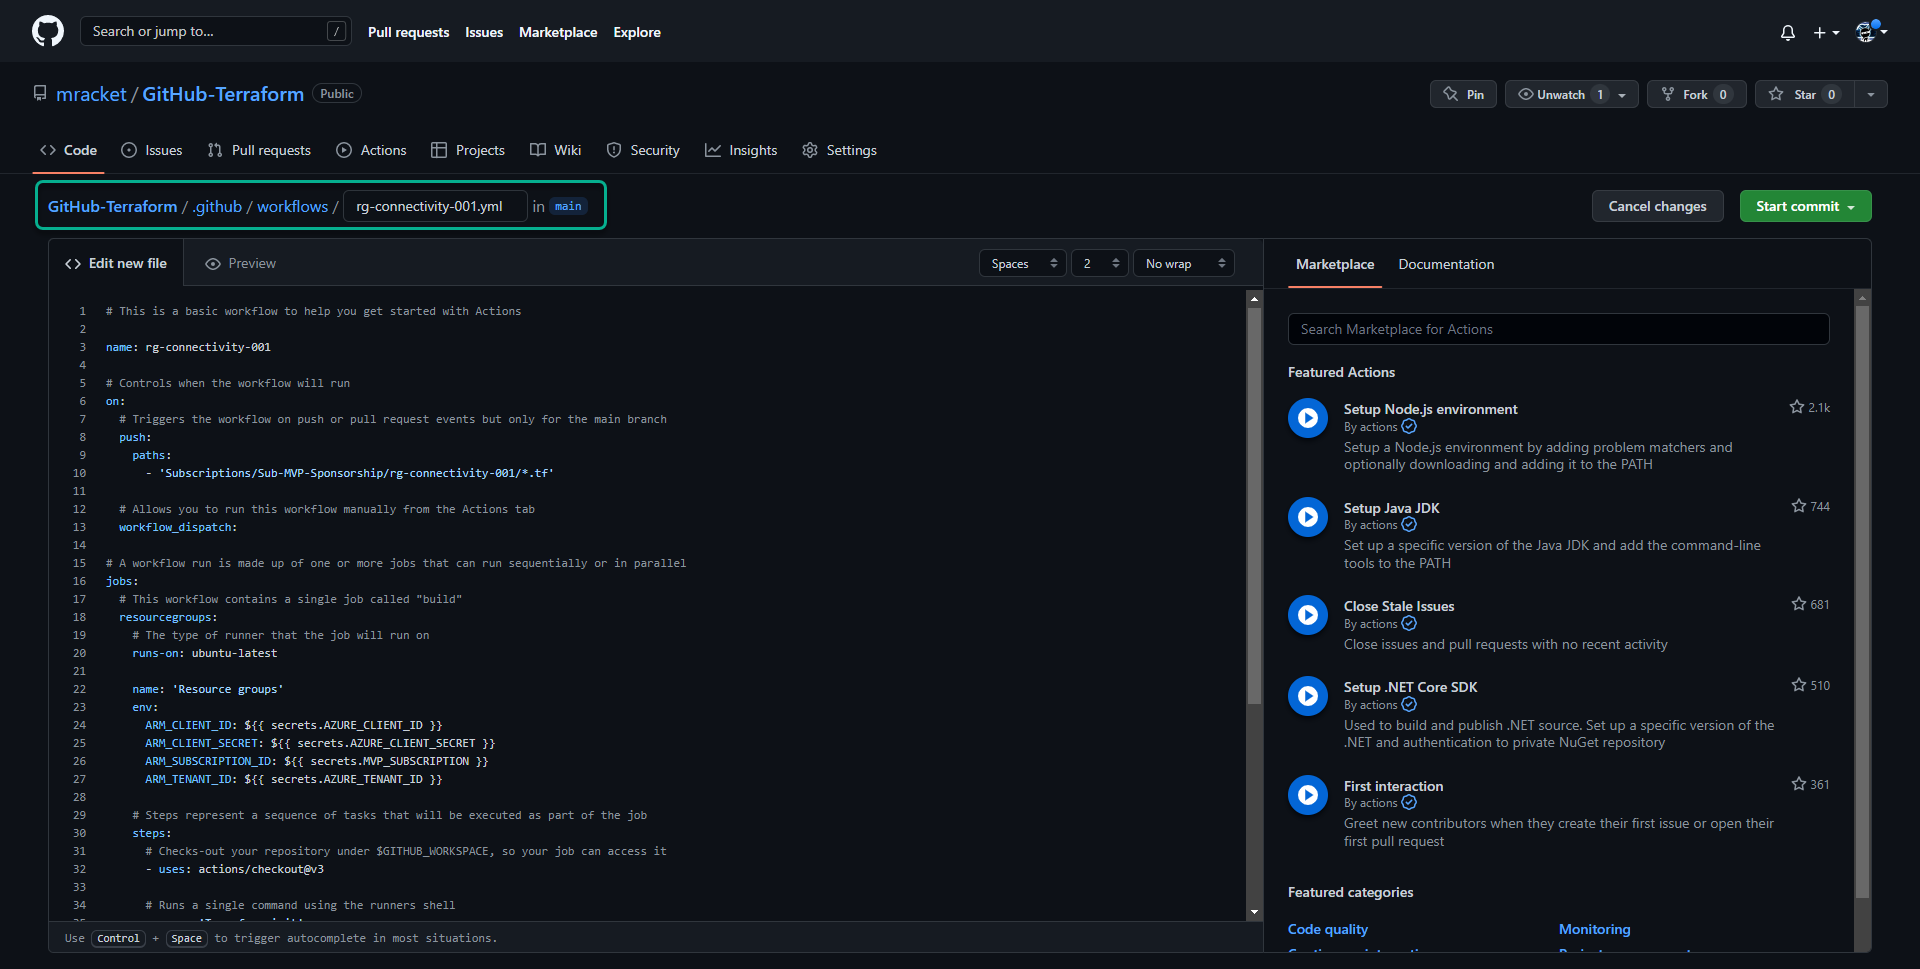
I renamed my file to “rg-connectivity-001.yml” and pasted the code below as my Action.
# This is a basic workflow to help you get started with Actions

name: rg-connectivity-001

# Controls when the workflow will run
on:
  # Triggers the workflow on push or pull request events but only for the main branch
  push:
    paths:
      - 'Subscriptions/Sub-MVP-Sponsorship/rg-connectivity-001/*.tf'

  # Allows you to run this workflow manually from the Actions tab
  workflow_dispatch:

# A workflow run is made up of one or more jobs that can run sequentially or in parallel
jobs:
  # This workflow contains a single job called "build"
  resourcegroups:
    # The type of runner that the job will run on
    runs-on: ubuntu-latest

    name: 'rg-connectivity-001'
    env:
      ARM_CLIENT_ID: ${{ secrets.AZURE_CLIENT_ID }}
      ARM_CLIENT_SECRET: ${{ secrets.AZURE_CLIENT_SECRET }}
      ARM_SUBSCRIPTION_ID: ${{ secrets.MVP_SUBSCRIPTION }}
      ARM_TENANT_ID: ${{ secrets.AZURE_TENANT_ID }}

    # Steps represent a sequence of tasks that will be executed as part of the job
    steps:
      # Checks-out your repository under $GITHUB_WORKSPACE, so your job can access it
      - uses: actions/checkout@v3

      # Runs a single command using the runners shell
      - name: 'Terraform init'
        id: init
        run: |
          cd Subscriptions/Sub-MVP-Sponsorship/rg-connectivity-001
          terraform init

      - name: 'Terraform plan'
        id: plan
        run: |
          cd Subscriptions/Sub-MVP-Sponsorship/rg-connectivity-001
          terraform plan

      - name: 'Terraform apply'
        id: apply
        run: |
          cd Subscriptions/Sub-MVP-Sponsorship/rg-connectivity-001
          terraform apply -auto-approve
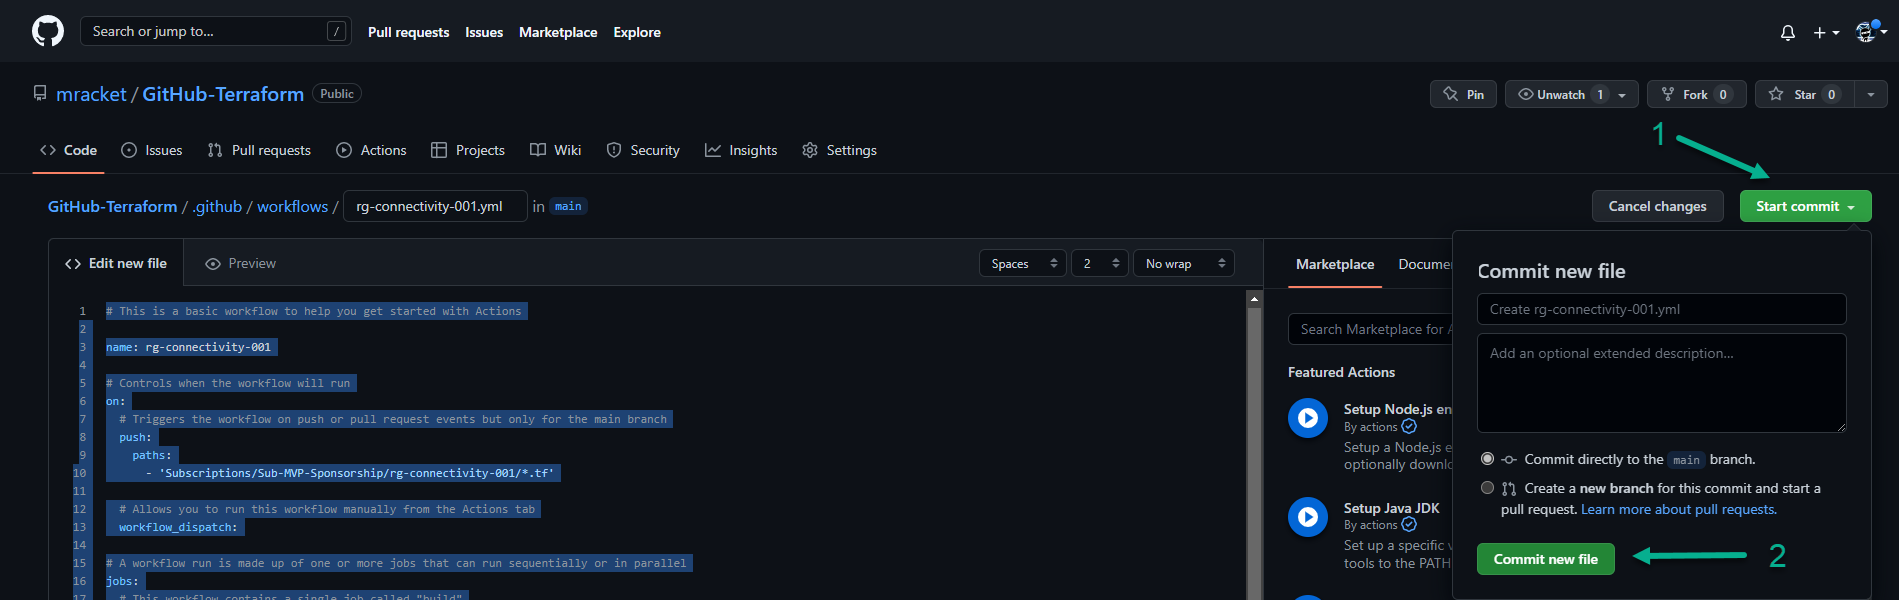
I can now click on “Start commit” and then “Commit new file”
GitHub Action for log analytics
I will create a similar Action for the log analytics resource group, and I have pasted the code for this below.
# This is a basic workflow to help you get started with Actions

name: rg-loganalytics-001

# Controls when the workflow will run
on:
  # Triggers the workflow on push or pull request events but only for the main branch
  push:
    paths:
      - 'Subscriptions/Sub-MVP-Sponsorship/rg-loganalytics-001/*.tf'

  # Allows you to run this workflow manually from the Actions tab
  workflow_dispatch:

# A workflow run is made up of one or more jobs that can run sequentially or in parallel
jobs:
  # This workflow contains a single job called "build"
  resourcegroups:
    # The type of runner that the job will run on
    runs-on: ubuntu-latest

    name: 'rg-loganalytics-001'
    env:
      ARM_CLIENT_ID: ${{ secrets.AZURE_CLIENT_ID }}
      ARM_CLIENT_SECRET: ${{ secrets.AZURE_CLIENT_SECRET }}
      ARM_SUBSCRIPTION_ID: ${{ secrets.MVP_SUBSCRIPTION }}
      ARM_TENANT_ID: ${{ secrets.AZURE_TENANT_ID }}

    # Steps represent a sequence of tasks that will be executed as part of the job
    steps:
      # Checks-out your repository under $GITHUB_WORKSPACE, so your job can access it
      - uses: actions/checkout@v3

      # Runs a single command using the runners shell
      - name: 'Terraform init'
        id: init
        run: |
          cd Subscriptions/Sub-MVP-Sponsorship/rg-loganalytics-001
          terraform init

      - name: 'Terraform plan'
        id: plan
        run: |
          cd Subscriptions/Sub-MVP-Sponsorship/rg-loganalytics-001
          terraform plan

      - name: 'Terraform apply'
        id: apply
        run: |
          cd Subscriptions/Sub-MVP-Sponsorship/rg-loganalytics-001
          terraform apply -auto-approve
Summary
I will end this part of the series with the two resource groups, and GitHub actions created. I hope you will follow along as I add resources to these two resource groups and the ones I will be making later in the series.
Any feedback is welcome, so reach out on Twitter or LinkedIn so that I can fix any errors or optimize the code I am using.
Links to other parts of the blog series
Part 2: https://www.cloudninja.nu/post/2022/06/github-terraform-azure-part2/
Part 3: https://www.cloudninja.nu/post/2022/06/github-terraform-azure-part3/
Part 4: https://www.cloudninja.nu/post/2022/06/github-terraform-azure-part4/
Part 5: https://www.cloudninja.nu/post/2022/06/github-terraform-azure-part5/
Link for all the code in this post
I have put all the code used in this blog post on my GitHub repository so you can download or fork the repository if you want to.
https://github.com/mracket/GitHub-Terraform
This blog is part of Azure Week. Find more great Azure content here.
About the Author:
I’m a Cloud Solution Specialist with expertise within Azure, Microsoft infrastructure services like DNS, DHCP, Domain services etc., Citrix Virtual Apps and Desktops and Citrix Cloud and automation with PowerShell.
I have over 15 years of experience working with IT and I have been working with both SMB companies and Enterprises. Through working with both I have gotten an insight into what is needed for each type of company and how it is best to do changes to IT within them.
Reference:
Therkelsen, M. (2022). Using GitHub and Terraform to deploy Azure resources – Part 1. Available at: https://www.cloudninja.nu/post/2022/06/github-terraform-azure-part1/ [Accessed: 12th July 2022].


