Whether you’re just starting out or an experienced pro, we’ve compiled this list of Microsoft Teams chat settings you can try out.
Some are tweaks to ease notification overload. Others will introduce you to more productive chats. And you’ll finally know whether that message belongs in a group chat or a channel.
Before we start to play around with specific Microsoft Teams chat settings, let’s make sure we’ve got the basics set up.
How do I enable chat in Microsoft Teams?
The chat option might not be visible the first time you sign in to Microsoft Teams. That’s because some organizations, like schools, might opt to switch the chat functionality off to keep all communication within the appropriate channels.
If you’re a user and have no admin rights, you need to ask your administrator to enable this functionality in the backend.
If you’re an admin:
- Log in at admin.teams.microsoft.com and select Messaging Policies from the navigation menu on the left-hand side;
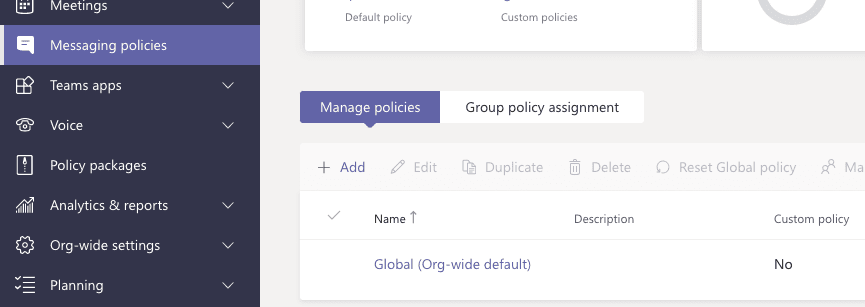
- Under the “Manage Policies” tab, select Global (Org-wide default);
- Once there, make sure that the “Chat” option is switched on;
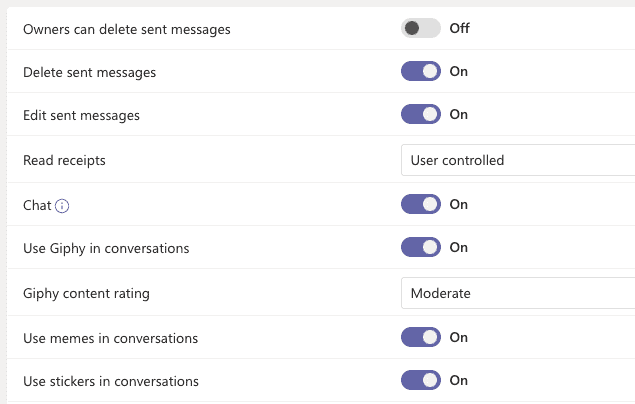
- Click “Save”
It might take some time for the change to take effect. If you don’t see the chat function appear after a few hours, clear your cache and try logging in again.
As an admin, you can also apply custom messaging policies for some users. To learn how to do that click here.
How do you manage conversations in Microsoft Teams?
The chat functionality of Teams can be the heart and soul of your collaboration experience.
But only if managed well.
While there are no hard and fast rules for managing conversations, these 10 Microsoft Teams chat settings and tips can be your guiding light.
1 – Play around with the Microsoft Teams chat settings area
Still in the admin center, you can create custom messaging policies that apply to individuals or groups of users in your organization.
Here are some options you can toggle on or off:
- Owners can delete sent messages – allows owners to delete messages sent by other users;
- Delete sent messages – allows users to delete messages they’d sent in chat;
- Edit sent messages – allows users to edit messages after they’d been sent in chat;
- Read receipts – notifies users when their chat messages have been read. Here, there’s the option to select:
- User controlled – the admin gives users the freedom to decide if they want this functionality ON or OFF;
- Turn on for everyone – this functionality in switched on by default;
- Turn off for everyone – this functionality is switched off by default;
Other options refer to the use of GIPHY, memes, and stickers in conversations, and whether users should be able to translate messages in their preferred language for Microsoft 365.
For a full list of Microsoft Teams chat settings and their meaning, please visit this page.
Admins can create any combination of Microsoft Teams chat settings and assign them to any group of users by creating custom messaging policy in the admin center:
Here, go to:
- Messaging Policies;
- Click “Add”
- Select the functionality you want to switch on or off:
- Click “Save”
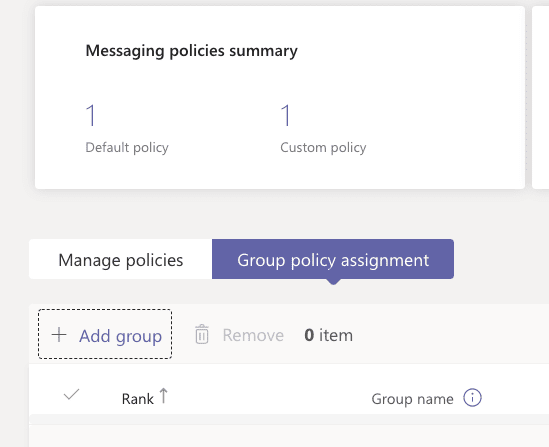
Once you create a custom policy, you can assign it to specific groups under “Group policy assignment”.
2 – Keep control of Teams notifications
Notifications can get overwhelming as you navigate communications between teams, projects, and customers. Add to the mix a few other communication channels like Slack or Zoom Chat, and you can easily spend the whole day reading and responding to messages.
As a Microsoft Teams user, you have full control over how, when, and where you get notifications.
- Navigate to the top menu and select Preferences to find your notifications settings;
- Go to the Notifications section and click “Edit” next to the Chat section;
- Here, select the type of notifications you want to receive for mentions, messages, likes, and reactions.
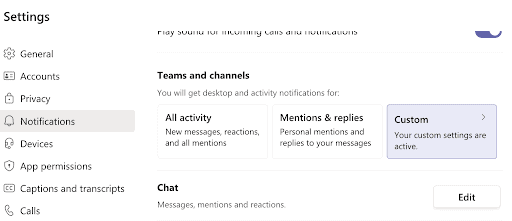
Banner and feed means that you’ll get notifications on your desktop as a pop-up message and in the Activity tab on Microsoft Teams. Feed means that you’ll only receive notifications via the Activity tab whereas Banner will keep the desktop notifications only.
In the same menu, you can also update your notification settings for teams, channels, and meetings, and switch the sound off/on for incoming calls or notifications.
3 – Use message threads in Microsoft Teams
Any collaboration tool can backfire if the noise it creates cancels out the benefits it brings to the table. This is especially true for large organizations where comms are ongoing and notifications can disrupt our work every few minutes.
This is where message threads are really useful. They keep conversations organized by allowing users to respond to messages as comments and keep all related communication under one thread.
The benefits from threads are plentiful:
- When replying to a message in a thread, only people included in that message will get notified, significantly reducing the notifications noise for other users;
- Messages are organized and easy to skim;
- Users can easily follow conversations without having to read through dozens of other, unrelated messages;
Message threads in Microsoft Teams work in group chats, channels, and private messages.
4 – Install a Microsoft Teams chat integration
There are hundreds of Microsoft Teams integrations to choose from. The selection gets smaller when you look for integrations specific to chat.
Chat integrations can be specific apps that expand the capabilities of the chat functionality, or automated chatbots which make the communication easier, faster, and….well, automated.
For instance, Growbot is a chatbot you can install within Microsoft Teams to help managers and supervisors automatically recognize the good work employees are doing. Users can see a leaderboard of distributed kudos which further encourages team collaboration and productivity.
Unlike bots, apps can be more sophisticated in that they enhance the overall chat functionality.
Mio, for instance, can easily be installed from the app store and enable users to communicate across Slack, Webex, and Zoom Chat without ever leaving Microsoft Teams.

More on Mio coming up.
5 – Communicate when to use group chats vs channels
Both are quite different. While channels are organized under the Teams tab based on a specific topic, group chats are private, direct messages between three or more people.
Channel conversations are visible to all members of the channel and are used to keep communication organized.
For instance, you can have a team called “Marketing” and have the following channels underneath: content strategy, inbound leads, email marketing etc.
Group chats, on the other hand, are used when users need to have a temporary or a one-off interaction. For instance, a group of four users are collaborating on a specific project and need to consult with one another for the duration of that project.
6 – Chat with users on Skype for Business
It’s not uncommon for people outside your organization to use Skype for Business as their preferred collaboration tool. Some businesses will still have Skype for Business until it’s no longer supported by Microsoft. Others may have instances of both Skype and Teams while they can run in coexistence mode.
If this is the case, you can use the Mindlink XMPP Federation Gateway to establish direct communication between Microsoft Teams and Skype for Business. The integration supports both one-to-one and multi-party instant messaging.
This integration is currently not available as a self-service tool and you’d need to contact the MindLink team to enable this functionality.
7 – Chat with users in other organizations
The Teams guest experience has long been scrutinized by users in the community.
Teams Connect will help you and external collaborators communicate in your native Microsoft Teams environment without having to log out of your account or use multiple communication platforms.
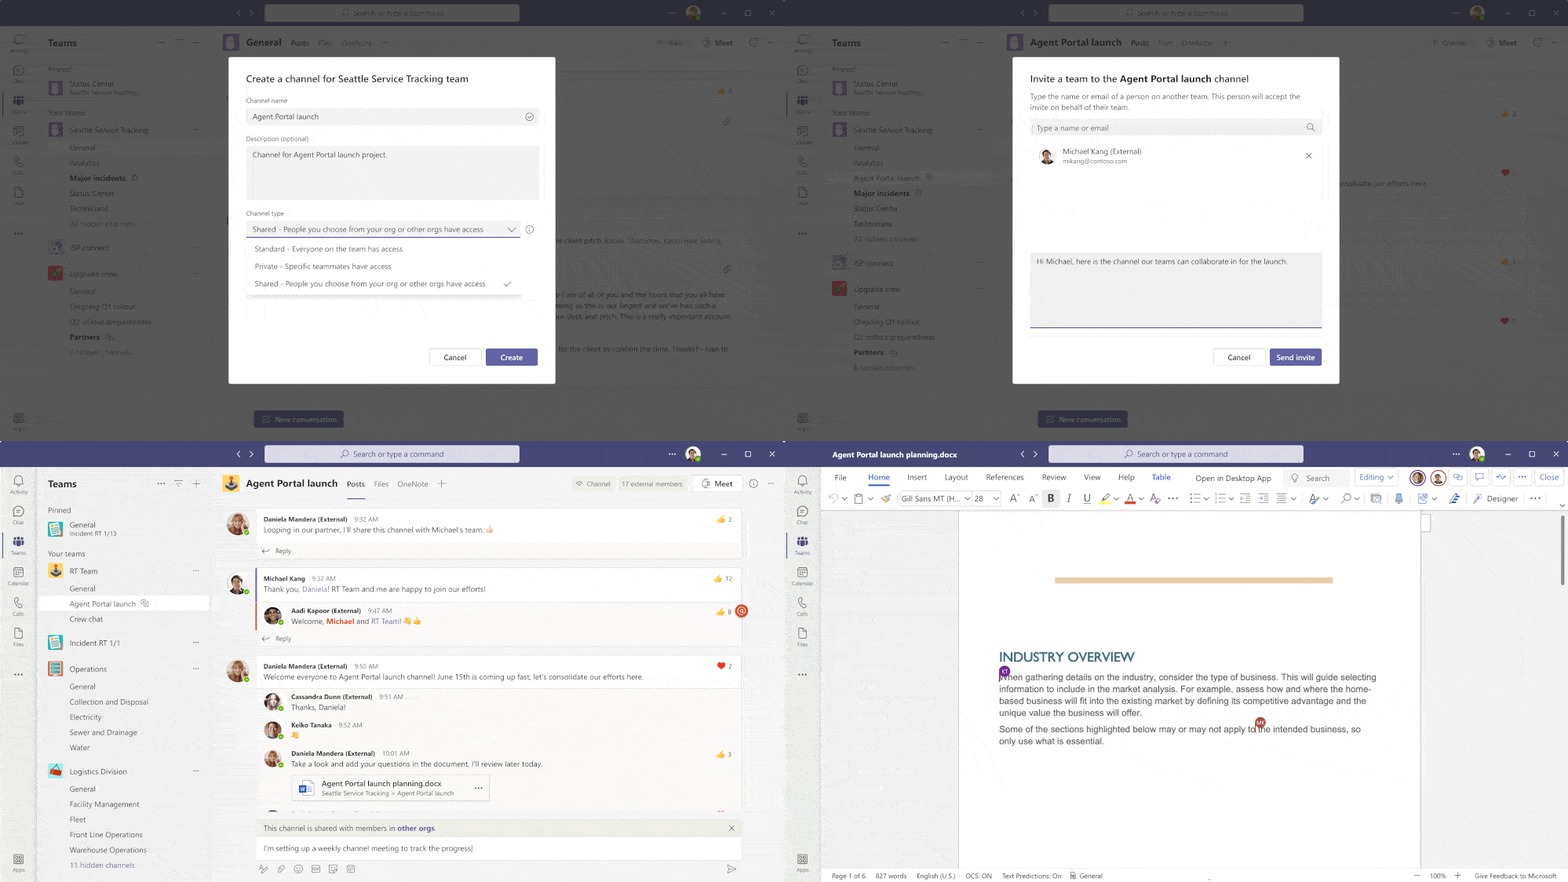
Teams Connect allows you to create shared channels which live under your existing Teams tab and are visible alongside other teams and channels you belong to.
8 – Send Microsoft Teams messages to Slack users
When you need to chat with teams on other platforms, what is your current process?
Maybe you revert to email? Or perhaps you have to set up a call each time you want to collaborate?
Instead, you could set up a universal channel between Microsoft Teams and Slack.
Universal channels provide an easy way to communicate with Slack users without ever leaving Microsoft Teams. You can either create a new channel or convert an existing channel into a universal channel following these steps:
- Install the Mio app;
- Go to the Team where you’d like to add a universal channel;
- Click on the three dots and select “add channel”;
- Name your channel and click “Add”
- Once the channel is created, go to “new conversation” and click on the three dots at the bottom;
- Search for the Mio app extension and click on it;
- On the pop-up screen, click “Convert and invite” to convert your regular channel into a universal channel;
- Share the newly generated URL with anyone who needs to join the channel;
Universal channels are a great way to streamline all communication across platforms without having to sacrifice yours or your clients’ preferred method of communication. They can also be used with internal team members who prefer to use Slack over Microsoft Teams.
You can also send direct messages from Teams to Slack.
Members of a universal channel can choose to start a direct message (DM) with individual members of that channel.
9 – Send Microsoft Teams messages to Webex users
How about when you need to chat with people who prefer to use Webex?
Revert to email again? Or are these the people you can only meet in real-time with?
Instead, you could set up a universal channel between Microsoft Teams and Webex. You can follow the same steps described above to create a universal channel within Microsoft Teams and invite external Webex users to join.
Webex users can also create a universal channel on their end and invite Microsoft Teams or Slack users to join. The steps are similar, though slightly different to those when creating a universal channel in Microsoft Teams:
- Install the Mio app in Webex;
- Go to the direct messaging space of your Mio bot and type in “create”;
- This will prompt you to create a new space or select an existing one;
- Give your channel a name and click “Save”;
- The app will generate a unique link you can share with anyone you’d like to join your universal channel;
You can also send DMs from Teams to Webex.
10 – Send Microsoft Teams messages to Zoom Chat users
And what happens when you win a new client who uses yet another communication tool – Zoom Chat? Do you tell them to switch to Microsoft Teams or do you try to accommodate their preferred method of communication?
Soon, universal channels will support interoperability between Microsoft Teams and Zoom Chat.
Just like Slack or Webex users, you can create universal channels on Teams to invite Zoom Chat users as well.
While the Mio team is building the Zoom Chat interop tool, join the waitlist here.
This blog post is part of Microsoft Teams Week. Find more great blogs here.
About the Author:
EdTech SaaS freelance writer with a focus on future of work, workplace learning and workplace collaboration.
Reference:
Serafimovska, N. (2021). 10 Microsoft Teams Chat Settings You Must Try. Available at: https://dispatch.m.io/microsoft-teams-chat-settings/

