A few months ago I wrote an article about a new preview feature for Copilot Studio called ‘Plugin Actions’. (You can read the article here if you haven’t read it yet.) If you’re not familiar with Plugin actions, they are used by copilot to respond to users automatically and you can call them from within a topic! In my previous article I showed you how to use an existing power platform connector to create a plugin action, and I showed how to call the action from a topic, and boy, does this cut down on the work that goes into creating topics! There are other ways to create plugin actions, besides using a pre-built power platform connector, you can also use custom built connectors and bot framework skills. Last but definitely not least, you can also use a power automate flow to build a plugin action, and that’s what this article is all about! I decided to write an article on how to use a power automate flow to build a plugin action because I couldn’t find any information online on how to do this!
Power Automate Flow
The first thing you will need to do is build a power automate flow. In my case I created a very simple power automate flow that queries Dynamics 365 for the unique ID of a contact row based on an email address, and then feeds that information from Power Automate back to Copilot. You’ll notice in the first step of the flow I am looking for an email address. This is important, as I’m using that input to query Dynamics 365 for a contact. I have some conditions in my flow of what to do when the email address that is entered in copilot doesn’t exist in Dynamics 365, but for the purpose of learning how to create a plugin action from a power automate flow you can skip those steps. (Just make sure when you test this, that you have a contact with an email address in Dynamics 365!)
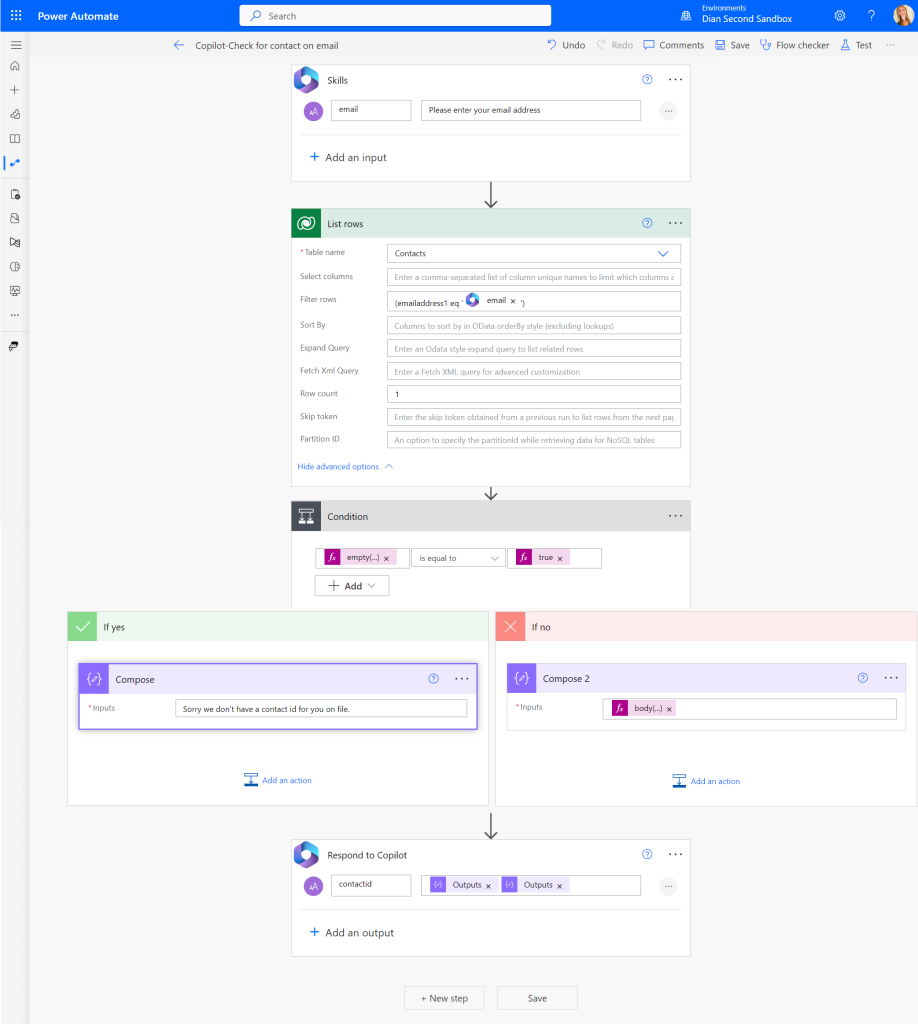
You’ll see the data from the power automate flow is fed back to Copilot in the last step of the flow(Respond to Copilot). Keep in mind this is just an example of a flow you can use to create a plugin action, you can also use other flows.
Create the plugin action
Once the power automate flow has been created, you can create the plugin action in Copilot Studio. In order to create the plugin action, you’ll need to open the copilot for which you want to create the plugin action. Click on the ‘Topics’ navigation item on the left side of the sitemap. Then click ‘+Add’ from the top of the screen and click on ‘Plugin Action(preview)’. This will bring up the ‘Add an action’ screen. From here you can search for the Power Automate flow you want to use for the action. In my case, the flow is called ‘Plugin-Check for contact on email’. Keep in mind the flow needs to be in the solution of the copilot to show up here. Once you select your flow, it shows on the ‘connection details’ step. Click ‘Next’ to review and finish, then, without making any changes, click ‘Finish’. I prefer making edits to the plugin action after it’s been saved, but you can also do this while creating the plugin.
Once you click ‘Save’, you will see your newly created plugin action in the list. Now it’s time to update the plugin action, so let’s click on it to open it. Under ‘Details’ you’ll see the plugin action name, the model display name and the model description. By default these values are copied over from the Power Automate Flow. The plugin action name is just the name of the plugin action, so that makers can easily identify the plugin action, so you can leave that as-is. The ‘model display name’ and the ‘model description’ are more important, as they are used by AI to determine when to use the plugin, what it does, etc. It’s very important that you enter clear information here.
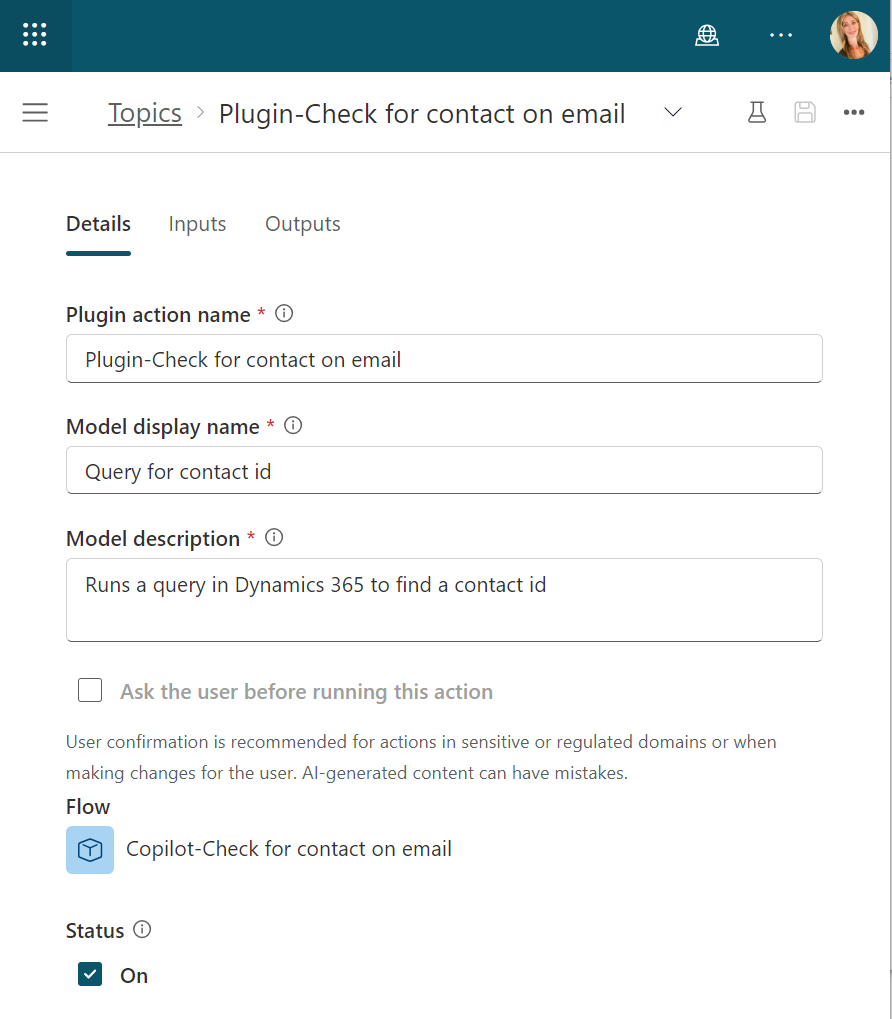
In the model display name I enter: ‘Query for contact id‘ and in the model description I enter: ‘Runs a query in Dynamics 365 to find a contact id.‘ NOTE: I had to try different things to make sure it worked when I tested it. Make sure you save your changes and click on ‘Inputs’. In the inputs section I only have one input (see the first step in the image of the power automate flow) where I need an order number. AI uses the display name to to determine how to fill this input. By default the display shows ’email’, as that’s what it is called in my power automate flow(in the copilot skills trigger). I am not changing this, as this shows exactly what I’m looking for in this input. The description of the input is also used by AI to determine the input, so here I enter: ‘Email address that is used for the query.’
In the output section, make sure the ‘Respond to the user after running this action’ is checked. This will allow the bot to send a message to the person it’s chatting with. Here you can have AI create the message, or you can create a message yourself. For this example I am going to create a message to display to the person interacting with copilot. I select ‘You create a message, after which I can create the message in the box that is now visible on the screen. When you click on the variables icon, you’ll notice the variables that are available from the power automate flow. If you check the image of the power automate flow, these are the values in the ‘Respond to Copilot’ step. I see the message variable output.contactid, which I add in the message box in the outputs section after I type ‘Your contact ID is ‘. Don’t forget to save your changes!
Add the plugin action to a topic
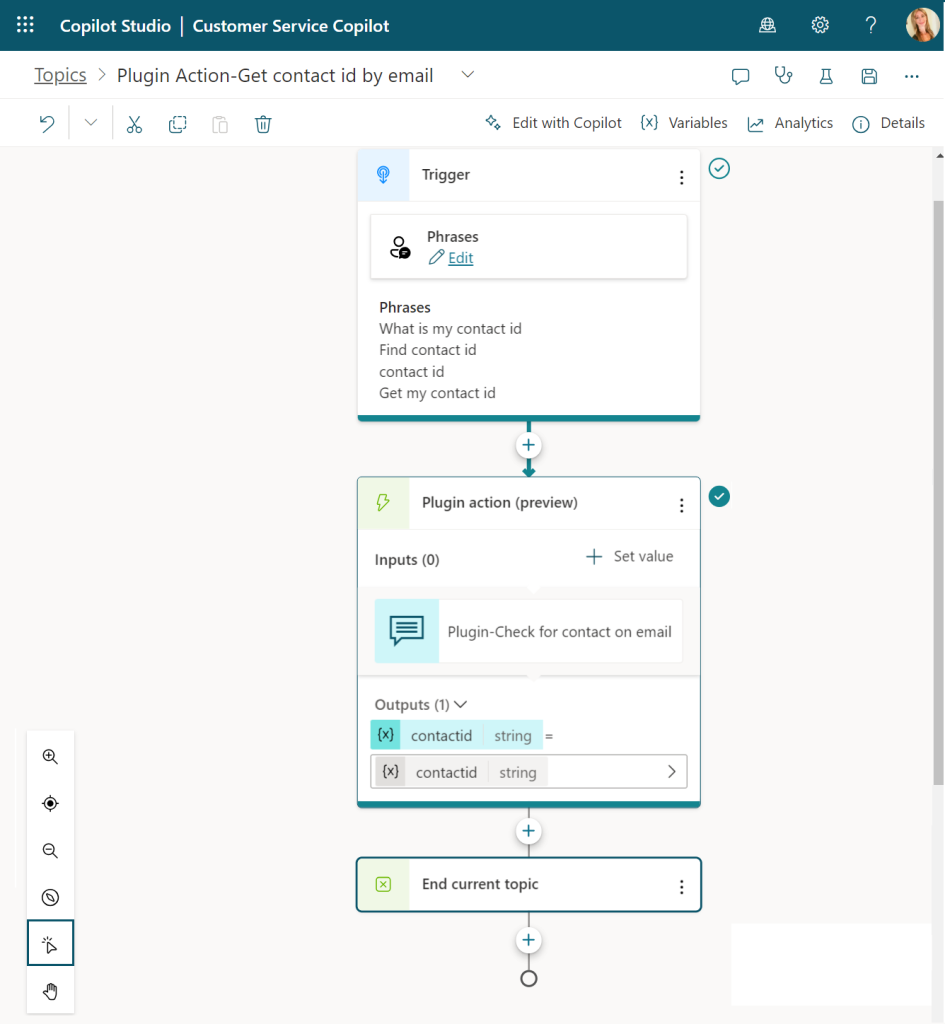
The last step in this exercise is to create a new topic and to add the plugin action in the topic. To create a new topic you need to click on ‘Topics’ on the left side of the screen. Click ‘+Add’ and select Topic > From blank. This will load the topic screen. Here you can enter a few triggers, in my case I added ‘Where is my contact id’, ‘Find contact id’, and ‘Contact id’. The next step is to add the plugin action. You can do this by clicking on the plus icon and selecting ‘Call an action’. Click on ‘Plugin actions (preview) and select the plugin action you created in the previous step. The last step here is to end the topic after the plugin action runs. Click on the plus button again and select ‘Topic Management’ > ‘End Current Topic’. Don’t forget to name the topic and to save it!
Test the topic!

ABOUT THE AUTHOR
Hi, my name is Dian Taylor. I was born and raised in the Netherlands and I moved to the United States in early 2004. I am a Microsoft Dynamics 365 (aka CRM) Presales Engineer at RSM. I have worked with Microsoft D365 Customer Engagement (formally known as Dynamics CRM) since 2011 and I am the proud recipient of the Microsoft Business Applications MVP Award.
REFERENCES
Taylor, D., (2023) ‘CREATE PLUGIN ACTIONS(PREVIEW) WITH POWER AUTOMATE IN COPILOT STUDIO’, available at: https://d365goddess.com/copilot-studio-plugin-actions-with-power-automate-flows/ [accessed 28th March 2024].