Introduction
In this article we will discover how easily we can create a secure tunnel between two different systems using Service Bus Relays from Microsoft Azure. We will start from a real life problem and we will discover how we can resolve this problem using Azure Services.
The Problem
We started to work on a project where we need to be able to offer a reliable solution for Remote Screen Sharing – RDP (Remote Desktop Protocol). Luckily, all devices are running Windows operating system and we can use with success the support from Windows.
Because all the devices are spreader worldwide we need a tunneling solution. All the content that is send over the wire needs to be encrypted. In theory we would need some relays servers that would be ‘the man on the middle’ between devices and people that would like to access that device – tunnelling.
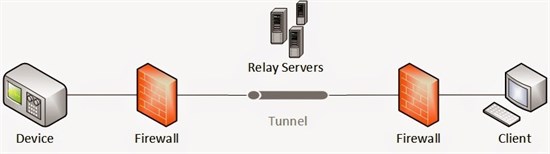
Relay Servers in Tunnelling
There are some solutions on the market for Relay Servers and Tunneling. Some of them are open source and free, others are expensive and very exotic. Our solution would run on Azure, because of this, we want to reduce the cost of operational and maintenance tasks as much as possible. Having some instances for Relay Server would require extra maintenance costs of that virtual machines. In the end we want to be as flexible as possible and to be able to scale up and down base on client’s needs.
On top of this, we need to support peeks that can reach 500 RDP sessions in the same time. Normally we need to support 30-50 RDP sessions, but we need to be able to support 500 RDP sessions.
From the moment when a client notify us that he wants to open a RDP session to the moment when he actually needs open the session we have 8 seconds to do all the magic. In this short period of time we need to notify device, open the tunneling channel with the relay server and establish the secure connection.
I tried to look on a solution that are scalable, because now we can have a peak of 500 RDP sessions, but we need to be prepared to support more than that. I don’t want to manage or debug and fix issues in a tunneling solution that don’t work as expected. This would require extra time to understand how the system works, how the implementation is done and so on – in the end this means extra costs and all the time we would need to have at least one person that know very good the tunneling solution and the problems with it.
What is Service Bus Relay
Service Bus Relay is a service that was built for hybrid application, which run on Azure and on-premises. It allow us to expose WCF services from on-premises system that can be accessed from Azure without having to manage firewall rules, open ports or other things. It helps us to expose a secure channel (a tunnel) between two endpoints in a secure and reliable way. All the communication with Service Bus Relay is made over HTTPS.
Implementation
Hmmm… Service Bus Relay could help us a lot. In this case it sounds like the perfect solution. If we could redirect the traffic generated by RDP connection through Service Bus Relay to the other endpoint…
Luckily this can be done easily. There is a great sample code written by Clemens Vasters (http://blogs.msdn.com/b/clemensv/archive/2009/11/18/port-bridge.aspx) that works very well. It is not yet production ready, but it is a good starting point, especially for a PoC, when you want to validate if a solution works or not.
I will not describes in details the solution that is offered by Clemens Vasters, because if it describes in details in his blog post.
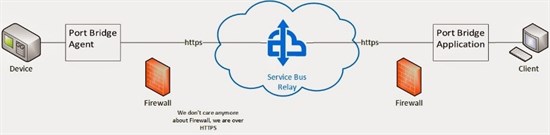
The solution includes an agent called Port Bridge Agent that will run on our devices. The agent will redirect the traffic of a specific port to Service Bus Relay. In our case we will redirect all the traffic generated by RDP session to Service Bus Relay
On the client machine, that wants to access the device, we will start another application (service) that will do a similar thing – map a custom port to the same relay from Service Bus Relay. In the moment when we will start the Remote Desktop Connection client we will specify the port where Service Bus Relay is configured to expose the data.
Service Bus Relay
In this way we will have a tunneling solution between this two machines over Service Bus Relay without having to open firewalls ports, having complex IP confirmations or having to manage relay servers.
If you want to make the sample work with Shared Access Policy token you will need to change the configuration of ‘TransportClientEndpointBehavior. The token provider needs to be specified using Shared Access Signature – see the below code.
relayCreds = new TransportClientEndpointBehavior
{
TokenProvider = TokenProvider.
CreateSharedAccessSignatureTokenProvider(
sharedAccessKeyName,sharedAccessKey)
};
Authentication
In this moment Service Bus Relay is the only service from Service Bus that does not have support for Shared Access Signature (SAS). Because of this we need to create and work with Shared Access Policies. This are pretty similar with SAS, but we cannot control access at relay level, only at namespace level.
Because of this we could have a security issue there. If the same namespace is shared between two different tunneling sessions, than both sessions content could be accessed by both clients (and this is possible and pretty simple – at package level)
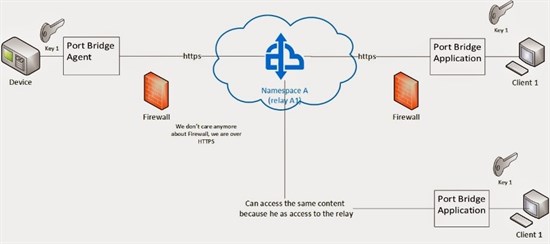
Namespace A Level
Another problem with them is the number of policies that can be defined on a Service Bus Namespace. We can have maximum 12 of them (Shared Access Policies).
The simplest solution is to create and use a different namespace for each tunneling session. In this way from a security perspective we can manage access in a secure and reliable way. More about this will be described in the next part.
Proposed Solution
We can create a pool of Service Bus namespaces that are managed by a server components. All the time we can have 30 namespace available in the pool for example. The service can increase or decrease the number of namespaces available in the pool based on the load or the hour. Creating a Service Bus namespace don’t require a long period of time. Even if there is no SLA related to how long it takes, we observed normally it does not takes more than 20 seconds. This pool can contains namespaces from different Azure subscriptions.
The cost of a namespace per month is ~7€. But if we create a namespace only for 2 days, we will pay only for that 2 days.
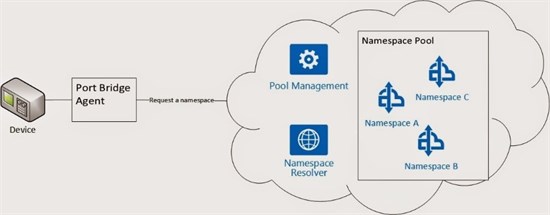
Port Bridge Agent & Namespace Pool
Above we can see the service that will be able to allocate namespaces from the pool. After that the service will be able to recycle them. When a session ends, the system will be able to invalidated the access key and regenerate new keys. In this way the old keys cannot be used anymore.
Price

We calculate how much traffic a RDP session generates for 1920×1080 screen size (32b colors), using RDP 6.1. For normal use, we observed that in general for every 5 minutes of connection we consume:
18MB data traffic
9000 messages over relay
Based on this estimations, in one hour we will consume:
106.800 messages
204 MB data traffic (outbound)
0.001$ the cost of an hour of open relay
The total cost for 1 hour of RDP is 0.21$, for normal use at a screen resolution of 1920×1080. A great price for an out of the box solution that does not requires maintenance and custom code and configuration on the relay server.
Possible Problems
The maximum number of namespaces under an Azure subscriptions is 100. To be able to have more than 100 namespaces available we can request the limitation to be changed for our Azure subscription or to use and manage more than one Azure subscription.
From time to time, using the default Windows RDP protocol we received “Because of an error in data encryption, this session will end”. It is not clear for us the root cause of the problem. The problem occurs especially in the moment when the screen content is updates and a lot of content is send by RDP. We suspect that the problem is related to package size. It seems that if we change the security layer to SSL (TLS 1.0) the problem disappear entirely. Further investigation needs to be done.
Last thing is not a real problem but we should be aware of it. To be able to use RDP over Service Bus Relay we need to deactivate the certificate security from Remote Desktop Connection. The client is behind a tunnel (Service Bus Relay) that will not be able to ‘virtualize’ the client certificate. Take into account that we are already using a secure connection, offered by the tunnel.
Conclusion
Service Bus Relay is an extremely interesting service that is very capable and scalable. It works great as a tunnel mechanism for RDP – an out of the box solution. Without having to manage custom configuration, relay servers or other custom components, we can say that it is a great option for tunneling. Also, what is great is that we don’t have to use a Remote Desktop solution from Microsoft. In the end we can use any kind of protocol, Service Bus Relay is only the poor bridge solution for tunneling.
The sample code for port bridge it is not a production code, but it is a good starting point that I highly recommend.
Share Point Step By Step
About the author Radu Vunvulea:

Radu Vunvulea
Radu Vunvulea is a technical lead at iQuest, working on LoB application using Microsoft technologies. He has a vast experience on different platforms from mobile and web to backend solution deployed on on-premise and in the cloud. He worked on different fields such as e-commerce, pharma, automoto, logistics, home automation and transportation. He is very active at offline events in Romania, where he is not only a speaker, but he is also an organizer. In the online world he writes technical posts on his blog.
Check out the 2016 European SharePoint Conference video: