Retention has become a hot topic in Office 365. Compliance can often be a blocker for cloud adoption. This is especially true for highly regulated and government organizations. It is crucial to understand the Office 365 retention features. In this post, we are going to tell you everything you need to know about how retention works in Microsoft Office 365.
Why Do We Care About Retention?
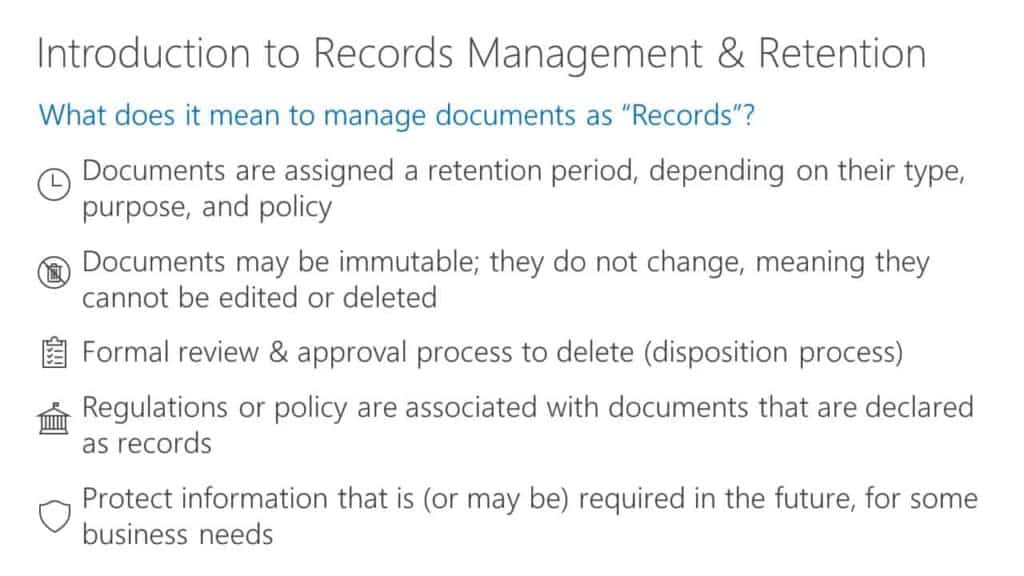
What are the drivers for needing records and retention in business? There are typically three:
- Regulatory compliance needs. Regulations are imposed through laws or regulatory frameworks. These are generally dependent on jurisdiction. For example, if you are in the finance industry in the United States, you need to comply with the Sarbanes-Oxley Act for your financial documents.
- Legal Reasons. There might be legal reasons to declare documents as records. For example, if you are under litigation, and you need to go through an eDiscovery process and place documents on hold. Under retaining, means you’re not keeping the data for long enough. Over retaining means that you’re keeping the records too long. Both of these can pose legal risks to the organization. You need to protect yourselves by using retention appropriately.
- Business Reasons. Your business may have internal policies. These bring consistency to how you retain documents and files for specific business reasons. For example, these might include employee onboarding documents and reviews.
Due to the reasons above or others, we assign documents a retention period, This depends on their type, purpose, and policy.
We may also declare documents as records that may or may not be immutable. This means they do not change, and we cannot edit or delete them.
Before we delete them records usually have a formal review and approval process. We call this a disposition review process.
What Does Records Management Mean in Office 365?
First, Office 365 manages records in place, meaning it does not move them to a separate location. Office 365 keeps the content wherever the document is located when it is declared as a record or given a retention period. Second, you can use labels and label policies to assign retention periods and manage documents as records. This label application could be a manual or automated process.
Office 365 has a built-in disposition review experience. This process happens when documents have reached the end of their retention period and need approval before deletion.
Office 365 also includes event-based retention. This type triggers a retention period when an event happens. An event example is as an employee leaving an organization. The Office 365 Advanced Data Governance features set allows you to automatically apply labels to documents. You can also view analytics about how we use those labels.
How Does Retention Work in Office 365?
There are two ways that you can retain and delete information in Office 365.
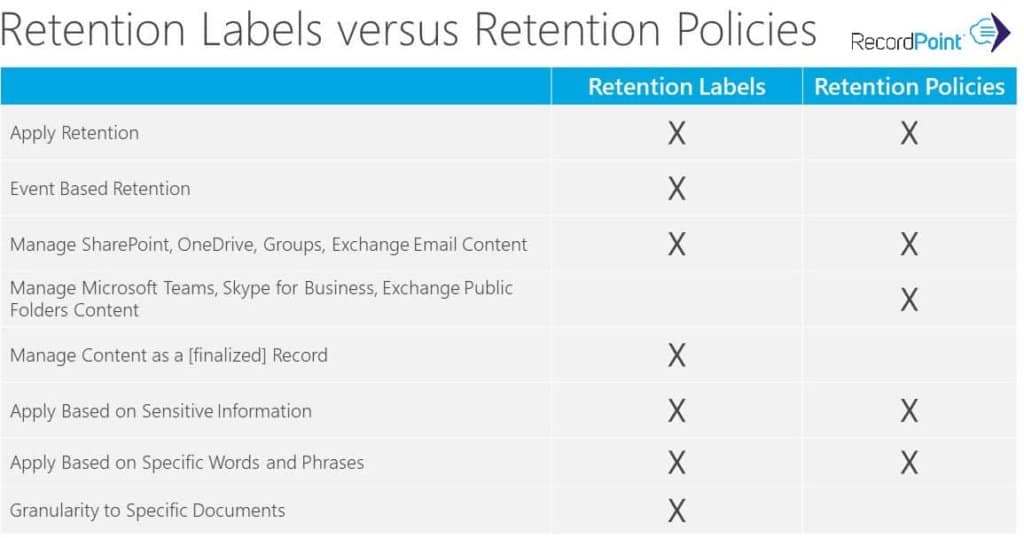
- Retention Label. Retention labels manage retention and deletion. They can do disposition reviews, event-based retention, and more. However, you can only use them to manage SharePoint, OneDrive, Office 365 Groups, and Exchange email content.
- Retention Policies. Retention Policies also allow you to manage content for retention deletion. They’re broad policies that you can use to manage Microsoft Teams, Skype for business, Exchange public folder content. They can also manage the content sources listed under retention labels.
The other thing to note is that both methods can work together, and you do not have to choose to use one or the other. You can use them both within the same Office 365 environment.
Here is a chart showing the difference between retention labels and retention policies. You can see that they have many similarities. However, only retention labels can manage event-based retention. They also can manage content as records to be finalized. Finally, they have the granularity where you can apply a label to a specific document.
Retention policies, however, are the only retention method that can manage content located in Microsoft Teams, Skype, and Exchange Public Folders. They are also more broad policies that are applied at the site collection or above level so they cannot be granular to specific documents.
We find both of these retention methods in the Office 365 Security and Compliance Center. Locate Retention Labels under the Classifications heading. Discover Retention Policies under the Data Governance heading.
How to Set Up a Retention Label
There are two steps to follow when setting up a retention label.
- Create a retention label and fill out the name, description, file plan information, and retention information. Choose whether the label will classify content as a record.
- Deploy the label using a retention label policy. In this step, you are going to choose the locations where the label should be published, or you can set up the automatic application of labels if you wish.
The first step is to name your label. First, you want to add a name. It is best to make the name specific, such as financial contracts with three-year retention, so that you can quickly tell your labels apart.
Next, you will want to enter a detailed description targeted towards administrators.
Finally, you will want to add a description for end users. Ideally, this will help end users differentiate this label from other labels that may be present in their environment.

The next step is to fill out the file plan descriptors. File plan descriptors allow you to organize and track labels. Here are the file plan descriptor fields:
- Reference ID, which can be a combination of numbers and letters that correspond to your formal file plan.
- Business function or departments such as HR, finance, or marketing to which the label applies.
- Category such as employee onboarding, financial invoices, or anything else
- Sub-category further creates a hierarchy for your file plan.
- Authority type is where you can designate whether the label is for legal, regulatory, or organization purposes.
- Regulation that the label corresponds to, you can add that citation in this field. All of these fields are customizable and allow you to create your values.
Office 365 Retention Label Settings
Now you will set up the retention label settings. This step is where you can turn retention on or off. You can choose how long to keep the content. We can set the retention period in years, months, or days.
Next, you will decide what happens after the retention period is over. Your choices are:
- Delete the content automatically
- Start a disposition review
- Do nothing
If you start a disposition review, you will also need to enter the name of the individual or Office 365 Group that should be notified to act on this review.
Finally, you could also choose not to keep content and delete it automatically if it is older than a certain amount of time.
Next, you will set a trigger for the retention period. You can choose to trigger the retention period from:
- The date when the content was created
- The date which the content was last modified. This option only applies to SharePoint and OneDrive content
- The date that the content was labeled
- The date of an event
Finally, there is a checkbox to choose whether this label should classify content as a record. This will lock the content to prevent it from being edited.
Use an Office 365 Retention Label Policy to Deploy the Label
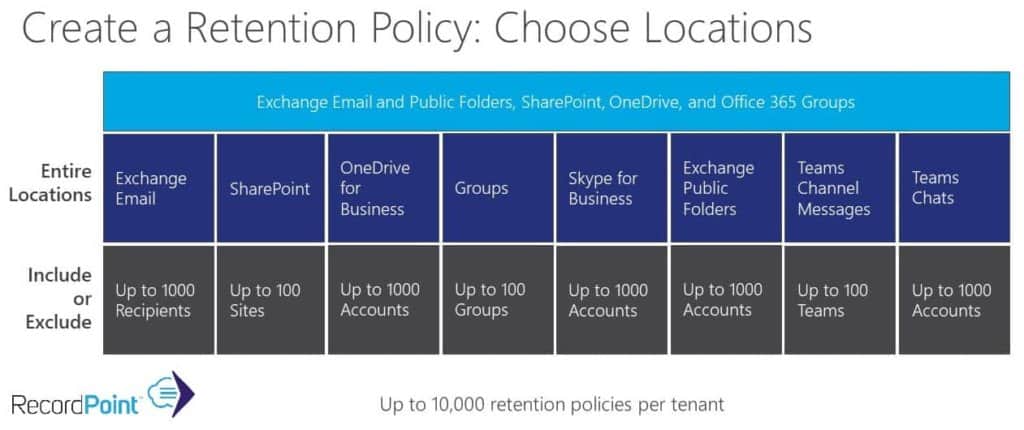
The third step in this process is to publish the retention label using a retention label policy. We can deploy Label Policies to a specific location or an entire organization. You will be able to choose whether the label should appear in all locations, which includes SharePoint, OneDrive, Office 365 Groups and Exchange email, or you can choose one of those locations in which the label would appear.
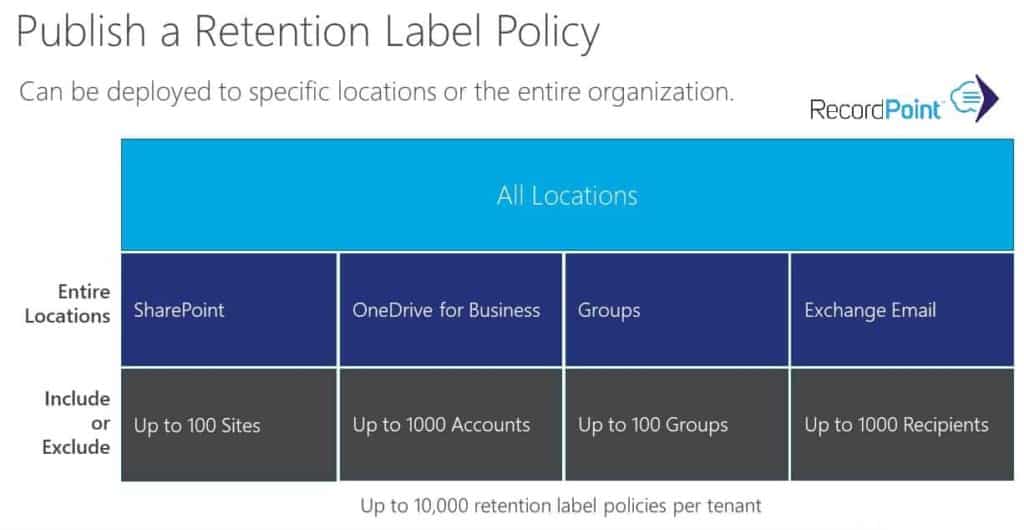
Finally, for each one of the locations, you can get even more granular in your deployment. You can specify up to a hundred sites or Office 365 Groups where the label would appear, or you can exclude up to 100 sites or groups.
For accounts, you can choose up to 1,000 accounts for OneDrive for business or 1,000 recipients for exchange email. Also, keep in mind that there is a limit of 10,000 retention label policies per tenant.
Office 365 Preservation Lock for Retention Labels
We should also mention that there is an option for Office 365 Retention Labels to use what’s called Preservation Lock. Some organizations may need to comply with rules which require that once a retention policy is turned on, you cannot turn it off or make it less restrictive.
Office 365 provides Preservation Lock so that no one, including administrators, can turn the policy off or make it less restrictive. You also cannot modify or delete content that’s subject to the policy during its retention period. However, you can broaden the scope of the policy and either add locations or extend its duration. You cannot make the Retention Label more restrictive or turn it off.
How to Set Up an Office 365 Retention Policy
Next, let us look at how you set up a retention policy.
- Name and describe your policy.
- Configure the retention policy settings.
- Choose the locations where we will deploy the retention policy.
First, name your policy. The same advice applies to a retention policy as with a retention label. You will want to create a specific name and then enter the description, which we will only show to the Security and Compliance Center administrators.

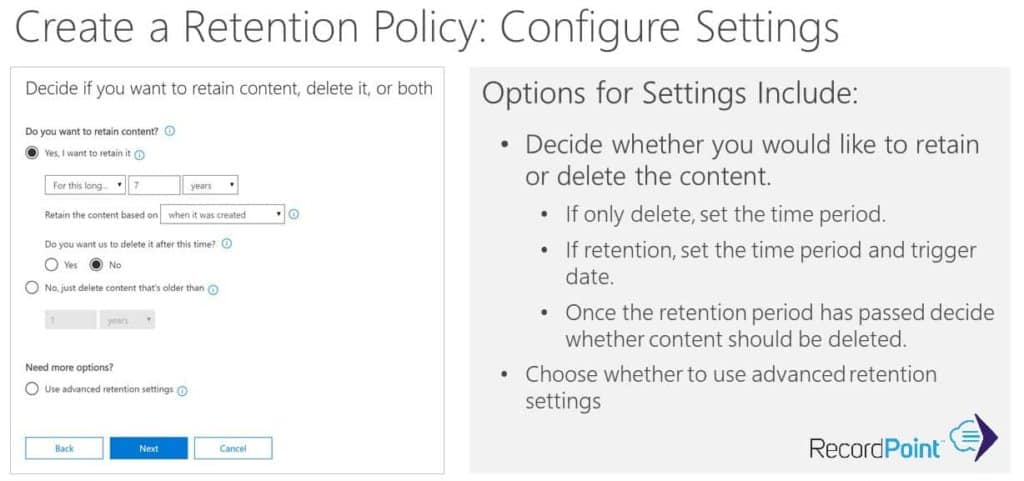
Next, you will configure the retention policy settings. First, decide whether you would like to retain or delete the content. If you would like only to delete the content, set the period in days, months, or years.
Second, you’ll want to retain the content, and have it trigger the retention period based on either when the content was created, or for SharePoint and OneDrive content, you can set it to trigger based on when the content was last modified.
Once the retention period has passed, you can choose whether you want to delete the content automatically or leave it how it is.
Next, instead of retaining the content, you have the choice to delete the content if it’s older than a certain amount of time.
Finally, you can use advanced retention settings to automatically apply the retention policy, which we will cover in the next section.
Choose the Locations Where the Retention Policy Will Be Deployed
When you choose the locations for a retention policy, you have more options than with retention labels. First, you can apply the retention policy to all locations, which includes Exchange email and Exchange Public Folders, SharePoint, OneDrive, and Office 365 Groups.

Next, you could deploy the retention policy to just a specific location, such as SharePoint, Teams Channel messages, or Skype for Business.
Lastly, for each location, you can include or exclude a certain number of recipients, sites, accounts, groups, et cetera, to further customize your deployment. Again, keep in mind that there are a combined 10,000 retention policies per tenant.
How to Manually Apply Office 365 Retention to Specific Content
Next, let us look at how you apply retention to specific content. As we have been mentioning, there are two ways to use retention: Retention Labels and Retention Policies.
Once we deploy Retention Labels, they are available to be manually applied by users at the file or email level in any location in which the label has been deployed. Retention labels can also be automatically applied to sites, libraries, files, emails, and other types of content that we can find in Office 365 search.
Retention policies, however, are generally applied rather than specifically applied. They apply to entire deployment locations. For example, if you deploy a retention policy to the ten finance sites that you specified during the deployment, then it will apply to the content in all 10 of those finance sites. It is not possible to get more granular at the document library or file level using Retention Policies.
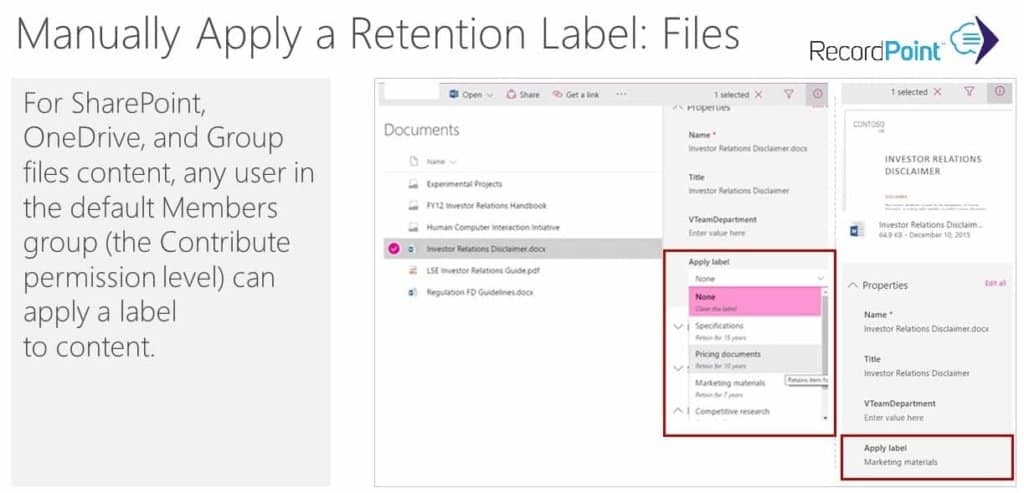
If you would like to apply a retention label to a file manually, the image above shows how we do that done for SharePoint, OneDrive, and Groups file content. For this content, any user in the default member group can apply a label to content or change a label.
They do this by selecting the document and editing the properties. In the properties pane, the user clicks the apply label dropdown to choose a label that we apply to the content.

For Exchange, users can apply labels to their emails. They can right click on the email, choose an assigned policy, and then select a policy that you’ve created using retention labels.
How to Automatically Apply Labels to Office 365 Content
There are also ways to apply retention labels or policies automatically. For retention labels only, you can specify a label that should apply to all documents within a document library. This method will work even if you are using folders and document sets in your library, and it will apply to all labels, all documents in that library.
We can manually set document library labels in the Library Settings area. Alternatively, this can also be scripted using PowerShell to set library Retention Labels at volume.

The other way is to use the Office 365 Advanced Data Governance features to either automatically apply a label or a policy based on a sensitive information type, or to auto-apply a label or policy based on the results of a search query.
Keep in mind that sensitive information types are only available in Exchange mailboxes, SharePoint, and OneDrive. Also note that in exchange, the auto-application of retention applies only to messages that have been newly sent or have been in transit. The Retention Labels will not apply retroactively to all items that are currently in the mailbox.
Automatically Apply a Retention Label Based on Sensitive Information
If you would like to automatically apply a Retention Label based on sensitive information types, here is how you do that.

First, you choose “apply a label to content that has sensitive information.”
Next, you will want to select a Data Loss Prevention (DLP) Policy. Out of the box, Office 365 has over a hundred built-in sensitive data types you can use to automatically apply Retention Labels to Exchange mailboxes, SharePoint, and OneDrive. They cover a wide variety of geographies and industries. You can also create new sensitive data templates.
Automatically Apply a Retention Label Based on a Search Query
Next, you can automatically apply a Retention Label or Retention Policy based on a search query. To do this, you would select automatically apply to content that contains specific words or phrases.
Then, you write the search query to find that content. This query uses the Keyword Query Language (KQL) to find the content automatically, and then you can refine your query by using search operators such as and, or, and not.

In the example screenshot, we are looking for content in a specific finance site that has a content type of invoice.
The last thing to note is that when you automatically apply retention labels, it can take some time. When you deploy a label or a policy, it will be deployed to the proper locations to enable manual labeling of documents and emails within one day.
It can then take up to seven days to automatically apply labels retroactively to existing content. However, once we deploy the label and the seven days have passed, going forward when users add new content, it will take approximately 15 minutes for the label to be applied.

How Office 365 Resolves Retention Conflicts
Finally, since you could potentially have a lot of retention labels and policies, it is possible that they could come into conflict. Since we can only apply one label at a time, there needs to be a way to decide which retention policy has priority.

Microsoft has created the principles of retention to determine how we resolve these conflicts. If one step resolves the conflict, then the resolution process will stop, but if it does not, it will go to the next criteria.
- Retention will always win over deletion. If you have a policy that deletes content older than three years and then also a policy that retains content for seven years, the retention policy will win over the deletion policy.
- The longest retention period wins. As an example, a retention policy of three years will win over a retention policy of seven years.
- Explicit inclusion will always win over implicit inclusion. What this means is, if you have a retention label or policy that applies to all SharePoint sites, a policy that only applies to the finance SharePoint site will win over the broad policy.
- If the conflict still is not resolved, then the shortest deletion period would win.
How Retention Works in SharePoint and OneDrive
What happens to content once we apply retention through one of these two methods? This section explains how retention works in SharePoint and OneDrive.
Once we apply a policy to a site, a library, or a piece of content, it is now subject to the retention period. If a user modifies or deletes the content (see #1 below) during the retention period, we hold a copy of that document in the preservation hold library.

First, for content located in the preservation hold library, a timer job is run periodically to see if the content has reached the end of its retention period. Second, once it has, and if we approve the document has for deletion, it will then take seven days to clean up that content. Third, during the cleanup process, the content is not available in eDiscovery or content search.
If the content is not modified during that time (see #2 above), then the content will remain in the same location until the retention period has passed. Once the retention period has passed, if the content has not been modified or deleted, it will then be moved to the first stage recycle bin.
Once the content has been moved to the first stage recycle bin, it can no longer be found using content search or eDiscovery. It will then take 93 days to fully move through the first and second stage recycle bin and be permanently deleted.
How Document Versioning Works with Retention
There are a few other exciting things to note with document versioning. First, if your retention policy is triggered based on the creation date, then the original document and each subsequent version will have the same retention period and disposition date.
However, if we trigger the retention period from the date last modified, then each version will be kept as a separate record with a different retention period and disposition date.
Finally, it’s also important to note that if you’re trying to delete a document library that contains content that is subject to a retention policy, you first need to remove all the documents in that library before you’re allowed actually to delete the library itself. The same logic applies to a site.
How Retention Works in Exchange Mailboxes
This section explains how Office 365 deletion works in exchange mailboxes in public folders. It is similar to how it works in SharePoint.
First, if a user deletes a document when it is subject to a retention policy, it’ll be eventually sent to the recoverable items folder. In the folder, a timer job runs and checks to see if the content has reached the end of the retention period.

Once the content has reached the end of the retention period, a cleanup job will run. That job takes anywhere to 14 to 30 days before Office 365 deletes the content permanently. The length of the cleanup job depends on the settings you’ve chosen.
Sometimes the content is not modified or deleted during the retention period. In this case, the content will wait in the user’s mailbox or archive until the retention period has passed. Then the same cleanup job would run for 14 to 30 days before the system deleted the content permanently.
In Conclusion, we hope that this article answered your questions about Office 365 Retention.