Are you effectively managing your Microsoft 365 evergreen change?
The pace of change in Microsoft 365 is rapid as Microsoft constantly delivers new features, updates to enhance customer value and ways to better secure the environment. We all know it is important to keep on top of this constant flow of changes, but keeping track of the evergreen changes across the multiple different Microsoft 365 services can be a challenging.
Microsoft post all change messages in the Microsoft 365 message center. However the message center is not a workflow tool so triaging and tracking the changes is difficult. In addition too much time is spent manually copying content from message center to other tools and notifying stakeholders rather than assessing the actual change itself!
So how do you remove this manual overhead and automate your Microsoft 365 evergreen change process?
Read on for top tips and guidance on how sync your Microsoft 365 messages to a Planner board and then use Power Automate to automate and customise your process. This will remove those repetitive tasks giving you more time to focus on the triage and track of the evergreen changes.
Managing Microsoft 365 evergreen change step 1: Admins can view changes in the Message Center
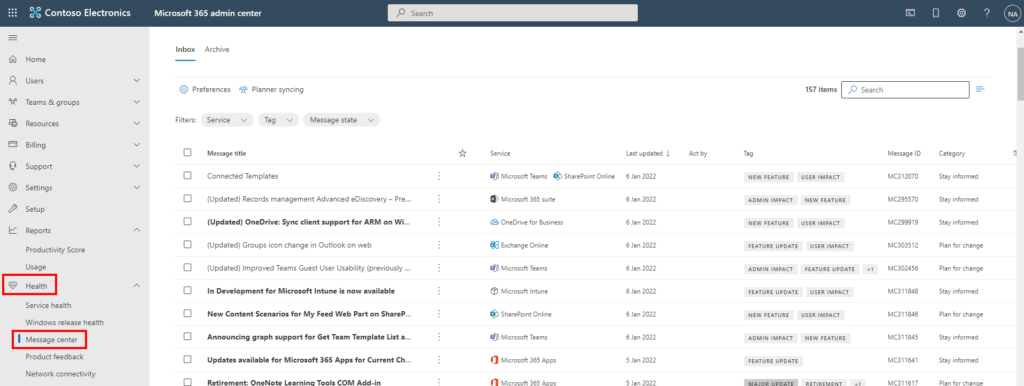
Microsoft 365 details all changes in the Microsoft 365 Admin Center under Health > Message Center.
Each message provides a high-level overview of a planned change and how it may impact users and administrators. Often there are links to more detailed information to help you prepare. Messages are often updated if the timescales change or additional information is added. Learn more about managing changes.
The message center shows all active messages in a table format. This allows you to filter or search for the changes that impact you. However this is not a workflow solution that allows you to triage the change so you end up manually copying the data from the message center elsewhere to allow the assessment to be undertaken.
Message center functionality
- Customize view
- Share Message via email or link
- Subscribe to weekly email digest
- Use the Microsoft 365 Admin app on your mobile
Limitations
- No visibility of changes by non-admin users
- Reliant on IT Admins having time to share information internally
- Difficult to hold people accountable for tasks
- No ability to triage and track the changes
These limitations can be addressed by syncing the messages from the Microsoft 365 admin center to Microsoft Planner.
Managing Microsoft 365 evergreen change step 2: Set up the message center sync to Planner
Step 1 is to sync the message center changes to a Planner board which is used to triage the changes.
The set up is configured from the Message Center where you have the options to:
- decide what changes to sync
- choose which planner board sync to
- set up the sync e.g. daily at 06:00
Full instructions to track your message center tasks in Planner.
Top Tip: Create a Team with all stakeholders as members and add your Planner in this Team. This will ensure that all business, IT and compliance stakeholders have the same access and assess the changes.
At each sync all new change messages are automatically added as new tasks in the Planner. Furthermore if a change has been updated then the sync will update the existing task in the Planner.
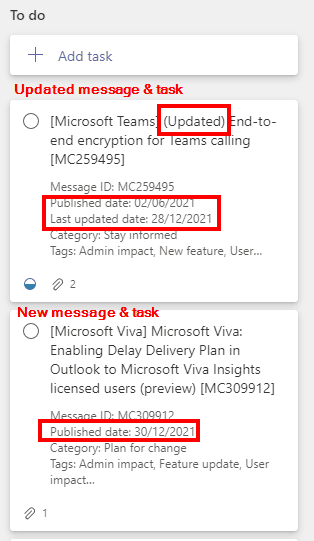
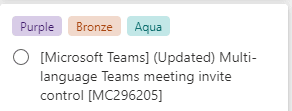
See example below of two changes that have been synced Planner.
- The first task is an updated task because the task title has (Updated) in the text and the task description includes both a published and last updated date.
- The second task is a new change as the new task description only has a Published date.
Benefits
- Easy to set up
- Option to select what types of changes to sync.
- Decide how often you want to sync the changes
- The initial sync can import the last 28 days of changes to the Planner.
Limitations
- There can only be a single Planner sync for the organization. So if multiple teams need to assess changes then they would all need visibility of the Planner board
- unlike the message canter there is no categorisation of the tasks making filtering and grouping difficult without manual updates.
- Manual input need to action repetitive actions such as add labels, assign tasks to user, add check lists or move to other buckets etc
These limitations are addressed by using Power Automate to automate your standard processes.
Managing Microsoft 365 evergreen change step 3: Customise your Planner tasks using Power Automate
In step 2 Power Automate is used to automate and customise the workflow process to meet your business processes. It will remove those repetitive tasks giving you more time to focus on the assessment of the evergreen changes.
This is an automated Power Automate flow that is triggered when a task is added to the Planner board. The flow will automatically update the new task with standardised actions such as:
- Add labels to show relevant services and tags
- Add a checklist
- Assign the task to a user(s)
- Move bucket
- even have different actions depending on the type of change.
The Power Automate steps below shows the art of the possible and can be adapted to suit your specific business processes.
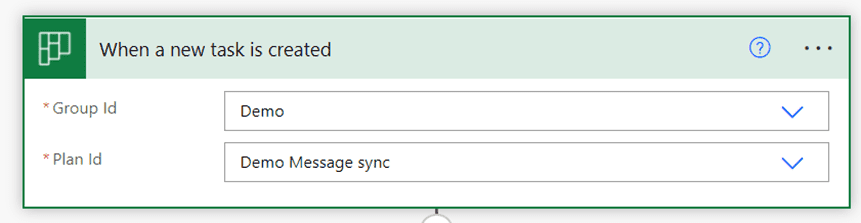
1. Trigger when a new task is created
Trigger = When a new task is created
- Group id = Team of the plan
- Plan id = Plan name that you listed in the sync process
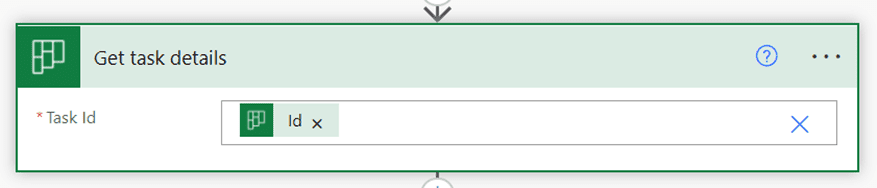
2. Get task details
The task details are needed so that the description can be searched to find the tag text that will create the labels.
Action = Get task details
- Task Id = ID (from When a task is created)
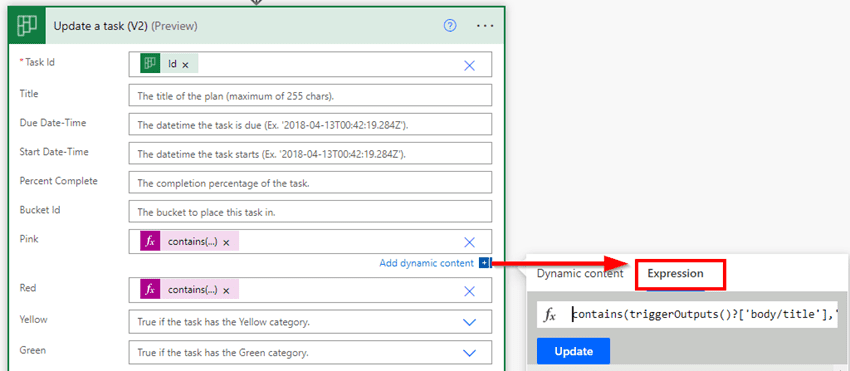
3. Update task to add labels
I recommend adding Task labels based on the Services and /or Tags so you can filter tasks rather than having one long list of tasks. In addition these labels are used as conditions in the flow to allow you to follow different outcomes based on which labels have been applied.
Top Tip: Remember to update the task labels text in the Planner so you know what each labels means. See examples below showing the default label text and the updated label text.

Action = Update task (V2) preview
- Task Id = ID (from When a task is created)
The labels are derived using a Contains Expression to match text strings in either the task title and or task description.
If you want to track the Services then they are shown in the task title. See example to label a Service based on text in the task title.
- Pink label = task title contains the string ‘Microsoft Teams’
contains(triggerOutputs()?['body/title'],'Microsoft Teams’)
If you want to track the Tags then they are shown in the task description. See example to label a Tag based on text in the task description.
- Red label = task description contains the string ‘New feature’
contains(outputs('Get_task_details')?['body/description'],'New feature’)
Full list Condition expressions that I use to capture the Service and Tag as per the Message Center.
- Pink =
contains(outputs('Get_task_details')?['body/description'],'New feature') - Red =
contains(outputs(‘Get_task_details’)?[‘body/description’],'User impact') - Yellow =
contains(outputs(‘Get_task_details’)?[‘body/description’],'Admin impact') - Green =
contains(outputs(‘Get_task_details’)?[‘body/description’],'Feature update') - Blue =
contains(outputs(‘Get_task_details’)?[‘body/description’],'Data privacy') - Purple =
contains(outputs(‘Get_task_details’)?[‘body/description’],'Major update') - Bronze =
contains(outputs(‘Get_task_details’)?[‘body/description’],'Retirement') - Lime =
contains(outputs(‘Get_task_details’)?[‘body/description’],'Updated message') - Cranberry =
contains(triggerOutputs()?['body/title'],'Microsoft 365 suite') - Orange =
contains(triggerOutputs()?['body/title'],'Office for the web') - Light green =
contains(triggerOutputs()?['body/title'],'Planner') - Dark green =
contains(triggerOutputs()?['body/title'],'SharePoint Online') - Teal =
contains(triggerOutputs()?['body/title'],'Exchange Online') - Light blue =
contains(triggerOutputs()?['body/title'],'OneDrive for Business') - Dark blue =
contains(triggerOutputs()?['body/title'],'Yammer') - Lavender =
contains(triggerOutputs()?['body/title'],'Microsoft Teams') - Plum =
contains(triggerOutputs()?['body/title'],'Stream') - Dark grey =
contains(triggerOutputs()?['body/title'],'General announcement') - Peach =
contains(triggerOutputs()?['body/title'],'Microsoft 365 Apps')
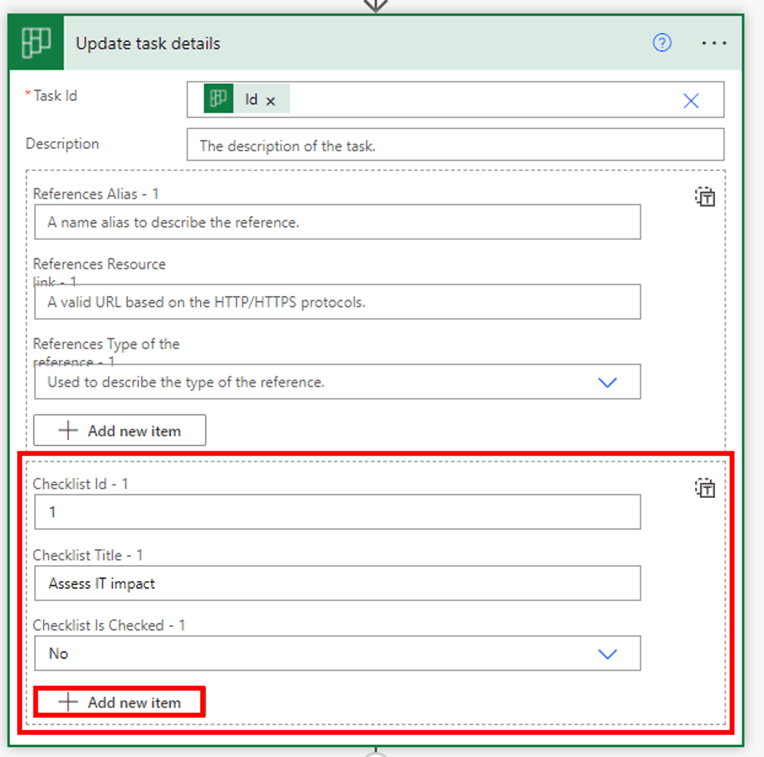
4. Update task details – add a checklist
This step will automatically add a checklist to each new task to allow you to track a standardized list of assessment activities. In this example I am adding a checklist with two items.

Action = Update task details
- ID = ID (from create a new task)
- Add first checklist item
- Checklist id – 1 = 1
- Checklist Title – 1 = Assess IT impact
- Checklist Is Checked – 1 = No
- Select +Add new Item to add the second item to the check list
- Checklist id – 2 = 2
- Checklist Title – 2 = Assess Business impact
- Checklist Is Checked – 2 = No
5. Assign a task to a user or group of users
There are two options for assigning a task to a user.
- Add in one or more email addresses (separated by semi-colons) in the flow. Top Tip: Remember to update the flow with a new email address if the person/ people triaging the tasks change.
- Assign the task to users who are a member of an Office 365 group, Team or security group. The benefit of this option is that the user list is managed outside of the flow.
5.1. Assign a task to a specific email address(es)
Important: if the assigned user is NOT a member of the Team then the user will only see tasks allocated to them. They will not be able to view the full Planner or any activity in the associated Team.
Action = Add assignees to a task
- Task id = ID
- Assigned User Ids = add in a list of email addresses separated by a semi-colon e.g. Adele@yourdomain.com;Alex@yourdomain.com

5.1. Assign a task to all members of a group or Team
Alternatively if you have multiple users triaging the tasks then you can assign the task to a group of users. This could be an Office 365 group, a Team or a security group. The benefit of this is you don’t need to update the flow if the people triaging the tasks change.
Top Tip: I recommend adding all users that triage the change to the Team hosting the Planner. This way you can assign the Planner task to all members of the Team. All users will have full visibility of the Planner plus you can use the Team to collaborate and communicate about Microsoft 365 changes.
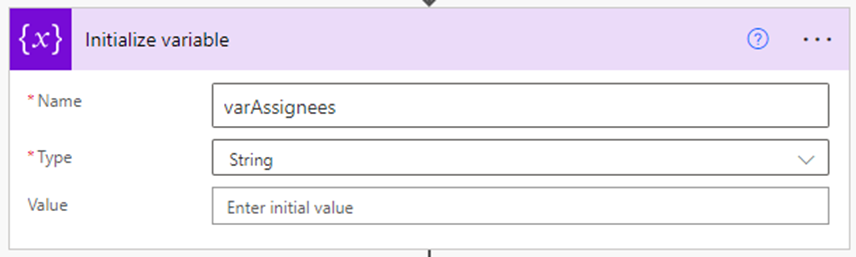
a Create string variable to hold the list of Team members
Action = Initialize variable
- Name= Assignees
- Type = String
- Value = leave blank
b List all members from the Group
Action = List group members
- Group id = Team where the Planner is located

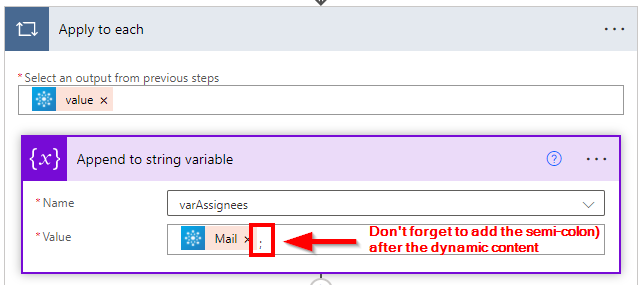
c Create a string of the Team members email addresses
Action = Append to string variable
- Name = varAssignees
- Value = Mail followed by a semi-colon. Important: remember to add the semi-colon.

d Add variable as the assignee to the task
This will add all the Team members as an assignee to the task by adding the variable that contains a semi-colon separated list of email addresses.
Action = Add assignees to a task
- Task id = ID
- Assigned User Ids = varAssignees

6. Post notification of new task in Team channel
I have demonstrated two options on how to communicate the new messages.
- The first is to use an Adaptive card to post a summary of the change in the Team hosting the Planner so can include a link to the Planner task.
- The second is to send a message to a wider group of people who are not triaging the task so do not have access to the Planner. in this scenario I include more information of the change and do not include a link to the task.
a. Post Adaptive card to Team channel with a link to the task
Add Post adaptive card in a chat or channel Microsoft Teams operation
- Post as = Flow Bot
- Post in = Channel
- Team D channel in Team you want the message posted
- Adaptive card body =add in the JSON for the card template

Top Tip: Copy the JSON below into the adaptive card to reproduce the example shown below. Alternatively use the Adaptive card designer Designer | Adaptive Cards to design you own card.
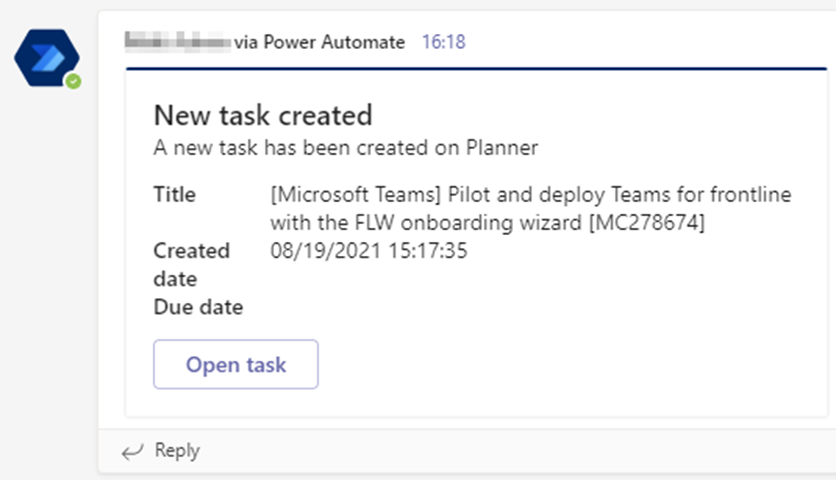
Example JSON
{"type": "AdaptiveCard",
"body": [
{
"type": "TextBlock",
"text": "New task created",
"spacing": "Medium",
"size": "Large",
"weight": "Bolder"
},
{
"type": "TextBlock",
"text": "A new task has been created on Planner",
"size": "Medium",
"spacing": "None"
},
{
"type": "FactSet",
"facts": [
{
"title": "Title",
"value": "@{triggerOutputs()?['body/title']}"
},
{
"title": "Created date",
"value": "@{triggerOutputs()?['body/createdDateTime']}"
},
{
"title": "Due date",
"value": "@{triggerOutputs()?['body/dueDateTime']}"
}
]
}
],
"actions": [
{
"type": "Action.OpenUrl",
"title": "Open task",
"url": "https://tasks.office.com/M365x002361.onmicrosoft.com/Home/Task/@{triggerOutputs()?['body/id']}",
"style": "positive"
}
],
"version": "1.2",
"$schema": "http://adaptivecards.io/schemas/adaptive-card.json"
}
Important: In the above JSON replace <YOUR_DOMAIN_NAME_HERE> in the line "url": "https://tasks.office.com/<YOUR_DOMAIN_NAME_HERE>/Home/Task/@{triggerOutputs()?['body/id']}", with your domain name so the URL links to your Planner.
b. Send Task summary to a wider group of users
Top Tip: This option allows you to send a details of the new message center change to users who do not have access to the Planner or Team.
Action = post message in chat or channel
- Post in = Channel
- Teams = select the additional Team to notify
- Message – include dynamic content Title and Description in the message as the users will not have access to view the Task in Planner.

6. Apply different actions depending on the type of change
If you have different users triaging the changes or different processes for managing some changes then use Conditions which are effectively an if then else option. this allows you to have different actions for you different processes.
Top Tip: Labels can be used as Condition actions e,g, if Green label = true. In addition you can also have multiple condition statements for example if the Pink label (Teams) is true OR if the title contains ‘SharePoint’ then apply run the Yes actions else run the No actions.
In this example I show two examples
- A simple condition based on one statement. In this example is the task as a pink label
- The second example show a condition with multiple statements defined as OR statements. If the task has a pink label OR the title contains the words SharePoint.
Add a Condition control operation
Value = Add label (make sure you select the dynamic content from the update a task action)
- Is equal to
- Value 2 = Expression true (must be lower case)

Add a second row making sure you change the setting to an OR so that is either option is true then the Yes path is followed. If neither are true then the No path is followed.

7. Move task to another bucket
If you want to have different buckets for different types of task then use Condition step to move a task to another bucket based on the outcome. If task has a Pink label move to bucket Teams etc.
Important: Power Automate uses the bucket id and not the bucket display name. Create this separate instant flow to get all your bucket ids for your Planner.
a. Create flow to get you bucket ids

The results will show detail all the buckets with the bucket display names called “name” and bucket id called “id”.
Copy out the relevant Bucket id to use in the update a task action in your flow.

b. Move task to a different bucket
Action = Update task V2 (Preview)
Task id = Id of task created
Bucket id = the id of the bucket

8 Create new task in a separate Planner board (not recommended)
If you have multiple teams who need to assess the changes then you may want to copy some tasks to different planner boards. For example a task with a Teams label copy to the Teams Planner and tasks with an Exchange label to the Exchange Planner board etc. However I do not recommend creating separate Planner boards because any updates to the changes are not copied across due to limitations of Power Automate.
When a Message Center change is updated the sync process will update the original task rather than creating a new task.
This is where the issue arises. Power Automate does not have a trigger for ‘when a task is updated’ meaning that there is no way to update the tasks in the new planner using Power Automate when a update occurs. As a result, the tasks quickly become out of date and therefore an unreliable source of information.
Managing Microsoft 365 evergreen change: Conclusion
We all know it is important to keep on top of the constant flow of Microsoft 365 changes, but keeping track of the evergreen changes across the multiple different Microsoft 365 services can be a challenging.
I walked through three ways for managing Microsoft 365 evergreen change:
- Basic: just view the changes in the message center.
- Better: sync the changes to a Planner board to provide a simple assessment process.
- Best: use Power Automate to automate and customise the process to meet your business needs.
This blog demonstrates the ‘art of the possible’ and can easily be adapted to meet your specific needs. Please contact me to find out more.
For more great blogs, click here
About the Author:
Nikki Chapple is a Principal Cloud Architect as CloudWay and specialises in Microsoft 365 governance, compliance and adoption.
Nikki is a regular speaker and has presented at conferences such as South Coast Summit, Teams Day Online and M365 Chicago as well as user groups.
She has recently joined the organizing committee for Microsoft Teams Day Online and is also an advocate for women in technology.
Nikki has 30 years’ experience covering both IT and business roles and prides herself on delivering a holistic and risk based approach to digital transformations.
Nikki holds multiple certifications from Microsoft including the Certified Enterprise Administrator Expert and is also a TOGAF qualified Enterprise Architect and PROCSI qualified Organisational Change Manager.
Her motto is “Microsoft 365 governance and compliance is not a project it is a lifestyle. It needs to be embedded into the culture of the organization”.
Reference:
Chapple, N. (2021). How to manage Microsoft 365 evergreen change using Power Automate. Available at: https://nikkichapple.com/how-to-manage-microsoft-365-change-using-power-automate/ [Accessed: 14th Feb 2022].