In this #PowerShot, I will demo how to configure a setup that will help you secure your Power Automate Cloud Flows that use the “When an HTTP Request is Received” trigger.
A newly released feature, now allows you to select “Who can trigger the flow” for the When an HTTP Request is Received trigger as shown in the screenshot below:
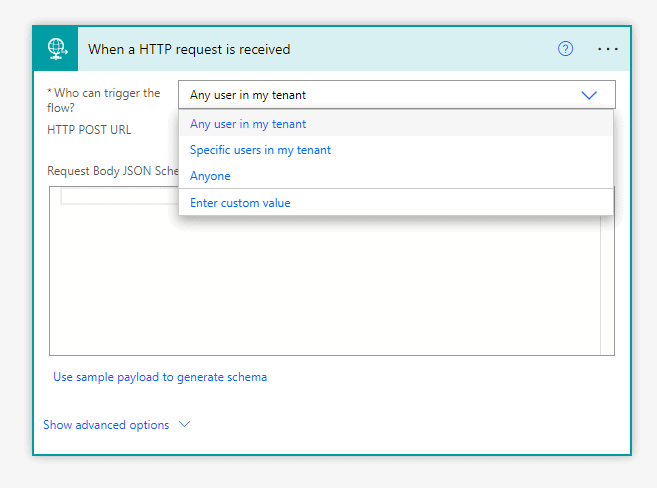
In this tutorial, we will take a look at the “Any user in my tenant option”. Note: the “Anyone” option is the one which was the default configuration before this newly released feature.
Let’s Get Started
Cloud Flows in Power Automate with the When an HTTP Request is Received trigger are widely used for various applications and use cases where the Flow acts as a service that gets invoked when a request is made, performs all the actions as per the logic and provides the response. Before the Who can trigger the flow option was released, using security keys, Azure key vault, tokens etc. were commonly used to authenticate the requests. Let’s take a look at how we can configure a secure Power Automate Cloud Flow that uses the When an HTTP Request is Received trigger with the Any user in my tenant as an option.
Azure Application Registration
We will first create an Application Registration in the Microsoft Entra ID (previously Azure Active Directory) for setting up the OAuth authentication.
Step 1: Navigate to portal.azure.com and click on the hamburger icon to access the nav bar and click on Microsoft Entra ID. If you do not have access, you will have to request your IT admin for support in creating the app registration.
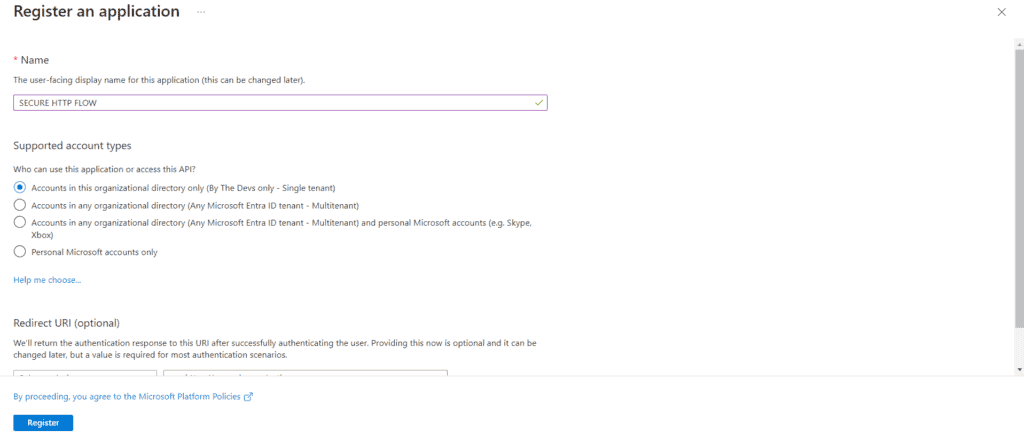
Step 2: On the Microsoft Entra ID page, click on App Registrations and then click on + New Registration. Provide a name for the app registration and select the supported account types as required and click on Register.
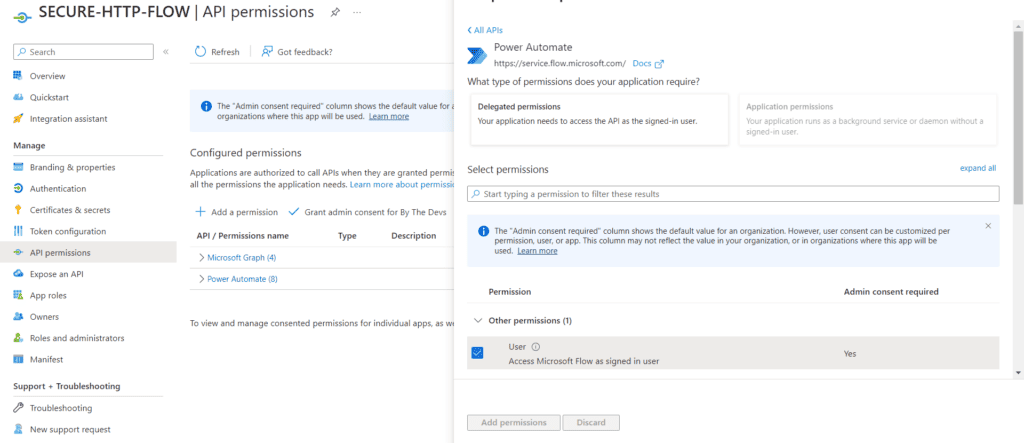
Step 3: Once the app registration is created, click on API Permissions -> +Add a permission -> Select Power Automate and then check the “User” check box and click on Add permission as shown in the screenshot below:
Step 4: Once the api permissions are added, generate a secret and save the details as those will be required while setting up the HTTP action in the flow.
Flow 1
In this section, we will create a flow that will act as the service and will be called using an HTTP action from another flow. We will create a simple flow that will accept a user name as an input and provide a success message as a response.
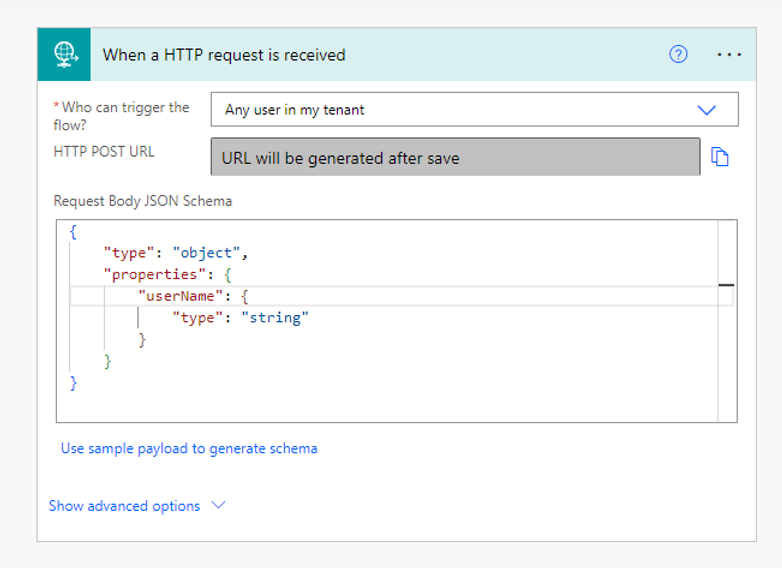
Step 1: Flow trigger: When an HTTP request is received: Select the When an HTTP request is received trigger and select the Anyone in my tenant option for Who can run this flow. For the request body JSON schema, we will configure the schema to accept an email address. You can use the below code for the JSON schema and once the items in the action are configured, the trigger should look like the screenshot below.
JSON Schema:
{
    "type": "object",
    "properties": {
        "userName": {
            "type": "string"
        }
     }
  }
Step 2: Action – Compose: to compose a text that will be returned as a response.

Step 3: Action – Response: to return the response.
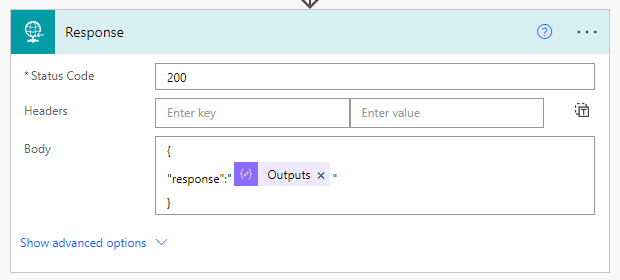
Step 4: Save the flow.
Once the flow is saved, the HTTP POST URL is generated. Copy this URL so it can be used in the next flow.
Flow 2
In this section, we will create a flow that will call the Flow 1 using an HTTP action and the Invoke an HTTP Request using Azure AD action. We will create a simple flow that will be manually triggered, call the Flow 1 using the two actions and display the response.
Step 1: Flow trigger: Manual – to manually trigger the flow.
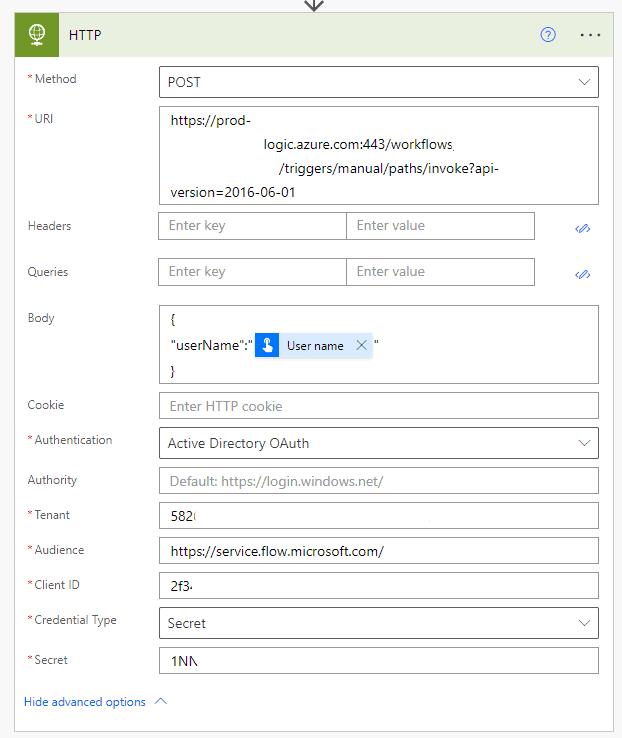
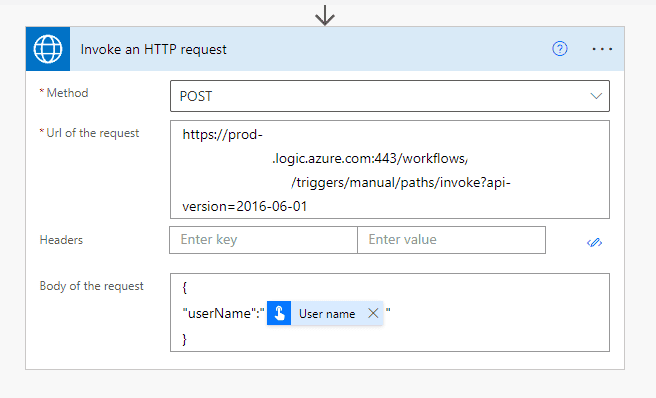
Step 2A: Action – Send an HTTP Request:
- Provide the HTTP POST URL copied when the Flow 1 was saved as the URI.
- For this example, I have provided the below body:
Request Body:
{
"userName":"@{triggerOutputs()['headers']['x-ms-user-name-encoded']}"
}- Select the Authentication type as Active Directory OAuth and provide the details from your app registration as shown in the screenshot below.
- The Audience is: https://service.flow.microsoft.com/
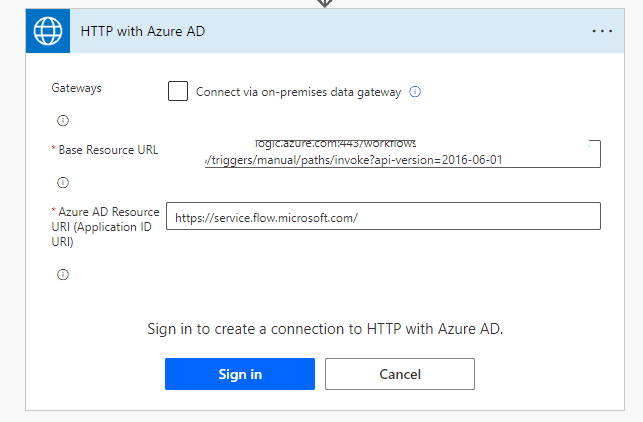
Step 2B: Action – Invoke an HTTP Request using Azure AD:
- I am adding this as a parallel branch in order to run both the actions parallelly.
- For the Base Resource URL, provide the HTTP POST URL and append “&sp=%2Ftriggers%2Fmanual%2Frun” at the end of the URL copied when the Flow 1 was saved.
- For the Azure AD Resource URI, provide the input as https://service.flow.microsoft.com/
- The authentication on the action looks like the screenshot below.
Once successfully authenticated,
- Provide the URI of the request as the HTTP POST URL copied when the Flow 1 was saved.
- For this example, I have provided the below body:
Request Body:
{
"userName":"@{triggerOutputs()['headers']['x-ms-user-name-encoded']}"
}
Once all the inputs are provided, the action looks like the screenshot below:
Step 3: Save the flow.
Setup in Action
In this post, we saw how to configure a setup for securing the When an HTTP Request is Received triggered flow with the Any user in my tenant option. Stay tuned for the Part 2 of this feature where we will learn how to configure the setup with the Specific users in my tenant option.
I hope you found this interesting and it helped you. Thank you for reading!
About the Author
I am a developer/ solutions architect with fair amount of experience working on technologies/ tools including but not limited to Dynamics 365, Power Apps, Power Automate, PowerBI, SharePoint, Azure Infrastructure Deployments, Robotic Process Automation (RPA) with UiPath & Win Automation, MS Bot Framework, DevOps and etc.
I am a Microsoft MVP for Business Applications and a Microsoft Certified Trainer 2020-2021. I am one of the User Group Leaders for the Power Apps and Power Automate User Group in Hyderbad region in India.
References