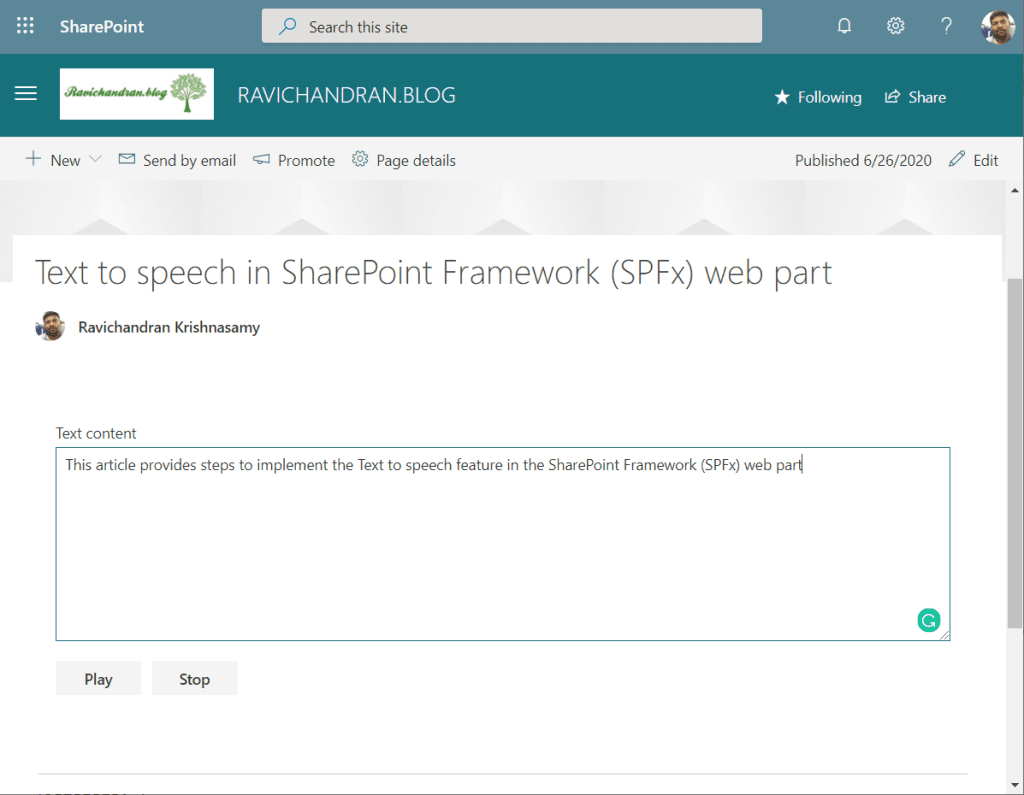
This article provides steps to implement the Text to speech feature in the SharePoint Framework (SPFx) web part
Create a new web part project
Open power shell and run following comment to create a new web part by running the Yeoman SharePoint Generator
yo @microsoft/sharepoint
When prompted:
Enter the webpart name as your solution name, and then select Enter.
Select Create a subfolder with solution name for where to place the files.
Select Y to allow the solution to be deployed to all sites immediately.
Select N on the question if solution contains unique permissions.
Select WebPart as the client-side component type to be created.
The next set of prompts ask for specific information about your web part:
Enter your web part name, and then select Enter.
Enter your web part description, and then select Enter.
Select React framework as the framework you would like to use, and then select Enter.
Start Visual Studio Code (or your favorite code editor) within the context of the newly created project folder.
cd .\web part name\
code .
Install the library and required dependencies
npm install speak-tts
Configure the custom properties
Create a new source code file under the src\webparts\<Webpart name>\components\ folder of the solution. Create the new file I<web part name>State.ts and use it to create a TypeScript Interface
export interface ISpfxTexttospeakState {textcontent : String;}
React Component
Update the tsx file under the components. First, add some import statements to import the types you defined earlier. Notice the import for I<web part name>Props and I<web part name>State. There are also some imports for the PnP components used to render the UI of the PnP React component and pnp sp imports.
import * as React from 'react';import styles from './SpfxTexttospeak.module.scss';import { ISpfxTexttospeakProps } from './ISpfxTexttospeakProps';import { ISpfxTexttospeakState } from './ISpfxTexttospeakState';import Speech from 'speak-tts'import { TextField, DefaultButton, Stack, IStackTokens } from 'office-ui-fabric-react/lib';

export default class SpfxTexttospeak extends React.Component<ISpfxTexttospeakProps, ISpfxTexttospeakState> {private speech: Speech;constructor(props: ISpfxTexttospeakProps, state: ISpfxTexttospeakState) {super(props);this.state = {textcontent: ''}; this.speech = new Speech();this.speech.init({volume: 1,lang: 'en-GB',rate: 1,pitch: 1,'voice': 'Google UK English Male',//'splitSentences': false,listeners: {onvoiceschanged: voices => {console.log("Voices changed", voices);}}}).then(data => {console.log("Speech is ready", data);}).catch(e => {console.log("An error occured while initializing : ", e);});}
Replace this render function with the following code.
public render(): React.ReactElement<ISpfxTexttospeakProps> {return (<div className={styles.spfxTexttospeak}><TextField rows={10} label="Text content" multiline autoAdjustHeight onChange={(e, newval) => this.setState({ textcontent: newval })} /><br /><Stack horizontal tokens={sectionStackTokens}><DefaultButtontext={'Play'}allowDisabledFocus onClick={this.onclickPlay} /><DefaultButtontext={'Stop'}allowDisabledFocus onClick={this.onclickStop} /></Stack></div>);}
Add below functions are inside the react component class
private onclickStop = (): void => {this.speech.cancel();}; private onclickPlay = (): void => {this.speech.speak({text: this.state.textcontent,queue: false,listeners: {onstart: () => {console.log("Start utterance");},onend: () => {console.log("End utterance");},onresume: () => {console.log("Resume utterance"); },onboundary: event => {console.log(event.name +" boundary reached after " +event.elapsedTime +" milliseconds.");}}}).then(data => {console.log("Success !", data);}).catch(e => {console.error("An error occurred :", e);});}
Deploy the solution
You’re now ready to build, bundle, package, and deploy the solution.
Run the gulp commands to verify that the solution builds correctly.
gulp build
Use the following command to bundle and package the solution.
gulp bundle --ship
gulp package-solution --ship
Browse to the app catalog of your target tenant and upload the solution package. You can find the solution package under the sharepoint/solution folder of your solution. It is the .sppkg file. After you upload the solution package in the app catalog. you can find and the web part anywhere across the tenant.Text to speech in SharePoint Framework (SPFx) web partgithub.com
Sharing is caring!
About the Author:
Ravichandran Krishnasamy is a SharePoint Developer.
Reference:
Krishnasamy, R. (2020). Text to speech in SharePoint Framework (SPFx) web part. Available at: https://ravichandran.blog/2020/06/25/text-to-speech-in-sharepoint-framework-spfx-web-part/ [Accessed: 19th November 2020].