In the last couple of months, I have fallen in love with Blazor. I can almost shout out: “imma firin mah Blazor!”

Blazor makes it possible to produce interactive web UIs using C# instead of JavaScript:
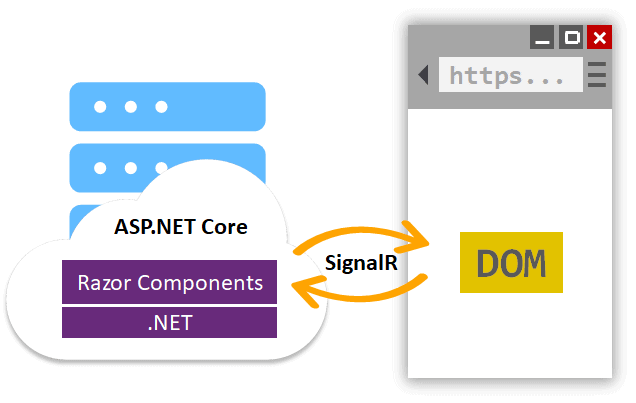
Blazor is a web framework based on Asp.Net core:
Blazor apps are composed of reusable web UI components implemented using C#, HTML, and CSS
In the past, I have already shown how to deploy a Blazor app as a container using the Azure IoT Edge deployment mechanism. This makes it possible to deploy and run a Blazor app on the Edge. There is no interaction with the Azure IoT Edge routing mechanism, though.
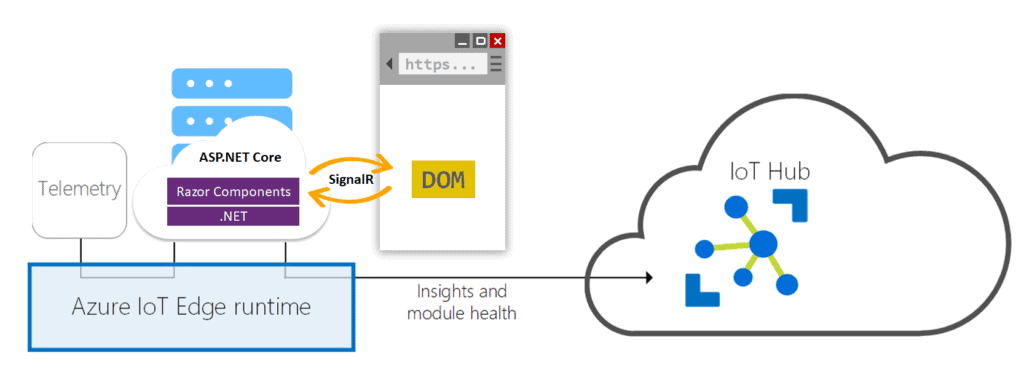
Wouldn’t it be nice if a Blazor app could actually receive IoT Edge messages or even could send IoT Edge messages to the cloud using that same routing mechanism?
This is what we want:
tldr; yes, this can be done.
Let’s see how this you can pull this off too.
If we look at the diagram above, we see that the communication between the backend and frontend (the logic running in the browser) is based on SignalR. SignalR is a clever superset of WebSockets. So, this communication could make it possible to send information from backend to frontend without user interaction.
This means we potentially could send incoming telemetry to the frontend and represent it in line charts, gauges, etc. I have shown how to do this with a NodeJS module in the past, that example was based on SocketIO.
But I want to do the same and more using C#.
Basic Blazor template app
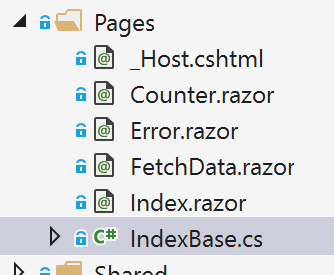
I started with the basic Blazor (server-side) app which can be generated using Visual Studio 2019 with recent updates (Blazor server is part of ASP.Net Core 3).
This template has a folder named ‘Data’ and it contains a service named Weather Forcast service. The data from this service is pulled from a webpage named ‘FetchData.razor’. As you can see, there is no knowledge about SignalR or Websockets needed. It just works.
Note: The code I demonstrate is also available on GitHub as a complete project.
The backend service
I created this IoTEdgeService which wraps IoT Edge access and has a ‘SendMessage’ method for putting a message on an IoT Edge routing output named ‘output1’. It also generates an event named ‘InputMessageReceived’ when a message arrives from the IoT Edge routing input ‘input1’:
using System;
using System.Text;
using System.Threading.Tasks;

using Microsoft.Azure.Devices.Client;
using Microsoft.Azure.Devices.Client.Transport.Mqtt;
using Newtonsoft.Json;

namespace BlazorEdgeModule.Edge
{
    public class IoTEdgeService
    {
        private ModuleClient ioTHubModuleClient;

        private int counter = 0;

        public IoTEdgeService()
        {
            Console.WriteLine("Starting IoTEdgeService singleton");

            Task.Run(() => this.Init()).Wait();
        }

        private async Task Init()
        {
            MqttTransportSettings mqttSetting = new MqttTransportSettings(TransportType.Mqtt_Tcp_Only);
            ITransportSettings[] settings = { mqttSetting };

            Console.WriteLine("Create IoTEdgeService...");

            // Open a connection to the Edge runtime
            ioTHubModuleClient = await ModuleClient.CreateFromEnvironmentAsync(settings);

            Console.WriteLine("Open IoTEdgeService...");

            await ioTHubModuleClient.OpenAsync();

            Console.WriteLine("IoTEdgeService intialized.");

            await ioTHubModuleClient.SetInputMessageHandlerAsync("input1", PipeMessageInputOne, ioTHubModuleClient);

            Console.WriteLine("Input1 handler attached");
        }

        public event EventHandler<string> InputMessageReceived;

        private async Task OnInputMessageReceived(string messageString)
        {
            await Task.Run(() => { InputMessageReceived?.Invoke(this, messageString); });
        }

        private async Task<MessageResponse> PipeMessageInputOne(Message message, object userContext)
        {
            var moduleClient = userContext as ModuleClient;
            if (moduleClient == null)
            {
                throw new InvalidOperationException("UserContext doesn't contain " + "expected values");
            }

            byte[] messageBytes = message.GetBytes();
            string messageString = Encoding.UTF8.GetString(messageBytes);

            Console.WriteLine($"-> Received message: '{messageString}'");

            if (!string.IsNullOrEmpty(messageString))
            {
                await OnInputMessageReceived(messageString);
            }

            Console.WriteLine("Message handled");

            return MessageResponse.Completed;
        }

        public async Task SendMessage()
        {
            Console.WriteLine("Sending Message");

            counter++;

            var messageBody = new MessageBody
            {
                counter = counter,
                timeStamp = DateTime.UtcNow,
            };

            var json = JsonConvert.SerializeObject(messageBody);

            using (var message = new Message(Encoding.UTF8.GetBytes(json)))
            {
                await ioTHubModuleClient.SendEventAsync("output1", message);

                Console.WriteLine("Message sent");
            }
        }
    }

    public class MessageBody
    {
        public int counter { get; set; }

        public DateTime timeStamp { get; set; }
    }

    public class InputMessageEventArgs : EventArgs
    {
        public string MessageString { get; set; }
    }
}
The code actually is based on the logic coming from the IoT Edge C# module template. So we just need to create an IoTHubModuleClient for the routing connection and security.
The code is pretty much unchanged regarding the template.
Note: the message formats are for demonstration only.
To get this code running, we need an extra NuGet package to satisfy the missing references. So add this line to the blazor app csproj project file:
<PackageReference Include="Microsoft.Azure.Devices.Client" Version="1.*" />
We only have to register our service as a Singleton to make it injectable into razor pages. Check out the ‘ConfigureServices’ method in ‘startup.cs’ and add this line:
services.AddSingleton<IoTEdgeService>();
The first page which injects this class will connect our Blazor app to the IoT Edge routing. After that, all other pages will reuse this singleton instance.
The razor page
The service is made accessible for razor pages, let us focus now on the home page which runs client-side.
I took the existing ‘index.razor’ and made some small modifications. This is the new updated ‘index.razor’:
@page "/"

@inherits IndexBase

<h1>Hello, world!</h1>

Welcome to your new app.

<SurveyPrompt Title="How is Blazor on Edge working for you?" />

<button class="btn btn-primary" @onclick="Send">Send message</button>

message: @message
First, I added a button which makes it possible to send a message to ‘output1’. I execute a method called ‘Send’ in the code-behind code of this page.
Then, I added a message placeholder (a label) which will be filled with incoming message texts (one message at a time).
Finally, I added a ‘inherits’ reference to a code-behind source-code file name ‘Indexbase’:
Note: I prefer code-behind files because these make programming, debugging, and testing much easier.
The code-behind in ‘IndexBase.cs’ looks like this:
using System;
using System.Threading.Tasks;

using BlazorEdgeModule.Edge;
using Microsoft.AspNetCore.Components;

namespace BlazorClientModule.Pages
{
    public class IndexBase : ComponentBase, IDisposable
    {
        [Inject]
        public IoTEdgeService EdgeService { get; set; }

        public string message;

        protected override void OnInitialized()
        {
            this.EdgeService.InputMessageReceived += OnInputMessageReceived;
        }

        void IDisposable.Dispose()
        {
            this.EdgeService.InputMessageReceived -= OnInputMessageReceived;
        }

        private async void OnInputMessageReceived(object sender, string messageString)
        {
            message = messageString;

            await InvokeAsync(() => StateHasChanged());
        }

        public async Task Send()
        {
            await EdgeService.SendMessage();
        }
    }
}
Let’s dive a little bit more into this code, step by step.
The most important part is the injection of the service:

With this, the code-behind code (which runs in the browser) gets access to the service (which runs on the back-end server)!
Sending a message is pretty simple, check out the button-click. The triggered HTML button on-click event is connected with the C# ‘Send’ method. This method executes the ‘SendMessage’ on the IoTEdgeService:

And we register the ‘OnInputMessageReceived’ event handler when the page is loaded for the first and only time (OnInitialize) in the browser:
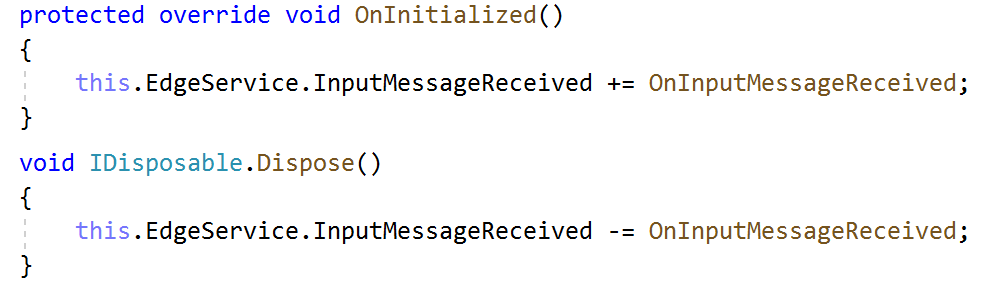
Note: We use the Dispose pattern to unregister the event handler.


In the code-behind, the private member ‘message’ is overwritten and the page ‘StateHasChanged’ method is fired. This way, the DOM of the browser page is updated and the message is shown without user activity.
Note: Check out the invocation of ‘StateHasChanged’. Special effort is put in place to prevent blocking threads.
It just works!
The most magical thing is that we do not have to think about the technical implications of the communication between the logic in the browser (the razor page code-behind) and logic on the backend (the service). We have no notion about Websockets. SignalR or even JavaScript!
See the code in action
Build the code, deploy the container to the container registry of your choice. Play with it.
Note: I have an already precompiled Linux container available here.
Check out the Container Create Options too. You need to deploy the container with the right port binding:
"bl": {
  "settings": {
    "image": "svelde/blazorclientmodule:20200502143131",
    "createOptions": "{\"HostConfig\":{\"PortBindings\":{\"443/tcp\":[{\"HostPort\":\"6443\"}],\"80/tcp\":[{\"HostPort\":\"6080\"}]}}}"
                        },
  "type": "docker",
  "version": "1.0",
  "status": "running",
  "restartPolicy": "always"
},
And you have to provide it the right routing lines:
"$edgeHub": {
  "properties.desired": {
    "routes": {
      "blToEcho": "FROM /messages/modules/bl/outputs/output1 INTO BrokeredEndpoint(\"/modules/echo/inputs/input1\")",
      "tempToBl": "FROM /messages/modules/tempSensor/* INTO BrokeredEndpoint(\"/modules/bl/inputs/input1\")"
    },
Note: we will be listening to incoming messages for the Microsoft simulated temperature sensor. Our messages will be sent to this ‘echo’ module:

Once deployed, check out the ‘iotedge list’ and the logging of the ‘bl’ module:
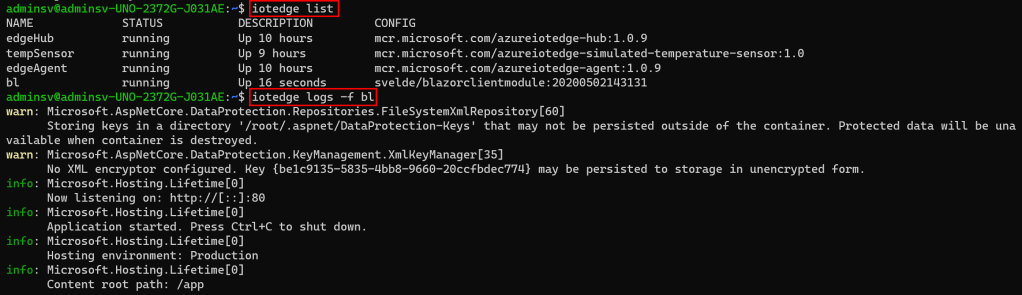
We see the ‘bl’ module is loaded and the module is waiting for calls on port 80 (inside the container). Due to the port binding, we will use port 6080 to access the homepage:
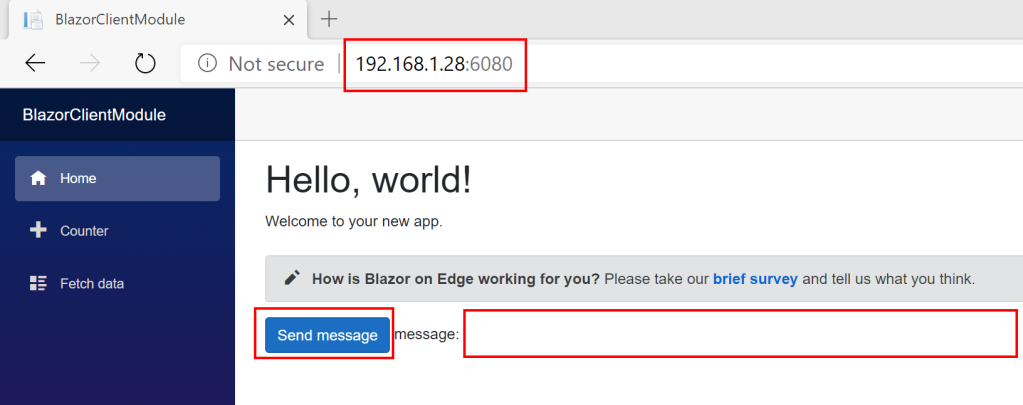
The razor on this page provides us a button and an empty message label.
Note: Did you notice a slight delay when loading this page for the first time? This is due to the construction of our IoTEdgeService as a singleton.
We can see the construction in the logging:

And after a short period (the Blazor app routings has to be registered by the edgeHub module), the first routed messages will arrive. See how a simulated temperature sensor message is received and logged.
The last incoming message is shown on the homepage, overwriting the previous message:

Note: this is not the same message as seen above. New messages arrive every ten seconds and all are shown, one by one.
So our Blazor app can receive messages. It’s up to you to build a beautiful UI with line charts or gauges.
The same message arrives at every browser having this page open:

Now, if I push the Send button, a predefined message is send to ‘output1’:

The message is picked up by the ‘echo’ module. This is how the log of the ‘echo’ module looks like, after receiving the message:
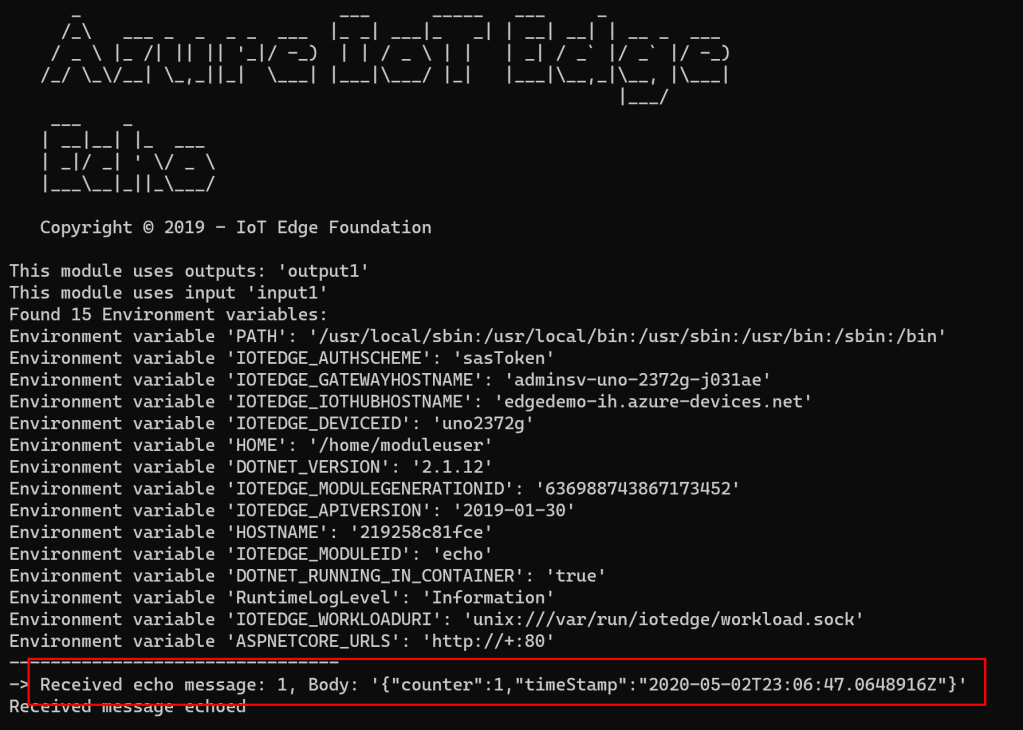
Yes, our Blazor app is capable of sending messages too!
Conclusion
Without any JavaScript or Websocket coding, we can both send and receive Azure IoT Edge routing messages.
This is the promise of Blazor and it makes us productive in building local dashboards on top of IoT Edge.
All code seen here is available on GitHub.
About the Author:
I’ve been presented with the 2017 – 2020 Microsoft Most Valuable Professional (MVP) Award for my Azure IoT community work.
I am involved with all aspects of the Azure IoT Platform and Azure in general. I like to implement IoT innovations in my daily work with partners, clients, and the community.
For me, it is important to share knowledge. And I am committed to this by writing blogs, articles for magazines and giving lots of presentations and workshops.
When offline, I like cutting down trees using Gränsfors Bruks axes, sailing, motorcycling or geocaching together with my wife and my sons.
Reference:
van de Velde, S. (2020). Attach Blazor to Azure IoT Edge Routing, Showing Live Message Feed. Available at: https://sandervandevelde.wordpress.com/2020/05/03/attach-blazor-to-azure-iot-edge-routing-showing-live-message-feed/ [Accessed: 20th May 2020].