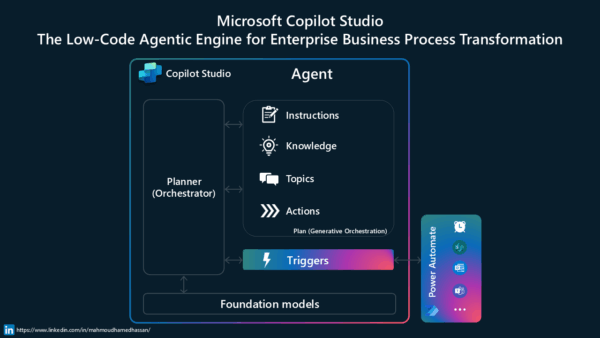
Microsoft has made significant strides in the development and evolution of chatbots – now known as copilots. The new Copilot Studio leverages the power of AI to create intelligent and intuitive conversational interfaces.
In a previous blog post I have demonstrated the use case of providing external data sources to Copilot and using the Generative Answers feature to automatically answer the user’s questions based on this data. You can read about it in this article: Enhance conversational experiences with Power Virtual Agents and Generative AI (PVA was the earlier name for copilots).
This time, I want to show how you can go even further with Generative AI. Instead of just searching for answers from a large body of text (like a knowledge base), copilots can learn to perform actions in connected systems, based on the user’s prompt. This elevates copilot from being merely a chat based search engine to what some might call an AI powered agent.
To understand how the new AI features simplify the task of building copilots that integrate with other apps, we need to go through a few central concepts in Copilot Studio:
- Topics vs. generative actions
- Copilot plugins
- Dynamic chaining
Let’s start by comparing the old vs. new way of building chatbots, before and after Generative AI.
Authoring topics
Currently when building copilots you need to design topics, as they define how conversation dialog plays out. Basically they are discrete conversation paths that when combined together allow users to have a conversation with a copilot that feels natural. In order to author topics, makers can create those from scratch or use Copilot in Microsoft Copilot Studio, and define which are the phrases that will trigger the topic and the actions that will be performed (send a message, ask a question, redirect conversation to another topic, etc.).
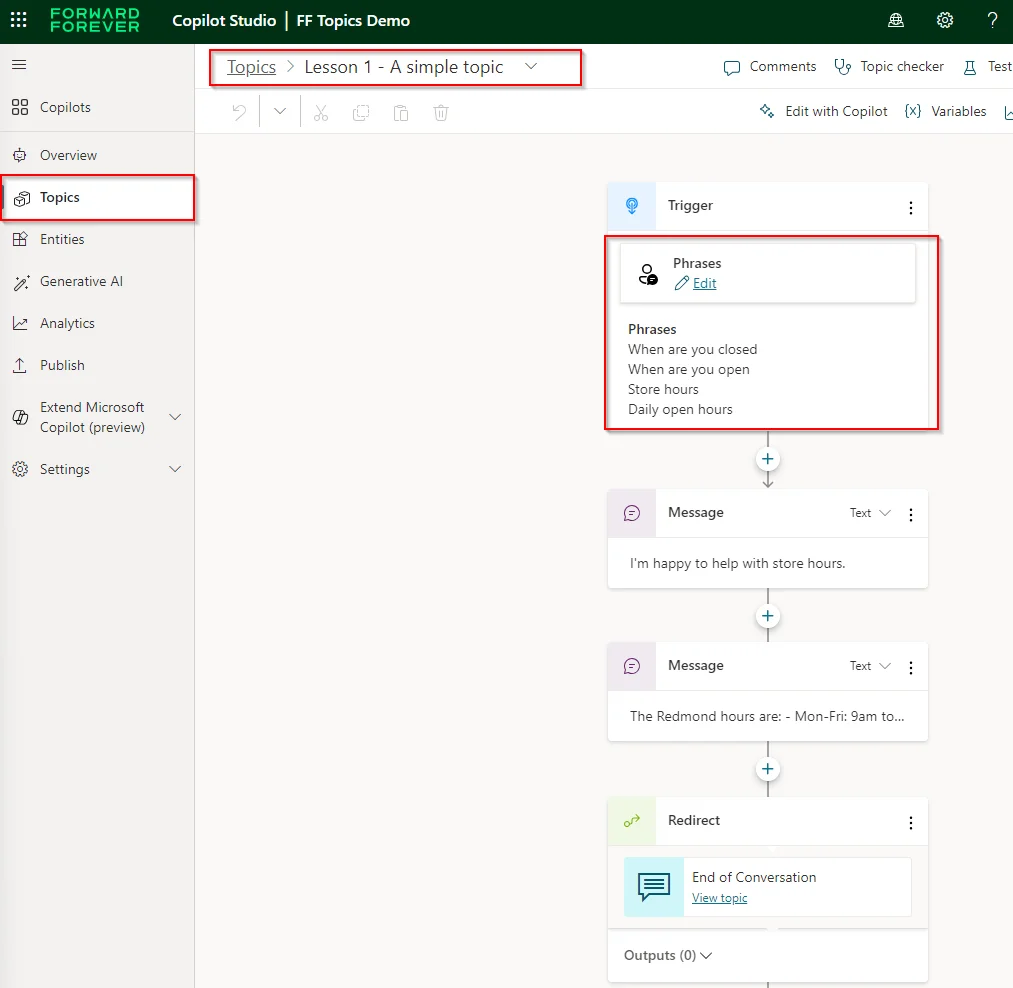
Topic authoring is probably the most important part to create a successful copilot, and makers should follow recommendations and best practices whenever it is possible.
Generative actions
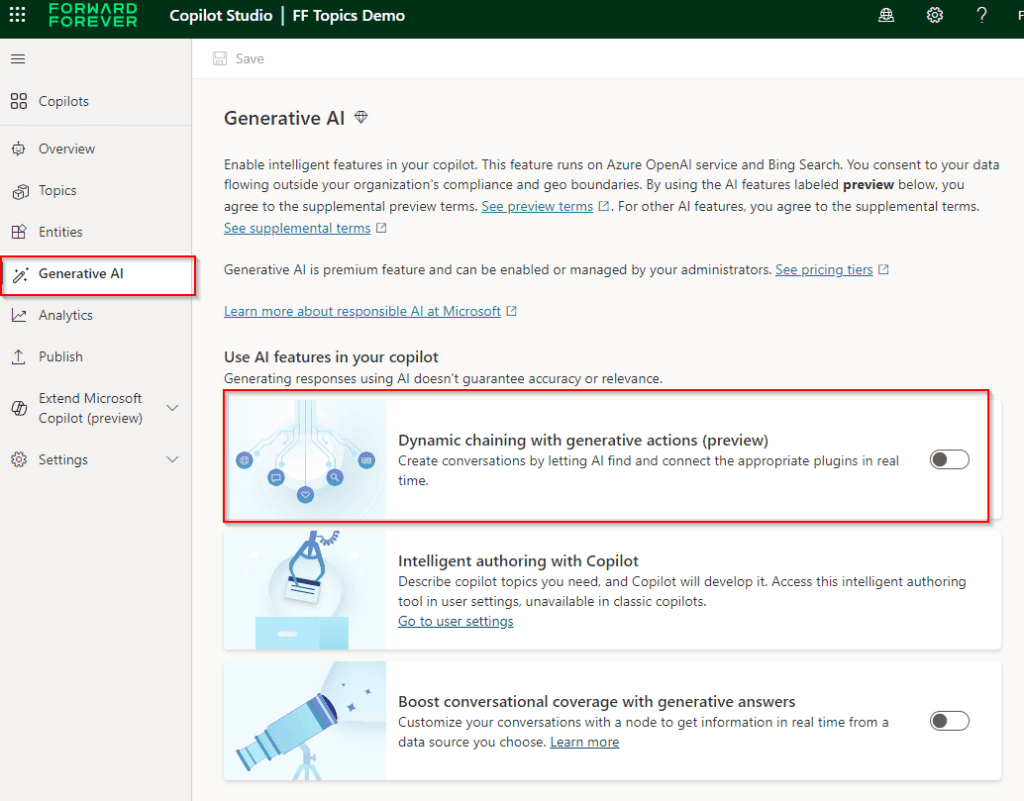
What if we can describe what a topic does, instead of writing trigger phrases, and let the system decide which topics fits best according to the conversation with the user? That is mainly what generative actions do! Although this feature is still in preview, it allows makers to replace topic triggering based on NLP (Natural Language Processing) by using GPT (Generative pre-trained transformer) to select a topic or a plugin action based on user’s query.
In order to use generative actions (preview), first of all we have enable them from the Generative AI section in Copilot Studio (you can select one of your existing copilots or create a new one).
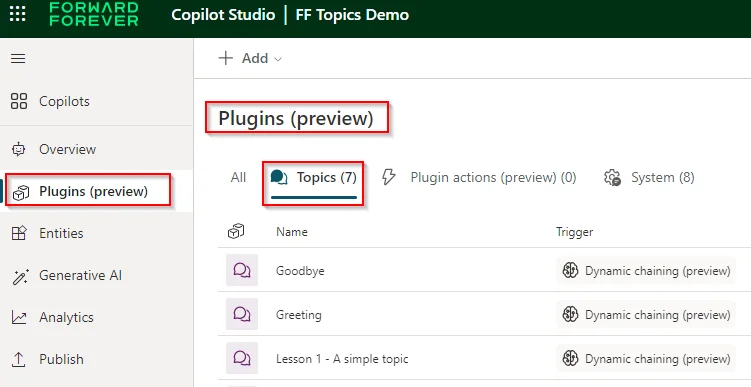
After saving changes, the first thing we will realize is that there is no Topics section anymore, and it has been replaced by a section called Plugins (preview). Moreover, if we open any of the topics, we will see that there are not any trigger phrases and now there is only a description about what the topic does.

In short, based on the description we enter in the trigger of the different topics, the system will decide which one matches best with the user’s intent and then will go through it. Thus, there is no need to enter different trigger phrases for each topic as we did previously, as we only need to provide a clear and natural description of what it does. There are other factors used to determine which topics and plugin actions are used: Name of the topic, inputs and outputs (and their associated names and descriptions).
Terminology: Although the Topics section has been renamed to Plugins (preview), you can find the Topics subsection within it.
Dynamic chaining
Thanks to generative actions, our copilot will trigger a topic based on a user’s query. And what about if the user’s intent refers to two different topics? Dynamic chaining comes to the rescue! With this new feature, a user’s query could trigger two or more topics sequentially (the order will be decided by the system), providing a much more detailed answer to the user. In the following screenshot we can see how it works:
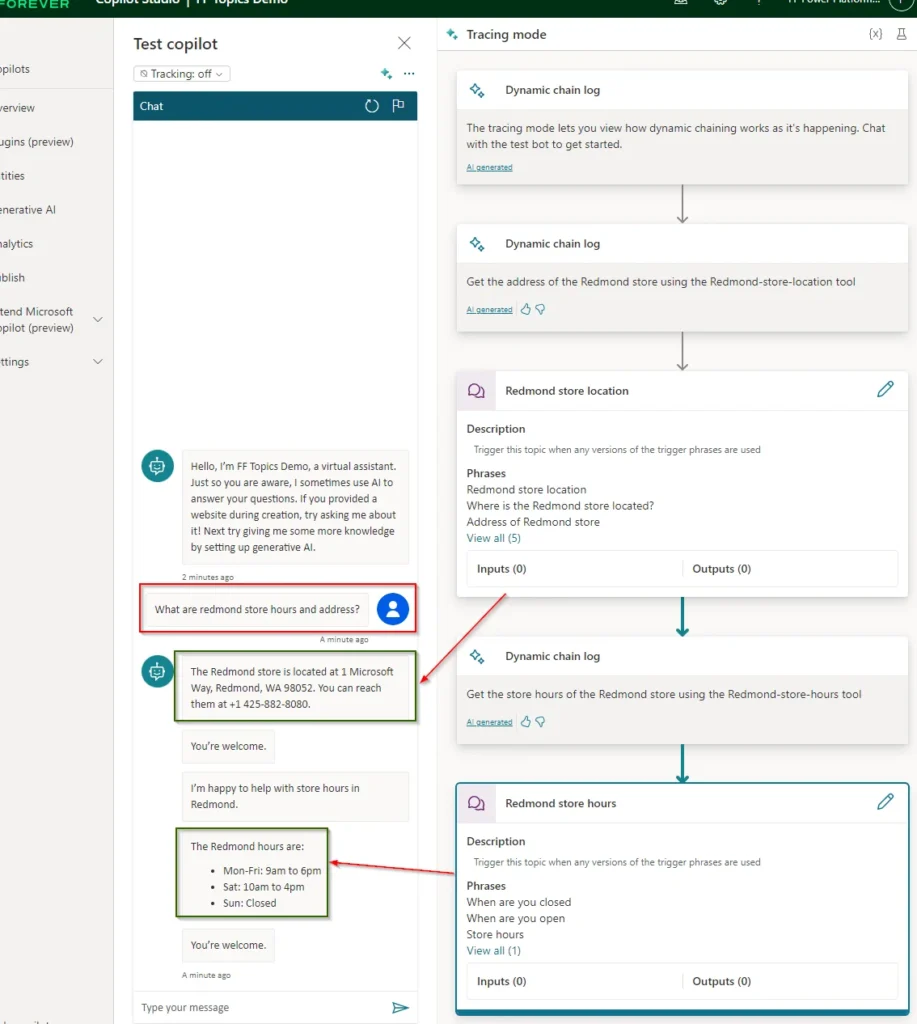
A user is asking about “Redmond store hours and where it is located”, which is managed by two different topics:
- Redmond store location: Topic that gives Redmond store complete address and phone number.
- Redmond store hours: Topic that provides information about Redmond store hours.
Although the user is asking for “store hours and address”, the copilot answers first with the address and after that with the store hours, but in the end, returning the information the user needed! Thanks to the new tracing mode in Copilot Studio, we can see which topics are triggered and in their order .
Plugin actions
What if we need to query other systems to provide a detailed answer to the user’s query? Could we create a reusable component that can leverage generative actions and dynamic chaining? The answer is of course: Plugin actions come into play! Plugin actions are actions based on prebuilt or custom connector actions and Power Automate cloud flows, that can generate a contextual response to a user’s query.
Let’s have a look at the different options that we have to create a plugin action.
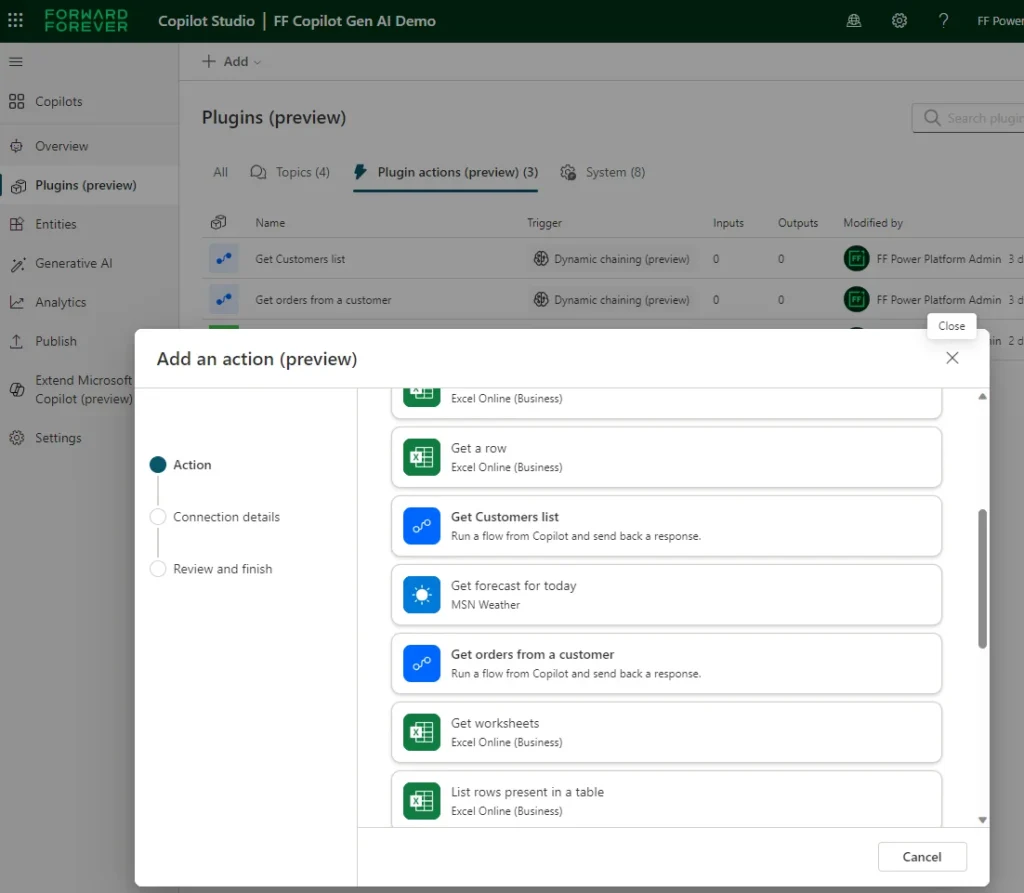
Prebuilt connector actions
There are hundreds of prebuilt connectors that we can use to perform specific actions: Send an email, post a message in Teams, delete a row in Excel, or get the weather forecast to name a few.
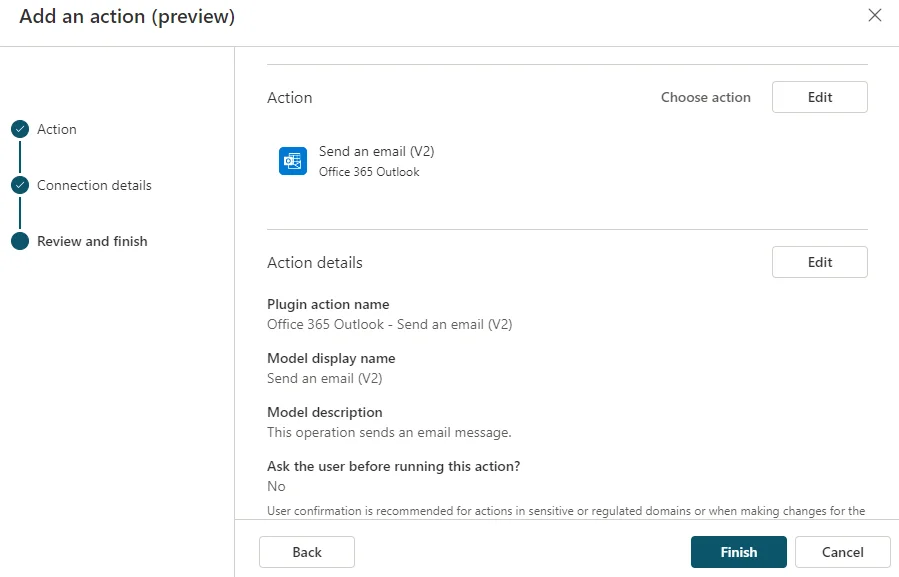
For example, we can create a plugin action to send an email. In this case we will need to provide the following information:
- Action details: Model name and descriptions are really important fields, as they are used by the system to select the right plugin when interacting with the user.
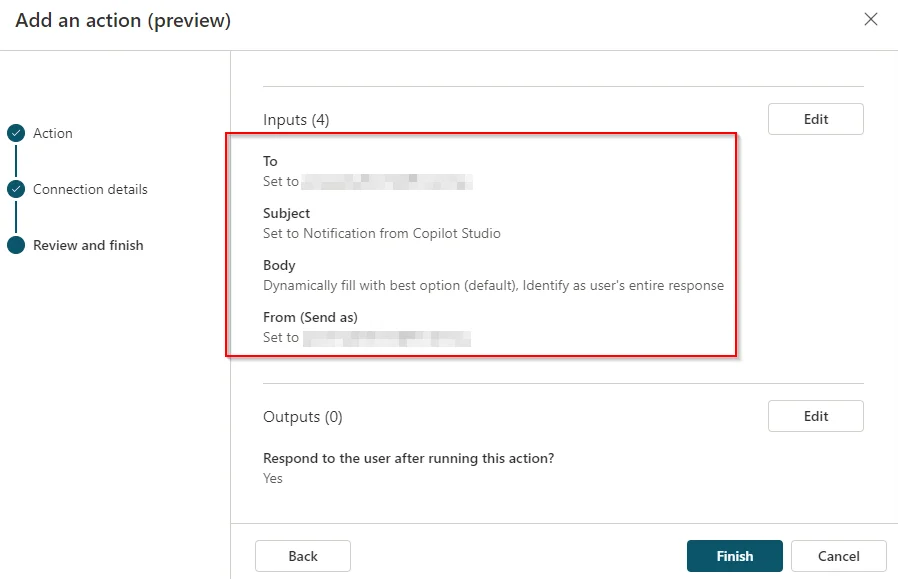
- Inputs and outputs: In order to send an email notification we need to specify To, Subject, and Body fields. How do we specify those values? That information could be detected by the system using context of the conversation, or can be entered manually. In the following screenshot, we specify that the To and Subject fields have static values, whereas the Body should be filled dynamically:
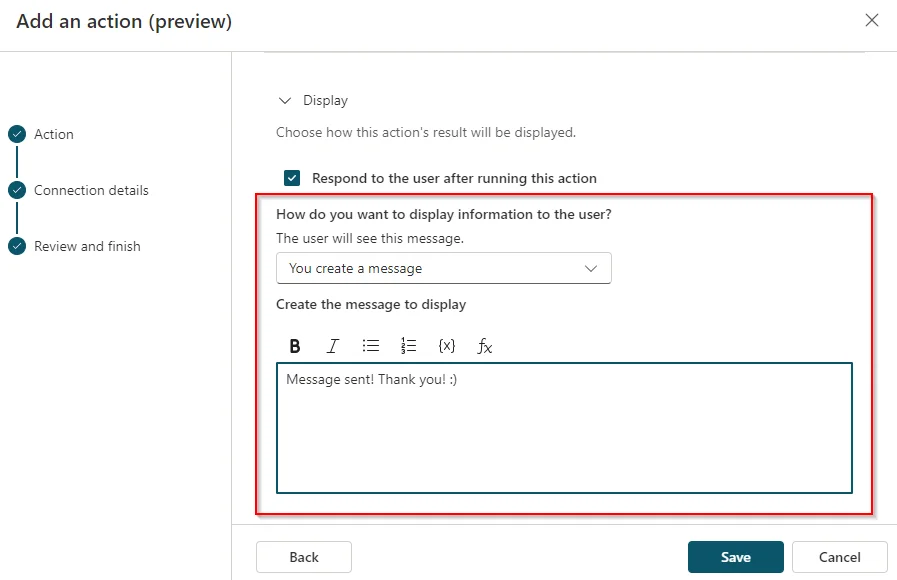
Finally, we can add some output parameters. In this case, we will send a message back to the user with a confirmation:
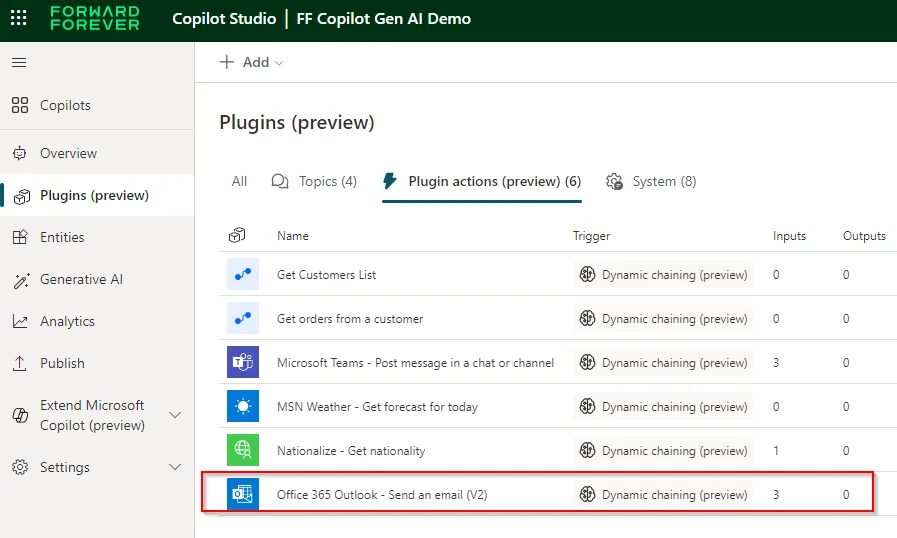
After that, the newly created plugin is listed in the plugins actions section:

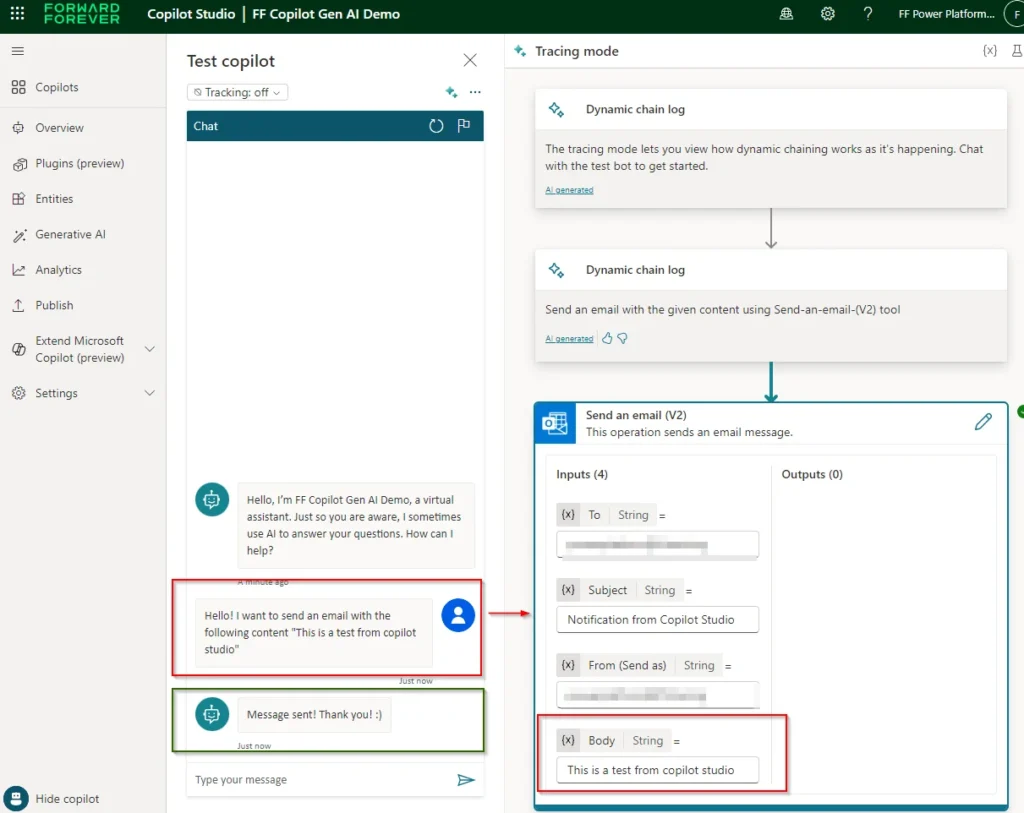
The user is asking to send an email with a specific content, and the copilot is able to understand that and use in in “Subject” field. Moreover, when the email is sent, the copilot shows a confirmation message as we configured in previous steps.
Custom connector actions
Instead of using a prebuilt connector, we can also create plugin actions based on custom connectors actions. For instance, we created a custom connector to query the Nationalize API, which predicts the nationality of a name. In order to create the plugin action, we will follow same steps we did before, but we will select a custom connector action instead of a prebuilt one.
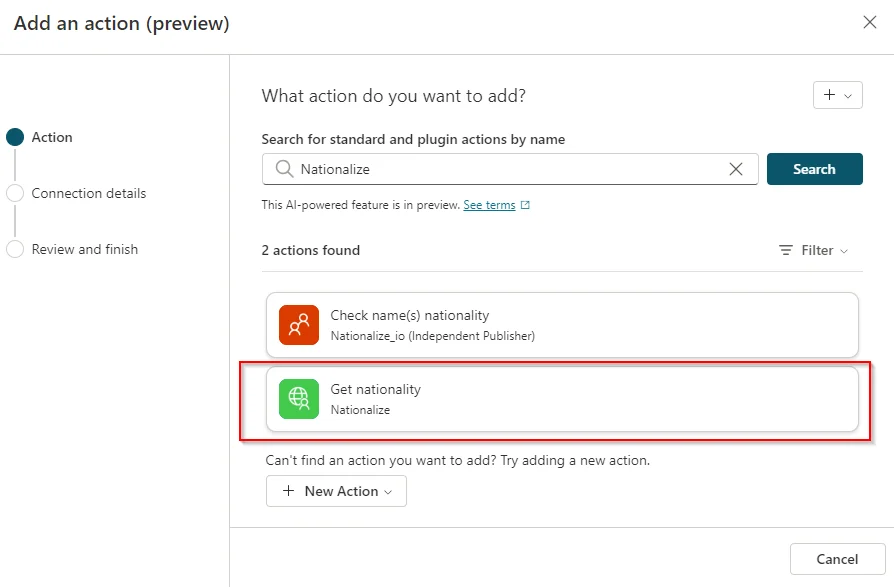
We also need to define model display name and description, as well as input and output parameters. Once we entered information into those fields and the plugin is saved, when can test it:
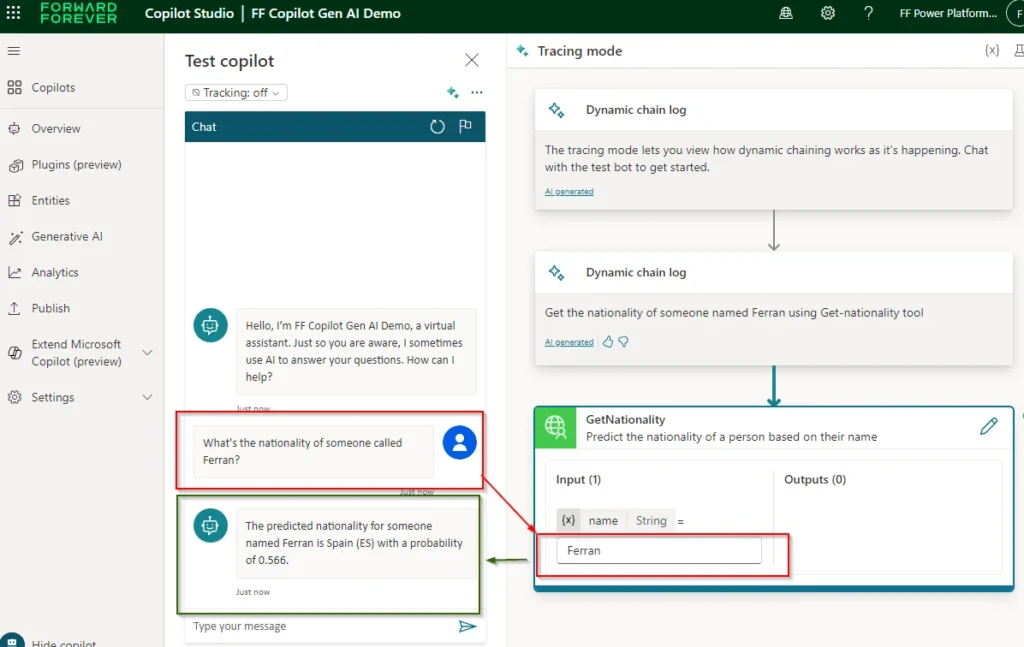
An image is worth than a thousand words: The user is asking for the nationality of someone called “Ferran”, and the copilot is able to understand that, so it calls the plugin action and use “Ferran” as a parameter for the custom connector action. The answer is dynamically generated and posted into the chat in a few seconds. Amazing, right?
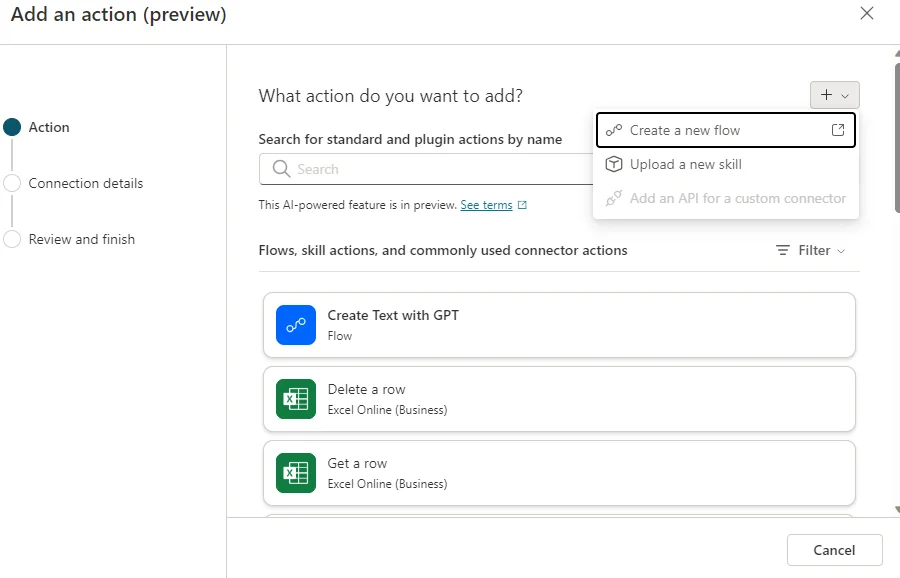
Power Automate cloud flow actions
Last, but not least, we can also create plugin actions from a Power Automate cloud flow:
The Power Automate designer will open, where we will see that that the trigger is called “Run flow from Copilot” and the last action is “Respond to Copilot”. In this case, we created a workflow to get information about customers (names and Id’s) using the Northwind API.
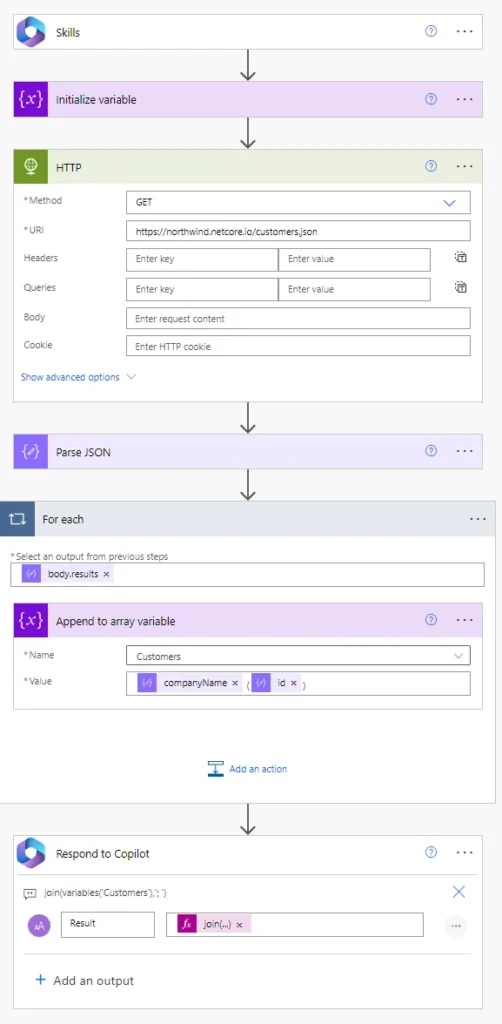
For readability purposes we are using the old designer, where the trigger has been renamed to “Skills” instead of “Run flow from Copilot”.
Once we create the workflow, we have to create the plugin based on it, and as we did in previous cases, we will need to inform about model name, description, input and output parameters:
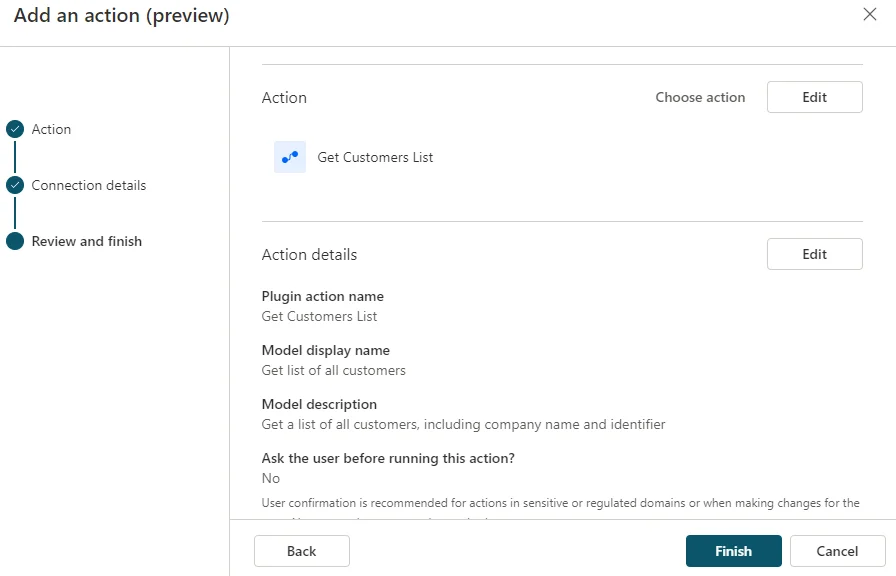
When the plugin action is saved, we are ready to test it:
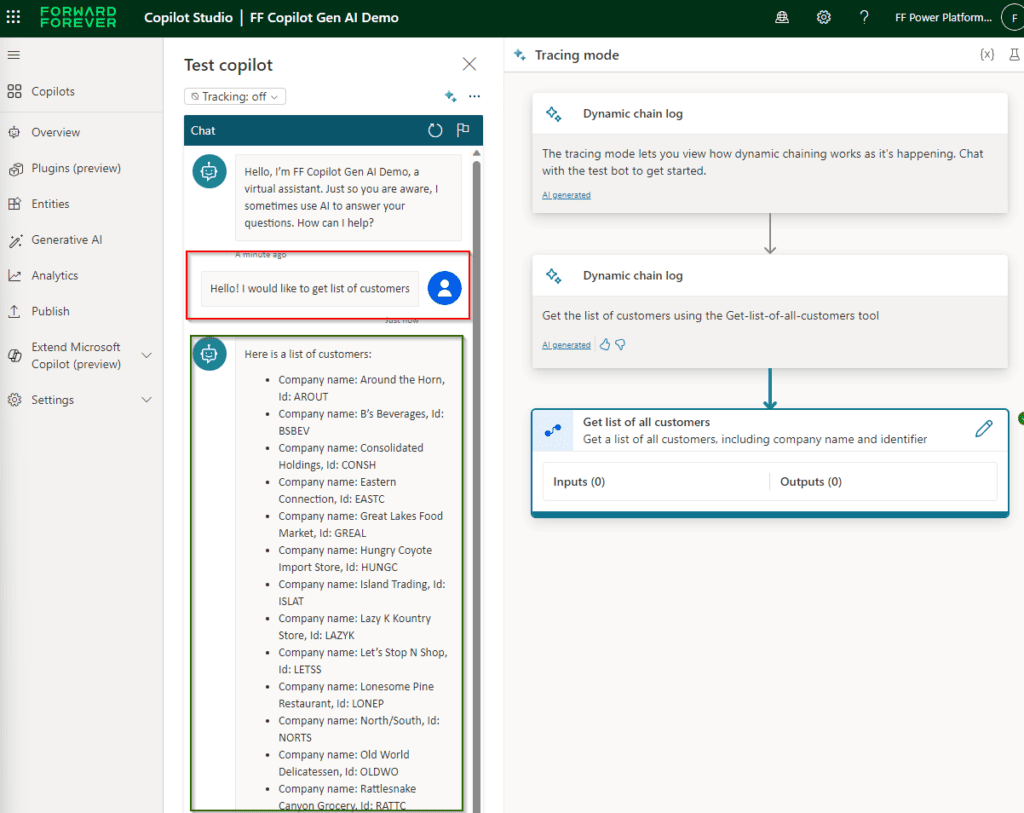
We triggered the plugin action to get the list of customers, which at the same time, triggered a Power Automate workflow to manage the HTTP request to the Northwind API and return the result to the copilot. The copilot does a great job parsing the information and displaying it in a readable format for the user, as Power Automate is returning that information in a CSV file format.
Dynamic chaining and plugin actions
As we mentioned previously, thanks to dynamic chaining, the copilot is able to provide and answer based on two or more topics. That works exactly the same with plugin actions: If a user’s intent matches more than one plugin action, those can be combined using dynamic chaining. Let’s see an example in the following screenshot:
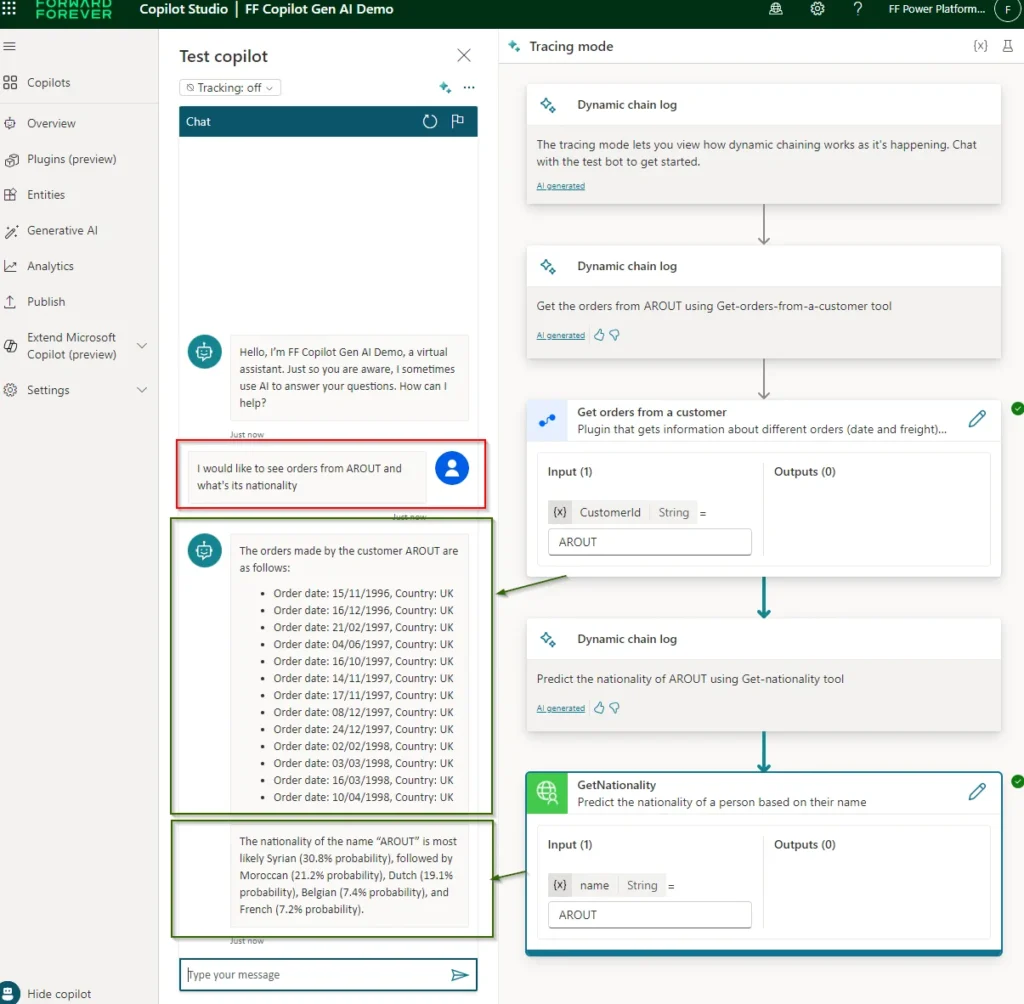
And those are the steps followed by the copilot:
- User asks to get orders from a customer called AROUT (it is the customer identifier).
- A plugin action called “Get orders from a customer” is triggered. This plugin action is based on a Power Automate cloud flow (see the icon next to it). The list of orders is returned to the copilot, which parses the results and shows a bulleted list.
- The copilot also detected that user asked for the nationality (or main location) of the company (we already know that the API behind the plugin is about real people names and company names, but it is used for sample purposes).
- Therefore, another plugin action is triggered: Get nationality, which is based on a custom connector action (see icon next to it).
- The result is parsed by the copilot and returned to the user.
After that, we could also use the plugin action to send that content by email.
Summary
Dynamic chaining and generative actions are exciting new features that will facilitate how makers design and implement copilots. In any case, those users will still need to manually author business-critical topics to ensure the best performance of the copilot. We definitely recommend to read the Copilot Studio Implementation Guide by Microsoft with many useful tips and best practices around using AI capabilities and topic structure among others.
About the Author
Ferran is a Computer Engineer with more than 20 years experience working on Microsoft’s products and services as a consultant, architect and developer. Currently he is focused on Microsoft 365 and Power Platform architecture, development and training projects.
Microsoft Certified Trainer since 2009, he has provided training to different kind of companies, dealing with diverse topics like user adoption, administration and development.
He has been awarded with the Business Applications MVP since 2022, being an active member of the Power Platform community, organizing and speaking at different events and writing some articles as well.
References
Chopo, F., (2023), ‘Build intelligent agents in Copilot Studio via generative actions, plugins and dynamic chaining’, available at: https://forwardforever.com/build-intelligent-agents-in-copilot-studio-via-generative-actions-plugins-and-dynamic-chaining/, [accessed 26th March 2024]