Hello;
Today we’re going to be starting a series that will lead us into PowerApps. This is part one and it’s walks through creating a custom workflow activity, then inserting into a custom action in a v9 environment.
The business requirement for this post is to have an action that is able to activate/deactivate a process.
Custom Workflow Activity
Microsoft provides a very extensively list of out of the box actions which gets updated frequently. It’s worth checking out this documentation from time to time to catch the latest and greatest https://msdn.microsoft.com/en-us/library/mt607829.aspx. Unfortunately there isn’t an action to activate/deactivate a process; this has to be handled through a custom workflow activity. The following code below is what’s required.
    public class SetProcessState : CodeActivity

    {

        /// <summary>
        /// This is the workflow that needs to be activated/deactivated.
        /// </summary>
        [Input("Workflow")]
        [ReferenceTarget("workflow")]
        public InArgument<EntityReference> Workflow { get; set; }

        /// <summary>
        /// This is the state of the workflow entity.
        /// 0 is draft and 1 is Activated
        /// </summary>
        [Input("Workflow State")]
        public InArgument<int> WorkflowState { get; set; }

        /// <summary>
        /// This is the status of the workflow entity.
        /// </summary>
        [Input("Workflow Status")]
        public InArgument<int> WorkflowStatus { get; set; }

        protected override void Execute(CodeActivityContext executionContext)
        {
            //Create the tracing service
            ITracingService tracingService = executionContext.GetExtension<ITracingService>();

            //Create the context
            IWorkflowContext context = executionContext.GetExtension<IWorkflowContext>();
            IOrganizationServiceFactory serviceFactory = executionContext.GetExtension<IOrganizationServiceFactory>();
            IOrganizationService service = serviceFactory.CreateOrganizationService(context.UserId);

            EntityReference workflow = Workflow.Get<EntityReference>(executionContext);
            int workflowState = WorkflowState.Get<int>(executionContext);
            int workflowStatus = WorkflowStatus.Get<int>(executionContext);

            if(workflow == null)
            {
                tracingService.Trace("The workflow entity reference past in is not valid");
                throw new Exception("The workflow entity reference past in is not valid");
            }

            tracingService.Trace("Activate/Deactivate Workflow:");

            var activateRequest = new SetStateRequest
            {
                EntityMoniker = new EntityReference
                    (workflow.LogicalName, workflow.Id),
                State = new OptionSetValue(workflowState),
                Status = new OptionSetValue(workflowStatus)
            };
            service.Execute(activateRequest);
            Console.WriteLine("and sent request to service.");

        }
    }
This custom workflow activity takes three parameters:
- Workflow – This is a entity reference to the actual process that’s going to be activated/deactivated.
- Workflow State – This is the state of the workflow entity
- Workflow Status – This is the status of the workflow entity.
With these three parameters we’re ready to create the action which will allow us to activate/deactivate a process.
Creating the Action
Creating an action is pretty straight forward; an action is a type of a process. The best part about actions is they become a message that’s callable through the web api directly. This alone makes them extremely powerful. It’s a great way to compartmentalize business logic or technical components.
Let’s navigate to a new solution I’ve setup where we are going to create an action.
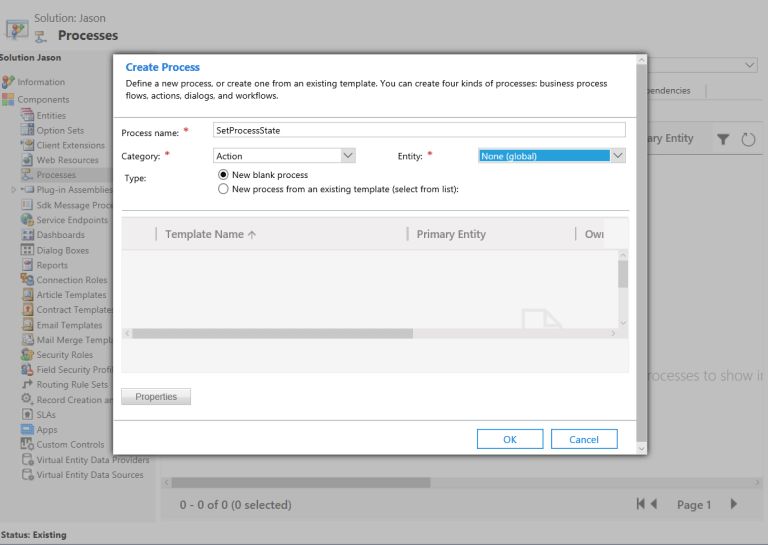
Create a Process
This particular action is going to be a global action which means it can be called standalone as apposed to against a specific entity. I do this because the process entity isn’t in the list of entities. The first thing we’ll do once the action is created is to add the three actions we defined in the custom workflow activity.
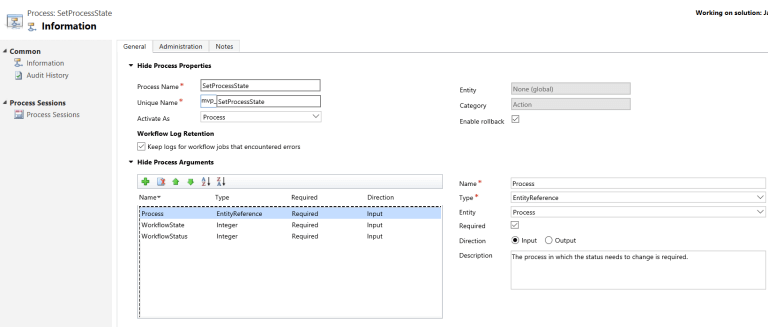
Process Information
Now we have the arguments that we can pass directly into the custom workflow activity allowing us to activate/deactivate any process. Let’s go ahead and add the call to our custom workflow activity and set the parameters of the step.
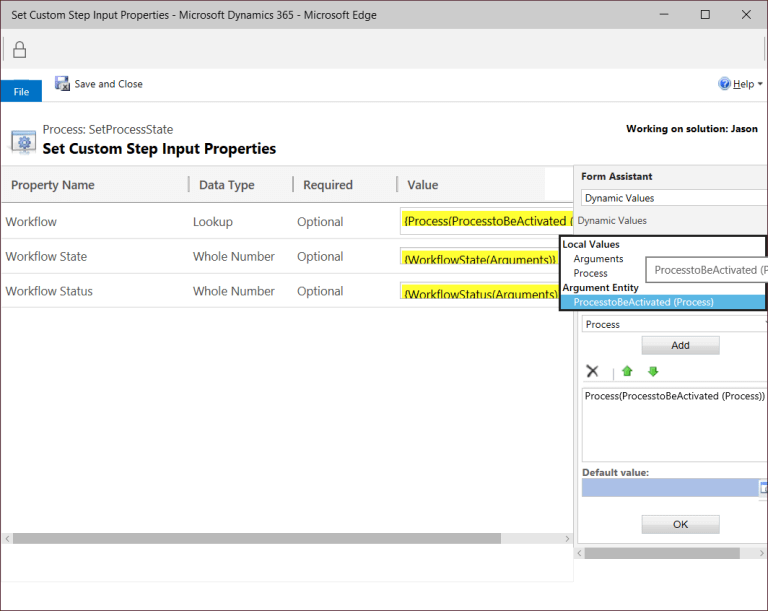
Set Custom Step Input Properties

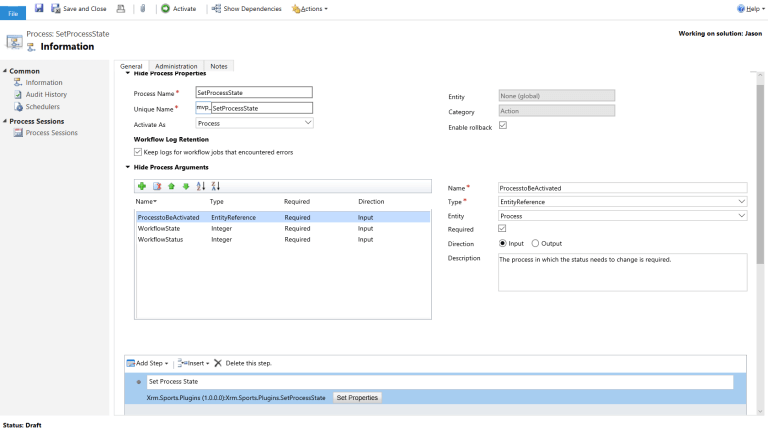
Process Information
We are now left with a completed action with the functionality to activate/deactivate processes. I hope you enjoyed the walk through on combining these two items together. Next post we’ll look at putting this action to good use through the API.
About the Author:
Jason is currently a CRM Technical Lead with a passion for all things Dynamics CRM. He has been working with Microsoft Dynamics CRM for over 10 years now.
He is a Microsoft Dynamics MVP for Dynamics 365 for three years. He is also a Microsoft Certified Technology Specialist having multiple Dynamics CRM exams and he is passionate about teaching others. He enjoys blogging and answer questions on the forums.
Reference:
Cosman, J (2018). Creating an action using a custom workflow activity. Available at: http://cosmansdynamics.com/2018/03/13/global-actions-but-think-of-a-business-scenario/ [Accessed: 27 August 2018]