With Global Availability of Office 365 Planner is a new way to Organize daily tasks to be more productive in a teamwork in Office 365 and in organizations and companies.
Office 365 Planner, offers to the company a new way to organize work with a simple interface. With Planner makes you and your team are able to create plans and can be used to manage a internal event, small projects, prepare a new product or just create tasks to your team be more organized.
What you can do with Planner:
- Create new plans, organize & assign tasks, share files, talk about what you’re working on, and get updates on progress

- Integrated with Office 365 Groups, so all of the conversations in Planner are available in Outlook 2016, Outlook on the web and the Outlook Groups mobile app

Organize teamwork with Office 365 Planner
Office 365 Planner are based on top of Office 365 Groups, used together, Microsoft Office 365 Groups and Office 365 Planner give you a simple and highly visual way to organize teamwork. Groups let you chat about what you are working on, get progress updates, share files, and see relevant messages in a conversational view, away from your email inbox. Planner shows all your plans in a centralized view and lets you set due dates, assign people to tasks, and track your progress in a chart—all without the learning curve and ramp-up time usually associated with project management software.
What are Groups?
Getting things done at work means sharing information and collaborating across ad hoc groups and project teams. Often, the tools we use to bring people together are different in each app—distribution lists in Outlook, workgroup lists in Skype, groups in Yammer. Office 365 Groups let you easily connect with the colleagues, information, and applications you need to work more collaboratively.
Groups are more than just a replacement for Outlook distribution lists. They offer the next generation in enterprise collaboration by bringing together conversations, document collaboration, and calendar-based event management in one seamless experience.
By combining the best of Microsoft Exchange and Microsoft SharePoint Online experiences with a social conversation model and integrated management functions, Groups offer “one-stop shopping” for all your group collaboration needs.
Here are some key points about Office 365 Groups:
- Conversations
- Documents
- Calendars
- Group management
How does Planner work with Groups?
Planner and Groups are integrated to work in unison—in fact, when you create a new group in Outlook it appears in Planner, and when you create a plan in Planner it appears in Outlook as a group. Everything you can do in a group in Outlook you can do in Planner, such as start or view a conversation, work with files and your team OneNote notebook, and manage members. Planner is discussed later in this guide.
Using Planner to create plans and track tasks
Planner lets you put your plans in motion. Easily build teams, share goals, and track progress to get work done together—anywhere, on any device.
Bring focus to your team with the Planner Board
Organize and divvy up plan tasks using the Board. You can set start dates and due dates, set progress status, and assign people to tasks. You can also keep track of working groups for virtual teams, feature crews, ship goals, and action items.
Map out your plan
Before you start using Planner to create your plan, keep the following in mind:
- Determine what the goals of your plan are, and set an overall plan start and due date.
- Come up with discrete tasks that have start and due dates, and set the order of the tasks.
- Decide who should work on those tasks.
- Check the availability of those people for the tasks.
- Gather or create the documents you will need to share with your team.
Now that you have mapped things out, it is time to create and build out your plan.
Add a new plan
You add plans from the Planner home page in Office 365.
1. Sign in to Office 365 at http://portal.office.com, select the app launcher , and then selectPlanner.

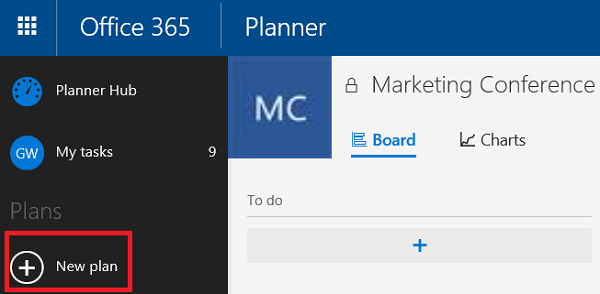
The New Plan dialog box appears.

3. Do one of the following:
- To create a plan for an existing Office 365 group, under the Plan name box, select Or create a plan for an existing Office 365 group. Then choose the group you want, and create the plan.
- To create a new group dedicated to the plan, give your plan a name and description in the Plan name and Plan description boxes.
As each plan is created, it is also set up as an Office 365 group and includes:
- A SharePoint Online document library, set up with appropriate permissions.
- A group mailbox for email and conversations.
- A group calendar.

Add and customize tasks
Now that you have created your plan, it is time to build it out. This is where you add tasks, set their start and finish dates, and assign the tasks to people.
- If you do not see your plan, select Planner to go to your Planner home page. This includes the PlannerHub, showing all your plans in one place. A donut chart for each plan gives you a quick view of its status. The chart shown here has four tasks in various progress states: Not started (gold), In progress (blue), Complete (green), and Late (red).

2. Select your plan, select the plus sign (+) underTo do, and give the new task a name.

3. Select Add.
Each task has its own “card,” which you can move between the default. To do bucket and any other custom buckets you create to organize your tasks. Buckets are a great way to organize your tasks by week, by task type, by priority, or whatever criteria suit you. Select New Bucket on the Board page to create a new bucket.

4. If you want, you can set a due date, upload a file or photo, or assign someone to a task. You can do one or all of these right away or you can wait until later if you are not ready yet.
5. You can categorize your task cards by adding a colored label that flags it for action or attention. Open the task card for editing, choose a label color, and enter your custom text. That text shows up as a tooltip when you move the pointer over the label.

Attach pictures, files, and hyperlinks to a task card

- Open the task card for editing.
- To attach a picture, selectAttach, and browse to the image you want to upload. The image file will be saved to the document library.

3. To set the image as the preview picture for the task card, select (Other Commands) in the upper-right corner of the image and chooseSet as preview.

4. To add a document to your plan, selectAttachand browse to your file. After you attach the file, it is available from the task card when the card is open for edit. On the task card, select the attachment icon (a paperclip) to open the task card. To open the document for viewing or editing in its Office Online app, select its name (a text link) under its preview image.
5. You can also add a hyperlink by selecting . Type the link text and enter the web address. The text you type for the link will appear as a hyperlink under the link icon.
Add people to your plan
If you are working on your own but want to share status with your manager or other stakeholders, you can add people to your team without assigning work. Or, if you have added tasks to your plan but have not yet assigned people to those tasks, you can assign those people now.
- If you do not see your plan, selectPlannerto go to your Planner home page.
- Select your plan. Your plan appears on the Board tab.

3. In the pane on the right side, selectAddMembers, and then start typing a name in the box. Type‑ahead is enabled, so you might need to type just the first few letters.
4. When you find someone you want to add to your plan, select his or her name, or press Enter.
Assign someone to a task
Keep in mind that you can assign only one person to a task at a time. As your plan progresses, you can assign another person to take over that task as needed.
- Select Board to switch to the Board view.
- If a person is a member of the plan group, you can drag their picture from the upper-right area of the page to the task. If not, continue to step 3 to assign that person. Assigning a person to a task adds them to the plan and its group.
- If the person you want to assign to the task isn’t a member of the plan, select the task.
A new window appears, showing the details for the task.
4. Select + Assign.
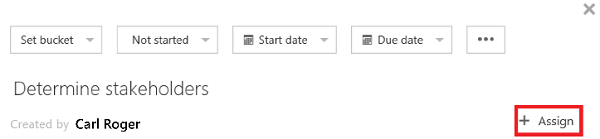
After you assign a person to your task, his or her name appears on the card for the task.
Set the progress status for a task
As your team members work on their tasks, you will want to look at or update their status.
- Switch to Charts view, and then select the task.
A new window appears, showing the details for the task, including the status. A new task will have the Not started status, as shown here.

As the status changes for a task, its color changes:
- A new task, by default, is set toNot startedand its color is gold.
- A task that you set toIn Progress changes to blue.
- A task that you set to Completed changes to green.
- If a task due date has passed, its status changes to Late, and its color changes to red.
When you are done with a plan
Before you think about deleting a plan, keep the following in mind:
- When you delete a plan, you also delete its group and its conversations, its document library, notebook, and other related information.
- If you really do want to delete your plan, consider creating an archive of your work by copying the dashboard status and the text of conversations, and saving any related documents—or whatever practices work best for you.
For more information
Video: Introducing groups in Office 365
Find help about groups in Office 365
For more great productivity guidance, visit…
https://products.office.com/en-us/business/office-365-planner#a
Blog Planner
https://blogs.office.com/planner/
About the Author: 
With more than 17 years’ experience in Datacenter Architectures, Nuno has 30+ certifications (MCT, MCSE, MCITP, MCSA and MCTS among others). Nuno is a Manager at GFI Portugal and a Microsoft Solutions Architect as well as a Microsoft MVP for Office Servers and Services Experience in enterprise environments. He has worked several industries, including Aerospace, Transportation, Energy, Manufacturing, Financial Services, Government, Health Care, Telecoms and IT Services and Gas-Oil Company in different countries and continents. Nuno has assisted Microsoft in the development of workshops and special events and case studies, and as a speaker at several Microsoft events. Contributes with several articles and publications in various blogs and communities.
Similar content from ESPC: