In my last post, we looked at how you can configure your Azure DevOps project and Power Platform environment to create a connection between the two, allowing you to take advantage of development best practices through using Azure Pipelines. In this post, we’re going to look at a simple pipeline that you can create to allow you to automate the process of exporting a Power Platform solution and push it to a repository you have setup. This guide assumes you have already setup your repository, one way of doing this is outlined in my last post: https://www.lowcodelewis.com/post/power-platform-configuration-with-azure-devops
Creating the pipeline
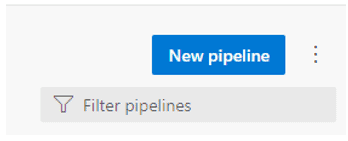
Step 1) First, you want to head over to your Azure DevOps project and click on the ‘pipelines’ tab found under the pipelines header. Then you want to click to create a ‘new pipeline’.
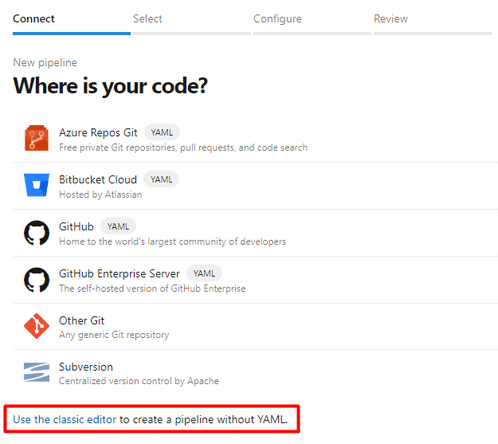
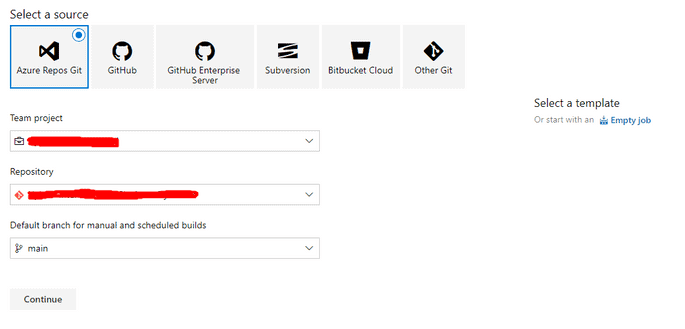
Step 2) Now you’re going to need to select the source of your repository. If you followed the steps in the last post on creating a connection between Azure DevOps and your Power Platform environment, you’re going to want to select ‘Azure Repos Git’ and select your project and repository in the dropdowns, you will also want to select the branch you wish to use should you have multiple already. Then we want to start with an empty job.

Step 3) Now you can give your pipeline a name and we can start adding tasks to Agent Job 1


In the add tasks search box, type Power to show all the tasks installed under Power Platform build tools. The first one we want to add is ‘Power Platform Tool Installer’. This task doesn’t require any configuration, you just need to add the task and it does the work itself!
Step 4) You now want to add the Power Platform Export Solution task to agent job 1 under the previous task added, and we will need to do some configuration here.

Then we want to input the following for our solution name, then we will add this variable in a moment under the variable tab of our pipeline:
$(SolutionName)
Then you need to add this syntax into the Solution Output File field:
$(Build.ArtifactStagingDirectory)\$(SolutionName).zip
As the above syntax includes pre-defined variables for Azure Pipelines we don’t need to define this under the variables tab.
Then you can choose if you want to export the solution as unmanaged or managed. If you’re exporting out of development and just saving your code, you might want to export as unmanaged, but if you have further plans to directly import this solution into test, UAT or production, you may want to export this as managed.
Step 5) Now we want to add a step in our agent job to unpack the solution we have exported. Add the Power Platform Unpack Solution step to your pipeline and then we want to build out the step similar to the example below using the exact syntax as below for Solution Input File and Target Folder to Unpack Solution as these include pre-defined variables and variables we will define for best practice.


Solution Input File:
$(Build.ArtifactStagingDirectory)\$(SolutionName).zip
Target Folder to Unpack Solution:
$(Build.SourcesDirectory)\$(SolutionName)
Then select whether the solution is managed or unmanaged as per your previous step.
Step 6) Now we want to look at pushing our code to our repository. For this step you’re going to want to add the ‘command line script’ task to your agent job in your pipeline.
We’re going to want to use the following code to push our code to our repo.
echo commit all changes
git config user.email "your email address"
git config user.name "your user name"
git checkout main
git add --all
git commit -m "solution"
echo push code to new repo
git push --all https://YOUR PAT@dev.azure.com/your repository path
Make sure you replace the red parts of the script above. You will need to generate a personal access token from Azure DevOps to insert into the start of the link where you’re pushing your code to. You can do this by going to settings in at the top ribbon in Azure DevOps, then go to ‘personal access tokens’

Step 7) Go ahead and run your pipeline, and if all setup correctly, you should see your Power Platform solution export in your repository and your pipeline should have successfully run.

About the Author:
Since October 2020 I have had access to the back ends of multiple Microsoft 365 tenancies and have continued to learn and gain a depth of skills around Microsoft 365, Power Platform and the basics of Dynamics CRM. My first role was started when I deployed Microsoft 365 for my swimming club with no prior usage of Microsoft 365 as a business user. This blog covers the skills I am implementing into my solution building on an almost daily basis through working for a MAT and continuing to volunteer at my local performance swimming club, Maxwell Swim Club. Let me know if there is something you’re stuck on that you think I might be able to cover by sending me a message on LinkedIn.

Bayvbutt, L. (2022). Push Power Platform solutions to a repository using Azure Pipelines. Available at: https://www.lowcodelewis.com/post/push-power-platform-solutions-to-a-repository-using-azure-pipelines [Accessed: 26th May 2022].