In this blog post, I will show you how to upload a file from Power Pages to a SharePoint Document Library. This post will help Power Platform Developers to overcome the limitations of interacting with SharePoint Document Library or other file repositories without the need of setting up SharePoint Document Integration with Dataverse.
There could be many scenarios where SharePoint Document Integration is not a viable option and the solution requirement is to upload a file from a Power Pages setup and further upload it to SharePoint/ GitHub or other repositories. All you need is a Power Automate flow that works as a connecting layer between the external page and the SharePoint Document Library.
Problem Statement
How to upload documents from Power Pages/ Power Apps Portals to a SharePoint List/ Library? How to save documents from Power Pages to SharePoint/ GitHub/ Storage Account/ Other repositories? How to pass a file from Power Pages to Power Automate?
Solution
To solve this problem, you can use JScript code that sends the file and uploads it to your document library.
The transfer of documents will happen in this direction: Source (Power Pages External Page) -> Power Automate -> Destination (SharePoint Document Library)
The first part is to setup the SharePoint Document Library. You can choose an existing library or create a new one.
The second part is the Power Automate Cloud flow to capture the file and save it to the SharePoint Document Library.
Power Automate: To extract the file and save it to the desired location, in this case SharePoint Document Library.
The below steps shows how to setup this configuration:
- The first step to setup the Power Automate Cloud Flow is the trigger. As this request will be made from the external page, the trigger will be “When an HTTP Request is received” from the “Request” connector. Refer Image 1. More details can be found here.
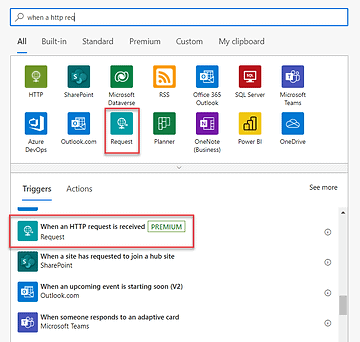
Image 1
Keep the “Request Body JSON Schema” as Blank.
** Since the action does not support file type input, we will be using trigger body multipart to extract the file content.
- The second step is to Initialize a variable to store the file name. The flow will accept inputs from the Power Pages custom page using Form Multi-parts. Refer Image 2. Use the below expression for extracting the file name. Explanation: File Name will be passed as a separate parameter(2nd Parameter) using API call.
- triggerMultipartBody(1)[‘$content’]
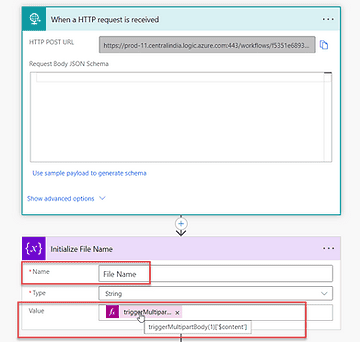
** Note: Other parameters can be passed from the page as well and can be extracted with index after 1.
- The third step is to Create File in SharePoint Document Library. Refer Image 3. a. Pass the File Name variable in the File Name property. b. Pass below expression in the File Content. Explanation: Extracts the file content which is passed as first parameter and converts the base64 format to Binary which is recognized as the proper file content.
base64toBinary(triggerMultipartBody(0)[‘$content’])
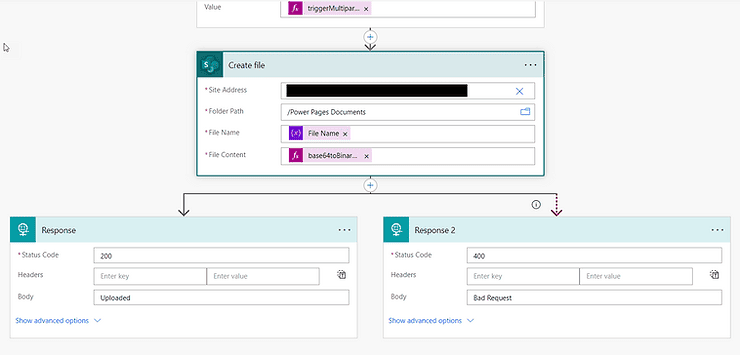
- The fourth step is to setup the response to let the custom page know whether the request was successful or not. For this, two response actions will be added in a parallel branch. Refer Image 3. The setup will be as below: a. First Response Action: Uploaded in the Body, status code as 200, and “is successful” selected in “Configure Run After” property of the action. b. Second Response Action: Bad Request in the Body, status code as 400, and “has failed, is skipped and has timed out” selected in “Configure Run After” property of the action.
If you want you can add other actions in the cloud flow before sending response based on the requirement.
The third part is to setup Power Page custom page.
Page Setup: This is where the file upload control exists on the Page.
The below code is for including the following components in HTML setup:
- Success Message
- Heading
- Input control
- Submit Button
<!--Heading to show success message--><h6 id="uploadsuccess" style="color: green;"></h6> <!--Heading for Title--> <h3 style="color:black"><b>Upload document to SharePoint Document Library</b> </h3> <!--Input control--> <div style="padding-top:30px"> <input type="file" id="file_upload" style="margin-top: 10px;display:inline-block;padding: 8px;"></input> </div> <!--button to upload the document--> <button onclick="uploadDocument()" style="margin-top: 30px;" class="btn-primary">Upload File </button>
The following script needs to be added to the page for making a call to the flow:
<script> function uploadDocument() { var files = document.getElementById('file_upload').files; //shows as error if no file is chosen if (files.length == 0) { alert("Please choose any file..."); return; } //extracts the file content var file = files[0]; //extracts the file name var filename = files[0].name; //created form data for passing file content to flow var form = new FormData(); //append properties to the form for sending data to cloud flow. Currently parameter 1 is passing file content and parameter 2 is passing file name. Note: More parameters can be passed to the cloud flow. form.append("", file, ""); form.append("filename", filename); //AJAX call to Cloud Flow $.ajax({ method: "POST", //Cloud FLow URL. The URL to be copied from cloud flow trigger. url: 'https://prod-11.centralindia.logic.azure.com:443/workflows/xxxxxxxxxxxxxxxxxxxxxxxxxxxxxxxxxxx/triggers/manual/paths/invoke?api-version=2016-06-01&sp=%2Ftriggers%2Fmanual%2Frun&sv=1.0&sig=xxxxxxxxxxxxxxxxxxxxxxxxxxx', timeout: 0, processData: false, //important parametermimeType: "multipart/form-data", contentType: false, data: form, success: function (result) { //checks if the document upload was a success if (result == "Uploaded") { //Sets the value of success header element. $('#uploadsuccess').html("File uploaded successfully."); } else { //shows error in case of failure alert("There is an issue encountered while uploading the file. Please contact help@bythedevs.com"); } }, error: function (result, status) { //shows error in case of failure alert("There is an issue encountered while uploading the file. Please contact help@bythedevs.com"); } }); } </script>
The explanation is added along with the script highlighted in Black.
You can now test the implementation. In case of any issues, please drop an email on ritika.agarwal@bythedevs.com.
DEMO
In this post we saw how to upload documents from Power Pages custom page to SharePoint Document Library. This blog will help you upload documents from Power Pages to various repositories like GitHub, Storage Accounts etc.
I hope this was useful for you. In case of any questions or suggestions, feel free to reach me out on twitter at @agarwal_ritika.
About the Author

Ritika is an active member of the Hyderabad Power Apps and Power Automate User Group, where she serves as one of the UG Leaders. Her extensive experience encompasses a wide range of Microsoft tools and platforms, including Microsoft PowerApps, Power Automate, PowerBI, Power Virtual Agents, Dynamics 365, Microsoft Azure, Powershell, and various others. Through her passion and knowledge, Ritika continues to make significant strides in the realm of business applications within the Microsoft ecosystem.
Reference
Agarwal, R., 2023, Drag and Drop Rows in Power Apps Grid, Agarwalritika.com, Available at: https://dianabirkelbach.wordpress.com/2023/04/29/drag-and-drop-rows-in-power-apps-grid/ [Accessed on 8 September 2023]
STAY UP TO DATE
Catch up on the latest blogs, eBooks, webinars, and how-to videos.
Not a member? Sign up today to unlock all content.
Subscribe to our YouTube channel for the latest community updates.