Microsoft recently launched a brand new search experience for Model-driven Power Apps and therefore also first-party Dynamics 365 apps operating on top of CDS. This is a significant step forward in the “non-structured” search capabilities in Power Apps. The structured queries one can construct via Advanced Find were always one of the most powerful features that the XRM platform could offer on top of relational data (and remain one of my most read posts on this blog). Now also the free text based search experience is catching up nicely:
Being a low-code application platform, there are several configuration options related to how the search features in Power Apps behave. This can also result in people missing out on how they could ensure that the search really works the way that the users would expect. In this blog post I’ll go through some common challenges that the Dynamics 365 professionals may have already learned to overcome but which can be surprising to new Power Apps makers.
Challenge 1: Relevance Search is not enabled
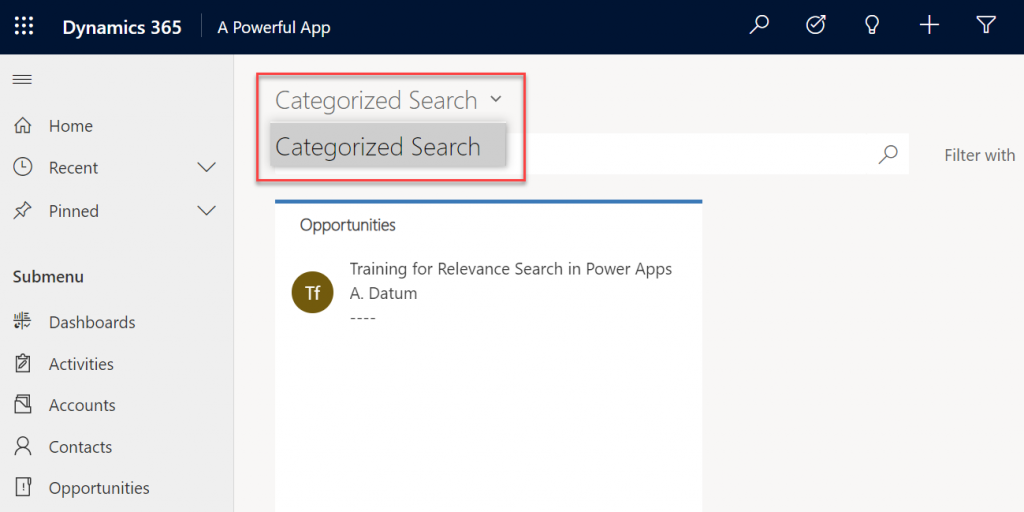
If you’re not seeing anything even remotely like the MS blog posts when performing a search in a Model-driven app, then you may well be using the limited Categorized Search instead of the fancier Relevance Search. When attempting to change the search type, you might discover that the dropdown actually doesn’t give you any choices, i.e. it’s a dead end with Categorized Search as the only option:
Why does this Categorized Search option even exist, and why do we need to specifically enable Relevance Search? It all comes down to the on-premises legacy of the platform, where the single CRM server had to be capable of offering a standalone search option. In the cloud era we can leverage Azure Search as the external search index database to where CDS data is syncrhonized to, thus offering a far richer search experience.
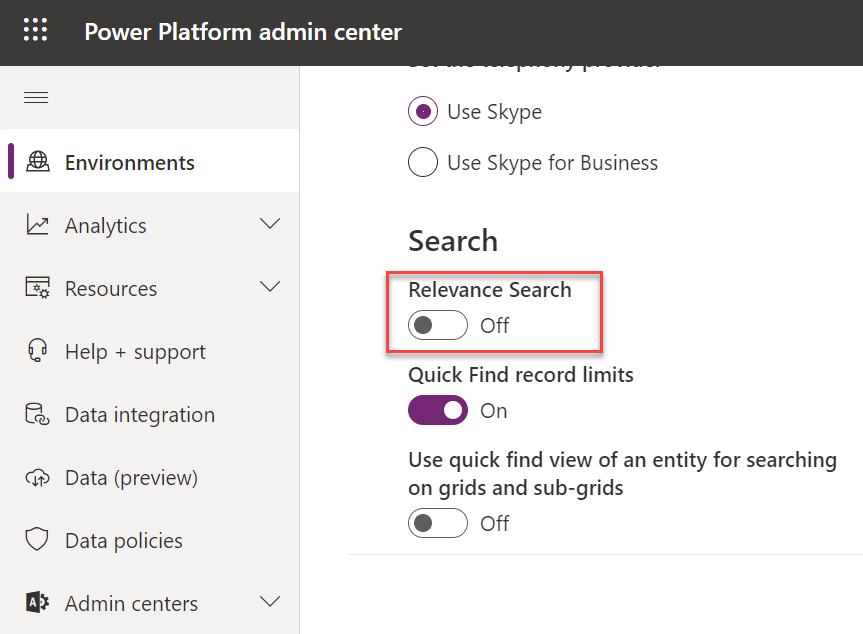
Now, Azure Search being a separate service and possibly having different types of SLAs and other legal variables than the core Power Apps or Dynamics 365 services follow, it’s not on by default even in the MS cloud. An administrator will need to navigate to the Power Platform Admin Center, choose the environment, then go under Settings / Features / Search to flip on the swith that turns on Relevance Search.
Once it’s enabled, only then will you see the option to also turn on the new search experience (which probably will become the default option in the future). It won’t show up there immediately, so give it a lil’ time.
Challenge 2: Relevance Seach doesn’t search my entities
Cool, we’ve now got the new UI up & running. When we do a search from the new prominent search bar always visible at the top, the results are returned for some of the entites. But why aren’t we getting any hits for Widgets, for example? In this scenario we know there are records in there that contain matches to our search string.
Even though Azure Search provides a richer search index for your Model-driven Power Apps, it doesn’t directly copy each and every table from CDS into it’s database automatically. When working with a Dynamics 365 environment there are some default entites covered (like accounts, contacts, opportunities). For any custom entities and especially with custom apps, you’re gonna have to explicitly tell which entities should be enabled for Relevance Search.
To access this configuration option you’ll need to leave behind the modern Power Platform Admin Center and venture into the land of the legacy web client and Dynamics CRM era customization UI. You can either add “/main.aspx?settingsonly=true” to your environment URL or find another path into the land of more advanced options. Once there, find Settings / Customizations / Customize The System and open up the Entities menu in the Default Solution window. Now you’ll see what entities are included in your Relevance Search Index and which are not, i.e. they are in the Available Entities list:
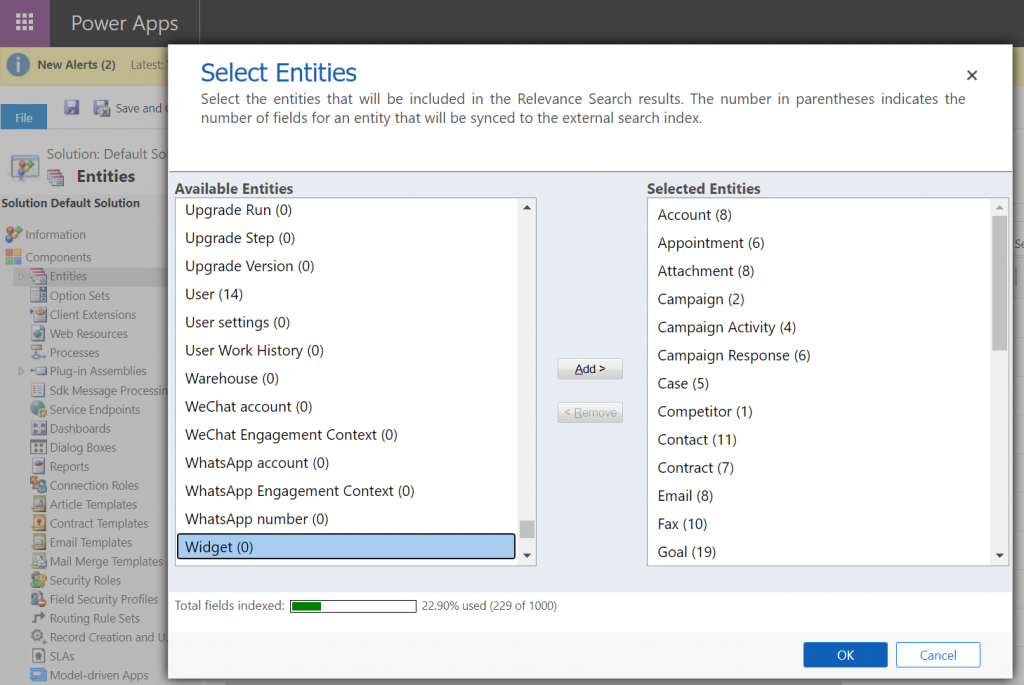
Select the entities you want, click OK, then Publish All Customizations and now they are enabled for the modern Relevance Search experience.
Challenge 3: Relevance Search doesn’t search the right fields
Hmm, why aren’t we still getting the full search results for our Widgets entity, even though we added it into Relevance Search? Well, technically you didn’t add the whole entity into the search index. By default a custom entity seems to pick up only the primary field (usually “name”) into the search scope, but it’s likely that you’ll have plenty of other important field that should also get indexed. The same goes for default entities: only a subset of the standard fields are included, and none of the custom ones are, unless you configure them to be included in Relevance Search.
If finding the menu from where the entities list for Relevance Search is maintained was a bit tricky, then figuring out the place for specifying the field level search settings ain’t that obvious either. You see, it’s not a property of the field in the entity itself. It’s the inclusion of that field in the entity’s specific view called Quick Find View that determines what gets pushed to Azure Search database and back to Power Apps UI.
Even though the entity view editor can already be found in the modern Maker Portal for Power Apps, these settings aren’t there yet, so I hope you didn’t close that legacy customization UI just yet!
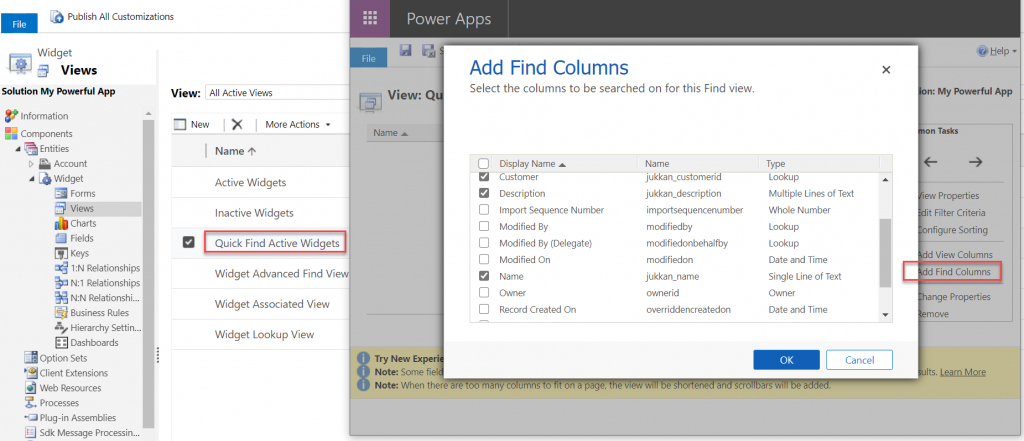
From the legacy Solution Explorer, open the Quick Find View for your entity, select Add Find Columns from the right and check the boxes for the fields you consider to be potentially useful for Relevance Search. Save & publish your changes, then verify that the search results match with your expectations.
Challenge 4: Relevance Search doesn’t cover inactive records

With the out-of-the-box configuration of Dynamics 365 or Power Apps, you won’t find them via Relevance Seach. Yes, the vast majority of records that you’re storing in CDS may well be excluded from the search index by default. This is because of the same Quick Find View we visited earlier. Not only does it control the fields being indexed, as well as the column layout of the search results page. It also controls the static filters which are applied to the search results before they are shown.
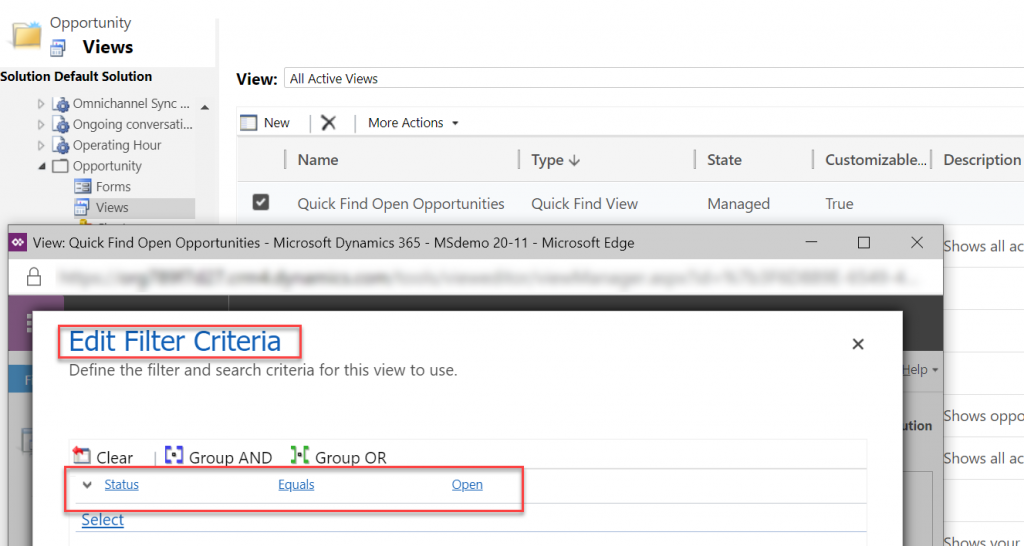
Using the OoB opportunity entity as an example, you’ll find a system view called “Quick Find Open Opportunities” under the entity. Click on Edit Filter Criteria to reveal the fact that it indeed does only include open opportunities. While we can’t create additional Quick Find Views for entities, luckily we have the freedom to modify or delete the existing filters. So, just remove that status field filter criteria, save & publish. Now your Relevance Search will also return results from the inactive records for this entity.
Challenge 5: Relevance Search suggestions aren’t found in the search results page
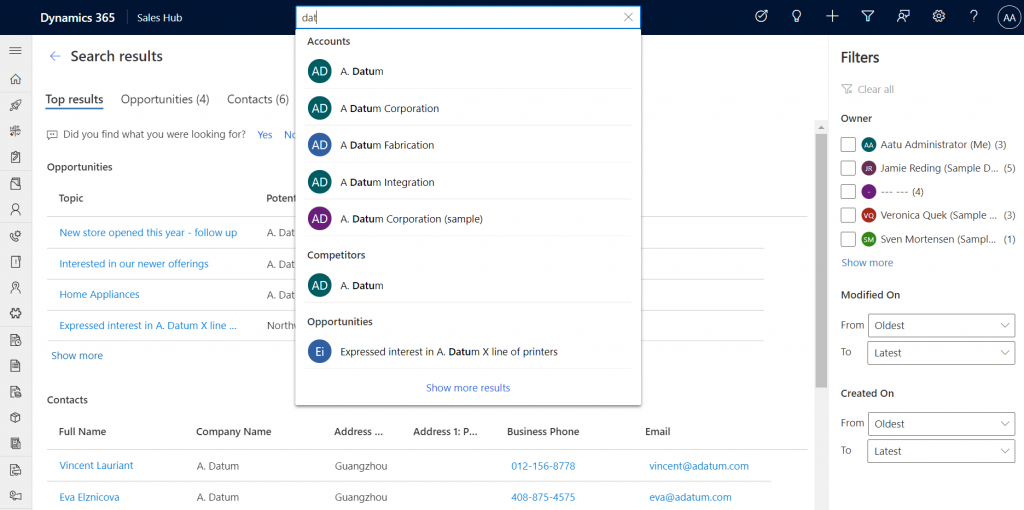
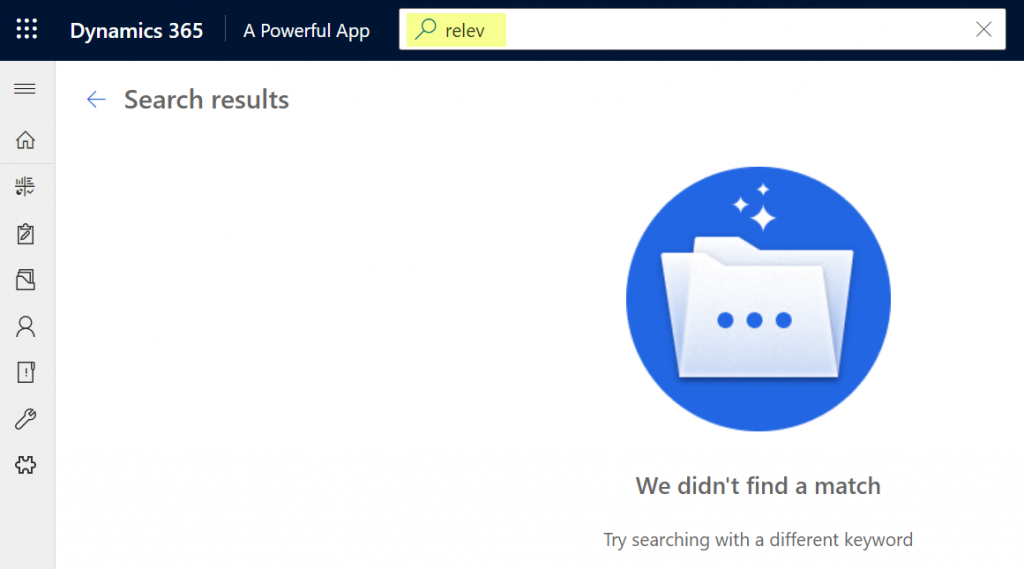
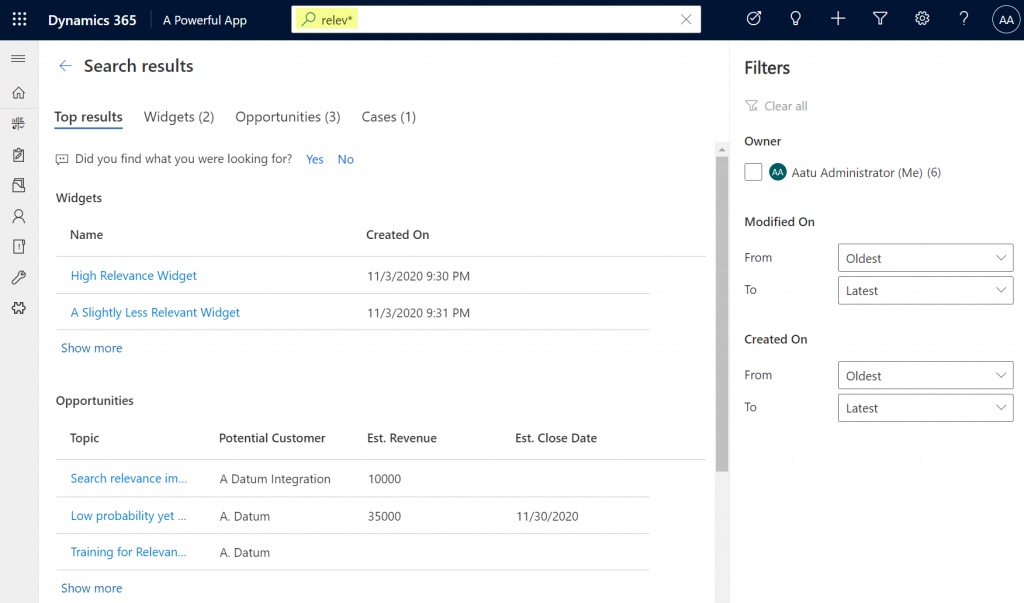
The new search experience has a nice UX for suggesting matching records immediately as you type the letters in your the search term. Let’s say that we’re interested in the search term “relevance”. By the time we’ve entered “relev” into the search bar there’s already a number of matches in the suggestions box:
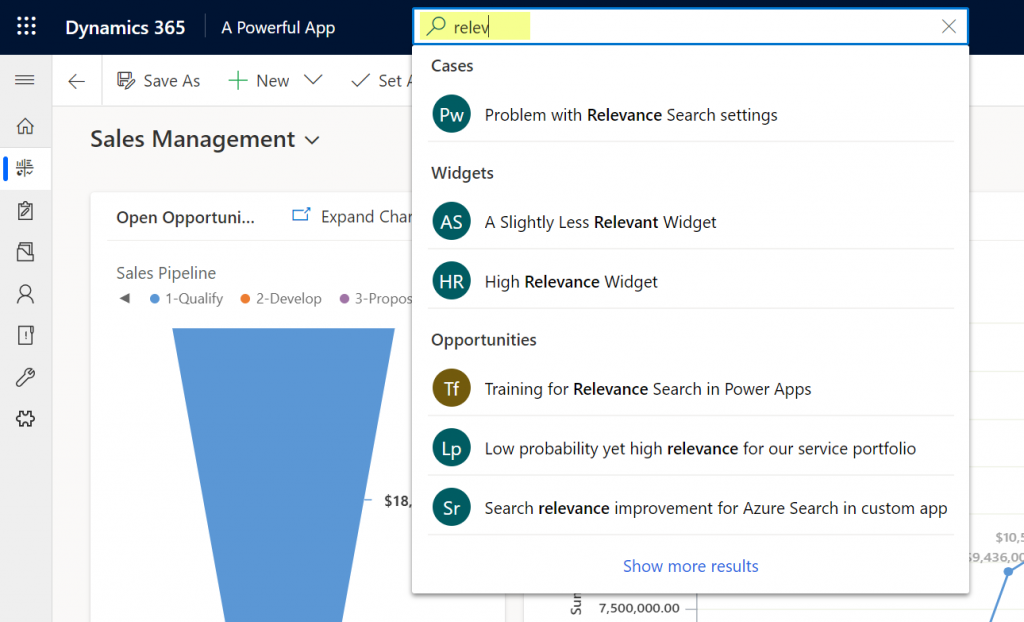
Looks great, but I think I want to see more details, so I’ll click on “show more results” at the end of the search suggestions. Hey, where did all those matching records go?!?
Unfortunately this is a challenge where you can’t configure way around it (at least yet). For the time being, this actually is by design. Taken from the documentation, Microsoft lists the suggestion feature separately from the actual search requests:
Suggestions provide a list of matches to the specified search parameter value, based on an entity record’s primary field. This is different from a regular search request because a suggestion search only searches through an entity record’s primary field, while search requests search through all relevance search-enabled entity fields.
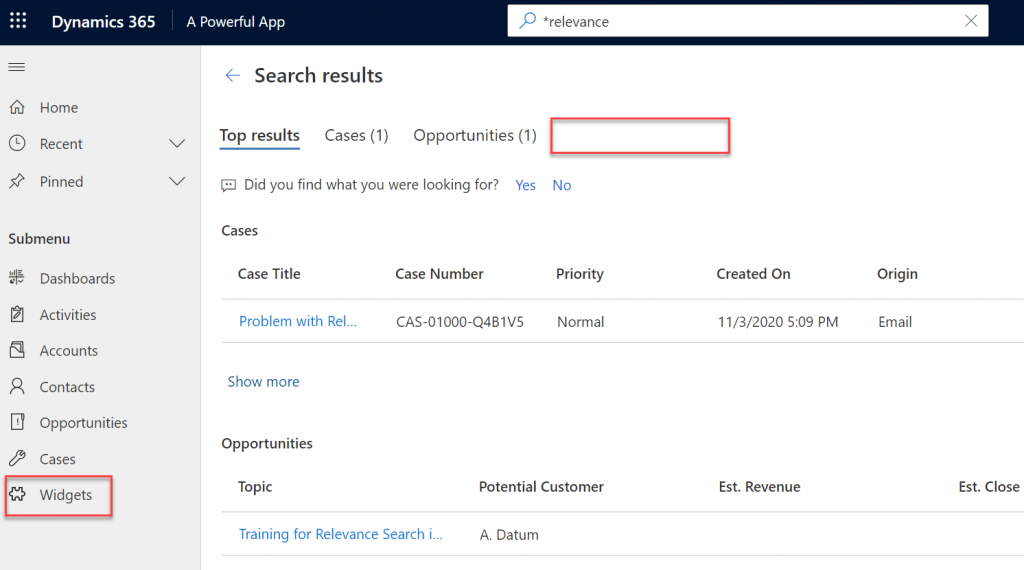
So, the search box and the search results page follow different logic, which is why it is expected that they will show different matches. This may be seem quite complex to explain to the app end users on a detailed technical level, so it’s better to just instruct them to always apply the wildcard character * at the end of their search term. The results are likely to be closer to what they expected to see:
Hopefully these 5 tips will help you in setting up the basis for more relevant search results and a better user experience in your Model-driven apps. For more comprehensive guidance, check out these three different levels of documentation that Microsoft provides on the Power Apps seach features:
- Users: Search for records using Relevance Search
- Admins: Configure Relevance Search to improve search results and performance
- Developers: Search across entity data using relevance search
About the Author:
I’m a 40-something business geek from Helsinki, Finland. I’m the Co-founder and Power Platform Advisor at Forward Forever. When I’m not diving deep into the latest Microsoft technologies, you may find me enjoying electronic music and live gigs, sipping on some tasty new craft beers, or travelling to places near and far.
Reference:
Niiranen, J. (2020). Make your Power Apps search experience more Relevant. Available at: https://jukkaniiranen.com/2020/11/make-your-power-apps-search-experience-more-relevant/ [Accessed: 7th March 2021].
Find more great Power Platform content here.