In the Part I of this tutorial we built the core game cycle for a Power Apps game “Little Helper”. In this part we’ll improve it in the following areas:
- restrict the game session to 1 minute;
- introduce high score logic;
- improve elf visual by adding a state when they hold a presents box.
In order to achieve the above, we will also need a new screen in the game — the start and game over screen (two in one).
Ready to go? Let’s do it.
Add a start screen
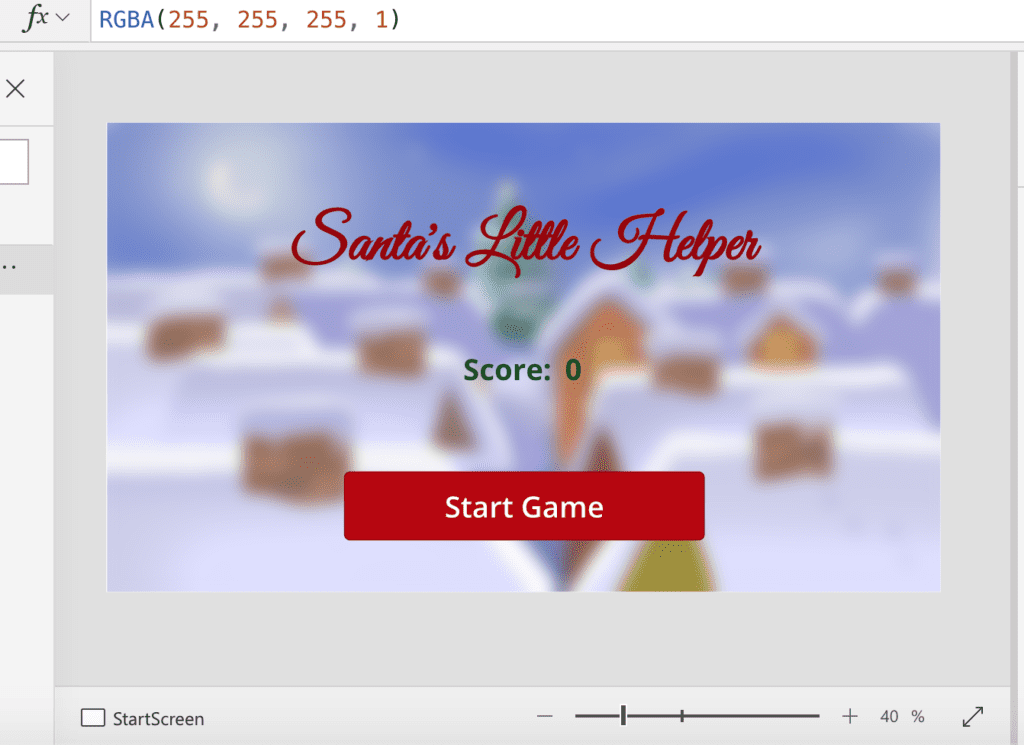
- First of all, add a new screen to the app: from the Home menu select New screen and select the Blank template. Rename the screen into StartScreen.
- Set the background of this screen with “background-blurred.png” image (see Part I how to set the background for a screen).
- Add the title label through Insert menu and Label element. Set the text of the Text property of the label to “Little Santa Helper” (or whatever you want to call it). Set the Font to Great Vibes, bold, size 76 and some red colour. Rename it into “TitleText”.
- Add two more labels to the screen to display the current score. Set the font size to 36, bold and green colour for all of them. Set text of one to “Score:” (text) and
Score(actual variable) to another one. Arrange them side by side and rename them “ScoreLabel” and “ScoreText”. - Add the game start button through Insert menu and Button element. Set the size of the button somewhat larger (see the picture below) and change the background colour to a shade of red, no border. Set text to “Start Game”, font size 36. Set the OnSelect property to the following formula:
Navigate(GameScreen,ScreenTransition.Fade)
- Move up the StartScreen above the GameScreen so it becomes the first screen when the app starts.

Run the preview of the app and make sure that the first screen shown is the new StartScreen and that you can stat the game through the click on the “Start Game” button.
Save the app (Ctrl+S).
Add the game timer
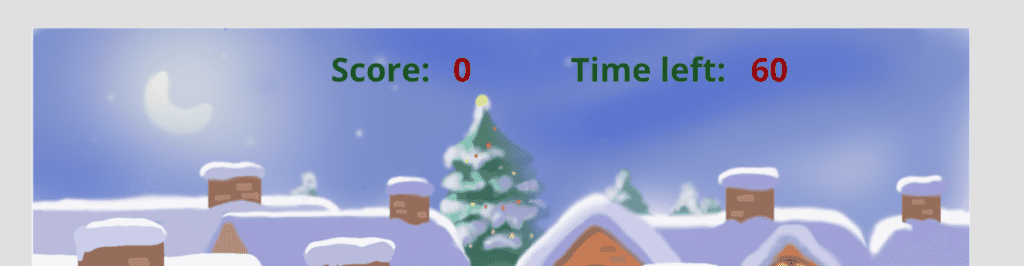
Select the GameScreen on the left Tree View of the app elements to return to the screen we created in Part I.
- Add another timer (Insert->Input->Timer) and rename it to GameTimer. Set Duration:
60000(in milliseconds, so it’s 1 minute), Repeat: OFF, Autostart: ON, Visible: ON. Set the visual properties of the timer — no border and background, text colour red, bold and font size 36. - Set the Text property of the timer as
Text(60 — Round(GameTimer.Value/1000,0)). This will display the number of seconds remaining in the 1-minute game session. - Set OnTimerEnd to the formula:
Set(GameOver, true); Navigate(StartScreen, ScreenTransition.Cover);This makes the “Game Over” text to display on the first screen. - Add a new pair of the labels (Insert->Label) and rename it into GameTimeLeftLabel. Set the colour of the label to the shade of red and text to “Time left:”. Align it to the game timer as shown on the screenshot.
Run the game to test that the game count down is displayed and the game session ends in 1 minute and returns to the start screen. Save the game.
Elf catches a box
The game will look much nicer if elves could hold for a few moments the presents box when clicked on them. We will need to introduce a new state of visibility when an elf is visible and holding a box. If you remember, in Part I we used the Visibility formula as a simple comparison with a “row state” variable Row_1_State, Row_2_State and Row_3_State. We’ll use the following tricks with negative numbers for these states:
- change the Visibility property of an elf to use a negative value when the box needs to be displayed, so instead of condition
Row_1_State = 1we will useRow_1_State = 1 or Row_1_State = -1 - change the Image displayed for an elf to display different state based whether the number is positive (elf_open.png) or holding a box (elf_box.png), e.g.
If(Row_1_State > 0, elf_open, elf_box) - add a condition in the OnSelect formula to allow click only when the elf is NOT holding a box:
If(Row_1_State > 0, Set(Score, Score + 50); Set(Row_1_State, Row_1_State * -1);)
So, what you need to do now is to go through each of the 9 elves and change the formulas in 3 properties of each — so 27 changes! While it’s a bit of tedious work, it should not take more than 10 mins. You will also learn than game development sometimes is not only a good fun, but hard yakka too!
If you done this correctly, you should have these as listed below:

Add high scores
Are you still here? Well done! You are a true Game Developer and a Power Apps guru now! At least you love games, so you probably play a few and know that the best achievements are recorded as “high scores” so the heroes are celebrated and other strive to do better. Let’s add a simple high score persistent variable.

ClearCollect(HighScore,0); LoadData(HighScore, "HighScore, true); Set(Score,0); Set(GameOver, false);
Now let’s bind the loaded high score to the display labels. Add two label elements and set the Text property value of those to “Best score:” (as text) for one and First(HighScore).Value for the other.
The last element of this is to actually compare the game results score with the current high score and update it if the player achieved a new record. In order to do that, go to the GameScreen, select the GameTimer and in the OnTimerEnd property add to the existing formula the following bit: If(Score > First(HighScore).Value, ClearCollect(HighScore, Score); SaveData(HighScore, "HighScore")); The whole formula should look like this:

Once this is done, go back to the StartScreen and add three labels (Insert->Label) there:
- Text “Best score:”, font 36, bold, green.
- Text
First(HighScore).Value, font 36, bold, green. - Text “Time is over!”, font 48, bold, red and position in the centre of the screen. Set the Visible property to
GameOverso it appears only after the game over.
Now you are done, just check that everything works as expected and save the game, publish it and launch from a device where a Power App is installed. You can be proud of what you’ve done!
If you are interested in Power Apps or Game Development or both, don’t stop here. Google it or reach out to me at LinkedIn https://www.linkedin.com/in/grischenko/. For serious game development I suggest you to look into Unity 3D platform. All the best!
About the Author:
My passion is creating software that people use for work, entertainment and managing their lives. I wear various hats: do analysis, coding, managing products, strategy and delivery. I do big projects at work and develop mobile games in my spare time.
Reference:
Grischenko, A. (2019). Get started Power Apps Game Tutorial — Part 2. Available at: https://medium.com/microsoft-power-platform-tips-tricks/power-apps-game-tutorial-part-2-2-15233ad4bc4e [Accessed: 10th April 2020].
Find more great Power Platform content here.