Build a Power Automate Flow using Aleph Alpha to extract a document summary by simply uploading it to a SharePoint document library.

Aleph Alpha
“Aleph Alpha’s mission is to enable the accessibility, usability, and integration of large, European multilanguage and multimodal AI models following the likes of GPT-3 and DALL-E, driving innovation for the explainability, alignment and integration. The funds significantly accelerate the process of bringing the latest generation of AI technology into application and secure the digital sovereignty for public and private sector partners in Europe and beyond.”
Jonas Andrulis, CEO and founder of Aleph Alpha
Luminous
The Luminous series is a family of large language models. Large language models are powerful technological tools that can process and produce human text. They have acquired this ability by “reading” enormous amounts of human text data during training. Like someone reading a whole library and half of the internet, large language models have acquired a structural understanding of language and accumulated information about the world.
What we are building
The Power Automate Flow we are building is quite simple.
- The flow should be triggered whenever we create — or upload — a document to a specific SharePoint document library
- Let Aleph Alpha summarize the document.
- The summary should then be written in a Summary column of the SharePoint file entry.
For simplicity we will keep it this short and do not perform any file validation or error handling. An important thing to note is that Aleph Alpha supports only Microsoft Word docx documents. Any other formats must be converted either to Microsoft Word or plain text.
Prerequisites
Let’s start with setting up the prerequisites.
Aleph Alpha Account
If you haven’t done it already visit the Aleph Alpha Website and register an account.
ALEPH ALPHA
Pioneering sovereign, European AI technology to transform human-machine interaction that can find solutions for the…
After registration go to your profile page (top right corner) and create a new token. Immediately copy the token after creation and store it in a safe place. You cannot access the token after you dismiss the popup window.
Document Library Configuration
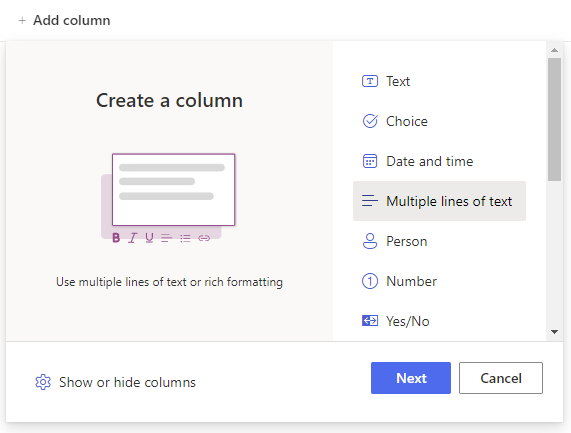
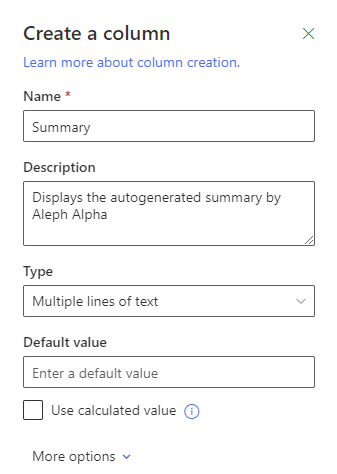
Choose or create a new document library in SharePoint. Click the Add Column button and create a new multiline Text column with the name Summary.
Aleph Alpha Data Connector
I have created a Data Connector you can import into your environment. By the time of this article the connector supports summarization and completion. Go ahead and download the apiDefinition.swagger.json file from my GitHub Repository.
power-platform/AlephAlpha at main · stefan-d-p/power-platform
“Aleph Alpha’s mission is to enable the accessibility, usability and integration of large, European multilanguage and…
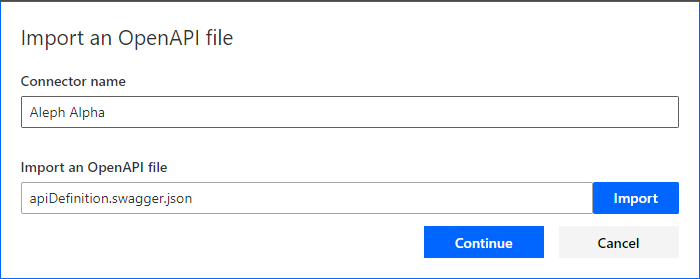
In your Power Automate environment click on Data — Custom Connectors. Select Import an OpenAPI file from the New custom connector dropdown.
Select the downloaded apiDefinition.swagger.json and provide a name for the connector — e.g. Aleph Alpha.
After clicking on Continue you can directly click on the Create connector. No additional configurations needed here. Except you want to add an icon.
Custom data connectors are a premium feature of the Power Platform. You need a Power Plan license to use Custom data connectors in your production environment.
Connection
In the Power menu click on Data — Connections. Then click the New connection button.
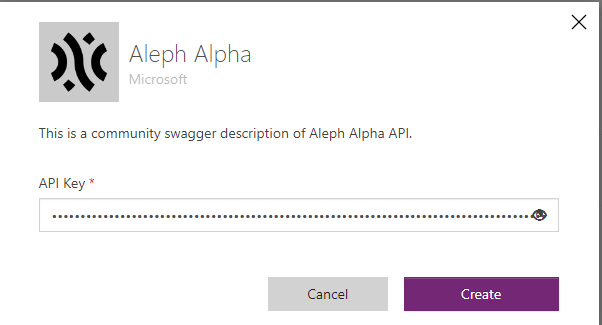
Select your Aleph Alpha data connector entry.
In the API Key field enter your Aleph Alpha token in the following format Bearer <Your Aleph Alpha Token>. In Words: The word Bearer, followed by a space, followed by your token.
With the prerequisites done, we can now create our Power Automate Flow.
Power Automate Flow
In the Power Automate menu select My flows and create a new Automated cloud flow.
As trigger event select When a file is created (properties only) from the SharePoint connector.
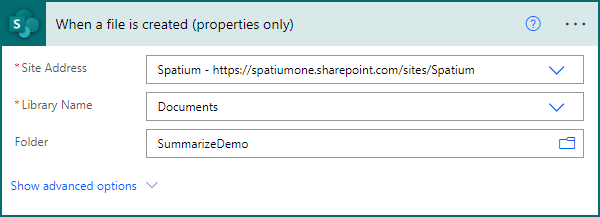
Trigger
Configure the trigger with your site, document library and (optional) folder name.
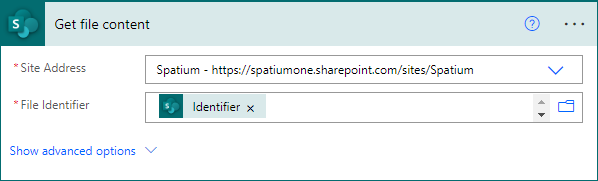
Click on + New step. From the list of actions in the SharePoint Standard data connector select the Get file content action.
Get File Content
Set the site to match the site you configured on the trigger. In the File Identifier field select Identifier from the When a file is created (properties only) trigger.
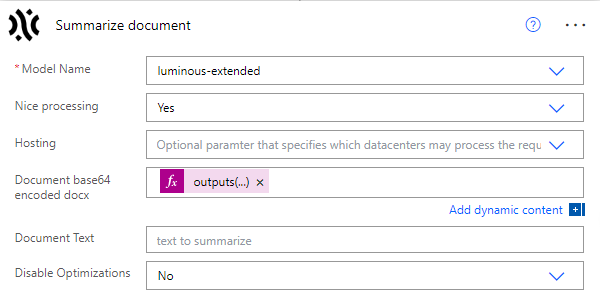
As a next step we add the Summarize Document action from the imported Aleph Alpha data connector.
Summarize Document
Select luminous-extended in the Model field.
Here you will find some additional information on the various models of Aleph Alpha. Note that not all models have summarization support.
What is Luminous? | Aleph Alpha API
The Luminous series is a family of large language models. Large language models are powerful technological tools that…
Click on the Document base64 encoded docx field. This one is a little tricky. Aleph Alpha expects the document to be a base64 encoded text. The good thing is that the Get file content action returns the document in exactly that format, but you cannot directly select it.
In the Dynamic Content flyout click on the Expressions tab. In the function field enteroutputs(‘Get file content’)?[‘body’]?[‘$content’]
Then click OK to set the field value.

Summarize | Aleph Alpha API
Will summarize a document using a specific model.
As a last step add the action Update file properties from the SharePoint Standard data connector.
Update File Properties
This one updates our created Summary column with the summarized text.
Set the site address and library name. In the Id field select ID from the When a file is created (properties only) action.
In the Summary field (name of the column of your document libary) select Summary from the Summarize document action.
Save and Test
Save your created Power Automate flow and perform a manual test run. If execution succeeds you will note that the Summary column will contain a summarized text of your document.
Thank you for reading. I hope you liked it and that i have explained the important parts well. Let me know if not 😊
Suggestions on how to improve this article are very welcome.
If you like my articles, please leave some claps. Follow me and subscribe to receive a notification whenever i publish a new article. Happy Low Coding!
About the Author
Digital Craftsman, OutSytems MVP, AWS Community Builder and Senior Director at Telelink Business Services.
Reference
Weber, S., 2023, Summarize a SharePoint Document with Power Automate and Aleph Alpha Luminous, lcnc.blog, Available at: https://lcnc.blog/summarize-a-sharepoint-document-with-power-automate-and-aleph-alpha-luminous-971e84586892 [Accessed on 11 September 2023]
STAY UP TO DATE
Catch up on the latest blogs, eBooks, webinars, and how-to videos.
Not a member? Sign up today to unlock all content.
Subscribe to our YouTube channel for the latest community updates.