I’m a heavy DeepL user. Mostly for translating messages to and from English, French and Spanish as DeepL has a much higher translation accuracy as the Microsoft Outlook built-in translation feature.
Besides translating plain text DeepL can also translate complete documents — Microsoft Office and PDF. You just upload a document (e.g., a Microsoft PowerPoint document), select a target language and get the translated document in the same format back.
As i have all my documents stored in OneDrive for Business i thought it would be nice to be able to execute a translation Power Automate flow which uploads the document to DeepL and sends me the document after it has finished translation.
I was a bit surprised to find out that there is no ready-made connector for DeepL. It totally makes sense to start a translation job for documents from OneDrive or SharePoint. Apparently, no one had it on screen.
I then created my own connector to create my translation flow. Here’s what I’ve been doing. Step by step, for you to rebuild.
https://cdn.embedly.com/widgets/media.html?src=https%3A%2F%2Fwww.youtube.com%2Fembed%2FVih4U_BKtbo&display_name=YouTube&url=https%3A%2F%2Fwww.youtube.com%2Fwatch%3Fv%3DVih4U_BKtbo&key=a19fcc184b9711e1b4764040d3dc5c07&type=text%2Fhtml&schema=youtubePresentation of final flow
Prerequisites
To follow you need
- A DeepL API account. A free tier is available.
- Access to your Microsoft Power Automate default environment. We are creating an Instant Cloud Flow. Instant Cloud Flows are executed on demand by a user. In our case the user should be able to execute a translation flow after selecting a document in OneDrive. A user will only see that option if the flow is created in the default environment and not in a development environment.
- Custom connectors are a premium feature of Microsoft Power Automate, so you need at least a Microsoft Power User plan license.
- Some files to translate in OneDrive for Business
Custom Connectors in Power Automate
There are three ways in Power Automate to create a custom connector
- Import an OpenAPI or Postman Collection — If you already have a definition file for the API you can simply import that. For OpenAPI you need an OpenAPI Version 2.0 definition file.
As with everything there are good and “not so good” OpenAPI definition files. Definition files need to have well defined request and response structures.
- Import from GitHub — Microsoft hosts a GitHub Repository which contains all standard and custom connectors available. You can import directly from there.
- Build from scratch — You can use the visual editor to define API actions and triggers. This is done by importing sample request and response JSON and the editor automatically extracts the schema definition from that samples.
While the visual editor is good if your API only communicates via JSON data, it is not usable for application/x-www-form-urlencoded and multipart/form-data requests. Power Automate does support that type of requests, but you cannot define them using the visual editor.
DeepL API uses both content-types. On their GitHub account DeepL has OpenAPI definition files available, but they are in version 3 format and therefore can’t be used for importing.
I had to rewrite their definition file to version 2.0. Here is a link to my github repository. Please download the apiDefinition.swagger.json file.
power-platform/DeepL at main · stefan-d-p/power-platform (github.com)
If you want to know how to create your own OpenAPI 2.0 (Swagger) definition files. Here are some links to follow
You will note that the DeepL definition file contains some additional elements (all starting with an x-). Those are extensions of Microsoft for connector definitions. You can learn more about custom connector extensions here.
Create a custom connector
- Download the API definition file above to your local drive
- Go to your Power Automate environment. Make sure that your default environment is selected.
- In the left menu open the Data menu and select Custom Connectors.
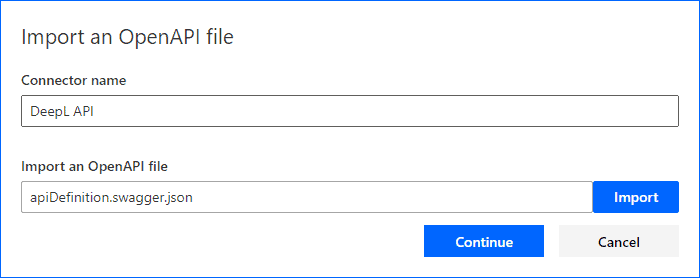
- In the top bar click on New custom connector a select Import an OpenAPI file and enter a name for the connector.
- In the General tab you can optionally add an Icon and a background color for that icon.
- In the top bar click on Create connector. Your imported connector is now saved and can be used in your flows.
As already stated above the visual editor cannot be used for the content types of the DeepL API. Also, you cannot use the test function of the visual editor for the DeepL API but must create a flow to test your integration.
Add a connection
The connector needs a configured connection to DeepL. This is where you enter your Authentication key from your DeepL Account.
- In the left menu under Data select Connections.
- Click on New connection and select the DeepL API connector from the list (use the top right search input to find it).
- Paste your API Key to the form and click Create.
The first time you drag an action from the connector to a flow canvas you are asked to either create a new connection or use an existing connection.
Create the Power Automate Flow — Upload to DeepL
A Power Automate flow always starts with a trigger. A trigger can either be
- Automatic — The flow starts when in an application or service something happens.
- Instant — The flow starts when a user manually initiates the flow. This is what we are doing.
- Scheduled — The flow starts periodically
Our trigger will be when a user selects a document in OneDrive for Business. The user then manually initiates our DeepL Translate flow and selects a target language.
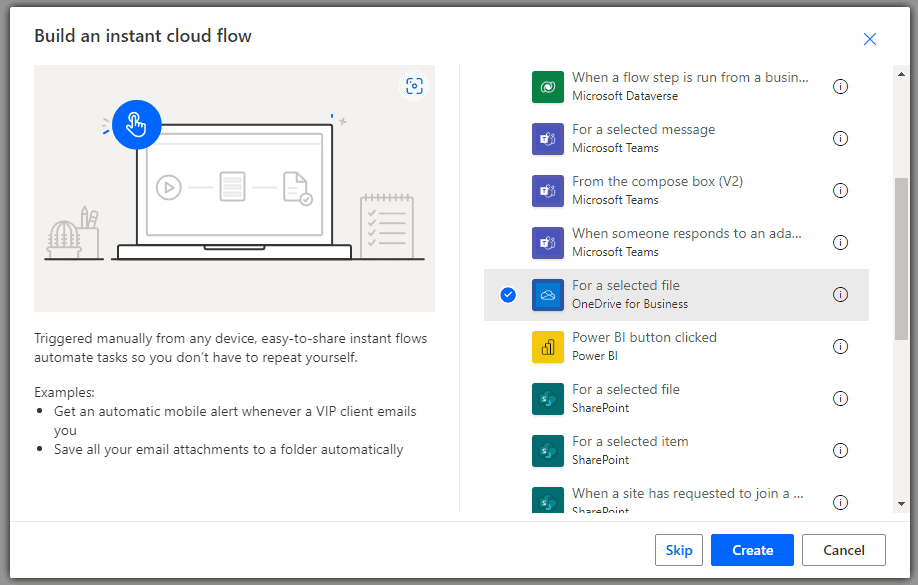
- In the left menu click on My flows and then in the top menu click on New flow and select Instant cloud flow.
- Give your flow a meaningful name (e.g., DeepL Translate) and select the For a selected file — OneDrive for Business trigger. Then click Create.
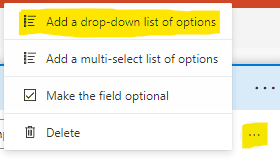
- In the editor canvas on the For a selected file trigger click on Add an input and select Text.
- Click on the ellipses menu and select Add a dropdown-list of options.
- Add all supported target languages as options to the list (or at least all languages you want to support)

Unfortunately, user input forms in Power Flows are very limited. You cannot add value/displayName pairs but rather have to stick to the language codes, as we need them later on in the flow.
- Add a new step below and select the Get file metadata using path — OneDrive for Business action.
- In the File Path input select the filePath result from the For a selected file trigger.

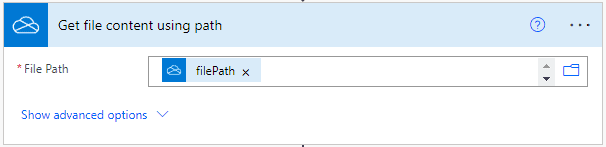
- Add a new step below and select Get file content using path — OneDrive for Business action.
- In the File Path input select the filePath result from the For a selected file trigger.
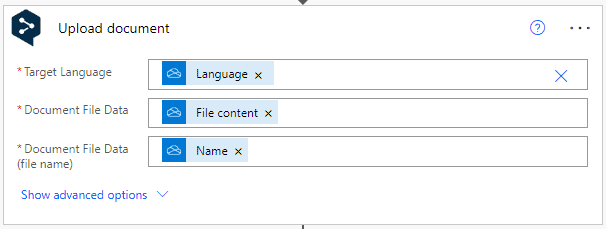
- Add a new step below and select Upload Document — DeepL API action. You will find your custom connector in the Custom connectors tab.
- For Target Language select custom and then select the Language variable from For a selected file trigger (that is the input variable we defined)
- For Document File Data select the File content variable from Get file content using path action.
- For Document File Data (file name) select the Name variable from Get file metadata using path action.
Create the Power Automate Flow — Check Status
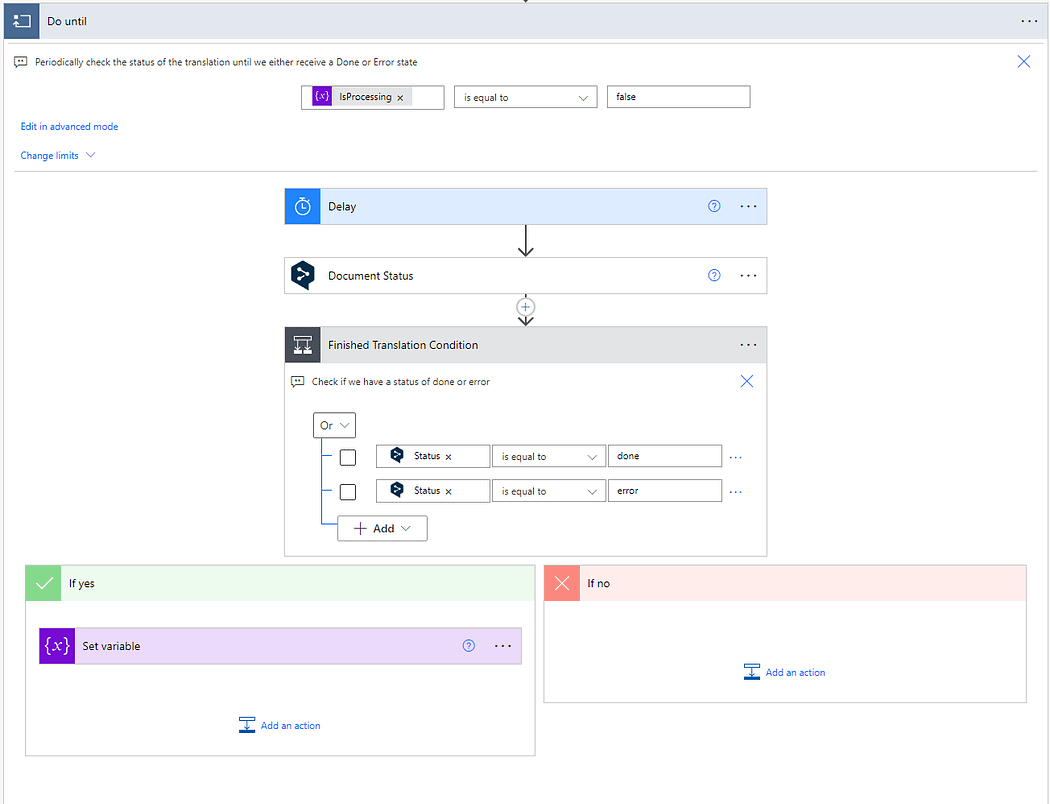
Congratulations. Up to now you can upload a selected OneDrive for Business document to DeepL. This operation is asynchronous. That means that you don’t immediately get the translated document back. DeepL now processes your document, and you must periodically check the status until it is finished (or ran into an error).
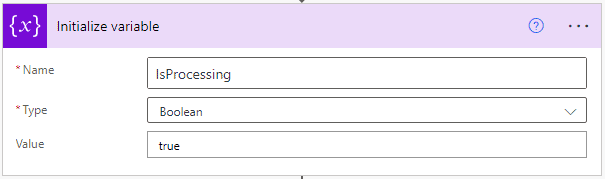
- Add a new step after Upload document and select the Initialize variable — Variable action.
- Set the Name to IsProcessing, the Type to boolean and Value to true. We use the variable as a criteria for the next step.
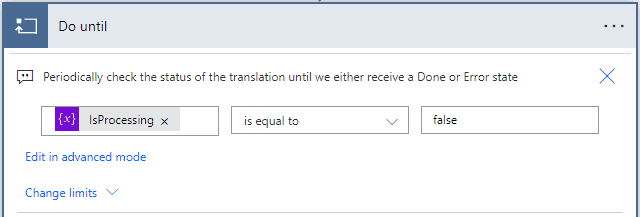
- Add a new step and select Do Until — Control action.
- As criteria set IsProcessing is equal to false. This means that the Do Until loop exists when IsProcessing is set to false.
- Inside the Do until add a new action and select the Delay — Schedule action. Set the delay Count to 30 and the Unit to second. During the first iteration of the Do Until look we first wait 30 seconds, before we check the translation status.
- Right after the delay action add another action and select Document Status — Deepl API action.
- For Document ID select the Document ID variable from the Upload Document action. For Document Key the Document Key variable from Upload Document action.
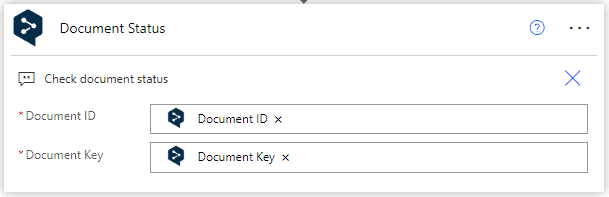
Document Status returns a Status response which can have a value of queued, translating, done and error.
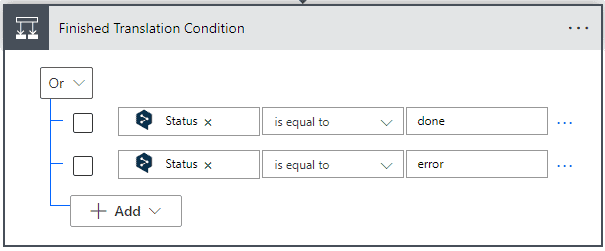
We want to exit our Do Until loop if the Status is either done or error.
- After Document Status add another action and select Condition — Control action.
- In the first row select the Status variable from Document Status action and set the condition to is equal to done.
- Add another row and select the Status variable from Document Status action and set the condition to is equal to error.
- Set the row condition to OR.
Optionally you can rename that condition as i did.
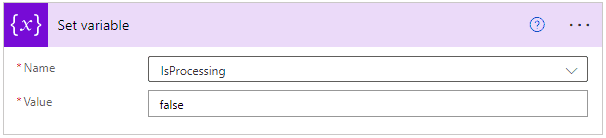
- In the If yes branch of the condition add a Set variable — Variable action.
- Choose IsProcessing and set its value to false.
After we uploaded our document the IsProcessing variable is true. We enter our Do until loop the first time and wait for 30 seconds. Then we check the status of our translation. If translation is not done or error, we leave the IsProcessing variable untouched, and the loop starts over again (again waiting another 30 seconds). In case we received a status of done or error, we set the IsProcessing variable to false. In that case the Do until loop exits.
Create the Power Automate Flow — Retrieve Translation
In this last step we download the translated document and send it by e-mail back to the user. If we received an error status, we just send a notification.
- Below the DoUntil add another step and select the Condition — Control action.
- Select the Status variable from the Document Status action and set the condition to is equal to done.
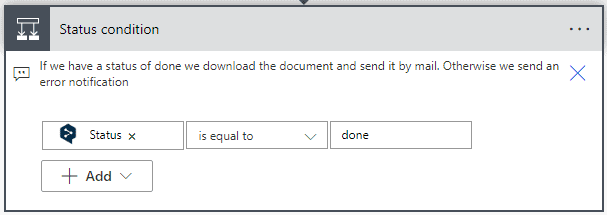
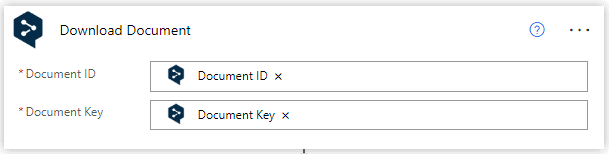
- In the If yes branch add an action and select Download Document — Deepl API action.
- Set Document ID to Document ID from the Upload Document action
- Set Document Key to Document Key from the Upload Document action
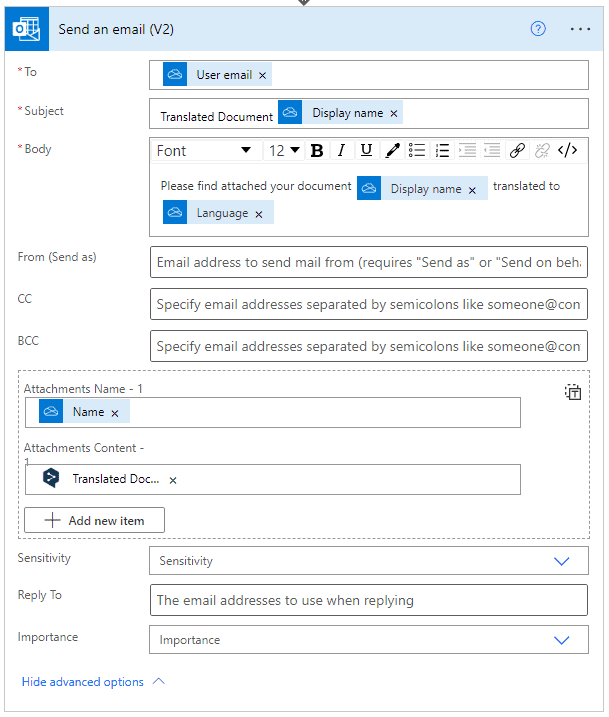
- Right after the Download Document action add another action and select Send an email (V2) — Office 365 Outlook. (Of course you can select any other email action).
- Set To to User email from the For a selected file action.
- Set Subject to Display name from the Get file metadata using path action. (you may include some additional text here)
- In the body add some text. You can again use variables from your flow to make it more meaningful or personal.
- Under Advanced Options set the Attachment Name to Name of the Get file metadata using path action.
- Set Attachments content to Translated Document from the Download Document action.
Thats it for the If yes branch. In the Is no branch — if we received an error — we just add a notification.
- In the If no branch add an action and select Send me an email notification — Notifications action.
- Set some text for the Subject and the Body.
Use the Flow
Save your flow and try it. Click the Test button in the flow editor and select Manual.
Go to OneDrive and select a document. In the top menu under Automate you will find an additional entry DeepL Translate.
Click on DeepL Translate, provide a target language, and run the flow.
If the flow succeeded, you should receive the translated document. Check for errors in the Test canvas and correct them.
About the Author
Digital Craftsman, OutSytems MVP, AWS Community Builder and Senior Director at Telelink Business Services.
Reference
Weber, S., 2023, Translate OneDrive Documents with DeepL and Power Automate, LCNC.blog, Available at: https://lcnc.blog/translate-onedrive-documents-with-deepl-and-power-automate-7d8d0570f82 [Accessed on 8 September 2023]
STAY UP TO DATE

Not a member? Sign up today to unlock all content.
Subscribe to our YouTube channel for the latest community updates.